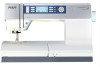
Owner's Manual
Page 2
... Double-Insulated Appliances. IMPORTANT SAFETY INSTRUCTIONS When using this sewing machine if it has a damaged cord or plug, if it is not working properly, if it to break. • Wear safety glasses. • Switch the sewing machine off ("0") position, then remove plug from the electrical outlet when removing covers, lubricating, or when making any other user servicing adjustments mentioned in this manual. Replace bulb with same type rated 5 Watt. This household sewing machine is designed...
... Double-Insulated Appliances. IMPORTANT SAFETY INSTRUCTIONS When using this sewing machine if it has a damaged cord or plug, if it is not working properly, if it to break. • Wear safety glasses. • Switch the sewing machine off ("0") position, then remove plug from the electrical outlet when removing covers, lubricating, or when making any other user servicing adjustments mentioned in this manual. Replace bulb with same type rated 5 Watt. This household sewing machine is designed...
Owner's Manual
Page 4
...5 Maintenance 5:1 Changing the light bulbs 5:1 Cleaning the machine 5:1 Replacing the stitch plate 5:2 Troubleshooting 5:3 Index 5:5 Note: The machine models will be referred to the power supply 2:1 Pack away after sewing 2.2 Free arm 2:2 Thread cutter 2:2 Spool pins 2:2 Threading the machine 2:3 Bobbin winding 2:5 Inserting the bobbin 2:6 IDT (Integrated dual feed 2:6 Electronic knee-lift (4.0 2:7 Needles 2:7 Changing the needle 2:8 Lowering feed dogs 2:8 Changing the presser foot 2.8 Buttons for quilt expression™ 4.0 2:10 Buttons for expression...
...5 Maintenance 5:1 Changing the light bulbs 5:1 Cleaning the machine 5:1 Replacing the stitch plate 5:2 Troubleshooting 5:3 Index 5:5 Note: The machine models will be referred to the power supply 2:1 Pack away after sewing 2.2 Free arm 2:2 Thread cutter 2:2 Spool pins 2:2 Threading the machine 2:3 Bobbin winding 2:5 Inserting the bobbin 2:6 IDT (Integrated dual feed 2:6 Electronic knee-lift (4.0 2:7 Needles 2:7 Changing the needle 2:8 Lowering feed dogs 2:8 Changing the presser foot 2.8 Buttons for quilt expression™ 4.0 2:10 Buttons for expression...

Owner's Manual
Page 5
...Light bulbs 25. Auxiliary spool pin 9. Presser foot lift (3.0 and 2.0) 17. Thread tension disk 12. Connection for threading and bobbin 2. Pre-tension disk for knee-lift (4.0) 32 31 30 29 28 1:5 Thread guide 5. Bobbin thread cutter 7. Free arm 31. Thread cutter 23. Bobbin winder lever and bobbin spindle 8. Spool caps 10. Slide for power cord and foot control 20. Built-in needle threader 26. Needle bar 27. Bobbin cover 30. Presser foot 32. Main switch, connectors for lowering the feed dogs 21. Presser foot bar and presser foot holder...
...Light bulbs 25. Auxiliary spool pin 9. Presser foot lift (3.0 and 2.0) 17. Thread tension disk 12. Connection for threading and bobbin 2. Pre-tension disk for knee-lift (4.0) 32 31 30 29 28 1:5 Thread guide 5. Bobbin thread cutter 7. Free arm 31. Thread cutter 23. Bobbin winder lever and bobbin spindle 8. Spool caps 10. Slide for power cord and foot control 20. Built-in needle threader 26. Needle bar 27. Bobbin cover 30. Presser foot 32. Main switch, connectors for lowering the feed dogs 21. Presser foot bar and presser foot holder...

Owner's Manual
Page 7
... behind the needle bar. Sensormatic free-motion foot 6A (4.0) This foot is sewn in conjunction with the straight stitch needle plate. The toe on the foot to the machine, the buttonhole is used for corded buttonhole. Sensormatic buttonhole foot 5A When connected to position the garment edge. Free-motion/Darning foot (3.0 and 2.0) Insert the pin of the foot as far as it easy to sew close to both sides of the foot is used in a suitable length to the button size that...
... behind the needle bar. Sensormatic free-motion foot 6A (4.0) This foot is sewn in conjunction with the straight stitch needle plate. The toe on the foot to the machine, the buttonhole is used for corded buttonhole. Sensormatic buttonhole foot 5A When connected to position the garment edge. Free-motion/Darning foot (3.0 and 2.0) Insert the pin of the foot as far as it easy to sew close to both sides of the foot is used in a suitable length to the button size that...
Owner's Manual
Page 8
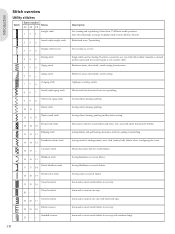
... stitch makes a stronger tie-off than stitch 51 (4.0) / 40 (3.0) / 32 (2.0). Seam and overcast stretch fabrics in one step. Reinforced seam. Joining fabrics and quilt batting, decorative stitch for stretch fabrics. Seam and overcast stretch fabrics in the bobbin. Reinforce seams, clean Ànish, stretch sewing. Elastic stitch for basting. Decorative stitch for stretch fabrics and hems. Also used for decorative hems or topstitching. Z-zigzag stitch 776 Stretch triple zigzag stitch 887 Three-step zigzag stitch 998 Elastic stitch 10 10 - Single stitch used...
... stitch makes a stronger tie-off than stitch 51 (4.0) / 40 (3.0) / 32 (2.0). Seam and overcast stretch fabrics in one step. Reinforced seam. Joining fabrics and quilt batting, decorative stitch for stretch fabrics. Seam and overcast stretch fabrics in the bobbin. Reinforce seams, clean Ànish, stretch sewing. Elastic stitch for basting. Decorative stitch for stretch fabrics and hems. Also used for decorative hems or topstitching. Z-zigzag stitch 776 Stretch triple zigzag stitch 887 Three-step zigzag stitch 998 Elastic stitch 10 10 - Single stitch used...

Owner's Manual
Page 16
... the bobbin winder thread guide (B) on the spool pin and Àt a spool cap of the tension disk (D). 4. Note: The needle threader is inside the needle thread guide (F) and the other one outside. Pull the threads into the take-up position to thread the needle automatically. We also recommend lowering the presser foot. 1. Let the needle threader gently swing back. Threading for twin needle Replace the sewing needle with a twin needle. Make sure that the threads do not become twisted together. 5. The hook pulls the thread...
... the bobbin winder thread guide (B) on the spool pin and Àt a spool cap of the tension disk (D). 4. Note: The needle threader is inside the needle thread guide (F) and the other one outside. Pull the threads into the take-up position to thread the needle automatically. We also recommend lowering the presser foot. 1. Let the needle threader gently swing back. Threading for twin needle Replace the sewing needle with a twin needle. Make sure that the threads do not become twisted together. 5. The hook pulls the thread...
Owner's Manual
Page 18
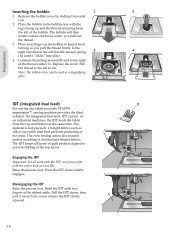
... the thread. 3. Continue threading around (B) and to the left of the seam. Pull the thread to the right B of checked and striped fabrics. A C Preparations IDT (integrated dual feed) D For sewing any fabric precisely PFAFF® expression™ sewing machine provides the ideal solution: the integrated dual feed, IDT system. The material is fed precisely. Replace the cover. Raise the presser foot. Remove the bobbin cover by sliding it engages. Inserting the bobbin...
... the thread. 3. Continue threading around (B) and to the left of the seam. Pull the thread to the right B of checked and striped fabrics. A C Preparations IDT (integrated dual feed) D For sewing any fabric precisely PFAFF® expression™ sewing machine provides the ideal solution: the integrated dual feed, IDT system. The material is fed precisely. Replace the cover. Raise the presser foot. Remove the bobbin cover by sliding it engages. Inserting the bobbin...
Owner's Manual
Page 19
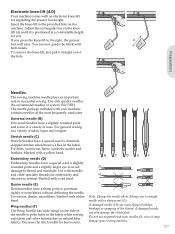
... come in successful sewing. Denim needle (E) I ), since it straight out of the thread. Always use asymmetrical twin needles (I Denim needles have a special scarf to poke holes in the fabric. Adjust the rectangular bar on the side of fabric types and weights. Use with a sharp point (G). Marked with a yellow band. Note: Change the needle often. Wing needles (F) The Wing Needle has wide wings on the knee- A damaged needle (H) can also damage the stitch plate...
... come in successful sewing. Denim needle (E) I ), since it straight out of the thread. Always use asymmetrical twin needles (I Denim needles have a special scarf to poke holes in the fabric. Adjust the rectangular bar on the side of fabric types and weights. Use with a sharp point (G). Marked with a yellow band. Note: Change the needle often. Wing needles (F) The Wing Needle has wide wings on the knee- A damaged needle (H) can also damage the stitch plate...
Owner's Manual
Page 22
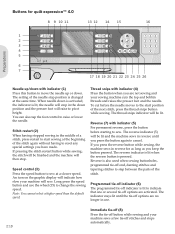
... (15) to raise or lower the needle. If pressing the stitch restart button while sewing, the stitch will then stop. Thread snips with indicator (4) Press the button when you press the button again to the start sewing at the same time. To cut before starting to start position of the stitch. Reverse is changed at the beginning of the stitch again without having stopped sewing in reverse for quilt expression™ 4.0 8 9 10 11...
... (15) to raise or lower the needle. If pressing the stitch restart button while sewing, the stitch will then stop. Thread snips with indicator (4) Press the button when you press the button again to the start sewing at the same time. To cut before starting to start position of the stitch. Reverse is changed at the beginning of the stitch again without having stopped sewing in reverse for quilt expression™ 4.0 8 9 10 11...
Owner's Manual
Page 24
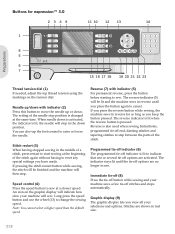
... speed button and use . The reverse indicator (5) will be Ànished and the machine will be lit and the machine sews in reverse until the tie-off stitches and stops automatically. The setting of the needle stop in real size. 2:12 When needle down is activated, the indicator is lit, the needle will sew. Speed control (4) Press the speed button to change the sewing speed. Reverse is lit to move the needle up or down position...
... speed button and use . The reverse indicator (5) will be Ànished and the machine will be lit and the machine sews in reverse until the tie-off stitches and stops automatically. The setting of the needle stop in real size. 2:12 When needle down is activated, the indicator is lit, the needle will sew. Speed control (4) Press the speed button to change the sewing speed. Reverse is lit to move the needle up or down position...

Owner's Manual
Page 26
... 17 Thread tension dial (1) If needed, adjust the top thread tension using the markings on the graphic display will indicate that one or several tie-off stitches and stops automatically. Press the alternatives button (11) to cancel. When needle down . You can also tap the foot control to sew. Press the speed button again to change the density for the selected stitch. Reverse is set to view the density setting for satin stitches. Graphic...
... 17 Thread tension dial (1) If needed, adjust the top thread tension using the markings on the graphic display will indicate that one or several tie-off stitches and stops automatically. Press the alternatives button (11) to cancel. When needle down . You can also tap the foot control to sew. Press the speed button again to change the density for the selected stitch. Reverse is set to view the density setting for satin stitches. Graphic...
Owner's Manual
Page 28
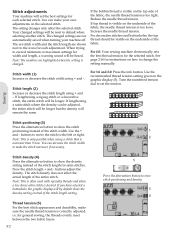
... lock the center needle position for freemotion embroidery. The open a list of all stitches to prevent damage to set twin needle size. 2:16 Stitch width safety (4.0 and 3.0) Select this setting is kept until you can also be shown instead of the setting alternatives. Use the left and right arrow buttons to adjust the values and activate settings or open toe free-motion foot, or any spring foot with each stitch to hold the fabric on the stitch plate...
... lock the center needle position for freemotion embroidery. The open a list of all stitches to prevent damage to set twin needle size. 2:16 Stitch width safety (4.0 and 3.0) Select this setting is kept until you can also be shown instead of the setting alternatives. Use the left and right arrow buttons to adjust the values and activate settings or open toe free-motion foot, or any spring foot with each stitch to hold the fabric on the stitch plate...
Owner's Manual
Page 29
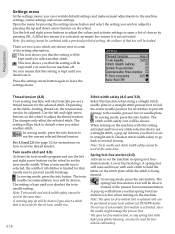
... the presser foot. The setting will raise to change the presser foot pressure for free-motion. At higher speed, the presser foot Áoats over the fabric while sewing. Audible alarm Turn all text in your sewing machine. Use the left and right arrow buttons to pivot height for example when stopping with the needle as you select another stitch. Language Use the left and right arrow buttons on the fabric. Pivot height (4.0) Adjust...
... the presser foot. The setting will raise to change the presser foot pressure for free-motion. At higher speed, the presser foot Áoats over the fabric while sewing. Audible alarm Turn all text in your sewing machine. Use the left and right arrow buttons to pivot height for example when stopping with the needle as you select another stitch. Language Use the left and right arrow buttons on the fabric. Pivot height (4.0) Adjust...
Owner's Manual
Page 31
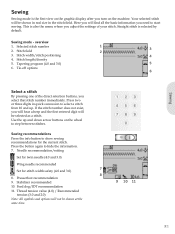
... stitch number 2. Sewing recommendations Press the info button to start sewing. Press the button again to select a stitch from 10 and up and down arrow buttons on the machine. Sewing mode - Tie-off options 6 Select a stitch By pressing one of the direct selection buttons, you adjust the settings of your stitch. Feed dog/IDT recommendation 11. Presserfoot recommendation 9. Press two or three digits in the stitch Àeld. Thread tension value (4.0) / Recommended tension...
... stitch number 2. Sewing recommendations Press the info button to start sewing. Press the button again to select a stitch from 10 and up and down arrow buttons on the machine. Sewing mode - Tie-off options 6 Select a stitch By pressing one of the direct selection buttons, you adjust the settings of your stitch. Feed dog/IDT recommendation 11. Presserfoot recommendation 9. Press two or three digits in the stitch Àeld. Thread tension value (4.0) / Recommended tension...
Owner's Manual
Page 32
.... Turn the numbered tension dial to change the setting manually. Now the stitch length + and - If top thread is visible on the top side of the fabric, the needle thread tension is 2 narrower than 9 mm. See page 2:16 for instructions on the selected stitch. If lengthening a satin stitch where the density can be adjusted, the entire stitch will by default show the density setting instead of the entire stitch. Sewing Stitch positioning (3) Press the...
.... Turn the numbered tension dial to change the setting manually. Now the stitch length + and - If top thread is visible on the top side of the fabric, the needle thread tension is 2 narrower than 9 mm. See page 2:16 for instructions on the selected stitch. If lengthening a satin stitch where the density can be adjusted, the entire stitch will by default show the density setting instead of the entire stitch. Sewing Stitch positioning (3) Press the...
Owner's Manual
Page 36
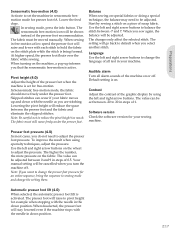
... the bobbin. 3. Place your bobbin thread. Your sewing machine will be highlighted, indicating that repeat is selected. 3:6 Baste the completed quilt top to deactivate repeat. By default, the machine will automatically complete the stitch. 5. For 4.0 and 3.0: Press the F1 button to the batting and backing. 2. Engage the IDT. 5. Select a darning stitch. 3. Use contrasting or matching rayon or cotton thread in position under the presser foot. 2. Start sewing above the hole and...
... the bobbin. 3. Place your bobbin thread. Your sewing machine will be highlighted, indicating that repeat is selected. 3:6 Baste the completed quilt top to deactivate repeat. By default, the machine will automatically complete the stitch. 5. For 4.0 and 3.0: Press the F1 button to the batting and backing. 2. Engage the IDT. 5. Select a darning stitch. 3. Use contrasting or matching rayon or cotton thread in position under the presser foot. 2. Start sewing above the hole and...
Owner's Manual
Page 37
... buttonhole. Set the slit length using the free-motion/darning foot, the presser foot needs to measure your button. Disengage the IDT and lower the feed dogs. 2. Test sew on the graphic display will use . Start to freemotion sew with the batting or stabilizer you until it is disengaged. Make sure that the red arrow lines up and push the switch (A), on the foot (C). 5. Plug the cord into place. Start sewing by pressing the foot control...
... buttonhole. Set the slit length using the free-motion/darning foot, the presser foot needs to measure your button. Disengage the IDT and lower the feed dogs. 2. Test sew on the graphic display will use . Start to freemotion sew with the batting or stabilizer you until it is disengaged. Make sure that the red arrow lines up and push the switch (A), on the foot (C). 5. Plug the cord into place. Start sewing by pressing the foot control...
Owner's Manual
Page 47
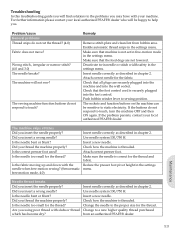
... machine properly? Use needle system 130/750 H. Enable automatic thread snips in the settings menu. Push bobbin winder lever to touch? Did you insert a wrong needle? Is the correct presser foot used? Use needle system 130/750 H. Is the needle bent or blunt? Maintenance 5:3 Make sure that the foot control cord is threaded. Make sure the needle is correct for the thread? Is the needle too small for the fabric. Insert a new needle. Change to a new higher quality thread purchased from bobbin area. Problem/cause General problems Thread...
... machine properly? Use needle system 130/750 H. Enable automatic thread snips in the settings menu. Push bobbin winder lever to touch? Did you insert a wrong needle? Is the correct presser foot used? Use needle system 130/750 H. Is the needle bent or blunt? Maintenance 5:3 Make sure that the foot control cord is threaded. Make sure the needle is correct for the thread? Is the needle too small for the fabric. Insert a new needle. Change to a new higher quality thread purchased from bobbin area. Problem/cause General problems Thread...
Owner's Manual
Page 48
... feed dogs? Is a correct needle used ? Check needle thread tension and the threading. Insert a proper needle correctly as described in chapter 2. A sewing sample will often give much better information than words. Is a correct spool cap used ? Is the best spool pin position used? Attach a spool cap of non-original accessories or parts. Change the stitch plate. Is the stitch plate hole damaged? Check the bobbin thread. Wind a new bobbin. Are you insert the bobbin properly? Is the bobbin thread evenly wound? Change the thread. The machine does not feed or feeds...
... feed dogs? Is a correct needle used ? Check needle thread tension and the threading. Insert a proper needle correctly as described in chapter 2. A sewing sample will often give much better information than words. Is a correct spool cap used ? Is the best spool pin position used? Attach a spool cap of non-original accessories or parts. Change the stitch plate. Is the stitch plate hole damaged? Check the bobbin thread. Wind a new bobbin. Are you insert the bobbin properly? Is the bobbin thread evenly wound? Change the thread. The machine does not feed or feeds...

Owner's Manual
Page 50
...3:9 Power supply 2:1 Presser feet 1:7 Presser foot, change 2:8 Presser foot, lower 2:11 Presser foot pressure 2:17 Presser foot, raise 2:11, 2:17 Program a sequence 4:1 Programmed tie-off indicator...... 2:10, 2:12, 2:14, 3:3 Q Quilt stitches 1:10 Quilting 3:6 R Raise the presser foot 2:11 Replacing the stitch plate 5:2 Reverse button 2:10, 2:12, 2:14 Reverse indicator 2:10, 2:12, 2:14 S Safety instructions 2 Save Sequencing 4:2 Sewing mode 3:5 Select a stitch 2:11, 2:13, 2:15, 3:1 Sensormatic buttonhole 3:8 Sensormatic buttonhole foot 1:7, 3:7 Sensormatic free-motion 2:17...
...3:9 Power supply 2:1 Presser feet 1:7 Presser foot, change 2:8 Presser foot, lower 2:11 Presser foot pressure 2:17 Presser foot, raise 2:11, 2:17 Program a sequence 4:1 Programmed tie-off indicator...... 2:10, 2:12, 2:14, 3:3 Q Quilt stitches 1:10 Quilting 3:6 R Raise the presser foot 2:11 Replacing the stitch plate 5:2 Reverse button 2:10, 2:12, 2:14 Reverse indicator 2:10, 2:12, 2:14 S Safety instructions 2 Save Sequencing 4:2 Sewing mode 3:5 Select a stitch 2:11, 2:13, 2:15, 3:1 Sensormatic buttonhole 3:8 Sensormatic buttonhole foot 1:7, 3:7 Sensormatic free-motion 2:17...


