Owner's Manual
Page 2
... provided on cord. Special care is required around the sewing machine needle. • Always use bent needles. • Do not pull or push fabric while stitching. Use only identical replacement parts. SAVE THESE INSTRUCTIONS SERVICING OF DOUBLE INSULATED PRODUCTS In a double-insulated product, two systems of insulation are being used or...
... provided on cord. Special care is required around the sewing machine needle. • Always use bent needles. • Do not pull or push fabric while stitching. Use only identical replacement parts. SAVE THESE INSTRUCTIONS SERVICING OF DOUBLE INSULATED PRODUCTS In a double-insulated product, two systems of insulation are being used or...
Owner's Manual
Page 3
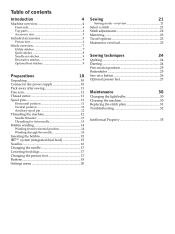
... 26 Optional presser feet 27 Maintenance 30 Changing the light bulbs 30 Cleaning the machine 30 Replacing the stitch plate 31 Troubleshooting 32 Intellectual Property 35 Table of contents Introduction 4 Machine overview 4 Front side 4 Top parts ...4 Accessory tray 5 Included accessories 5 Presser feet 6 Stitch overview 7 Utility stitches 7 Quilt stitches 8 Needle art stitches 9 Decorative stitches 9 Optional feet stitches 9 Preparations 10 Unpacking 10 Connect to the power supply 10 Pack away after sewing 11 Free...
... 26 Optional presser feet 27 Maintenance 30 Changing the light bulbs 30 Cleaning the machine 30 Replacing the stitch plate 31 Troubleshooting 32 Intellectual Property 35 Table of contents Introduction 4 Machine overview 4 Front side 4 Top parts ...4 Accessory tray 5 Included accessories 5 Presser feet 6 Stitch overview 7 Utility stitches 7 Quilt stitches 8 Needle art stitches 9 Decorative stitches 9 Optional feet stitches 9 Preparations 10 Unpacking 10 Connect to the power supply 10 Pack away after sewing 11 Free...
Owner's Manual
Page 4
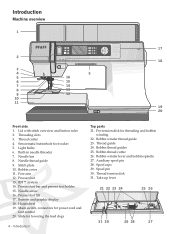
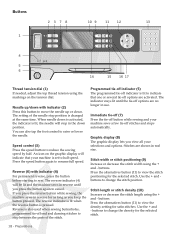
... 22 23 24 25 26 31 30 29 28 27 Built-in needle threader 7. Thread guide 24. Bobbin thread cutter 26. Sensormatic buttonhole foot socket 5. Stitch plate 10. Main switch, connectors for lowering the feed dogs 4 - Bobbin thread guides 25. Bobbin winder lever and bobbin spindle 27. Spool pin 30. Needle... Machine overview 1 4 3 2 1 2 3 4 5 5 16 6 15 7 14 8 13 9 12 10 11 inch mm 00 10 20 1 30 40 2 50 17 18 19 20 Front side 1. Lid with stitch overview and button ruler 2. Thread cutter 4. Light bulbs 6. Presser foot 13.
... 22 23 24 25 26 31 30 29 28 27 Built-in needle threader 7. Thread guide 24. Bobbin thread cutter 26. Sensormatic buttonhole foot socket 5. Stitch plate 10. Main switch, connectors for lowering the feed dogs 4 - Bobbin thread guides 25. Bobbin winder lever and bobbin spindle 27. Spool pin 30. Needle... Machine overview 1 4 3 2 1 2 3 4 5 5 16 6 15 7 14 8 13 9 12 10 11 inch mm 00 10 20 1 30 40 2 50 17 18 19 20 Front side 1. Lid with stitch overview and button ruler 2. Thread cutter 4. Light bulbs 6. Presser foot 13.
Owner's Manual
Page 6
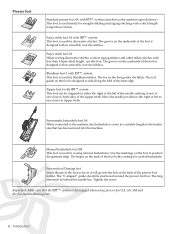
... 6 - The toe on the back of the hem edge. The long arm must be positioned around the presser foot bar. Fancy stitch foot 1A with a stitch length longer than 1.0mm stitch length, use this foot. Blindhem foot 3 with less than 1.0 mm. The "C-shaped" guide should be behind the needle bar. ...Tighten the screw. Manual buttonhole foot 5M This foot is designed to zipper teeth. Introduction The groove on the foot is used for decorative stitches. Move the needle position to the right or left of the needle, making it will go into the machine. The red guide on the...
... 6 - The toe on the back of the hem edge. The long arm must be positioned around the presser foot bar. Fancy stitch foot 1A with a stitch length longer than 1.0mm stitch length, use this foot. Blindhem foot 3 with less than 1.0 mm. The "C-shaped" guide should be behind the needle bar. ...Tighten the screw. Manual buttonhole foot 5M This foot is designed to zipper teeth. Introduction The groove on the foot is used for decorative stitches. Move the needle position to the right or left of the needle, making it will go into the machine. The red guide on the...
Owner's Manual
Page 7
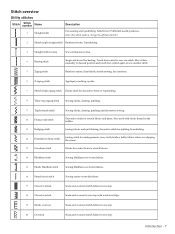
.... 17 Closed overlock Seam and overcast stretch fabrics in one step. 18 Closed overlock Seam and overcast in one stitch. Note: This stitch makes a stronger tie-off than stitch 37. 2 Stretch triple straight stitch Reinforced seam. Move fabric manually to desired position and touch foot control again to sew one step with elastic thread...
.... 17 Closed overlock Seam and overcast stretch fabrics in one step. 18 Closed overlock Seam and overcast in one stitch. Note: This stitch makes a stronger tie-off than stitch 37. 2 Stretch triple straight stitch Reinforced seam. Move fabric manually to desired position and touch foot control again to sew one step with elastic thread...

Owner's Manual
Page 8
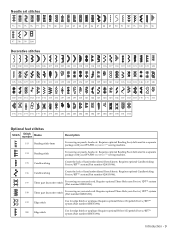
... with pointed tack Tailors buttonhole or decorative buttonhole. 29 Rounded buttonhole Buttonhole for light garments or jackets. 30 Bound buttonhole Foundation stitch for blouses, shirts and jackets. Introduction Quilt stitches 37* 38 39 40 41 42 43 44 45 46 47 48 49 50 51 52 53 54 55 56 57 58... 59 60 61 62 63 64 65 66 67 68 69 70 71 72 * This stitch makes a more decorative tie-off than stitch 1. 8 - Stitch Stitch number Name 21 Closed overlock Description Seam and overcast in one step, patch, hem. 22 Stretch knit overlock Seam and overcast stretch...
... with pointed tack Tailors buttonhole or decorative buttonhole. 29 Rounded buttonhole Buttonhole for light garments or jackets. 30 Bound buttonhole Foundation stitch for blouses, shirts and jackets. Introduction Quilt stitches 37* 38 39 40 41 42 43 44 45 46 47 48 49 50 51 52 53 54 55 56 57 58... 59 60 61 62 63 64 65 66 67 68 69 70 71 72 * This stitch makes a more decorative tie-off than stitch 1. 8 - Stitch Stitch number Name 21 Closed overlock Description Seam and overcast in one step, patch, hem. 22 Stretch knit overlock Seam and overcast stretch...
Owner's Manual
Page 9
... Create the look of hand embroidered French knots. Requires optional Beading Foot, delivered in a separate package with your PFAFF® expression™ sewing machine. 194 Beading stitch For sewing on pearls, beads etc. Needle art stitches 73 74 75 76 77 78 79 80 81 82 83 84 85 86 87 88 89 90... 147 148 149 150 151 152 153 154 155 156 157 158 159 160 161 162 163 164 165 166 167 168 169 170 171 172 173 174 175 176 177 178 179 180 181 182 183 184 185 186 187 188 189 190 191 192 Optional feet stitches Stitch Stitch number Name 193...
... Create the look of hand embroidered French knots. Requires optional Beading Foot, delivered in a separate package with your PFAFF® expression™ sewing machine. 194 Beading stitch For sewing on pearls, beads etc. Needle art stitches 73 74 75 76 77 78 79 80 81 82 83 84 85 86 87 88 89 90... 147 148 149 150 151 152 153 154 155 156 157 158 159 160 161 162 163 164 165 166 167 168 169 170 171 172 173 174 175 176 177 178 179 180 181 182 183 184 185 186 187 188 189 190 191 192 Optional feet stitches Stitch Stitch number Name 193...

Owner's Manual
Page 10
Turn the foot control over. Do not modify the plug in the accessory tray while sewing may affect stitch quality. Preparations Unpacking 1. Lift the machine out of the box, remove the outer packaging and lift off the accessory tray and remove the styrofoam inside ...
Turn the foot control over. Do not modify the plug in the accessory tray while sewing may affect stitch quality. Preparations Unpacking 1. Lift the machine out of the box, remove the outer packaging and lift off the accessory tray and remove the styrofoam inside ...
Owner's Manual
Page 16
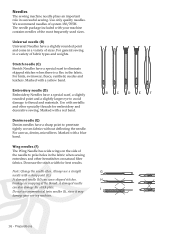
... Àber fabrics. A damaged needle can cause skipped stitches, breakage or snapping of the needle to eliminate skipped stitches when there is a Áex in a variety of fabric types and weights. Decrease the stitch width for embroidery and decorative sewing. Note: Change the ...with a red band. Embroidery needle (D) Embroidery Needles have a sharp point to thread and materials. A damaged needle (H) can also damage the stitch plate. Marked with a blue band. Marked with a yellow band. We recommend needles of the most frequently used sizes. The needle package included ...
... Àber fabrics. A damaged needle can cause skipped stitches, breakage or snapping of the needle to eliminate skipped stitches when there is a Áex in a variety of fabric types and weights. Decrease the stitch width for embroidery and decorative sewing. Note: Change the ...with a red band. Embroidery needle (D) Embroidery Needles have a sharp point to thread and materials. A damaged needle (H) can also damage the stitch plate. Marked with a blue band. Marked with a yellow band. We recommend needles of the most frequently used sizes. The needle package included ...
Owner's Manual
Page 18
... time. The indicator stays lit until you keep the button pressed. Press the alternatives button (11) to sew. The setting of the stitch. Programmed tie-off indicator (5) The programmed tie-off indicator is also used when sewing buttonholes, programmed tie-off options are shown in the... alternatives button (11) to move the needle up /down . Reverse is lit to change the density for the selected stitch. Immediate tie-off (7) Press the tie-off stitches and stops automatically. Graphic display (8) The graphic display lets you view all your machine sews a few tie-off button ...
... time. The indicator stays lit until you keep the button pressed. Press the alternatives button (11) to sew. The setting of the stitch. Programmed tie-off indicator (5) The programmed tie-off indicator is also used when sewing buttonholes, programmed tie-off options are shown in the... alternatives button (11) to move the needle up /down . Reverse is lit to change the density for the selected stitch. Immediate tie-off (7) Press the tie-off stitches and stops automatically. Graphic display (8) The graphic display lets you view all your machine sews a few tie-off button ...

Owner's Manual
Page 19
...repeat buttonholes and to deactivate repeat for machine settings. Mirror side to side (17) For mirroring stitches side to move around the graphic display. Alternatives (11) When you select a decorative stitch, the width and length settings will be Ànished and the machine will then stop. ...used to reset any special settings you select the stitch represented by that number immediately. Stitch restart (16) When having stopped sewing in the middle of a stitch, press restart to start sewing at the beginning of the stitch again without having to activate the tie-off options...
...repeat buttonholes and to deactivate repeat for machine settings. Mirror side to side (17) For mirroring stitches side to move around the graphic display. Alternatives (11) When you select a decorative stitch, the width and length settings will be Ànished and the machine will then stop. ...used to reset any special settings you select the stitch represented by that number immediately. Stitch restart (16) When having stopped sewing in the middle of a stitch, press restart to start sewing at the beginning of the stitch again without having to activate the tie-off options...
Owner's Manual
Page 20
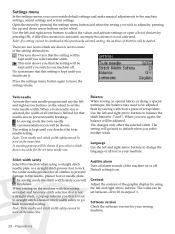
...dashed. When turning on the wheel. Contrast Adjust the contrast of choices by pressing the settings menu button and select the setting you select another stitch. Use the left and right arrow buttons. The setting will go back to adjust the values and activate settings or open a list of ...normal sewing. A warning pop-up informs you that is selected, the width of all alarm sounds of scrap fabric. The changes only affect the selected stitch. Default setting is not activated. Open the menu by pressing OK. When a twin needle size is too wide for your machine off . The ...
...dashed. When turning on the wheel. Contrast Adjust the contrast of choices by pressing the settings menu button and select the setting you select another stitch. Use the left and right arrow buttons. The setting will go back to adjust the values and activate settings or open a list of ...normal sewing. A warning pop-up informs you that is selected, the width of all alarm sounds of scrap fabric. The changes only affect the selected stitch. Default setting is not activated. Open the menu by pressing OK. When a twin needle size is too wide for your machine off . The ...

Owner's Manual
Page 21
.../density 5. Presserfoot recommendation 8. Feed dog/IDT™ system recommendation 10. Stitch Àeld 3. Stabilizer recommended 9. Select a stitch By pressing one of your stitch. Your selected stitch will not be selected as a stitch. Press two or three digits in the stitch Àeld. Sewing mode - Selected stitch number 2. Needle recommendation/setting Set for twin needle Wing needle recommended...
.../density 5. Presserfoot recommendation 8. Feed dog/IDT™ system recommendation 10. Stitch Àeld 3. Stabilizer recommended 9. Select a stitch By pressing one of your stitch. Your selected stitch will not be selected as a stitch. Press two or three digits in the stitch Àeld. Sewing mode - Selected stitch number 2. Needle recommendation/setting Set for twin needle Wing needle recommended...
Owner's Manual
Page 22
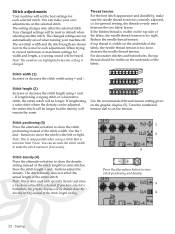
... loose. If top thread is visible on the underside of the fabric, the needle thread tension is correctly adjusted, i.e. Stitch width (1) Increase or decrease the stitch width using + and -. You can make the stitch narrower if necessary. Your changed settings will be longer but the density will remain the same. Increase the needle...
... loose. If top thread is visible on the underside of the fabric, the needle thread tension is correctly adjusted, i.e. Stitch width (1) Increase or decrease the stitch width using + and -. You can make the stitch narrower if necessary. Your changed settings will be longer but the density will remain the same. Increase the needle...
Owner's Manual
Page 23
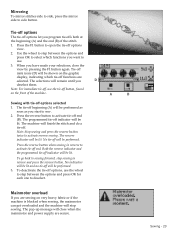
.... Mainmotor overload If you program tie-offs both at the beginning (A) and the end (B) of the machine. The pop-up message will Ànish the stitch and do a tie-off options selected 1. When you D deselect them. A B Sewing with tie-off . Note: Stop sewing and press the reverse button..., close when the mainmotor and power supply are selected. The selections will be performed as soon as you want to deselect. Mirroring To mirror stitches side to side, press the mirror side to activate reverse sewing. Press the reverse button to sew. 2. No tie-off end (B). To ...
.... Mainmotor overload If you program tie-offs both at the beginning (A) and the end (B) of the machine. The pop-up message will Ànish the stitch and do a tie-off options selected 1. When you D deselect them. A B Sewing with tie-off . Note: Stop sewing and press the reverse button..., close when the mainmotor and power supply are selected. The selections will be performed as soon as you want to deselect. Mirroring To mirror stitches side to side, press the mirror side to activate reverse sewing. Press the reverse button to sew. 2. No tie-off end (B). To ...
Owner's Manual
Page 24
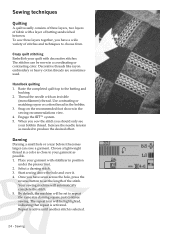
... usually consists of three layers, two layers of fabric with an invisible (monoÀlament) thread. Thread the needle with a layer of the stitch. Engage the IDT™ system. 5. Decorative threads like rayon embroidery or heavy cotton threads are sometimes used. Choose a lightweight thread in a ...can be sewn in position under the presser foot. 2. Sewing Darning Darning a small hole or a tear before it . 4. Select a darning stitch. 3. The repeat icon will be set the length of batting sandwiched between. To sew three layers together, you have sewn across the hole, press...
... usually consists of three layers, two layers of fabric with an invisible (monoÀlament) thread. Thread the needle with a layer of the stitch. Engage the IDT™ system. 5. Decorative threads like rayon embroidery or heavy cotton threads are sometimes used. Choose a lightweight thread in a ...can be sewn in position under the presser foot. 2. Sewing Darning Darning a small hole or a tear before it . 4. Select a darning stitch. 3. The repeat icon will be set the length of batting sandwiched between. To sew three layers together, you have sewn across the hole, press...
Owner's Manual
Page 25
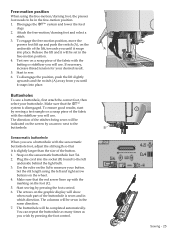
..., then select your desired result. 5. You can repeat the buttonhole as many times as you wish by sewing a test sample on a scrap piece of the stitches being sewn will be indicated on the graphic display will be completed automatically. Snap on the wheel. 4. Set the slit length using the free-motion... the switch (A), on the foot (C). 5. Free-motion position When using the left underside behind the light bulb. 3. Attach the free-motion/darning foot and select a stitch. 3. The arrows on the screen by pressing the foot control. 6. A B C Sewing - 25
..., then select your desired result. 5. You can repeat the buttonhole as many times as you wish by sewing a test sample on a scrap piece of the stitches being sewn will be indicated on the graphic display will be completed automatically. Snap on the wheel. 4. Set the slit length using the free-motion... the switch (A), on the foot (C). 5. Free-motion position When using the left underside behind the light bulb. 3. Attach the free-motion/darning foot and select a stitch. 3. The arrows on the screen by pressing the foot control. 6. A B C Sewing - 25
Owner's Manual
Page 26
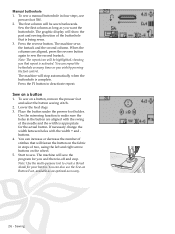
The machine sews the bartack and the second column. Note: The repeat icon will show the part and sewing direction of stitches that will sew the program for you wish by pressing the foot control. Use the mirroring function to make sure the holes in the button ... buttonhole as many times as an optional accessory. 26 - Press the reverse button. Sew on a button, remove the presser foot and select the button sewing stitch. 2. Note: Use the multi-purpose tool to sew. The Àrst column will stop . Sew the Àrst column as long as you that is...
The machine sews the bartack and the second column. Note: The repeat icon will show the part and sewing direction of stitches that will sew the program for you wish by pressing the foot control. Use the mirroring function to make sure the holes in the button ... buttonhole as many times as an optional accessory. 26 - Press the reverse button. Sew on a button, remove the presser foot and select the button sewing stitch. 2. Note: Use the multi-purpose tool to sew. The Àrst column will stop . Sew the Àrst column as long as you that is...
Owner's Manual
Page 27
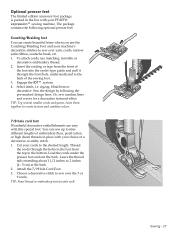
... the front hole, underneath and to nine different lengths of embroidery Áoss, pearl cotton or high sheen threads in the box with your PFAFF® expression™ sewing machine. Lead the cords under the presser foot and out the back. Attach the 7/9 Hole Cord Foot. 3. Engage the IDT.... Sew the design by following optional presser feet: Couching/Braiding foot You can sew up to the back of a decorative or utility stitch. 1. Choose a decorative stitch to the bottom. The package contains the following the pre-marked design lines. Sewing - 27 Insert the cording or tape from the...
... the front hole, underneath and to nine different lengths of embroidery Áoss, pearl cotton or high sheen threads in the box with your PFAFF® expression™ sewing machine. Lead the cords under the presser foot and out the back. Attach the 7/9 Hole Cord Foot. 3. Engage the IDT.... Sew the design by following optional presser feet: Couching/Braiding foot You can sew up to the back of a decorative or utility stitch. 1. Choose a decorative stitch to the bottom. The package contains the following the pre-marked design lines. Sewing - 27 Insert the cording or tape from the...
Owner's Manual
Page 28
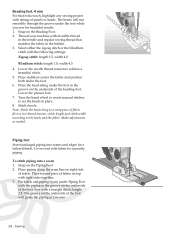
...a scrap piece of fabric Àrst to test thread tension, stitch length and stitch width according to achieve a beautiful stitch. 5. Piping foot Insert packaged piping into a seam: 1. Sew with the following settings: Zigzag stitch: length 3.5, width 4.0 Blindhem stitch: length 1.0, width 4.5 4. The beads will guide the piping as... of the foot will run smoothly through the groove under the foot. 6. Select either the zigzag stitch or the blindhem stitch with a straight stitch, length 2.5. Place stabilizer under the fabric and position both under the foot while you sew. 28 - To...
...a scrap piece of fabric Àrst to test thread tension, stitch length and stitch width according to achieve a beautiful stitch. 5. Piping foot Insert packaged piping into a seam: 1. Sew with the following settings: Zigzag stitch: length 3.5, width 4.0 Blindhem stitch: length 1.0, width 4.5 4. The beads will guide the piping as... of the foot will run smoothly through the groove under the foot. 6. Select either the zigzag stitch or the blindhem stitch with a straight stitch, length 2.5. Place stabilizer under the fabric and position both under the foot while you sew. 28 - To...


