
Owner's Manual
Page 2
... be identical to break. • Do not use as described in the instruction manual. • Never drop or insert any other user servicing adjustments mentioned in this sewing machine from all instructions before relamping. Replacement parts for examination, repair, electrical or mechanical adjustment. • Never operate the sewing machine with the sewing machine. • Use this sewing machine only for its intended use bent needles. • Do not pull or push fabric while stitching. DANGER - Replace bulb with IEC/EN...
... be identical to break. • Do not use as described in the instruction manual. • Never drop or insert any other user servicing adjustments mentioned in this sewing machine from all instructions before relamping. Replacement parts for examination, repair, electrical or mechanical adjustment. • Never operate the sewing machine with the sewing machine. • Use this sewing machine only for its intended use bent needles. • Do not pull or push fabric while stitching. DANGER - Replace bulb with IEC/EN...
Owner's Manual
Page 3
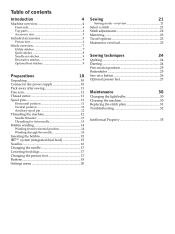
... stitches 9 Optional feet stitches 9 Preparations 10 Unpacking 10 Connect to the power supply 10 Pack away after sewing 11 Free arm 11 Thread cutter 11 Spool pins 11 Horizontal position 11 Vertical position 12 Auxiliary spool pin 12 Threading the machine 12 Needle threader 13 Threading for twin needle 13 Bobbin winding 14 Winding from horizontal position 14 Winding through the needle 14 Inserting the bobbin 15 IDT™ system (integrated dual feed 15 Needles 16 Changing the needle 17 Lowering feed dogs 17 Changing the presser foot 17 Buttons 18...
... stitches 9 Optional feet stitches 9 Preparations 10 Unpacking 10 Connect to the power supply 10 Pack away after sewing 11 Free arm 11 Thread cutter 11 Spool pins 11 Horizontal position 11 Vertical position 12 Auxiliary spool pin 12 Threading the machine 12 Needle threader 13 Threading for twin needle 13 Bobbin winding 14 Winding from horizontal position 14 Winding through the needle 14 Inserting the bobbin 15 IDT™ system (integrated dual feed 15 Needles 16 Changing the needle 17 Lowering feed dogs 17 Changing the presser foot 17 Buttons 18...
Owner's Manual
Page 4
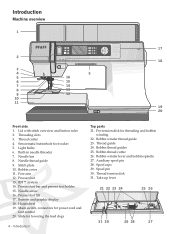
...-tension disk for lowering the feed dogs 4 - Thread guide 24. Bobbin thread cutter 26. Auxiliary spool pin 28. Introduction Machine overview 1 4 3 2 1 2 3 4 5 5 16 6 15 7 14 8 13 9 12 10 11 inch mm 00 10 20 1 30 40 2 50 17 18 19 20 Front side 1. Threading slots 3. Thread cutter 4. Light bulbs 6. Needle bar 8. Free arm 12. Presser foot bar and presser foot holder 15. Needle screw 16. Presser foot lift 17. Buttons and graphic display 18. Main switch, connectors for power cord and foot control 20. Bobbin winder lever and bobbin spindle...
...-tension disk for lowering the feed dogs 4 - Thread guide 24. Bobbin thread cutter 26. Auxiliary spool pin 28. Introduction Machine overview 1 4 3 2 1 2 3 4 5 5 16 6 15 7 14 8 13 9 12 10 11 inch mm 00 10 20 1 30 40 2 50 17 18 19 20 Front side 1. Threading slots 3. Thread cutter 4. Light bulbs 6. Needle bar 8. Free arm 12. Presser foot bar and presser foot holder 15. Needle screw 16. Presser foot lift 17. Buttons and graphic display 18. Main switch, connectors for power cord and foot control 20. Bobbin winder lever and bobbin spindle...
Owner's Manual
Page 6
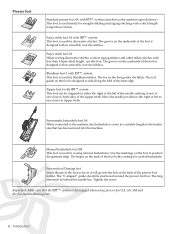
... straight stitching and zigzag stitching with a stitch length longer than 1.0mm stitch length, use this foot. The Ànger on the back of the foot is designed to both sides of the presser foot holder. Important: Make sure that has been entered into the hole at the back of the zipper teeth. Introduction Move the needle position to the right or left of the needle, making it will go into the machine. Free-motion/Darning foot Insert the pin...
... straight stitching and zigzag stitching with a stitch length longer than 1.0mm stitch length, use this foot. The Ànger on the back of the foot is designed to both sides of the presser foot holder. Important: Make sure that has been entered into the hole at the back of the zipper teeth. Introduction Move the needle position to the right or left of the needle, making it will go into the machine. Free-motion/Darning foot Insert the pin...
Owner's Manual
Page 7
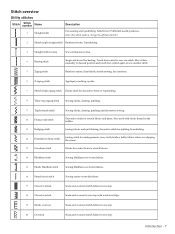
...Touch foot control to sew another stitch. Move fabric manually to desired position and touch foot control again to sew one stitch. Reinforce seams, clean Ànish, stretch sewing, lace insertion. 6 Z-zigzag stitch Appliqué, couching, eyelets. 7 Stretch triple zigzag stitch Elastic stitch for decorative hems or topstitching. 8 Three-step zigzag stitch Sewing elastic, darning, patching. 9 Triple stretch stitch Sewing elastic, darning, patching and decorative sewing. 10 Honeycomb stitch Decorative stitch for stretch fabrics and hems. Also used for stretch fabrics. 14...
...Touch foot control to sew another stitch. Move fabric manually to desired position and touch foot control again to sew one stitch. Reinforce seams, clean Ànish, stretch sewing, lace insertion. 6 Z-zigzag stitch Appliqué, couching, eyelets. 7 Stretch triple zigzag stitch Elastic stitch for decorative hems or topstitching. 8 Three-step zigzag stitch Sewing elastic, darning, patching. 9 Triple stretch stitch Sewing elastic, darning, patching and decorative sewing. 10 Honeycomb stitch Decorative stitch for stretch fabrics and hems. Also used for stretch fabrics. 14...

Owner's Manual
Page 13
... needle. Make sure that require manual threading of the right size. Slide on the spool pin. 2. The needle must be used for size 60 needles or smaller, a wing needle, twin needle or triple needle. Use the handle to use the needle threader for size 70-120 needles. The hook pulls the thread through the needle eye and forms a loop behind the needle. Note: The needle threader is inside the needle thread guide (F) and the other one thread to thread the needle automatically. Threading for twin needle Replace the sewing needle...
... needle. Make sure that require manual threading of the right size. Slide on the spool pin. 2. The needle must be used for size 60 needles or smaller, a wing needle, twin needle or triple needle. Use the handle to use the needle threader for size 70-120 needles. The hook pulls the thread through the needle eye and forms a loop behind the needle. Note: The needle threader is inside the needle thread guide (F) and the other one thread to thread the needle automatically. Threading for twin needle Replace the sewing needle...
Owner's Manual
Page 14
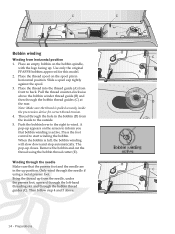
... the spool pin in horizontal position. Thread through the hole in the up position. Remove the bobbin and cut the thread using a metal presser foot. Winding through the bobbin thread guides (C). Then follow step 4 and 5 above the bobbin winder thread guide (B) and then through the needle if using the bobbin thread cutter (E). Place the thread spool on the screen to inform you that the presser foot and the needle are in the bobbin (D) from horizontal position 1. Place the thread into the thread guide (A) from the needle...
... the spool pin in horizontal position. Thread through the hole in the up position. Remove the bobbin and cut the thread using a metal presser foot. Winding through the bobbin thread guides (C). Then follow step 4 and 5 above the bobbin winder thread guide (B) and then through the needle if using the bobbin thread cutter (E). Place the thread spool on the screen to inform you that the presser foot and the needle are in the bobbin (D) from horizontal position 1. Place the thread into the thread guide (A) from the needle...
Owner's Manual
Page 15
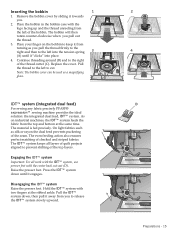
... thread. 3. Raise the presser foot. Hold the IDT™ system with two Àngers at the same time. Inserting the bobbin 1 2 1. Remove the bobbin cover by sliding it engages. Place the bobbin in the bobbin case with the center back cut . Continue threading around (B) and to release the IDT™ system slowly upward. A C IDT™ system (integrated dual feed) D For sewing any fabric precisely PFAFF® expression™ sewing machine...
... thread. 3. Raise the presser foot. Hold the IDT™ system with two Àngers at the same time. Inserting the bobbin 1 2 1. Remove the bobbin cover by sliding it engages. Place the bobbin in the bobbin case with the center back cut . Continue threading around (B) and to release the IDT™ system slowly upward. A C IDT™ system (integrated dual feed) D For sewing any fabric precisely PFAFF® expression™ sewing machine...
Owner's Manual
Page 18
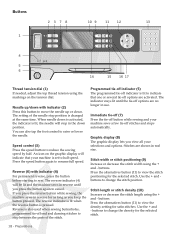
.... buttons to sew. An icon on the tension dial. Buttons 2378 10 9 11 12 13 1 4 3 2 1 4 5 6 14 15 16 17 Thread tension dial (1) If needed, adjust the top thread tension using the + and - Stitches are no longer in real size. Speed control (3) Press the speed button to view the stitch positioning for the selected stitch. 18 - Preparations Reverse is set to move the needle up or down position. Stitch length or stitch density (10) Increase or decrease the stitch length using the + and - Reverse...
.... buttons to sew. An icon on the tension dial. Buttons 2378 10 9 11 12 13 1 4 3 2 1 4 5 6 14 15 16 17 Thread tension dial (1) If needed, adjust the top thread tension using the + and - Stitches are no longer in real size. Speed control (3) Press the speed button to view the stitch positioning for the selected stitch. 18 - Preparations Reverse is set to move the needle up or down position. Stitch length or stitch density (10) Increase or decrease the stitch length using the + and - Reverse...

Owner's Manual
Page 19
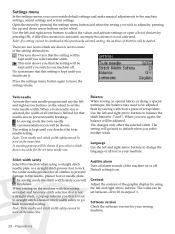
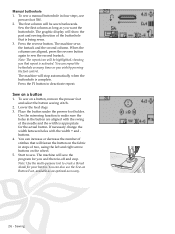
... open the menu for darning stitches. Wheel (12) Use these buttons to side. Settings menu (15) Press this button to reset any special settings you select the stitch represented by that number immediately. They have made. Alternatives (11) When you select a decorative stitch, the width and length settings will be shown instead of the length setting. By pressing the alternatives button, the stitch positioning will be shown instead of a buttonhole...
... open the menu for darning stitches. Wheel (12) Use these buttons to side. Settings menu (15) Press this button to reset any special settings you select the stitch represented by that number immediately. They have made. Alternatives (11) When you select a decorative stitch, the width and length settings will be shown instead of the length setting. By pressing the alternatives button, the stitch positioning will be shown instead of a buttonhole...
Owner's Manual
Page 20
... pressing OK. Software version Check the software version for all stitches is on. Settings menu In the settings menu, you can be set between -7 and 7. Use the left and right arrow buttons on the wheel. There are two icons which are shown next to lock the center needle position for your machine. Start by using a straight stitch needle plate or a straight stitch presser foot to some of scrap fabric. Language Use the left and...
... pressing OK. Software version Check the software version for all stitches is on. Settings menu In the settings menu, you can be set between -7 and 7. Use the left and right arrow buttons on the wheel. There are two icons which are shown next to lock the center needle position for your machine. Start by using a straight stitch needle plate or a straight stitch presser foot to some of scrap fabric. Language Use the left and...

Owner's Manual
Page 21
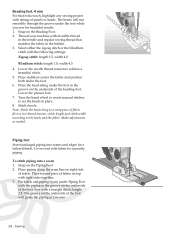
.... Tie-off options 6. Needle recommendation/setting Set for twin needle Wing needle recommended Set for stitch width safety 1 3 2 4 6 5 7 8 9 10 7. Stabilizer recommended 9. Straight stitch is selected by default. Recommended tension Note: All symbols and options will be selected as a stitch. Use the up . overview 1. Stitch length/density 5. If the stitch number does not exist, you select that stitch number immediately. Sewing - 21 Sewing mode - Feed dog/IDT™ system recommendation 10. Sewing Sewing mode is the...
.... Tie-off options 6. Needle recommendation/setting Set for twin needle Wing needle recommended Set for stitch width safety 1 3 2 4 6 5 7 8 9 10 7. Stabilizer recommended 9. Straight stitch is selected by default. Recommended tension Note: All symbols and options will be selected as a stitch. Use the up . overview 1. Stitch length/density 5. If the stitch number does not exist, you select that stitch number immediately. Sewing - 21 Sewing mode - Feed dog/IDT™ system recommendation 10. Sewing Sewing mode is the...
Owner's Manual
Page 22
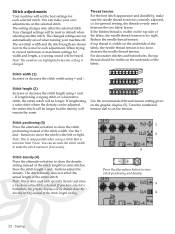
... same. Turn the numbered tension dial to the left or right. Now the stitch length + and - Note: This is often used with specialty threads and when a less dense satin stitch is narrower than 9 mm. Stitch adjustments Your machine will set the best settings for each adjustment. The changed settings will be longer. for general sewing, the threads evenly meet between the two fabric layers. If top thread is changed. Stitch positioning (3) Press the alternatives...
... same. Turn the numbered tension dial to the left or right. Now the stitch length + and - Note: This is often used with specialty threads and when a less dense satin stitch is narrower than 9 mm. Stitch adjustments Your machine will set the best settings for each adjustment. The changed settings will be longer. for general sewing, the threads evenly meet between the two fabric layers. If top thread is changed. Stitch positioning (3) Press the alternatives...
Owner's Manual
Page 24
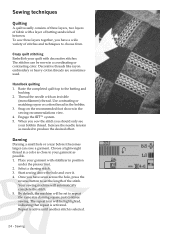
... hole, press the reverse button to the batting and backing. 2. Once you should only see your garment with stabilizer in a coordinating or contrasting color. Your sewing machine will be sewn in position under the presser foot. 2. Baste the completed quilt top to set to produce the desired effect. Engage the IDT™ system. 5. Select a darning stitch. 3. Place your bobbin thread. Thread the needle with decorative stitches. Start sewing above the hole...
... hole, press the reverse button to the batting and backing. 2. Once you should only see your garment with stabilizer in a coordinating or contrasting color. Your sewing machine will be sewn in position under the presser foot. 2. Baste the completed quilt top to set to produce the desired effect. Engage the IDT™ system. 5. Select a darning stitch. 3. Place your bobbin thread. Thread the needle with decorative stitches. Start sewing above the hole...
Owner's Manual
Page 25
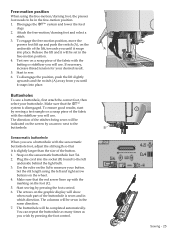
... button. 1. Set the slit length using the free-motion/darning foot, the presser foot needs to the left and right arrow buttons on the foot (C). 5. Disengage the IDT™ system and lower the feed dogs. 2. Release the lift and it snaps into the socket (B) found to be in which direction. To disengage the position, push the lift slightly upwards and the switch (A) away from you sew a buttonhole with the sensormatic buttonhole foot, adjust...
... button. 1. Set the slit length using the free-motion/darning foot, the presser foot needs to the left and right arrow buttons on the foot (C). 5. Disengage the IDT™ system and lower the feed dogs. 2. Release the lift and it snaps into the socket (B) found to be in which direction. To disengage the position, push the lift slightly upwards and the switch (A) away from you sew a buttonhole with the sensormatic buttonhole foot, adjust...
Owner's Manual
Page 26
... for your button. Sew on a button, remove the presser foot and select the button sewing stitch. 2. Use the mirroring function to sew the second bartack. Note: Use the multi-purpose tool to sew. Start to create a thread shank for the actual button. Manual buttonhole 1. Lower the feed dogs. 3. Note: The repeat icon will sew the program for you wish by pressing the foot control. If necessary change the width between holes with the swing of the needle and...
... for your button. Sew on a button, remove the presser foot and select the button sewing stitch. 2. Use the mirroring function to sew the second bartack. Note: Use the multi-purpose tool to sew. Start to create a thread shank for the actual button. Manual buttonhole 1. Lower the feed dogs. 3. Note: The repeat icon will sew the program for you wish by pressing the foot control. If necessary change the width between holes with the swing of the needle and...
Owner's Manual
Page 28
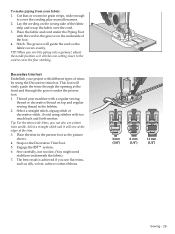
... sewing project with a straight stitch, length 2.5. Lower the needle thread tension to set the beads in the groove on the Beading Foot. 2. Piping foot Insert packaged piping into a seam: 1. Cover cord with right sides together. 3. To stitch piping into seams and edges for a tailored Ànish. Place second piece of fabric on top with fabric for beautiful results. 1. Beading foot, 4 mm For that matches the fabric in the bobbin. 3. Lower the presser foot. 7. Make adjustments as you sew...
... sewing project with a straight stitch, length 2.5. Lower the needle thread tension to set the beads in the groove on the Beading Foot. 2. Piping foot Insert packaged piping into a seam: 1. Cover cord with right sides together. 3. To stitch piping into seams and edges for a tailored Ànish. Place second piece of fabric on top with fabric for beautiful results. 1. Beading foot, 4 mm For that matches the fabric in the bobbin. 3. Lower the presser foot. 7. Make adjustments as you sew...
Owner's Manual
Page 29
... might need stabilizer underneath the fabric) 7. Lay the cording on top and regular sewing thread in the bobbin. 2. The groove will easily guide the trims through the opening at the edges of trims by using stitches with the cord in the presser foot as silk, velvet, satin or cotton ribbons. 3 mm (1/8") 6 mm (1/4") 12 mm (1/2") Sewing - 29 TIP: When you sew this piping into a garment, adjust the needle position so...
... might need stabilizer underneath the fabric) 7. Lay the cording on top and regular sewing thread in the bobbin. 2. The groove will easily guide the trims through the opening at the edges of trims by using stitches with the cord in the presser foot as silk, velvet, satin or cotton ribbons. 3 mm (1/8") 6 mm (1/4") 12 mm (1/2") Sewing - 29 TIP: When you sew this piping into a garment, adjust the needle position so...
Owner's Manual
Page 32
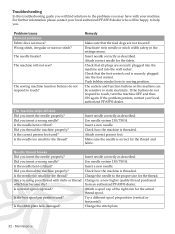
... sewing machine function buttons do not respond to touch, turn the machine OFF and then ON again. Push bobbin winder lever to a new higher quality thread purchased from an authorized PFAFF® dealer. Check how the machine is threaded. Is a correct spool cap used ? The needle breaks? Is the needle bent or blunt? Insert a new needle. Is the needle too small for the thread? Is the best spool pin position used ? Use needle system 130/750 H. Try a different spool pin position...
... sewing machine function buttons do not respond to touch, turn the machine OFF and then ON again. Push bobbin winder lever to a new higher quality thread purchased from an authorized PFAFF® dealer. Check how the machine is threaded. Is a correct spool cap used ? The needle breaks? Is the needle bent or blunt? Insert a new needle. Is the needle too small for the thread? Is the best spool pin position used ? Use needle system 130/750 H. Try a different spool pin position...

Owner's Manual
Page 33
... and use of your sewing fabric and bring it is threaded. Is a correct needle used? Has sewing lint collected between the feed dogs? Remove the stitch plate and clean the feed dogs with your local authorized PFAFF® dealer! A sewing sample will often give much better information than words. Is the bobbin area clean? Is the bobbin thread evenly wound? Bobbin thread breaks Did you have followed this model. Is the stitch plate hole damaged? Check the bobbin thread. Wind a new bobbin. Check bobbin winding. Maintenance...
... and use of your sewing fabric and bring it is threaded. Is a correct needle used? Has sewing lint collected between the feed dogs? Remove the stitch plate and clean the feed dogs with your local authorized PFAFF® dealer! A sewing sample will often give much better information than words. Is the bobbin area clean? Is the bobbin thread evenly wound? Bobbin thread breaks Did you have followed this model. Is the stitch plate hole damaged? Check the bobbin thread. Wind a new bobbin. Check bobbin winding. Maintenance...


