
Owner's Manual
Page 2
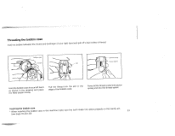
... machine will start inadvertently, or the control or motor may have appeared. 1 Do's and Don'ts 1 Always beware of the up-an&down movement of the needle and do not turn your sewing machine for the first time, place a piece of the wall socket. 3. The maximum permissible power for the sewing lamp bulb is running. 2. When changing the needle, the sewing foot, the bobbin or any oil...
... machine will start inadvertently, or the control or motor may have appeared. 1 Do's and Don'ts 1 Always beware of the up-an&down movement of the needle and do not turn your sewing machine for the first time, place a piece of the wall socket. 3. The maximum permissible power for the sewing lamp bulb is running. 2. When changing the needle, the sewing foot, the bobbin or any oil...

Owner's Manual
Page 3
... Table of needles, threads and fabrics 12 Inserting the needle 13 The stitch selector, Model 72 14 The stitch selector, Model 75 14 The stitch selector, Model 77 15 Colourcodeselector 15 Stitch length selector and reversing button 16 Regulating the threadtensions 17 Regulating the sewing foot pressure (Patch-O-Matic) 18 Dropping the feed 18 Removing and inserting the bobbin case and bobbin, Model 72 19 Removing and inserting the bobbin case and bobbin, Models 75 and 77 20 Winding the bobbin 21 How to wind correctly 22 Threading the bobbin case...
... Table of needles, threads and fabrics 12 Inserting the needle 13 The stitch selector, Model 72 14 The stitch selector, Model 75 14 The stitch selector, Model 77 15 Colourcodeselector 15 Stitch length selector and reversing button 16 Regulating the threadtensions 17 Regulating the sewing foot pressure (Patch-O-Matic) 18 Dropping the feed 18 Removing and inserting the bobbin case and bobbin, Model 72 19 Removing and inserting the bobbin case and bobbin, Models 75 and 77 20 Winding the bobbin 21 How to wind correctly 22 Threading the bobbin case...
Owner's Manual
Page 4
Applications for the free arm of Models 75 and Sewing tubular - Feather stitch, Model 77 Overlock stitch, Models 75 and 77 Sewing buttonholes Sewing on Models 75 77 and 77 Sewing with a twin needle Tricot zigzag stitch, Models 75 and 77 Triple, straight stretch stitch, Models 75 and 77. shaped articles on buttons Sewing in zip fasteners Hemming Sewing blind hems, Model 72 Sewing blind hems, Models 75 and 77 Embroidery Cleaning the shuttle race Cleaning the feed dog How to oil the machine Drive belt tension Faults and how to remedy them 28 3
Applications for the free arm of Models 75 and Sewing tubular - Feather stitch, Model 77 Overlock stitch, Models 75 and 77 Sewing buttonholes Sewing on Models 75 77 and 77 Sewing with a twin needle Tricot zigzag stitch, Models 75 and 77 Triple, straight stretch stitch, Models 75 and 77. shaped articles on buttons Sewing in zip fasteners Hemming Sewing blind hems, Model 72 Sewing blind hems, Models 75 and 77 Embroidery Cleaning the shuttle race Cleaning the feed dog How to oil the machine Drive belt tension Faults and how to remedy them 28 3
Owner's Manual
Page 6
1 Sewing foot pressure regulator (Patch-O-Matic) 2 Bobbin winder tension 3 Take-up lever 4 Thread guide 5 Top cover 6 Spool pins 7 Stitch selector 8 Bobbin winder spindle 9 Bobbin winder stop 10 Hand wheel 11 Stitch length selector 12 Reversing button 13 Bedplate 14 Needle thread tension 15 Needle bar 16 Needle holder with fixing screw 17 Bedplate cover 18 Sewing toot 19 Needle plate 20 Sewing foot fixing screw 21 Presser bar 22 Thread guides 23 Face plate 5
1 Sewing foot pressure regulator (Patch-O-Matic) 2 Bobbin winder tension 3 Take-up lever 4 Thread guide 5 Top cover 6 Spool pins 7 Stitch selector 8 Bobbin winder spindle 9 Bobbin winder stop 10 Hand wheel 11 Stitch length selector 12 Reversing button 13 Bedplate 14 Needle thread tension 15 Needle bar 16 Needle holder with fixing screw 17 Bedplate cover 18 Sewing toot 19 Needle plate 20 Sewing foot fixing screw 21 Presser bar 22 Thread guides 23 Face plate 5

Owner's Manual
Page 8
1 Sewing foot pressure regulator (Patch-O-Matic) 2 Bobbin winder tension 3 Take-up lever 4 Thread guide 5 Top cover 6 Spool pins 7 Stitch selector 8 Bobbin winder spindle 9 Bobbin winder stop 10 Hand wheel 11 Stitch length selector 12 Reversing button 13 Bedplate 14 Needle thread tension 15 Needle bar 16 Needle holder with fixing screw 18 Sewing foot 19 Needle plate 20 Sewing foot fixing screw 21 Presser bar 22 Thread guides 23 Face plate 25 Free arm 26 Detachable workplate 7
1 Sewing foot pressure regulator (Patch-O-Matic) 2 Bobbin winder tension 3 Take-up lever 4 Thread guide 5 Top cover 6 Spool pins 7 Stitch selector 8 Bobbin winder spindle 9 Bobbin winder stop 10 Hand wheel 11 Stitch length selector 12 Reversing button 13 Bedplate 14 Needle thread tension 15 Needle bar 16 Needle holder with fixing screw 18 Sewing foot 19 Needle plate 20 Sewing foot fixing screw 21 Presser bar 22 Thread guides 23 Face plate 25 Free arm 26 Detachable workplate 7
Owner's Manual
Page 10
1 Sewing foot pressure regulator (Patch-O-Matic) 2 Bobbin winder tension 3 Take-up lever 4 Thread guide 5 Top cover 6 Spool pins 7 Stitch selector 8 Bobbin winder spindle 9 Bobbin winder stop 10 Hand wheel 11 Stitch length selector 1 2 Reversing button 13 Bedplate 14 Needle thread tension 15 Needle bar 16 Needle holder with fixing screw 18 Sewing foot 19 Needle plate 20 Sewing foot fixing screw 21 Presser bar 22 Thread guides 23 Face plate 24 Colour code selector 25 Free arm 26 Detachable workplate 9
1 Sewing foot pressure regulator (Patch-O-Matic) 2 Bobbin winder tension 3 Take-up lever 4 Thread guide 5 Top cover 6 Spool pins 7 Stitch selector 8 Bobbin winder spindle 9 Bobbin winder stop 10 Hand wheel 11 Stitch length selector 1 2 Reversing button 13 Bedplate 14 Needle thread tension 15 Needle bar 16 Needle holder with fixing screw 18 Sewing foot 19 Needle plate 20 Sewing foot fixing screw 21 Presser bar 22 Thread guides 23 Face plate 24 Colour code selector 25 Free arm 26 Detachable workplate 9
Owner's Manual
Page 12
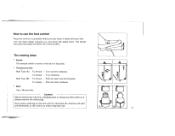
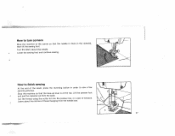
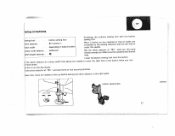
... you press the pedal the faster the machine sews. Turn clockwise Bulb Type (B): To remove - Before leaving the machine, changing parts or doing any other work on the back of face plate. * Changing the bulb Bulb Type (A): To remove - The sewing lamp * Switch The sewlight switch is found on it easily with your foot. Push and twist clockwise * Bulb Use a 15-watt bulb. How to use the foot control Place the control in a position where you...
... you press the pedal the faster the machine sews. Turn clockwise Bulb Type (B): To remove - Before leaving the machine, changing parts or doing any other work on the back of face plate. * Changing the bulb Bulb Type (A): To remove - The sewing lamp * Switch The sewlight switch is found on it easily with your foot. Push and twist clockwise * Bulb Use a 15-watt bulb. How to use the foot control Place the control in a position where you...
Owner's Manual
Page 15
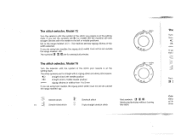
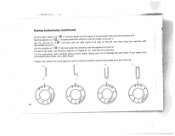
... you are for sewing buttonholes. The white symbols are using twin needles the zigzag stitch width must not be set outside the range marked .. If yoi the r Red Cob Befoi of the stitch you are for straight stitch, zigzag stitch and utility stitch seams. straight stitch, left or middle positions. If you set outside the range marked Stretch stitch 14 Stretch blind stitch Overlock stitch Triple straight stretch stitch Red symbols UI LU Sewing buttonholes without turning the fabric The Turn The...
... you are for sewing buttonholes. The white symbols are using twin needles the zigzag stitch width must not be set outside the range marked .. If yoi the r Red Cob Befoi of the stitch you are for straight stitch, zigzag stitch and utility stitch seams. straight stitch, left or middle positions. If you set outside the range marked Stretch stitch 14 Stretch blind stitch Overlock stitch Triple straight stretch stitch Red symbols UI LU Sewing buttonholes without turning the fabric The Turn The...
Owner's Manual
Page 16
to sew, set the lever of this control of the stitch you are using twin the range marked needles the zigzag stitch width must not be set outside Stretch stitch Fancy stitch Stretch blind stitch Red symbols 111 III Sewing buttonholes without turning the fabric The blue symbols are for super-utility-stitch seams III Triple straight stretch stitch \AANv/w Triple zigzag stretch stitch, from 1 to 5 mm If you require is at the setting mark. The arrow shows the colour...
to sew, set the lever of this control of the stitch you are using twin the range marked needles the zigzag stitch width must not be set outside Stretch stitch Fancy stitch Stretch blind stitch Red symbols 111 III Sewing buttonholes without turning the fabric The blue symbols are for super-utility-stitch seams III Triple straight stretch stitch \AANv/w Triple zigzag stretch stitch, from 1 to 5 mm If you require is at the setting mark. The arrow shows the colour...
Owner's Manual
Page 19
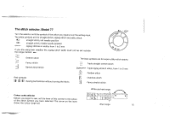
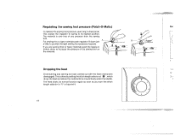
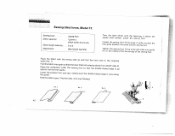
The feed starts its highest position. This is now free of the sewing foot on the material. disengaged. The material is done by setting the stitch length selector at HU ,which 3. If you turn the stitch length selector to "0" or beyond it. 18 This causes the regulator to spring to increase the pressure of any pressure from the sewing foot. A For sewing thin or light materials push regulator B down...
The feed starts its highest position. This is now free of the sewing foot on the material. disengaged. The material is done by setting the stitch length selector at HU ,which 3. If you turn the stitch length selector to "0" or beyond it. 18 This causes the regulator to spring to increase the pressure of any pressure from the sewing foot. A For sewing thin or light materials push regulator B down...
Owner's Manual
Page 24
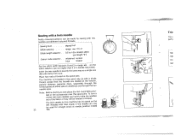
Hold the bobbin case in your right hand and pull off a few inches of thread. Now pull the thread under the tension spring and into the slot in the edge of the bobbin case. Inserting the bobbin * When inserting the case bobbin case in the drawing and hand place the filled bobbin inside. Threading the bobbin case Hold the bobbin betwen the thumb and forefinger of your left as shown in the machine make sure the latch snaps into place properly on the centre pin 23 (see page 19 and 20). Pull the thread into the thread eyelet.
Hold the bobbin case in your right hand and pull off a few inches of thread. Now pull the thread under the tension spring and into the slot in the edge of the bobbin case. Inserting the bobbin * When inserting the case bobbin case in the drawing and hand place the filled bobbin inside. Threading the bobbin case Hold the bobbin betwen the thumb and forefinger of your left as shown in the machine make sure the latch snaps into place properly on the centre pin 23 (see page 19 and 20). Pull the thread into the thread eyelet.
Owner's Manual
Page 28
... needle eye. 27 Stop the machine so that the needle is at the corner so that the take-up lever is down in order to sew a few securing stitches. How to turn corners Stop the machine at the top. Cut the thread using the cutter let into the presser bar, or a pair of the seam, press the reversing button in the material, then lift the sewing foot...
... needle eye. 27 Stop the machine so that the needle is at the corner so that the take-up lever is down in order to sew a few securing stitches. How to turn corners Stop the machine at the top. Cut the thread using the cutter let into the presser bar, or a pair of the seam, press the reversing button in the material, then lift the sewing foot...
Owner's Manual
Page 31
...their shank be used for this machine has left. Sewing with two Sewing toot zigzag foot Stitch selector range: 0 to 2 Stitch length selector:. . 0.5 to 1 (for stretch stitch use length "4") Colour code selector: . . Note: Before ded in corner out of ttwshhteiaetrhftaaitnbcwgcriienctsonsooreseretihwdeelseypsolwavycieolelrubtthehheaetvwteswipstoooteordtloauokpnriendbsth.rfoeeTklotnesnetpu.erdronlevasi The twin needle for straight stitch at in the needle its shank on the break. Insert the twin needle in range than 2 or a needle , may on the middle can only position middle...
...their shank be used for this machine has left. Sewing with two Sewing toot zigzag foot Stitch selector range: 0 to 2 Stitch length selector:. . 0.5 to 1 (for stretch stitch use length "4") Colour code selector: . . Note: Before ded in corner out of ttwshhteiaetrhftaaitnbcwgcriienctsonsooreseretihwdeelseypsolwavycieolelrubtthehheaetvwteswipstoooteordtloauokpnriendbsth.rfoeeTklotnesnetpu.erdronlevasi The twin needle for straight stitch at in the needle its shank on the break. Insert the twin needle in range than 2 or a needle , may on the middle can only position middle...
Owner's Manual
Page 35
Lower the sewing foot and begin sewing. Sewing foot zigzag foot Stitch selector Colour code selector:. . 11111 Iii 1111111! 111111 Overlock stitch, Models 75 and 77 With this seam it is possible to check the stitch setting. blue Stitch length selector:, . 4 Place the fabric under the sewing foot so that the stitches are plaäed correctly when the needle just misses the 34 fabric edge when descending on easily fraying fabrics, with a good-looking and lasting...
Lower the sewing foot and begin sewing. Sewing foot zigzag foot Stitch selector Colour code selector:. . 11111 Iii 1111111! 111111 Overlock stitch, Models 75 and 77 With this seam it is possible to check the stitch setting. blue Stitch length selector:, . 4 Place the fabric under the sewing foot so that the stitches are plaäed correctly when the needle just misses the 34 fabric edge when descending on easily fraying fabrics, with a good-looking and lasting...
Owner's Manual
Page 37
... Set the seledor at "4 2" and sew about five stitches until the needle is at point C. 111 " and sew until the right seam is long enough, then stop the machine with the needle at Cut the buttonhole open carefully using a seam ripper, c and sew a few stitches. To secure the seam, set the stitch selector for zigzag at point D. Set the selector at "4 Set the selector at "3 2' and sew about five stitches until the seam...
... Set the seledor at "4 2" and sew about five stitches until the needle is at point C. 111 " and sew until the right seam is long enough, then stop the machine with the needle at Cut the buttonhole open carefully using a seam ripper, c and sew a few stitches. To secure the seam, set the stitch selector for zigzag at point D. Set the selector at "4 Set the selector at "3 2' and sew about five stitches until the seam...
Owner's Manual
Page 38
... Stitch length selector:. . t the stitch selector at €D" you turn the hand needle enters the left hole is under the needle. Set the stitch slowly towards selector at and sew three or four securing stitches. ewing on buttons Exchange the ordinary sewing foot with the button Sewing foot button sewing foot stitch selector Stitch width €D W' depending on the material so that allows the needle to enter the right hole in button colour code selector:. Make...
... Stitch length selector:. . t the stitch selector at €D" you turn the hand needle enters the left hole is under the needle. Set the stitch slowly towards selector at and sew three or four securing stitches. ewing on buttons Exchange the ordinary sewing foot with the button Sewing foot button sewing foot stitch selector Stitch width €D W' depending on the material so that allows the needle to enter the right hole in button colour code selector:. Make...
Owner's Manual
Page 41
... Stitch length selector: stitch width 3 to 5 mm 2 to the required Fold the fabric over again so that the about 5mm (5/32") (No.2). The hem (No. 3)is in order to place sewing foot. fabric 1). with the wrong side up Lower the the guide. presser foot and sew, making sure the double folded edge C runs along Fold the fabric apart. Sewing blind hems, Model 72 Sewing foot: Stitch selector: zigzag foot Turn the hand wheel until the needle plate...
... Stitch length selector: stitch width 3 to 5 mm 2 to the required Fold the fabric over again so that the about 5mm (5/32") (No.2). The hem (No. 3)is in order to place sewing foot. fabric 1). with the wrong side up Lower the the guide. presser foot and sew, making sure the double folded edge C runs along Fold the fabric apart. Sewing blind hems, Model 72 Sewing foot: Stitch selector: zigzag foot Turn the hand wheel until the needle plate...
Owner's Manual
Page 43
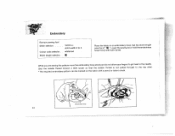
... an embroidery hoop. Embroidery Remove sewing foot Stitch selector'..... While you (Set the are sewing the needle thread pattern move the tension a little embroidery hoop slowly and looser so that the bobbin do not allow your fingers to get near to the top side). *The required embroidery pattern can be marked on the fabric with both hands. thread is not pulled through to the needle. Lowerthe sewing foot. white/red Stitch length selector:. Hold the embroidery hoop...
... an embroidery hoop. Embroidery Remove sewing foot Stitch selector'..... While you (Set the are sewing the needle thread pattern move the tension a little embroidery hoop slowly and looser so that the bobbin do not allow your fingers to get near to the top side). *The required embroidery pattern can be marked on the fabric with both hands. thread is not pulled through to the needle. Lowerthe sewing foot. white/red Stitch length selector:. Hold the embroidery hoop...
Owner's Manual
Page 48
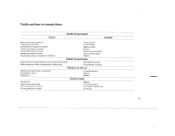
... Thread check spring is broken Needle not properly inserted Needle plate, shuttle or sewing foot damaged Thread properly Loosen tension Replace needle Change Have a new spring fitted Insert needle properly Replace Bobbin thread breaks Bobbin thread entangled because of incorrectly wound bobbin Bobbin thread not under tension spring on bobbin case Wind bobbin correctly Thread bobbin correctly Stitches are left out Needle not properly fitted on needle bar Needle bent or blunt Needle worn Fit needle properly Replace Replace Needle breaks Needle bent Needle not properly fitted Fabric...
... Thread check spring is broken Needle not properly inserted Needle plate, shuttle or sewing foot damaged Thread properly Loosen tension Replace needle Change Have a new spring fitted Insert needle properly Replace Bobbin thread breaks Bobbin thread entangled because of incorrectly wound bobbin Bobbin thread not under tension spring on bobbin case Wind bobbin correctly Thread bobbin correctly Stitches are left out Needle not properly fitted on needle bar Needle bent or blunt Needle worn Fit needle properly Replace Replace Needle breaks Needle bent Needle not properly fitted Fabric...
Owner's Manual
Page 49
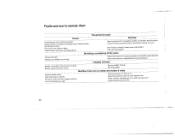
... thread tension Thread machine properly and/or wind bobbin thread correctly See "Fabrics, threads, thread sizes and needles Have spring replaced Shrinking or puckering of the seam Tension too tight Sewing foot pressure too strong Read instructions for regulating sewing foot pressure Irregular stitches Needle- and bobbin thread tensions Read instructions for regulating needle- Faults and how to remedy them Thread forms loops Cause: Thread tension not properly regulated Needle thread not properly threaded and/or bobbin thread not properly wound Thread size not suited to clean shuttle...
... thread tension Thread machine properly and/or wind bobbin thread correctly See "Fabrics, threads, thread sizes and needles Have spring replaced Shrinking or puckering of the seam Tension too tight Sewing foot pressure too strong Read instructions for regulating sewing foot pressure Irregular stitches Needle- and bobbin thread tensions Read instructions for regulating needle- Faults and how to remedy them Thread forms loops Cause: Thread tension not properly regulated Needle thread not properly threaded and/or bobbin thread not properly wound Thread size not suited to clean shuttle...


