
Owner's Manual
Page 4
...Tie-off options 4:5 Speed control 4:6 Sewing programs 4:6 Balance 4:8 Mirroring 4:8 Zoom to update your machine 2:14 Buttons and icons 2:15 3 PFAFF® HD screen 3:1 Task bar 3:2 Use the task bar 3:3 Common icons 3:3 Selection menu 3:4 Embroidery edit 3:5 Embroidery text editor 3:6 ... How to all 4:8 Stitch settings 4:9 Stitch width 4:9 Stitch positioning 4:9 Stitch length 4:9 Stitch density 4:10 Thread tension 4:10 Buttonhole slit length 4:10 Button stitch repetition 4:11 Sequence start position 4:11 Sewing techniques 4:12 Three-step zigzag...
...Tie-off options 4:5 Speed control 4:6 Sewing programs 4:6 Balance 4:8 Mirroring 4:8 Zoom to update your machine 2:14 Buttons and icons 2:15 3 PFAFF® HD screen 3:1 Task bar 3:2 Use the task bar 3:3 Common icons 3:3 Selection menu 3:4 Embroidery edit 3:5 Embroidery text editor 3:6 ... How to all 4:8 Stitch settings 4:9 Stitch width 4:9 Stitch positioning 4:9 Stitch length 4:9 Stitch density 4:10 Thread tension 4:10 Buttonhole slit length 4:10 Button stitch repetition 4:11 Sequence start position 4:11 Sewing techniques 4:12 Three-step zigzag...
Owner's Manual
Page 6
... sewing machine. stitch-out 9:1 To enter embroidery stitch-out 9:2 Embroidery stitch-out - This discoloring may be very difficult or impossible to stitch 9:4 Thread tension 9:4 Basting 9:5 Color block sort 9:5 Pan 9:5 Option bar 9:6 More options 9:6 Speed control 9:7 Hoop position 9:7 Precise positioning 9:8 Common embroidery stitch-out pop-ups 9:11 10 Files & Folders...
... sewing machine. stitch-out 9:1 To enter embroidery stitch-out 9:2 Embroidery stitch-out - This discoloring may be very difficult or impossible to stitch 9:4 Thread tension 9:4 Basting 9:5 Color block sort 9:5 Pan 9:5 Option bar 9:6 More options 9:6 Speed control 9:7 Hoop position 9:7 Precise positioning 9:8 Common embroidery stitch-out pop-ups 9:11 10 Files & Folders...
Owner's Manual
Page 9
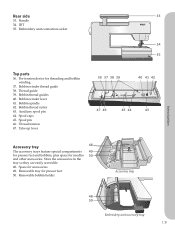
... compartments 49 for presser feet and bobbins, plus space for accessories 49. Space for needles 50 and other accessories. Pre-tension device for presser feet 50. Bobbin winder lever 41. Thread tension 47. IDT 35. Bobbin thread cutter 43. Spool pin 46. Rear side 33 33. Removable tray for threading and bobbin...
... compartments 49 for presser feet and bobbins, plus space for accessories 49. Space for needles 50 and other accessories. Pre-tension device for presser feet 50. Bobbin winder lever 41. Thread tension 47. IDT 35. Bobbin thread cutter 43. Spool pin 46. Rear side 33 33. Removable tray for threading and bobbin...
Owner's Manual
Page 25
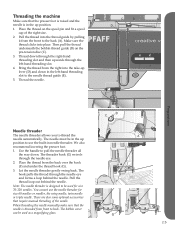
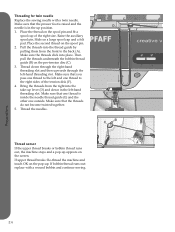
... fit a spool cap of the needle. Note: The needle threader is designed to thread the needle automatically. Thread down . Place the thread on the pre-tension disc (C). 3. Needle threader The needle threader allows you to be in the up position. 1. The hook pulls the thread through the needle eye and forms...
... fit a spool cap of the needle. Note: The needle threader is designed to thread the needle automatically. Thread down . Place the thread on the pre-tension disc (C). 3. Needle threader The needle threader allows you to be in the up position. 1. The hook pulls the thread through the needle eye and forms...
Owner's Manual
Page 26
... the needles. If upper thread breaks: Re-thread the machine and touch OK on the pop-up appears on the screen. Slide on the pre-tension disc (C). 3. Then pull the threads underneath the bobbin thread guide (B) on a large spool cap and a felt pad. Pull the threads into the thread ... -hand threading slot. Thread down in the left -hand threading slot. Place the second thread on the spool pin and fit a spool cap of the tension disk (F). 4. Make sure that you pass one thread to the back (A). If bobbin thread runs out: replace with a twin needle. Make sure that the...
... the needles. If upper thread breaks: Re-thread the machine and touch OK on the pop-up appears on the screen. Slide on the pre-tension disc (C). 3. Then pull the threads underneath the bobbin thread guide (B) on a large spool cap and a felt pad. Pull the threads into the thread ... -hand threading slot. Thread down in the left -hand threading slot. Place the second thread on the spool pin and fit a spool cap of the tension disk (F). 4. Make sure that you pass one thread to the back (A). If bobbin thread runs out: replace with a twin needle. Make sure that the...
Owner's Manual
Page 27
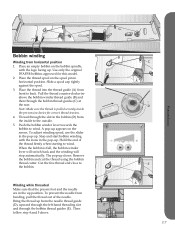
... guides (E). Stop and start bobbin winding with the logo facing up . Slide a spool cap tightly against the spool. 3. Use only the original PFAFF® bobbins approved for correct thread tension. 4. Pull the thread counter-clockwise above . Hold the end of the needle. Cut the free thread end close to the outside. 5. Remove... bobbin spindle, with the icons in the pop-up . Bring the thread up from horizontal position 1. To prevent the needle from the inside the pre-tension device for this model. 2. Push the bobbin winder lever towards the bobbin to wind.
... guides (E). Stop and start bobbin winding with the logo facing up . Slide a spool cap tightly against the spool. 3. Use only the original PFAFF® bobbins approved for correct thread tension. 4. Pull the thread counter-clockwise above . Hold the end of the needle. Cut the free thread end close to the outside. 5. Remove... bobbin spindle, with the icons in the pop-up . Bring the thread up from horizontal position 1. To prevent the needle from the inside the pre-tension device for this model. 2. Push the bobbin winder lever towards the bobbin to wind.
Owner's Manual
Page 28
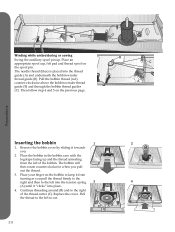
... pin up and the thread unreeling from turning as you pull the thread firmly to the right and then to the left into the tension spring 3 4 (A) until it towards you pull out the thread. 3. Pull the bobbin thread (red) counter-clockwise above the bobbin winder thread guide (B) and through the...
... pin up and the thread unreeling from turning as you pull the thread firmly to the right and then to the left into the tension spring 3 4 (A) until it towards you pull out the thread. 3. Pull the bobbin thread (red) counter-clockwise above the bobbin winder thread guide (B) and through the...
Owner's Manual
Page 52
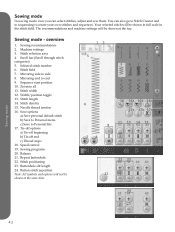
overview 1. Machine settings 3. Sequence start position 10. Width/position toggle 13. Needle thread tension 16. Balance 21. Sewing mode In sewing mode view you can also go to Stitch Creator and to sequencing to Personal file 17. Sewing ...
overview 1. Machine settings 3. Sequence start position 10. Width/position toggle 13. Needle thread tension 16. Balance 21. Sewing mode In sewing mode view you can also go to Stitch Creator and to sequencing to Personal file 17. Sewing ...
Owner's Manual
Page 60
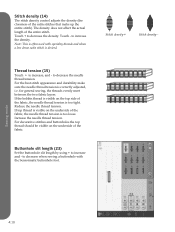
.... Stitch density (14) The stitch density control adjusts the density (the closeness of the satin stitches that make sure the needle thread tension is too tight. Buttonhole slit length (23) Set the buttonhole slit length by using + to decrease when sewing a buttonhole with specialty...If top thread is visible on the underside of the entire stitch. Sewing mode 23 4:10 Thread tension (15) Touch + to decrease the density. Reduce the needle thread tension. Increase the needle thread tension. Touch + to increase, and - for general sewing, the threads evenly meet between the two...
.... Stitch density (14) The stitch density control adjusts the density (the closeness of the satin stitches that make sure the needle thread tension is too tight. Buttonhole slit length (23) Set the buttonhole slit length by using + to decrease when sewing a buttonhole with specialty...If top thread is visible on the underside of the entire stitch. Sewing mode 23 4:10 Thread tension (15) Touch + to decrease the density. Reduce the needle thread tension. Increase the needle thread tension. Touch + to increase, and - for general sewing, the threads evenly meet between the two...
Owner's Manual
Page 65
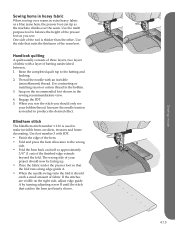
... sewing over the seam. Blindhem stitch The blindhem stitch number 1.1.16 is thicker than the other. One side of your bobbin thread. Increase the needle tension as the machine climbs over seams in extra heavy fabric or a blue jeans hem, the presser foot can tip as needed to make invisible hems...
... sewing over the seam. Blindhem stitch The blindhem stitch number 1.1.16 is thicker than the other. One side of your bobbin thread. Increase the needle tension as the machine climbs over seams in extra heavy fabric or a blue jeans hem, the presser foot can tip as needed to make invisible hems...
Owner's Manual
Page 112
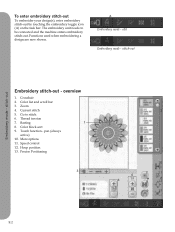
... needs to stitch 6. edit Embroidery mode - stitch-out Embroidery stitch-out - Basting 1 8. pan (always active) 10. Precise Positioning 3 2 6 4 5 10 7 11 8 12 9 13 9:2 Current stitch 5. Thread tension 7. Color block sort 9. stitch-out Embroidery mode - Functions used when embroidering a design are now shown. Zoom 4. To enter embroidery stitch-out To embroider your design...
... needs to stitch 6. edit Embroidery mode - stitch-out Embroidery stitch-out - Basting 1 8. pan (always active) 10. Precise Positioning 3 2 6 4 5 10 7 11 8 12 9 13 9:2 Current stitch 5. Thread tension 7. Color block sort 9. stitch-out Embroidery mode - Functions used when embroidering a design are now shown. Zoom 4. To enter embroidery stitch-out To embroider your design...
Owner's Manual
Page 114
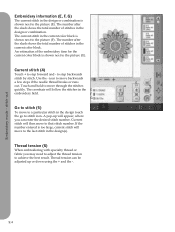
...or runs out. Touch and hold to move through the stitches quickly. The crosshair will appear, where you may need to adjust the thread tension to the picture (F). stitch-out 9:4 An estimation of stitches in the E embroidery field. to step forward and - A pop...-up or down using the + and the -. 7 6 4 8 5 9 Embroidery mode - Thread tension (6) When embroidering with specialty thread or fabric you can enter the desired stitch number. Thread tension can be adjusted up will follow the stitches in the current color block. F G Go to stitch (5) To ...
...or runs out. Touch and hold to move through the stitches quickly. The crosshair will appear, where you may need to adjust the thread tension to the picture (F). stitch-out 9:4 An estimation of stitches in the E embroidery field. to step forward and - A pop...-up or down using the + and the -. 7 6 4 8 5 9 Embroidery mode - Thread tension (6) When embroidering with specialty thread or fabric you can enter the desired stitch number. Thread tension can be adjusted up will follow the stitches in the current color block. F G Go to stitch (5) To ...
Owner's Manual
Page 134
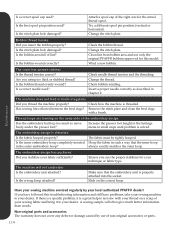
...bobbin wound correctly? Change the stitch plate. Wind a new bobbin. The seam has uneven stitches Is the thread tension correct? Check needle thread tension and the threading. The machine does not feed or feeds irregularly Did you stabilize your fabric sufficiently? ...correctly as described in the outer embroidery hoop? Is the inner embroidery hoop completely inserted in chapter 2. Maintenance Have your local authorized PFAFF® dealer! Non-original parts and accessories The warranty does not cover any defect or damage caused by your sewing machine serviced...
...bobbin wound correctly? Change the stitch plate. Wind a new bobbin. The seam has uneven stitches Is the thread tension correct? Check needle thread tension and the threading. The machine does not feed or feeds irregularly Did you stabilize your fabric sufficiently? ...correctly as described in the outer embroidery hoop? Is the inner embroidery hoop completely inserted in chapter 2. Maintenance Have your local authorized PFAFF® dealer! Non-original parts and accessories The warranty does not cover any defect or damage caused by your sewing machine serviced...
Owner's Manual
Page 138
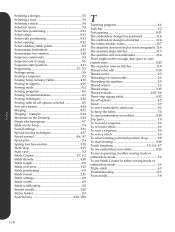
... The seam has uneven stitches 11:4 Thread color edit 8:10 Thread cutter 2:3 Threading for twin needle 2:6 Threading the machine 2:5 Thread sensor 2:6 Thread snips 2:15 Thread tension 4:10, 9:4 Three-step zigzag stitch 4:12 Tie-off options 4:5 Timer 3:9 To enter embroidery stitch-out 9:2 To hoop the fabric 7:4 To open embroidery text editor 8:20...
... The seam has uneven stitches 11:4 Thread color edit 8:10 Thread cutter 2:3 Threading for twin needle 2:6 Threading the machine 2:5 Thread sensor 2:6 Thread snips 2:15 Thread tension 4:10, 9:4 Three-step zigzag stitch 4:12 Tie-off options 4:5 Timer 3:9 To enter embroidery stitch-out 9:2 To hoop the fabric 7:4 To open embroidery text editor 8:20...

