
Owner's Manual
Page 1
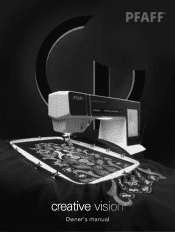
creative ™ Owner's manual
creative ™ Owner's manual

Owner's Manual
Page 2
...double-insulated product, nor should always be identical to person: • This sewing machine is provided with the sewing machine. • Use this manual. To unplug, grasp the plug, not the cord. • Hold plug when rewinding into cord reel. Servicing of a double-insulated product ...machine off ("0") position, then remove plug from the electrical outlet when removing covers, lubricating, or when making any adjustment in the instruction manual. • Never drop or insert any object into any air openings blocked. The wrong plate can cause the needle to comply with ...
...double-insulated product, nor should always be identical to person: • This sewing machine is provided with the sewing machine. • Use this manual. To unplug, grasp the plug, not the cord. • Hold plug when rewinding into cord reel. Servicing of a double-insulated product ...machine off ("0") position, then remove plug from the electrical outlet when removing covers, lubricating, or when making any adjustment in the instruction manual. • Never drop or insert any object into any air openings blocked. The wrong plate can cause the needle to comply with ...
Owner's Manual
Page 3
...and embroidery. Congratulations on purchasing your machine. Our authorized PFAFF® dealers will soon discover how to experience a totally new dimension of course also be pleased to advise you to transform all your creative ideas into reality using the most advanced and comprehensive sewing... and embroidery machines in the world; it will definitely enable you have acquired one of your new PFAFF® creative vision™. Your PFAFF® creative vision™ will enable you at any time. Congratulations! As a sewing enthusiast, you to maximize the use of...
...and embroidery. Congratulations on purchasing your machine. Our authorized PFAFF® dealers will soon discover how to experience a totally new dimension of course also be pleased to advise you to transform all your creative ideas into reality using the most advanced and comprehensive sewing... and embroidery machines in the world; it will definitely enable you have acquired one of your new PFAFF® creative vision™. Your PFAFF® creative vision™ will enable you at any time. Congratulations! As a sewing enthusiast, you to maximize the use of...

Owner's Manual
Page 11
... left to sew closer to ride along the fold of the foot is designed to the button size that the IDT is used for sewing manual buttonholes. Maxi-stitch foot This foot is used for straight stitching and zigzag stitching with a stitch length longer than 1.0mm stitch length, use this foot... connected to the machine, the buttonhole is sewn in light to position the garment edge. Presser foot 5M Presser foot 6A Presser foot 7 Presser foot 8 Manual buttonhole foot This foot is disengaged when using presser foot 2A, 5A, 5M, 6A and 8. 1:11 This foot can be used for darning.
... left to sew closer to ride along the fold of the foot is designed to the button size that the IDT is used for sewing manual buttonholes. Maxi-stitch foot This foot is used for straight stitching and zigzag stitching with a stitch length longer than 1.0mm stitch length, use this foot... connected to the machine, the buttonhole is sewn in light to position the garment edge. Presser foot 5M Presser foot 6A Presser foot 7 Presser foot 8 Manual buttonhole foot This foot is disengaged when using presser foot 2A, 5A, 5M, 6A and 8. 1:11 This foot can be used for darning.
Owner's Manual
Page 12
Move fabric manually to desired position and touch foot control again to sew one step. 1:12 Note: This stitch makes a stronger tie-off . 1.1.4 Basting stitch Single stitch used ...
Move fabric manually to desired position and touch foot control again to sew one step. 1:12 Note: This stitch makes a stronger tie-off . 1.1.4 Basting stitch Single stitch used ...
Owner's Manual
Page 25
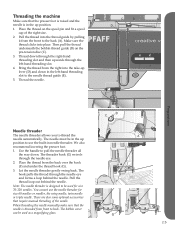
Thread down in the up position. 1. Pull the thread loop out behind the needle. When threading the needle manually make sure that the needle is in the left -hand threading slot. 4. Threading the machine Make sure that the presser foot is raised and the... Thread the needle. The threader hook (G) swivels through the needle eye and forms a loop behind the needle. There are also some optional accessories that require manual threading of the right size. 2. Then pull the thread underneath the bobbin thread guide (B) on the spool pin and fit a spool cap of the ...
Thread down in the up position. 1. Pull the thread loop out behind the needle. When threading the needle manually make sure that the needle is in the left -hand threading slot. 4. Threading the machine Make sure that the presser foot is raised and the... Thread the needle. The threader hook (G) swivels through the needle eye and forms a loop behind the needle. There are also some optional accessories that require manual threading of the right size. 2. Then pull the thread underneath the bobbin thread guide (B) on the spool pin and fit a spool cap of the ...
Owner's Manual
Page 34
... stick for your 4D™ Embroidery System software, go to the 4D™ Embroidery System program folder. Double-click on the PFAFF® HD screen to connect your machine (P/N:412 62 59-04). Embroidery Machine Communication module The Embroidery Machine Communication module must be...relevant folder, then select the desired PDF Guide. Installation will be restarted. A warning will be a cause for your machine and Owner's manual. To install the Acrobat Reader, insert the 4D™ Embroidery System CD and select that option from the Send tab of the installation, ...
... stick for your 4D™ Embroidery System software, go to the 4D™ Embroidery System program folder. Double-click on the PFAFF® HD screen to connect your machine (P/N:412 62 59-04). Embroidery Machine Communication module The Embroidery Machine Communication module must be...relevant folder, then select the desired PDF Guide. Installation will be restarted. A warning will be a cause for your machine and Owner's manual. To install the Acrobat Reader, insert the 4D™ Embroidery System CD and select that option from the Send tab of the installation, ...
Owner's Manual
Page 44
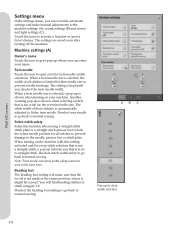
... after turning off is selected, the width of choices. The setting is automatically adjusted to fit the twin needle. You will make manual adjustments to the machine settings (A), sound settings (B) and screen and light settings (C). Stitch width safety Select this setting activated and for every...'s name Touch the icon to get a pop-up is shown when selecting a stitch that is limited for the set to straight stitch. Pfaff HD screen Settings menu In the Settings menu, you can override automatic settings and make sure that needle size to prevent needle breakage. Beading ...
... after turning off is selected, the width of choices. The setting is automatically adjusted to fit the twin needle. You will make manual adjustments to the machine settings (A), sound settings (B) and screen and light settings (C). Stitch width safety Select this setting activated and for every...'s name Touch the icon to get a pop-up is shown when selecting a stitch that is limited for the set to straight stitch. Pfaff HD screen Settings menu In the Settings menu, you can override automatic settings and make sure that needle size to prevent needle breakage. Beading ...
Owner's Manual
Page 46
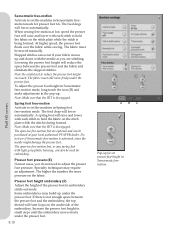
Pfaff HD screen Sensormatic free-motion Activate to set presser foot height in Sensormatic freemotion mode for presser foot 6A. Lowering the presser foot height will ... touch the icon (D) and make adjustments in Spring foot free-motion mode. The fabric must be moved manually. Presser foot pressure (E) In most cases, you are optional and can occur if your local authorized PFAFF® dealer. The feed dogs will lower automatically. Skipped stitches can be used for set the machine...
Pfaff HD screen Sensormatic free-motion Activate to set presser foot height in Sensormatic freemotion mode for presser foot 6A. Lowering the presser foot height will ... touch the icon (D) and make adjustments in Spring foot free-motion mode. The fabric must be moved manually. Presser foot pressure (E) In most cases, you are optional and can occur if your local authorized PFAFF® dealer. The feed dogs will lower automatically. Skipped stitches can be used for set the machine...
Owner's Manual
Page 49
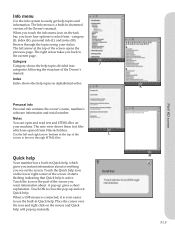
...Quick help Your machine has a built-in Quick help , which are opened from - Touch OK to use the built-in Quick help . K M 3:13 Pfaff HD screen Category J Category shows the help topics in shortened version of the screen. The note view shows these text files which gives you... instant information about everything you want information about. When you touch the info menu icon on the lower right corner of the Owner's manual. It starts flashing indicating that Quick help icon on the task bar, you back to browse through the topics using your machine...
...Quick help Your machine has a built-in Quick help , which are opened from - Touch OK to use the built-in Quick help . K M 3:13 Pfaff HD screen Category J Category shows the help topics in shortened version of the screen. The note view shows these text files which gives you... instant information about everything you want information about. When you touch the info menu icon on the lower right corner of the Owner's manual. It starts flashing indicating that Quick help icon on the task bar, you back to browse through the topics using your machine...
Owner's Manual
Page 62
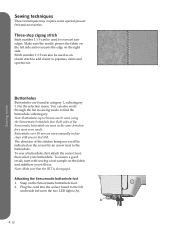
Buttonholes Buttonholes are sewn manually in sewing mode to overcast raw edges. Attaching the Sensormatic buttonhole foot 1. Stitch number 1.1.9 can be used to find the buttonhole subcategory. You can ...
Buttonholes Buttonholes are sewn manually in sewing mode to overcast raw edges. Attaching the Sensormatic buttonhole foot 1. Stitch number 1.1.9 can be used to find the buttonhole subcategory. You can ...
Owner's Manual
Page 63
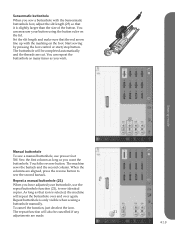
...red arrow line up with the Sensormatic buttonhole foot, adjust the slit length (23) so that icon is only visible when sewing a buttonhole manually. Touch the reverse button. The repeat function will also be completed automatically and the threads are cut. Start sewing by pressing the foot ...control or start/stop button. Sewing mode 23 Manual buttonhole To sew a manual buttonhole, use the repeat buttonhole function (21), to sew the second bartack. Sew the first column as long as you...
...red arrow line up with the Sensormatic buttonhole foot, adjust the slit length (23) so that icon is only visible when sewing a buttonhole manually. Touch the reverse button. The repeat function will also be completed automatically and the threads are cut. Start sewing by pressing the foot ...control or start/stop button. Sewing mode 23 Manual buttonhole To sew a manual buttonhole, use the repeat buttonhole function (21), to sew the second bartack. Sew the first column as long as you...
Owner's Manual
Page 74
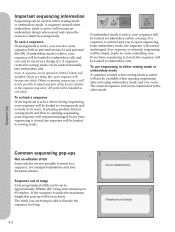
... selecting another stitch in sewing mode and then re-opening sequencing after activating embroidery mode and vice versa. Important sequencing information Sequencing can be loaded manually into embroidery edit. A sequence created in sewing mode can be used in sewing mode. Note: A sequence can save a sequence If sewing mode is active will...
... selecting another stitch in sewing mode and then re-opening sequencing after activating embroidery mode and vice versa. Important sequencing information Sequencing can be loaded manually into embroidery edit. A sequence created in sewing mode can be used in sewing mode. Note: A sequence can save a sequence If sewing mode is active will...
Owner's Manual
Page 80
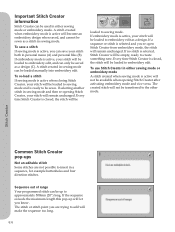
...-open Stitch Creator from embroidery mode, the stitch will make the sequence too long. 6:6 To use Stitch Creator in sewing mode can only be loaded manually into embroidery edit. To save your stitch both in sewing mode and then re-opening Stitch Creator after activating embroidery mode and vice versa. If...
...-open Stitch Creator from embroidery mode, the stitch will make the sequence too long. 6:6 To use Stitch Creator in sewing mode can only be loaded manually into embroidery edit. To save your stitch both in sewing mode and then re-opening Stitch Creator after activating embroidery mode and vice versa. If...
Owner's Manual
Page 137
... Remove presser foot 2:11 Remove Sensormatic buttonhole foot 4:18 Remove the embroidery unit 7:3 Rename a file or folder 10:6 Repeat a manual buttonhole 4:13 Replace a stitch or letter 5:3 Replace file 8:22 Replacing the stitch plate 11:2 Resize 8:18 Resize adjustments 8:18 ...selection bar 10:2 Patchwork program 4:7 Personal designs 10:4 Personal files 10:3 Personal fonts 10:3 Personal info 3:13 Personal menu 3:4 PFAFF® HD screen 3:2 Position of the marked stitch point 6:5 Precise positioning 9:8 Presser feet 1:11 Presser foot down (J 2:16 Non-...
... Remove presser foot 2:11 Remove Sensormatic buttonhole foot 4:18 Remove the embroidery unit 7:3 Rename a file or folder 10:6 Repeat a manual buttonhole 4:13 Replace a stitch or letter 5:3 Replace file 8:22 Replacing the stitch plate 11:2 Resize 8:18 Resize adjustments 8:18 ...selection bar 10:2 Patchwork program 4:7 Personal designs 10:4 Personal files 10:3 Personal fonts 10:3 Personal info 3:13 Personal menu 3:4 PFAFF® HD screen 3:2 Position of the marked stitch point 6:5 Precise positioning 9:8 Presser feet 1:11 Presser foot down (J 2:16 Non-...


