
Owner's Manual
Page 3
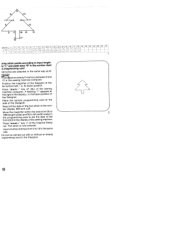
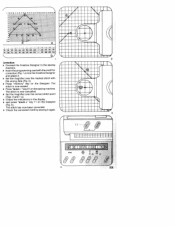
... stitch points marked out in the P memories of the sewing machine com puter. The motifs are 16 programming memo ries available from the Pfaff dealer against charge. 1 Altogether you can be obtained from P 0 to the equipment of 999 stitches. The Creative Designer is used for sewing whenever required. This appliance is provided with..." key (me m +) 12 Clip slide, left The top illustration shows how the unit is stored on the rear side of the car rying case. 4 Creative designer The Creative Designer belongs to P 15, each of which holds a maximum of the Pfaff Creative 1473 CD.
... stitch points marked out in the P memories of the sewing machine com puter. The motifs are 16 programming memo ries available from the Pfaff dealer against charge. 1 Altogether you can be obtained from P 0 to the equipment of 999 stitches. The Creative Designer is used for sewing whenever required. This appliance is provided with..." key (me m +) 12 Clip slide, left The top illustration shows how the unit is stored on the rear side of the car rying case. 4 Creative designer The Creative Designer belongs to P 15, each of which holds a maximum of the Pfaff Creative 1473 CD.
Owner's Manual
Page 11
... or near a heater, stove, etc. • Do not place any objects on or in the Designer. • If something goes wrong with the Designer it is automatically register ed by the manufacturer. • After using the Creative Designer • always first insert the connection lead in the correct position. When you align the control...-cross magnifier is important to the right and close cover 2, For this reason, whenever you select a P-memory between 0 and 15 be repaired by the sewing machine compu ter as basic position B00/L00.
... or near a heater, stove, etc. • Do not place any objects on or in the Designer. • If something goes wrong with the Designer it is automatically register ed by the manufacturer. • After using the Creative Designer • always first insert the connection lead in the correct position. When you align the control...-cross magnifier is important to the right and close cover 2, For this reason, whenever you select a P-memory between 0 and 15 be repaired by the sewing machine compu ter as basic position B00/L00.
Owner's Manual
Page 19
nn V \f IvI L_Li_I_______ 6 1 L___ p___..J PFAFF I N Checking Push the magnifier back to the left datum point 00 and check that the red horizontal line of the sewing machine. 17 press 'rn em -" key 47 of magnifier 6 is in line with datum line 00 (adjust, if necessary). With the magnifier fully to the bottom left .
nn V \f IvI L_Li_I_______ 6 1 L___ p___..J PFAFF I N Checking Push the magnifier back to the left datum point 00 and check that the red horizontal line of the sewing machine. 17 press 'rn em -" key 47 of magnifier 6 is in line with datum line 00 (adjust, if necessary). With the magnifier fully to the bottom left .
Owner's Manual
Page 20
...• enter it by pressing "mem+" key 11 of the Creative Designer once (Fig. 3). • Input all of the other stitch points from 2 to be input is indicated at the right of the Designer is made, the display of the sewing machine connection. When the entry is pressed the display moves forward by... next stitch to 18 one by one in the same way. • Press "memory" key 30 of the sewing machine (Fig. 3). • Pull the plug of the Creative Designer out of the sewing machine shows the following: The co'ordinates, width data B and length data L, for each recorded stitch point. - The ...
...• enter it by pressing "mem+" key 11 of the Creative Designer once (Fig. 3). • Input all of the other stitch points from 2 to be input is indicated at the right of the Designer is made, the display of the sewing machine connection. When the entry is pressed the display moves forward by... next stitch to 18 one by one in the same way. • Press "memory" key 30 of the sewing machine (Fig. 3). • Pull the plug of the Creative Designer out of the sewing machine shows the following: The co'ordinates, width data B and length data L, for each recorded stitch point. - The ...
Owner's Manual
Page 22
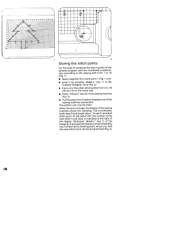
..., i. its basic position. /\ Press "mem-' key 47 (BL) of the Designer. I Move the magnifier within the area from 2 to 18 in the same way. e. A flashing 1" appears at the far bottom left, i. Read off the data of the Creative Desig ner. Press "m em +" key 11 of the first stitch in the... set the data of the first stitch in the display of the sewing machine. st'tect an empty P-memory between 0 and 15 in the programming area to input length- - Place the sample programming card at the side of the Designer. e. Input all other stitches from 00 to 2 198 (length scale)...
..., i. its basic position. /\ Press "mem-' key 47 (BL) of the Designer. I Move the magnifier within the area from 2 to 18 in the same way. e. A flashing 1" appears at the far bottom left, i. Read off the data of the Creative Desig ner. Press "m em +" key 11 of the first stitch in the... set the data of the first stitch in the display of the sewing machine. st'tect an empty P-memory between 0 and 15 in the programming area to input length- - Place the sample programming card at the side of the Designer. e. Input all other stitches from 00 to 2 198 (length scale)...
Owner's Manual
Page 23
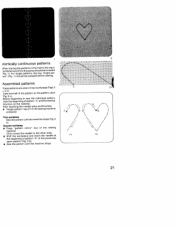
... beginning of pattern "A" and the sewing Jirection on the pattern chart :Fig. 2 C). Second workstep S Press "pattern mirror" key of the sewing machine (This moves the needle to the other side). • Shift the workpiece and insert the needle at the beginning of pattern "A" of the previously ...sewn pattern (Fig. 2 b). • Sew the pattern until the machine stops (Fig. 2 a). rff ,o1 WL L ssembIed patterns rhese patterns are sewn in the matrix the requi ed distances of 5 to 8 squares should ...
... beginning of pattern "A" and the sewing Jirection on the pattern chart :Fig. 2 C). Second workstep S Press "pattern mirror" key of the sewing machine (This moves the needle to the other side). • Shift the workpiece and insert the needle at the beginning of pattern "A" of the previously ...sewn pattern (Fig. 2 b). • Sew the pattern until the machine stops (Fig. 2 a). rff ,o1 WL L ssembIed patterns rhese patterns are sewn in the matrix the requi ed distances of 5 to 8 squares should ...
Owner's Manual
Page 24
...memory. You now have two pattern halves, 2 a +2 b. Enter each part 2 a +2 b of the previously sewn pattern. • Sew the pattern until the machine stops. After inputting the needle entry points • Press "single pattern" key 27 of them. Preparation of the matrix Stick two matrices (Fig. 1) one below... the other and draw your pattern over both of the sewing machine First workstep • Select the first P-memory • Sew the pattern until the machine stops. These pat terns are sewn in two P-memories Fig. 3 shows a joined pattern, 18 mm...
...memory. You now have two pattern halves, 2 a +2 b. Enter each part 2 a +2 b of the previously sewn pattern. • Sew the pattern until the machine stops. After inputting the needle entry points • Press "single pattern" key 27 of them. Preparation of the matrix Stick two matrices (Fig. 1) one below... the other and draw your pattern over both of the sewing machine First workstep • Select the first P-memory • Sew the pattern until the machine stops. These pat terns are sewn in two P-memories Fig. 3 shows a joined pattern, 18 mm...
Owner's Manual
Page 29
Input the stitch points in different pattern widths (Figs. 1 and 2) put the P-memory into an M memory. For continuous sewing in the sewing machine. Example: • Select a free M-memory • Push "mem+" key48 • Select the P-memory with consistent left edge: • the right outer stitch point must lie ...
Input the stitch points in different pattern widths (Figs. 1 and 2) put the P-memory into an M memory. For continuous sewing in the sewing machine. Example: • Select a free M-memory • Push "mem+" key48 • Select the P-memory with consistent left edge: • the right outer stitch point must lie ...
Owner's Manual
Page 30
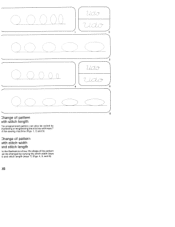
\, 2 3 5 6 Dhange of pattern with stitch length The programmed pattern can also be changed by hortening or lengthening the stitches with stitch width nd stitch length \s the illustrations show, the shape of pattern with keys 7 )f the sewing machine (Figs. 1 2 and 3). Dhange of the pattern an be varied by varying the stitch width (keys ) and stitch length (keys 7) (Figs. 4, 5, and 6).
\, 2 3 5 6 Dhange of pattern with stitch length The programmed pattern can also be changed by hortening or lengthening the stitches with stitch width nd stitch length \s the illustrations show, the shape of pattern with keys 7 )f the sewing machine (Figs. 1 2 and 3). Dhange of the pattern an be varied by varying the stitch width (keys ) and stitch length (keys 7) (Figs. 4, 5, and 6).
Owner's Manual
Page 32
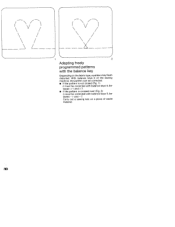
(v) H / 2 Adapting freely programmed patterns with balance keys 5, be tween - 1 and -7. Carry out a sewing test on the fabric type, a pattern may finish distorted. With balance keys 5 of the sewing machine, the pattern can be corrected. • If the pattern is not closed (Fig. 1) it must be corrected with balance keys 5, be tween + 1 and + 7. • If the pattern is crossed over (Fig. 2) it must be corrected with the balance key Depending on a piece of waste material.
(v) H / 2 Adapting freely programmed patterns with balance keys 5, be tween - 1 and -7. Carry out a sewing test on the fabric type, a pattern may finish distorted. With balance keys 5 of the sewing machine, the pattern can be corrected. • If the pattern is not closed (Fig. 1) it must be corrected with balance keys 5, be tween + 1 and + 7. • If the pattern is crossed over (Fig. 2) it must be corrected with the balance key Depending on a piece of waste material.
Owner's Manual
Page 33
... the requi red stitch width. Important: If you wish to sew your entered program consecu tively with keys 8. • Sew the modified pattern until the machine stops (Fig. 2). The display shows the maximum stitch width and stitch length. • Press the "single p1 ' attern key. • Sew the first pattern until.... • Alter the stitch width to a pattern width of 4.5 mm with keys 8. • Sew the modified pattern until the machine stops. • Alter the stitch width to a pattern width of a consecutive pat tern in centre position, your drawing in the matrix must touch lines 00 ...
... the requi red stitch width. Important: If you wish to sew your entered program consecu tively with keys 8. • Sew the modified pattern until the machine stops (Fig. 2). The display shows the maximum stitch width and stitch length. • Press the "single p1 ' attern key. • Sew the first pattern until.... • Alter the stitch width to a pattern width of 4.5 mm with keys 8. • Sew the modified pattern until the machine stops. • Alter the stitch width to a pattern width of a consecutive pat tern in centre position, your drawing in the matrix must touch lines 00 ...
Owner's Manual
Page 34
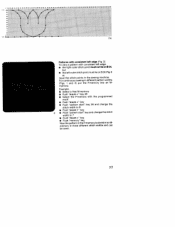
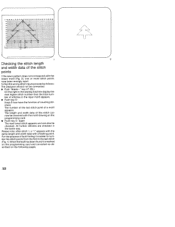
... on the programming card. • Push key 5- When the fault has been found it is marked on the programming card and corrected as follows: The Designer should not be checked with the motif drawing on the following pages. i. E + z_. 1 2 Checking the stitch length and width data of fault finding it is... easier to num ber the stitch points from the first to the last stitch (Fig. 1). On the right in the sewing machine display the next higher stitch number than the total num ber of stitches in the same way.
... on the programming card. • Push key 5- When the fault has been found it is marked on the programming card and corrected as follows: The Designer should not be checked with the motif drawing on the following pages. i. E + z_. 1 2 Checking the stitch length and width data of fault finding it is... easier to num ber the stitch points from the first to the last stitch (Fig. 1). On the right in the sewing machine display the next higher stitch number than the total num ber of stitches in the same way.
Owner's Manual
Page 35
...04 2 6 20 24 0832 36 40 44 46 52 58 5 04 86 72 Boo 18 a 1O]öj5O4O6pJj4 2 orrection: / Connect the Creative Designer to the sewing machine. Insert the programming card with the wrong data (Fig. 2). Set the magnifier over the correct stitch point (Figs. 3 and 1 a>. c 3 ...4 Check the indications in the display I Check the corrected motif by sewing it . I and press 'mem+" key 11 on the Designer. "key 47 on the sewing machine. Set the magnifier over the marked stitch with the motif for correction (Fig. 1 a) into the Creative Designer and adjust it again.
...04 2 6 20 24 0832 36 40 44 46 52 58 5 04 86 72 Boo 18 a 1O]öj5O4O6pJj4 2 orrection: / Connect the Creative Designer to the sewing machine. Insert the programming card with the wrong data (Fig. 2). Set the magnifier over the correct stitch point (Figs. 3 and 1 a>. c 3 ...4 Check the indications in the display I Check the corrected motif by sewing it . I and press 'mem+" key 11 on the Designer. "key 47 on the sewing machine. Set the magnifier over the marked stitch with the motif for correction (Fig. 1 a) into the Creative Designer and adjust it again.
Owner's Manual
Page 36
...wish to set stitches at the beginning of stitches you wish to insert a stitch, e.g. Adding on: • Connect the Creative Designer. • Push "mem-" key 47 BL on the sewing machine. Input the stitches required. All further stitches move up by pressing the memory key on the..." key again. If the cancelled P-memory is now empty. Inserting and adding on stitches Inserting: • Connect the Creative Designer. • Push "mem-" key 47 BL on the sewing machine. If you select stitch 10 with a flashing point. Cancelling stitches see "correction", page 33 To cancel an entire ...
...wish to set stitches at the beginning of stitches you wish to insert a stitch, e.g. Adding on: • Connect the Creative Designer. • Push "mem-" key 47 BL on the sewing machine. Input the stitches required. All further stitches move up by pressing the memory key on the..." key again. If the cancelled P-memory is now empty. Inserting and adding on stitches Inserting: • Connect the Creative Designer. • Push "mem-" key 47 BL on the sewing machine. If you select stitch 10 with a flashing point. Cancelling stitches see "correction", page 33 To cancel an entire ...
Owner's Manual
Page 47
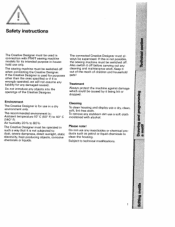
... ones specified or if it off when connecting the Creative Designer. To remove any stubborn dirt use a soft cloth moistened with PFAFF sewing machine models for any damaged caused. Safety instructions I a, C E E a V C 0 a, E a, C 11 Treatment Always protect the machine against damage which could be supervised. Subject to 80% The Creative Designer must be operated in a dry environ ment only...
... ones specified or if it off when connecting the Creative Designer. To remove any stubborn dirt use a soft cloth moistened with PFAFF sewing machine models for any damaged caused. Safety instructions I a, C E E a V C 0 a, E a, C 11 Treatment Always protect the machine against damage which could be supervised. Subject to 80% The Creative Designer must be operated in a dry environ ment only...
Owner's Manual
Page 59
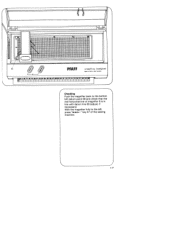
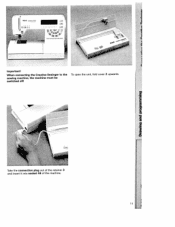
I I PAF 7570 -- - I Take the connection plug out of the retainer 3 and insert it into socket 46 of the machine. I 11 When connecting the Creative Desinger to the sewing machine, the machine must be switched off! To open the unit, fold cover 2 upwards. C Important!
I I PAF 7570 -- - I Take the connection plug out of the retainer 3 and insert it into socket 46 of the machine. I 11 When connecting the Creative Desinger to the sewing machine, the machine must be switched off! To open the unit, fold cover 2 upwards. C Important!
Owner's Manual
Page 71
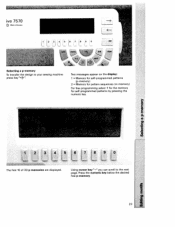
lye 7570 o Gemny -> 1 2 3 4 :5 6 7 B 9 0 esc Selecting a p-memory To transfer the design to the next page. Using cursor key "-*" you can scroll to your sewing machine press key"m" Two messages appear on the display: 1 = Memory for self-programmed patterns (p-memory) 2 = Memory for pattern sequences (rn-memory) For free programming select 1 for the memory for self-programmed patterns by pressing the numeric key. I 23 Press the numeric key below the desired free p-memory. I j7 1' 2 3 45 j6 B 9o t The first 10 of 30 p-memories are displayed.
lye 7570 o Gemny -> 1 2 3 4 :5 6 7 B 9 0 esc Selecting a p-memory To transfer the design to the next page. Using cursor key "-*" you can scroll to your sewing machine press key"m" Two messages appear on the display: 1 = Memory for self-programmed patterns (p-memory) 2 = Memory for pattern sequences (rn-memory) For free programming select 1 for the memory for self-programmed patterns by pressing the numeric key. I 23 Press the numeric key below the desired free p-memory. I j7 1' 2 3 45 j6 B 9o t The first 10 of 30 p-memories are displayed.
Owner's Manual
Page 76
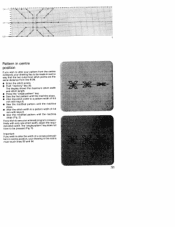
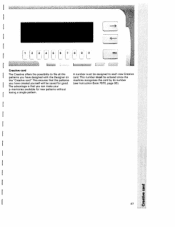
...:IrfIfjIt I:: iI I jH - -r - ttt rft j Pattern combinations p-memories in two or more etDomIotaregcoicmsherietdpohieortnehesdruasippnivabroinodlondegunaratdealonrmapdpdw-rmemomsigyienargomrgaunkmorsawrhmdyeiepidesfnaeoittggrstrenpts(rhihnanoeetntseoemttutra.hnorrestteif"xgb.AaryTi"mdauf.pposelirentgw4)o Ensure that the in our machine only example from has top to to sew 28 sewing (in one direction bottom). t1 Ii f-_lt4 It f fH t 4 4 H-f -H - 4 + 14 t±W I f4fIUI t 11...
...:IrfIfjIt I:: iI I jH - -r - ttt rft j Pattern combinations p-memories in two or more etDomIotaregcoicmsherietdpohieortnehesdruasippnivabroinodlondegunaratdealonrmapdpdw-rmemomsigyienargomrgaunkmorsawrhmdyeiepidesfnaeoittggrstrenpts(rhihnanoeetntseoemttutra.hnorrestteif"xgb.AaryTi"mdauf.pposelirentgw4)o Ensure that the in our machine only example from has top to to sew 28 sewing (in one direction bottom). t1 Ii f-_lt4 It f fH t 4 4 H-f -H - 4 + 14 t±W I f4fIUI t 11...
Owner's Manual
Page 94
->
->
Owner's Manual
Page 95


