
Owner's Manual
Page 3
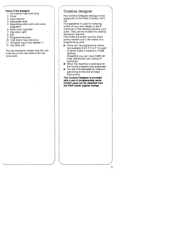
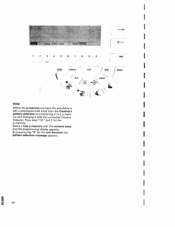
...P memories. • When the machine is switched off, the stored programs are 16 programming memo ries available from the Pfaff dealer against charge. 1 The Creative Designer is provided with wire-cross magnifier) 6 Wire-cross magnifier 7 Clip slide, right 8 Slot 9 Programming area 10 Call... these instructions. Parts of the Designer 1 Connection lead with plug 2 Cover 3 Lead retainer 4 Adjustable slide 5 Magnifying slide (with a pad of programming cards. This appliance is stored on the rear side of the car rying case. 4 Creative designer The Creative Designer belongs to P 15, each ...
...P memories. • When the machine is switched off, the stored programs are 16 programming memo ries available from the Pfaff dealer against charge. 1 The Creative Designer is provided with wire-cross magnifier) 6 Wire-cross magnifier 7 Clip slide, right 8 Slot 9 Programming area 10 Call... these instructions. Parts of the Designer 1 Connection lead with plug 2 Cover 3 Lead retainer 4 Adjustable slide 5 Magnifying slide (with a pad of programming cards. This appliance is stored on the rear side of the car rying case. 4 Creative designer The Creative Designer belongs to P 15, each ...
Owner's Manual
Page 20
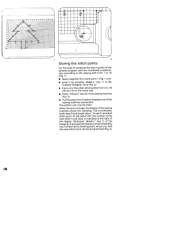
...18 one by one in the same way. • Press "memory" key 30 of the sewing machine (Fig. 3). • Pull the plug of the Creative Designer out of the display. Whenever "mem+" key 11 of the sewing machine shows the following: The co'ordinates, width data B and length data L, for each... sake of simplicity the stitch points of the sample program card are numbered consecuti vely according to the sewing path from 1 to 18 (Fig. 1). • Move magnifier 6 to stitch point 1 (Fig. 1) and • enter it by pressing "mem+" key 11 of the Creative Designer once (Fig. 3). • Input all of the ...
...18 one by one in the same way. • Press "memory" key 30 of the sewing machine (Fig. 3). • Pull the plug of the Creative Designer out of the display. Whenever "mem+" key 11 of the sewing machine shows the following: The co'ordinates, width data B and length data L, for each... sake of simplicity the stitch points of the sample program card are numbered consecuti vely according to the sewing path from 1 to 18 (Fig. 1). • Move magnifier 6 to stitch point 1 (Fig. 1) and • enter it by pressing "mem+" key 11 of the Creative Designer once (Fig. 3). • Input all of the ...
Owner's Manual
Page 22
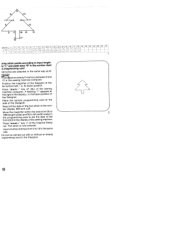
ta "L" and width data "B" in the number chart a programming card nemories are selected in the display of the sewing machine. the basic position of the Creative Desig ner. Press "m em +" key 11 of the Designer. I Move the magnifier within the area from 2 to 18 in the sewing machine ... same way. e. e. his can be carried out with or without an empty rogramming card in the display, i. A flashing 1" appears at the right in the Designer. Position the magnifier of the Designer at the side of the Designer. 7 L Zi L L' ,ring stitch points according to set the data of the...
ta "L" and width data "B" in the number chart a programming card nemories are selected in the display of the sewing machine. the basic position of the Creative Desig ner. Press "m em +" key 11 of the Designer. I Move the magnifier within the area from 2 to 18 in the sewing machine ... same way. e. e. his can be carried out with or without an empty rogramming card in the display, i. A flashing 1" appears at the right in the Designer. Position the magnifier of the Designer at the side of the Designer. 7 L Zi L L' ,ring stitch points according to set the data of the...
Owner's Manual
Page 35
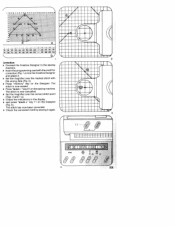
... 40 44 46 52 58 5 04 86 72 Boo 18 a 1O]öj5O4O6pJj4 2 orrection: / Connect the Creative Designer to the sewing machine. Set the magnifier over the correct stitch point (Figs. 3 and 1 a>. "key 47 on the Designer (Fig. 4). The stitch has now been corrected. i Press 'rn em - I and press 'mem+" key 11 on... now cancelled. The stitch is now erased. Check the indications in the display I Check the corrected motif by sewing it . c 3 4 Press 'memory" key on the Designer. Insert the programming card with the wrong data (Fig. 2).
... 40 44 46 52 58 5 04 86 72 Boo 18 a 1O]öj5O4O6pJj4 2 orrection: / Connect the Creative Designer to the sewing machine. Set the magnifier over the correct stitch point (Figs. 3 and 1 a>. "key 47 on the Designer (Fig. 4). The stitch has now been corrected. i Press 'rn em - I and press 'mem+" key 11 on... now cancelled. The stitch is now erased. Check the indications in the display I Check the corrected motif by sewing it . c 3 4 Press 'memory" key on the Designer. Insert the programming card with the wrong data (Fig. 2).
Owner's Manual
Page 43
Contents Balance 10 Connecting the Creative Designer 10 Examples of Creative patterns 35 40 Important notes 0 Multiple stitch, searching 14 P-memories to M-memories, transferring 24 Parts of the Designer Pattern change by spacings 29 Pattern change ...21 Patterns, assembled, in two P-memories 22, 23 Patterns, drawing on the programming card 4 Patterns, vertical 21 Programming card 2, 3 Programming card, adjusting in Designer 1317 Programming card, inserting in Designer 12 Spacing between patterns 6, 7 Stitch length points, establishing 6 Stitch points, numbering...
Contents Balance 10 Connecting the Creative Designer 10 Examples of Creative patterns 35 40 Important notes 0 Multiple stitch, searching 14 P-memories to M-memories, transferring 24 Parts of the Designer Pattern change by spacings 29 Pattern change ...21 Patterns, assembled, in two P-memories 22, 23 Patterns, drawing on the programming card 4 Patterns, vertical 21 Programming card 2, 3 Programming card, adjusting in Designer 1317 Programming card, inserting in Designer 12 Spacing between patterns 6, 7 Stitch length points, establishing 6 Stitch points, numbering...
Owner's Manual
Page 51
... of a pattern Clearing the p-memory Connecting the Creative Designer Creative card Creative designer Deleting a pattern Deleting a p-pattern from the Creative card Deleting a stitch Drawing a motif Drawing and programming a motif Editing Editing a a Creative motif pattern in the p-memory (ROM) Editing ...out stitch points Inserting a stitch Inserting straight stitch (continuous pattern) Inserting the programming sheet Loading a p-pattern from the creative card "m+" key "m-"key "mem" symbol Moving a block Moving a stitch No function "num" function Pattern combinations Programming a ...
... of a pattern Clearing the p-memory Connecting the Creative Designer Creative card Creative designer Deleting a pattern Deleting a p-pattern from the Creative card Deleting a stitch Drawing a motif Drawing and programming a motif Editing Editing a a Creative motif pattern in the p-memory (ROM) Editing ...out stitch points Inserting a stitch Inserting straight stitch (continuous pattern) Inserting the programming sheet Loading a p-pattern from the creative card "m+" key "m-"key "mem" symbol Moving a block Moving a stitch No function "num" function Pattern combinations Programming a ...
Owner's Manual
Page 92
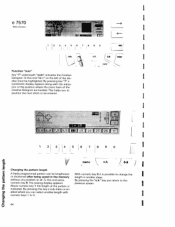
... this end "rn +" on the left of the pattern is possible to 0. o.L card 1. II Changing the pattern length A freely programmed pattern can select another length with the indica tion of the position where the cross hairs of the Creative Designer are located. without any problem at all. Above numeric key 1 the length of... I 8116.0117.5 li9 5 II 1115 1118 II 23 II 28 II + L I I 1 234 5 6 7 8 9 0 I ___ e 7570 Made n Germany -> 2 3, 4 5 6 7 8 9 0 eac info Function "num" Key "7" underneath "num" activates the Creative Designer. The sewing disp'ay appears.
... this end "rn +" on the left of the pattern is possible to 0. o.L card 1. II Changing the pattern length A freely programmed pattern can select another length with the indica tion of the position where the cross hairs of the Creative Designer are located. without any problem at all. Above numeric key 1 the length of... I 8116.0117.5 li9 5 II 1115 1118 II 23 II 28 II + L I I 1 234 5 6 7 8 9 0 I ___ e 7570 Made n Germany -> 2 3, 4 5 6 7 8 9 0 eac info Function "num" Key "7" underneath "num" activates the Creative Designer. The sewing disp'ay appears.
Owner's Manual
Page 95
Owner's Manual
Page 98
____ I 1 I
____ I 1 I


