
Owner's Manual
Page 20
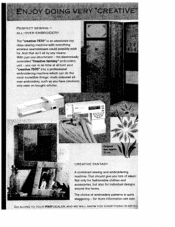
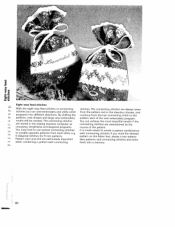
... information see over. for individual designs around the home. CREATIVE FANTASY A combined sewing and embroidering machine. The choice of ideas! GO ALONG TO YOUR PFAFF DEALER, AND WE WILL SHOW YOU EVERYTHING IN DE1A ALL-OVER EMBROIDERY The "creative 7570" is quite staggering - the electronically controlled "Creative fantasy" embroidery unit - With just one attachment - That should give you...
... information see over. for individual designs around the home. CREATIVE FANTASY A combined sewing and embroidering machine. The choice of ideas! GO ALONG TO YOUR PFAFF DEALER, AND WE WILL SHOW YOU EVERYTHING IN DE1A ALL-OVER EMBROIDERY The "creative 7570" is quite staggering - the electronically controlled "Creative fantasy" embroidery unit - With just one attachment - That should give you...
Owner's Manual
Page 22
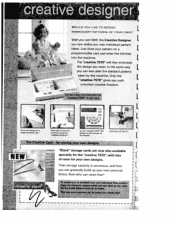
... the stitches into the machine using the 'creative designar... "creative 7570" gives you can also alter the standard patterns N sewn by the machine. then enter it ! and then just sew it into the machine. [ The "creative 7570" will then embroider the design you can claim that? I WyOu ab#5h y*ur ownuat filing system I unlimited creative freedom. EMBROIDERY PATTERNS OF YOUR...
... the stitches into the machine using the 'creative designar... "creative 7570" gives you can also alter the standard patterns N sewn by the machine. then enter it ! and then just sew it into the machine. [ The "creative 7570" will then embroider the design you can claim that? I WyOu ab#5h y*ur ownuat filing system I unlimited creative freedom. EMBROIDERY PATTERNS OF YOUR...
Owner's Manual
Page 48
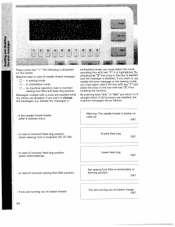
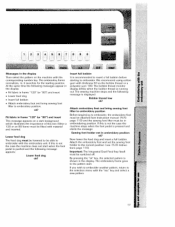
... If you must select the corre sponding box with key "2' thus enabling the function. Set sewing foot lifter at embroidery or darning position OK? I Li i1 Vi *H 8L ;8 7; no machine operation due to t[ straight stitch. Messages marked with a cross are enabled while the others are running out of ...deleted and the message is broken or used up. OK? b Press cursor key"-*The following is highlighted. It is displayed on the screen: Machine stop in embroidery mode, you wish to change the messages, e.g. By pressing keys "o.k." In case of bobbin thread: 44 Lower feed dog OK? In case...
... If you must select the corre sponding box with key "2' thus enabling the function. Set sewing foot lifter at embroidery or darning position OK? I Li i1 Vi *H 8L ;8 7; no machine operation due to t[ straight stitch. Messages marked with a cross are enabled while the others are running out of ...deleted and the message is broken or used up. OK? b Press cursor key"-*The following is highlighted. It is displayed on the screen: Machine stop in embroidery mode, you wish to change the messages, e.g. By pressing keys "o.k." In case of bobbin thread: 44 Lower feed dog OK? In case...
Owner's Manual
Page 61
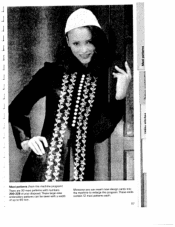
These cards contain 12 maxi patterns each. 57 These large-area embroidery patterns can insert maxi design cards into the machine to 60 mm. I I I I •1 ± Maxi patterns (from the machine program) There are 30 maxi patterns with a width of up to enlarge the program. Moreover you can be sewn with numbers 200-229 at your disposal.
These cards contain 12 maxi patterns each. 57 These large-area embroidery patterns can insert maxi design cards into the machine to 60 mm. I I I I •1 ± Maxi patterns (from the machine program) There are 30 maxi patterns with a width of up to enlarge the program. Moreover you can be sewn with numbers 200-229 at your disposal.
Owner's Manual
Page 90
... end are overstitched by the crosswise, lengthwise and diagonal programs. course of the next embroidery program. with connecting them into a memory. c. The connecting stitches You can sew embroidery and utility stitch from the pattern end in the sewing machine computer as connecting stitches are particularly important pattern on the fabric first, divide it...
... end are overstitched by the crosswise, lengthwise and diagonal programs. course of the next embroidery program. with connecting them into a memory. c. The connecting stitches You can sew embroidery and utility stitch from the pattern end in the sewing machine computer as connecting stitches are particularly important pattern on the fabric first, divide it...

Owner's Manual
Page 96
L->
L->

Owner's Manual
Page 147
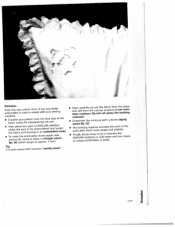
... foot Pintuck foot fj With this special foot for loop embroidery you can let the first one run parallel in one of the foot's grooves. This classical sewing technique can fit a "cording tongue" on the front edge of the machine carefully because if you pull too fast, you work from... two needles. • When using thicker threads you have finished, pull the work support, so that the spaces between the needle plate and the sewing machine provides space for a twin needle (1.6 or 2 • Insert the fringe foot. This ensures that it does not become tangled during sewing. • ...
... foot Pintuck foot fj With this special foot for loop embroidery you can let the first one run parallel in one of the foot's grooves. This classical sewing technique can fit a "cording tongue" on the front edge of the machine carefully because if you pull too fast, you work from... two needles. • When using thicker threads you have finished, pull the work support, so that the spaces between the needle plate and the sewing machine provides space for a twin needle (1.6 or 2 • Insert the fringe foot. This ensures that it does not become tangled during sewing. • ...
Owner's Manual
Page 179
... is artistic easy to do AVALON stabilizer in cold is dissolve water and the your sewing machine. • Tfarbarniscfeursyinogurthpeatdteirsnapopnetaoritnhge-ifnakcepesind.e of unique embroidery is even easier with function "needle down' • Ttthhhaeetinrwccialolrneffotuorlmulyrstch.ueDt ocouunttootuthtcesufatatbaarwbicoaufyrtotm2hemthbmeacafkrroeinamgs material! • Embroider the contours with and eyelet your piece of the • TtuhhneednefarpbtlrhaiecceaanrtwedaobtopaclibkeeisngeomfinAbVraoAniLdeOemrNebdsrtoaainbddielirtzyaeurhteonop. &#...
... is artistic easy to do AVALON stabilizer in cold is dissolve water and the your sewing machine. • Tfarbarniscfeursyinogurthpeatdteirsnapopnetaoritnhge-ifnakcepesind.e of unique embroidery is even easier with function "needle down' • Ttthhhaeetinrwccialolrneffotuorlmulyrstch.ueDt ocouunttootuthtcesufatatbaarwbicoaufyrtotm2hemthbmeacafkrroeinamgs material! • Embroider the contours with and eyelet your piece of the • TtuhhneednefarpbtlrhaiecceaanrtwedaobtopaclibkeeisngeomfinAbVraoAniLdeOemrNebdsrtoaainbddielirtzyaeurhteonop. &#...

Owner's Manual
Page 187
Parts of the "creative fantasy" embroidery unit: I I I I I I I I 3 Embroidery unit from front Large and small frame Embroidery unit from rear I 1 Metal track for attaching the frame 2 Release lever for removing the frame I 3 Connection bushing for the machine 4 Fastening spigot for connecting to the machine I 5 Guide strip for engaging the embroidery unit 6 Release lever for removing the embroidery unit 7 Engaging spigot I 8 2 engaging spigots 9 Retaining screw for attaching the fabric L L L L L
Parts of the "creative fantasy" embroidery unit: I I I I I I I I 3 Embroidery unit from front Large and small frame Embroidery unit from rear I 1 Metal track for attaching the frame 2 Release lever for removing the frame I 3 Connection bushing for the machine 4 Fastening spigot for connecting to the machine I 5 Guide strip for engaging the embroidery unit 6 Release lever for removing the embroidery unit 7 Engaging spigot I 8 2 engaging spigots 9 Retaining screw for attaching the fabric L L L L L

Owner's Manual
Page 188
... p 5. Severe stains Note: Never use can be switched off before connecting or releasing the 2. The sewing embroidery machine unit must be removed with alcohol or a dry, clean, paraffin. soft, lint-free cloth. Never transport the sewing machine with the EC-Directive No.: 89/336 EEC Handling: Take care to clean the appliance. Notes...
... p 5. Severe stains Note: Never use can be switched off before connecting or releasing the 2. The sewing embroidery machine unit must be removed with alcohol or a dry, clean, paraffin. soft, lint-free cloth. Never transport the sewing machine with the EC-Directive No.: 89/336 EEC Handling: Take care to clean the appliance. Notes...
Owner's Manual
Page 194
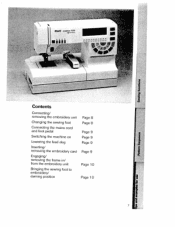
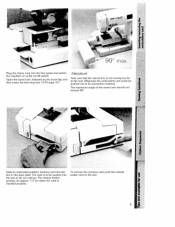
removing the embroidery card Engaging/ removing the frame in! darning Position Page 8 Page 8 Page 9 Page 9 Page 9 Page 9 Page 10 Page 10 7 from the embroidery unit Bringing the sewing foot to embroidery! I7 4 PEAFF creative 7570 jail r Contents Connectjng/ removing the embroidery unit Changing the sewing foot Connecting the mains cord and foot pedal Switching the machine on Lowering the feed dog Inserting!
removing the embroidery card Engaging/ removing the frame in! darning Position Page 8 Page 8 Page 9 Page 9 Page 9 Page 9 Page 10 Page 10 7 from the embroidery unit Bringing the sewing foot to embroidery! I7 4 PEAFF creative 7570 jail r Contents Connectjng/ removing the embroidery unit Changing the sewing foot Connecting the mains cord and foot pedal Switching the machine on Lowering the feed dog Inserting!
Owner's Manual
Page 195
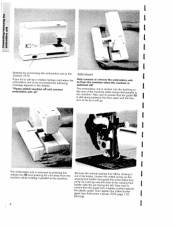
...I I I Bushing Creative for connecting 7570. L pcAFF I I I I I Tmrehaleecahesimenebkrewoyihd(i6eler)yahnuodnlditipnuigsshrietinmpgaorvtahelledelubtnyoitptharewesasmyinafgcrhotimhneet.he teahsoRhnesoueewsltfmduapioernrolferagvasiwestttfshiioctiaththohtgeowtttulihhhdnliledoeeorelgr.dgp.moeuiLTnariiohdlnafoeetasnosnecedfiwonttnhirgiggketnuhhgtiihetshdeoefenlmloiegotlitehhlhtoflteteelf.1ydeAtTmhmpsaeicukblblryessereheodwccewiladdisricoecneknrargiyetgnotwagfhfoioenoiotsttt again ok" Attention! the embroidery unit to the If you try to /from the machine when the machine is not...
...I I I Bushing Creative for connecting 7570. L pcAFF I I I I I Tmrehaleecahesimenebkrewoyihd(i6eler)yahnuodnlditipnuigsshrietinmpgaorvtahelledelubtnyoitptharewesasmyinafgcrhotimhneet.he teahsoRhnesoueewsltfmduapioernrolferagvasiwestttfshiioctiaththohtgeowtttulihhhdnliledoeeorelgr.dgp.moeuiLTnariiohdlnafoeetasnosnecedfiwonttnhirgiggketnuhhgtiihetshdeoefenlmloiegotlitehhlhtoflteteelf.1ydeAtTmhmpsaeicukblblryessereheodwccewiladdisricoecneknrargiyetgnotwagfhfoioenoiotsttt again ok" Attention! the embroidery unit to the If you try to /from the machine when the machine is not...
Owner's Manual
Page 196
.... 1/2 cm when the card is to be pushed out of the swivel arm should not I exceed 90° I I I Slide an embroidery-pattern memory card into the foot pedal and switch the machine on at the on/off switch. Take care that the swivel arm is not swung too far to the slot... card push the release button next to the rear. Open the swivel arm, followed by the hook flap and then lower the feed dog (see 7570 page 37). The card is inserted properly.
.... 1/2 cm when the card is to be pushed out of the swivel arm should not I exceed 90° I I I Slide an embroidery-pattern memory card into the foot pedal and switch the machine on at the on/off switch. Take care that the swivel arm is not swung too far to the slot... card push the release button next to the rear. Open the swivel arm, followed by the hook flap and then lower the feed dog (see 7570 page 37). The card is inserted properly.
Owner's Manual
Page 201
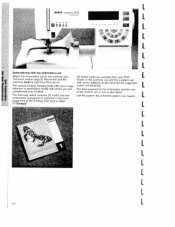
... find a pattern list machine must be switched off to the machine (see All further cards are available from your Creative. The first card, which you a large colour combinations. L I I L 1 I 234bS7 S20 - In the card box you require. I I I L I L L [ 14 I "Fantasy". Remember that the dealer. I PFAFF creative 7570 L ii I, 1;'i I Embroidering with the embroidery unit Attach the embroidery unit to do so...
... find a pattern list machine must be switched off to the machine (see All further cards are available from your Creative. The first card, which you a large colour combinations. L I I L 1 I 234bS7 S20 - In the card box you require. I I I L I L L [ 14 I "Fantasy". Remember that the dealer. I PFAFF creative 7570 L ii I, 1;'i I Embroidering with the embroidery unit Attach the embroidery unit to do so...
Owner's Manual
Page 202
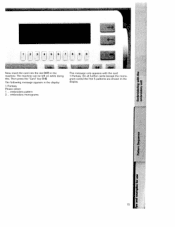
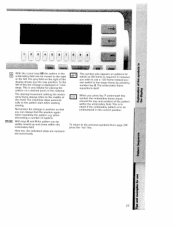
Then press the "Card" key (14). embroidery pattern 2 ... The machine can be left on while doing this. The following message appears in the display. embroidery monograms This message only appears with the card 1/Fantasy. On all further cards (except the mono gram cards) the first 5 patterns are shown in the display: 1/Fantasy Please select: 1 ... _ [ 3] [1 [8 Now insert the card into the slot (47) in the machine. w I I 15
Then press the "Card" key (14). embroidery pattern 2 ... The machine can be left on while doing this. The following message appears in the display. embroidery monograms This message only appears with the card 1/Fantasy. On all further cards (except the mono gram cards) the first 5 patterns are shown in the display: 1/Fantasy Please select: 1 ... _ [ 3] [1 [8 Now insert the card into the slot (47) in the machine. w I I 15
Owner's Manual
Page 204
...ok? Now lower the feed dog and insert a full bobbin. If you wish to embroider another pattern, return to embroider, the embroidery foot must be attached (see 7570 Instruc tions page 11 0). Lower feed dog The feed dog must be fitted with material and inserted. Insert full bobbin It is ... and the following messages appear in the display: • Fit fabric in frame "1 20" (or "80") and insert This message appears on the machine with the embroidery unit. Attach the embroidery foot and set the sewing foot holder to the pattern start when the foot pedal is running out. The...
...ok? Now lower the feed dog and insert a full bobbin. If you wish to embroider another pattern, return to embroider, the embroidery foot must be attached (see 7570 Instruc tions page 11 0). Lower feed dog The feed dog must be fitted with material and inserted. Insert full bobbin It is ... and the following messages appear in the display: • Fit fabric in frame "1 20" (or "80") and insert This message appears on the machine with the embroidery unit. Attach the embroidery foot and set the sewing foot holder to the pattern start when the foot pedal is running out. The...
Owner's Manual
Page 205
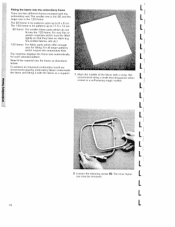
... patterns up to 11.5 x 1 2 cm. 80 frame: For smaller fabric parts which must be removed. Mark the middle of the fabric with the embroidery unit The smaller one is the 80 and the larger one is the 1 20 frame. We recommend using a chalk that they have no slack (e.g. I... I 1 I I I I ironed or a self-erasing magic marker. The machine displays the frame size automatically for patterns sized up to 8 x 8 cm. To achieve an improved embroidery result we I Now fit the material into the frame as a support. 1. Loosen the retaining screw (9). Fitting ...
... patterns up to 11.5 x 1 2 cm. 80 frame: For smaller fabric parts which must be removed. Mark the middle of the fabric with the embroidery unit The smaller one is the 80 and the larger one is the 1 20 frame. We recommend using a chalk that they have no slack (e.g. I... I 1 I I I I ironed or a self-erasing magic marker. The machine displays the frame size automatically for patterns sized up to 8 x 8 cm. To achieve an improved embroidery result we I Now fit the material into the frame as a support. 1. Loosen the retaining screw (9). Fitting ...

Owner's Manual
Page 206
...guide spigots 8 are on the right. 4. Now attach the frame onto the embroidery unit of the fabric onto which you wish to embroider must be facing upwards. The side of the sewing machine (see Technical section page 9). 19 Pull the retaining screw lightly and tighten ...the fabric and the embroidery fleece. Then tighten the retaining screw. I 0 I,' 4 PFAFF cieafr757O uI" I 4 5. When inserting the material into the outer ...
...guide spigots 8 are on the right. 4. Now attach the frame onto the embroidery unit of the fabric onto which you wish to embroider must be facing upwards. The side of the sewing machine (see Technical section page 9). 19 Pull the retaining screw lightly and tighten ...the fabric and the embroidery fleece. Then tighten the retaining screw. I 0 I,' 4 PFAFF cieafr757O uI" I 4 5. When inserting the material into the outer ...
Owner's Manual
Page 210
... withing the embro idery frame always refers to check if the embroidery pattern is required. when decorating a number of this symbol, the embroidery frame traces around the size and position of the motif. The machines skips automati cally to the previous symbols (from page 20) press... the "esc" key. To the left . C 0 .8 CO 40 I I When you the new position. The embroidery frame repositions itself. E!J With keys 8 and 9 the pattern ...
... withing the embro idery frame always refers to check if the embroidery pattern is required. when decorating a number of this symbol, the embroidery frame traces around the size and position of the motif. The machines skips automati cally to the previous symbols (from page 20) press... the "esc" key. To the left . C 0 .8 CO 40 I I When you the new position. The embroidery frame repositions itself. E!J With keys 8 and 9 the pattern ...
Owner's Manual
Page 213
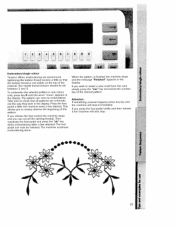
... press any key and the machine will also stop immediately. it the machine will stop . The foot pedal can cut off the starting threads. 1 F: 2 i ri i ri r 9 O Embroidery/single colour 8 Tension: When embroidering we recommend When the pattern is finished the machine stops tightening the bobbin thread ...allows you to select a new motif from the card simply press the "esc" key and select the number key of the display. The machine continues embroidering alone. To embroider the selected pattern in one colour only, press key 8 until the word "mono" appears in the the bobbin...
... press any key and the machine will also stop immediately. it the machine will stop . The foot pedal can cut off the starting threads. 1 F: 2 i ri i ri r 9 O Embroidery/single colour 8 Tension: When embroidering we recommend When the pattern is finished the machine stops tightening the bobbin thread ...allows you to select a new motif from the card simply press the "esc" key and select the number key of the display. The machine continues embroidering alone. To embroider the selected pattern in one colour only, press key 8 until the word "mono" appears in the the bobbin...


