

Owner's Manual
Page 3
... working properly, if it has been dropped or damaged, or dropped into water. Do not place in this sewing machine is being used as threading needle, changing needle, threading bobbin, or changing presser foot, etc. 1 6. Use only attachments recommended by the manufacturer as a bed or couch where the air openings may deflect...
... working properly, if it has been dropped or damaged, or dropped into water. Do not place in this sewing machine is being used as threading needle, changing needle, threading bobbin, or changing presser foot, etc. 1 6. Use only attachments recommended by the manufacturer as a bed or couch where the air openings may deflect...
Owner's Manual
Page 5
... Light-knits Menu Menu, Basic explanation Monograms Narrow edge foot Needle changing Needle chart Needle plate change Needle plate changer (Optional extra) Needle positions Needle thread tension Needle threader Numbered keys 37 14-15 1 22 10-11 122-138 31-32 132-133 79 108 15 11 3 115 30 78 44...
... Light-knits Menu Menu, Basic explanation Monograms Narrow edge foot Needle changing Needle chart Needle plate change Needle plate changer (Optional extra) Needle positions Needle thread tension Needle threader Numbered keys 37 14-15 1 22 10-11 122-138 31-32 132-133 79 108 15 11 3 115 30 78 44...

Owner's Manual
Page 6
Index "Tacking" key Tacking stitch Technical section Thread cutter Thread tension Threading the needle thread Top cover Twin-needle cording foot Twin-needle embroidery Utility stitch programs Utility stitches Word sequence, creating in M-memory Work support Zigzag stitch Zippers, installing 36 69 14-27 25 21 23 14 11 4 1 38 8-9 67-85 54-5 6 16 70 84-85 7
Index "Tacking" key Tacking stitch Technical section Thread cutter Thread tension Threading the needle thread Top cover Twin-needle cording foot Twin-needle embroidery Utility stitch programs Utility stitches Word sequence, creating in M-memory Work support Zigzag stitch Zippers, installing 36 69 14-27 25 21 23 14 11 4 1 38 8-9 67-85 54-5 6 16 70 84-85 7

Owner's Manual
Page 7
... hole. 28 Round buttonhole For buttonholes on stretch materials. 7,5 For finishing and overedge seams. - 7,5 9 Description 18 Fancy elastic stiVtch Application For overstitching elastic and woollen threads, and for open-knit fabric and jersey. 21 Stem stitch, narrow For embroidering in connection with the embroidery programs. - Width up to mm 6 1 9 Cross stitch...
... hole. 28 Round buttonhole For buttonholes on stretch materials. 7,5 For finishing and overedge seams. - 7,5 9 Description 18 Fancy elastic stiVtch Application For overstitching elastic and woollen threads, and for open-knit fabric and jersey. 21 Stem stitch, narrow For embroidering in connection with the embroidery programs. - Width up to mm 6 1 9 Cross stitch...
Owner's Manual
Page 9
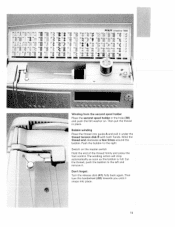
... 42 43 44 46 47 453 49 sc = 52 57 °i 53 2 54 61 54) 459 66 67 60 69 70 71 72 734. 74 PFAFF creative 7560 75Lr 75 77 75 95 79 55 81 82 96 2 83 84 80 97 A 861 z 87 88 55 90 98 9 914 92 9 94 99 Winding... the hole (38) and push the felt washer on the master switch Hold the end of the thread firmly and press the foot control. Push the bobbin to the left and remove it under the thread tension disk B with both hands. Don't forget: Turn the release disk (41) fully back again.Then...
... 42 43 44 46 47 453 49 sc = 52 57 °i 53 2 54 61 54) 459 66 67 60 69 70 71 72 734. 74 PFAFF creative 7560 75Lr 75 77 75 95 79 55 81 82 96 2 83 84 80 97 A 861 z 87 88 55 90 98 9 914 92 9 94 99 Winding... the hole (38) and push the felt washer on the master switch Hold the end of the thread firmly and press the foot control. Push the bobbin to the left and remove it under the thread tension disk B with both hands. Don't forget: Turn the release disk (41) fully back again.Then...
Owner's Manual
Page 11
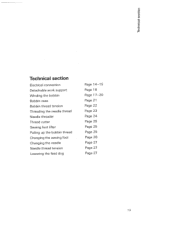
0 aC,, (I, cc C, C, Technical section Electrical connection Detachable work support Winding the bobbin Bobbin case Bobbin thread tension Threading the needle thread Needle threader Thread cutter Sewing foot lifter Pulling up the bobbin thread Changing the sewing foot Changing the needle Needle thread tension Lowering the feed dog Page 14-15 Page 16 Page 1 7-20 Page 21 Page 22 Page 23 Page 24 Page 25 Page 25 Page 25 Page 26 Page 27 Page 27 Page 27 13
0 aC,, (I, cc C, C, Technical section Electrical connection Detachable work support Winding the bobbin Bobbin case Bobbin thread tension Threading the needle thread Needle threader Thread cutter Sewing foot lifter Pulling up the bobbin thread Changing the sewing foot Changing the needle Needle thread tension Lowering the feed dog Page 14-15 Page 16 Page 1 7-20 Page 21 Page 22 Page 23 Page 24 Page 25 Page 25 Page 25 Page 26 Page 27 Page 27 Page 27 13

Owner's Manual
Page 13
... to loosen, or turn the adjusting screw very slightly to the right, using your finger, i.e. Release the latch and take out the empty bobbin. the threads are correctly adjusted to tighten. 21 i.e. Taking out the bobbin case Lift the latch of the fabric. To correct the bobbin... thread tension turn it towards the front. For ornamental seams and buttonholes, the thread interlace should be visible on the reverse side of the bobbin case and pull the bobbin case out. Hook...
... to loosen, or turn the adjusting screw very slightly to the right, using your finger, i.e. Release the latch and take out the empty bobbin. the threads are correctly adjusted to tighten. 21 i.e. Taking out the bobbin case Lift the latch of the fabric. To correct the bobbin... thread tension turn it towards the front. For ornamental seams and buttonholes, the thread interlace should be visible on the reverse side of the bobbin case and pull the bobbin case out. Hook...

Owner's Manual
Page 14
... is described on the reel holder (36) and fit a corresponding unwinding disk. -A Threading the needle thread Switch off the master switch. Pull the thread around stop E into the right-hand threading slot and upwards to the take -up lever (33).The thread must be pulled into guide A. Raise the sewing foot lifter (23) and turn...
... is described on the reel holder (36) and fit a corresponding unwinding disk. -A Threading the needle thread Switch off the master switch. Pull the thread around stop E into the right-hand threading slot and upwards to the take -up lever (33).The thread must be pulled into guide A. Raise the sewing foot lifter (23) and turn...

Owner's Manual
Page 15
Pulling up the bobbin thread. *7 Bobbin thread Close the hook cover (49) and pull the threads under the sewing foot to the left. Thread cutter Pull the threads from the back to bring up the bobbin thread Raise the sewing foot. Pull the needle thread to the front over the thread cutter (52). 25 Presser foot lifter The sewing foot is raised and lowered with the presser foot lifter (23). Hold the needle thread and turn the handwheel towards you until the needle has reached its highest position and the bobbin thread has formed a loop.
Pulling up the bobbin thread. *7 Bobbin thread Close the hook cover (49) and pull the threads under the sewing foot to the left. Thread cutter Pull the threads from the back to bring up the bobbin thread Raise the sewing foot. Pull the needle thread to the front over the thread cutter (52). 25 Presser foot lifter The sewing foot is raised and lowered with the presser foot lifter (23). Hold the needle thread and turn the handwheel towards you until the needle has reached its highest position and the bobbin thread has formed a loop.

Owner's Manual
Page 16
... the rear. Now the feed dog is between 2 and 3. Hold the needle and tighten the retaining screw (25) firmly. : Setting the needle thread tension Set the required needle thread tension with the help of the needle must face to 5, For embroidering and buttonhole sewing it goes. darning, the feed dog (54) has...
... the rear. Now the feed dog is between 2 and 3. Hold the needle and tighten the retaining screw (25) firmly. : Setting the needle thread tension Set the required needle thread tension with the help of the needle must face to 5, For embroidering and buttonhole sewing it goes. darning, the feed dog (54) has...
Owner's Manual
Page 18
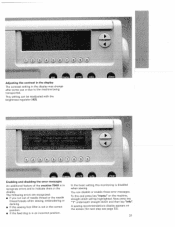
... key "menu" on the screen (for next step see page 32>. 31 The following errors are recognized: • If you run out of the creative 7560 is in an incorrect position. You can be highlighted. To this monitoring is disabled when sewing. r Adjusting the contrast in the display The contrast setting... may change after some use or due to indicate them in the display. Enabling and disabling the error messages An additional feature of needle thread or the needle thread breaks when sewing, embroidering or darning. • If the sewing foot lifter is not in the correct position. • If the ...
... key "menu" on the screen (for next step see page 32>. 31 The following errors are recognized: • If you run out of the creative 7560 is in an incorrect position. You can be highlighted. To this monitoring is disabled when sewing. r Adjusting the contrast in the display The contrast setting... may change after some use or due to indicate them in the display. Enabling and disabling the error messages An additional feature of needle thread or the needle thread breaks when sewing, embroidering or darning. • If the sewing foot lifter is not in the correct position. • If the ...

Owner's Manual
Page 21
.... Within a selected pattern, you can use these keys to select the letters. 0-9 Pattern selection (22) After pressing key 0-9 you will obtain information on the recommended thread tension, pattern mirroring, pattern start and end, the correct sewing foot and possible special accessories. In the alphabet, these keys are used to determine pattern...
.... Within a selected pattern, you can use these keys to select the letters. 0-9 Pattern selection (22) After pressing key 0-9 you will obtain information on the recommended thread tension, pattern mirroring, pattern start and end, the correct sewing foot and possible special accessories. In the alphabet, these keys are used to determine pattern...

Owner's Manual
Page 39
TIP: Make sure that do not fray too much. Overlock stitches Programs 06, 13, 20, 30-34 For knit and other stretch materials, the creative 7560 offers a selection of fabric and serge them in one operation. They have a higher elasticity than usual stitches, they are very durable and, they are very... and prevents tunneling of the seam at its farthest right-hand position just misses the edge of the material. Closed overlock stitch with edge thread Program 06 Select program 06 if you wish to process materials that ravel very much.With this stitch it is suitable for both seaming and...
TIP: Make sure that do not fray too much. Overlock stitches Programs 06, 13, 20, 30-34 For knit and other stretch materials, the creative 7560 offers a selection of fabric and serge them in one operation. They have a higher elasticity than usual stitches, they are very durable and, they are very... and prevents tunneling of the seam at its farthest right-hand position just misses the edge of the material. Closed overlock stitch with edge thread Program 06 Select program 06 if you wish to process materials that ravel very much.With this stitch it is suitable for both seaming and...

Owner's Manual
Page 46
... • Materials that every single buttonhole is exactly the right size, the creative 7560 is equipped with gimp thread"). • Linen buttonholes look more dense and attractive when embroidery or darning thread is used. 87 You only have to an edge cannot be achieved by Madeira... finish to the second red mark. Set the needle thread tension at +3. A better result can sew perfect buttonholes even on the most difficult materials such as velvet, plush, heavy knit or woolen fabrics. Buttonholes The creative 7560 offers you the perfect buttonhole for buttonhole sewing.
... • Materials that every single buttonhole is exactly the right size, the creative 7560 is equipped with gimp thread"). • Linen buttonholes look more dense and attractive when embroidery or darning thread is used. 87 You only have to an edge cannot be achieved by Madeira... finish to the second red mark. Set the needle thread tension at +3. A better result can sew perfect buttonholes even on the most difficult materials such as velvet, plush, heavy knit or woolen fabrics. Buttonholes The creative 7560 offers you the perfect buttonhole for buttonhole sewing.

Owner's Manual
Page 51
... red mark! q7 L The bartack can be self-defined using the balance. Keyhole buttonhole Important: The keyhole buttonhole should use a stronger thread or gimp thread if necessary (see "Buttonhole with the rounding facing the edge. Caution: Before starting point inwards. Mark the length of the buttonholes on ...; A pre-programmed buttonhole length of the second purl seam can be set using key"6' The stitch density cannot be placed with gimp thread"). The stitch density of 22 mm appears on the fabric first, making sure to measure from the inside outwards towards the edge.
... red mark! q7 L The bartack can be self-defined using the balance. Keyhole buttonhole Important: The keyhole buttonhole should use a stronger thread or gimp thread if necessary (see "Buttonhole with the rounding facing the edge. Caution: Before starting point inwards. Mark the length of the buttonholes on ...; A pre-programmed buttonhole length of the second purl seam can be set using key"6' The stitch density cannot be placed with gimp thread"). The stitch density of 22 mm appears on the fabric first, making sure to measure from the inside outwards towards the edge.

Owner's Manual
Page 52
... more durable and neater. Use pearl cotton or a regular gimp thread as available at specialized shops. • Place the gimp thread over the front ridge of the buttonhole foot and clamp the thread ends to the right and left into the rear ridge. • Push the runner forwards up to the second marking.... • Now sew buttonhole No. 25, 26 or 27. • After finishing the buttonhole, pull the left thread until the loop is covered by the buttonhole bartack, • Cut off the loose ends close to the bartack. 99
... more durable and neater. Use pearl cotton or a regular gimp thread as available at specialized shops. • Place the gimp thread over the front ridge of the buttonhole foot and clamp the thread ends to the right and left into the rear ridge. • Push the runner forwards up to the second marking.... • Now sew buttonhole No. 25, 26 or 27. • After finishing the buttonhole, pull the left thread until the loop is covered by the buttonhole bartack, • Cut off the loose ends close to the bartack. 99

Owner's Manual
Page 55
.../705 H-ZW Cording tongue 12 pcs.( Pintuck foot Adjustable blind-stitch and overlock foot Fagot guide Finger guard Fringe foot Free-motion quilt foot 3rd thread spool holder to be placed on the pin Straight stitch foot with round needle hole 93-042 950-91 93-042 953-91 For cording...
.../705 H-ZW Cording tongue 12 pcs.( Pintuck foot Adjustable blind-stitch and overlock foot Fagot guide Finger guard Fringe foot Free-motion quilt foot 3rd thread spool holder to be placed on the pin Straight stitch foot with round needle hole 93-042 950-91 93-042 953-91 For cording...

Owner's Manual
Page 56
...edge of the foot's grooves.This ensures that it makes the pintuck even broader. For thinner materials, use a pintuck foot with a gimp thread makes a similar optical effect, it does not become tangled during sewing. • While sewing the tucks, the material must be fed under... the detachable work without a cording tongue. • First remove the needle plate. • Thread the gimp thread upwards through the hole in one pintuck. Pintuck foot This classical sewing technique can be pulled lightly. 109 The notch between the pintucks ...
...edge of the foot's grooves.This ensures that it makes the pintuck even broader. For thinner materials, use a pintuck foot with a gimp thread makes a similar optical effect, it does not become tangled during sewing. • While sewing the tucks, the material must be fed under... the detachable work without a cording tongue. • First remove the needle plate. • Thread the gimp thread upwards through the hole in one pintuck. Pintuck foot This classical sewing technique can be pulled lightly. 109 The notch between the pintucks ...

Owner's Manual
Page 57
...fabric in three different ways: 1. Folding the fabric in pleats, sewing them on to sew on shape cut parts, we recommend adding a wool thread under slight tension and overstitching it easy to another piece of fabric and sewing lace inbetween at the same time. Program: 00 Stitch length: ...3 Tension: 3-5 111 When you buy the ruffler from your PFAFF dealer, you can make closely or widely spaced pleats automatically while sewing. To obtain a perfect seam on beads or sequins. The ruffler can ...
...fabric in three different ways: 1. Folding the fabric in pleats, sewing them on to sew on shape cut parts, we recommend adding a wool thread under slight tension and overstitching it easy to another piece of fabric and sewing lace inbetween at the same time. Program: 00 Stitch length: ...3 Tension: 3-5 111 When you buy the ruffler from your PFAFF dealer, you can make closely or widely spaced pleats automatically while sewing. To obtain a perfect seam on beads or sequins. The ruffler can ...
Owner's Manual
Page 59
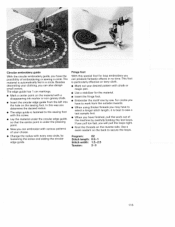
... with a disappearing-ink marker or non-greasy chalk. • Insert the circular edge guide from the outside inwards. • When using thicker threads you may have to secure the loops. If you pull too fast, you have to work out of the machine by row. Fringe foot With.... • The edge guide is fastened to sew a test sample first. • When you will pull the loops tight. • Knot the threads on the back to select a longer stitch length; it is particularly effective on the sewing foot. Besides decorating your desired pattern with the screw. •...
... with a disappearing-ink marker or non-greasy chalk. • Insert the circular edge guide from the outside inwards. • When using thicker threads you may have to secure the loops. If you pull too fast, you have to work out of the machine by row. Fringe foot With.... • The edge guide is fastened to sew a test sample first. • When you will pull the loops tight. • Knot the threads on the back to select a longer stitch length; it is particularly effective on the sewing foot. Besides decorating your desired pattern with the screw. •...


