
Owner's Manual
Page 25
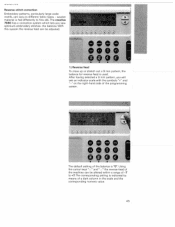
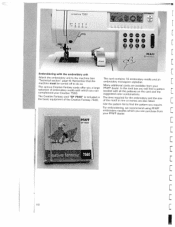
... keys "-" and "-" the reverse feed of the machine can be adjusted. woolen material is fed differently to +7. The creative 7560 has a correction system which lets you will see an indicator scale with the symbols "+" and on different fabric types - After having selected a 9 mm pattern, you sew optimum embroidery stitches: the balance. • Reverse stitch...
... keys "-" and "-" the reverse feed of the machine can be adjusted. woolen material is fed differently to +7. The creative 7560 has a correction system which lets you will see an indicator scale with the symbols "+" and on different fabric types - After having selected a 9 mm pattern, you sew optimum embroidery stitches: the balance. • Reverse stitch...
Owner's Manual
Page 59
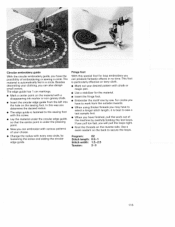
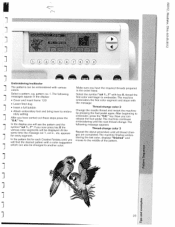
... on terry-cloth. • Mark out your choice. • Change the radius with chalk or magic pen. • Use a stabilizer for loop embroidery you can produce fantastic effects in a circle. In this special foot for the material. • Insert the fringe foot. • Embroider the motif ...chalk. • Insert the circular edge guide from the outside inwards. • When using thicker threads you may have the possibility of the machine by row. Fringe foot With this way you determine the desired radius. • The edge guide is particularly effective on the sewing foot. Use...
... on terry-cloth. • Mark out your choice. • Change the radius with chalk or magic pen. • Use a stabilizer for loop embroidery you can produce fantastic effects in a circle. In this special foot for the material. • Insert the fringe foot. • Embroider the motif ...chalk. • Insert the circular edge guide from the outside inwards. • When using thicker threads you may have the possibility of the machine by row. Fringe foot With this way you determine the desired radius. • The edge guide is particularly effective on the sewing foot. Use...
Owner's Manual
Page 64
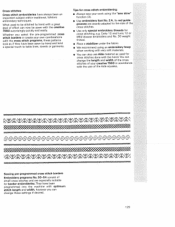
...8226; Always sew your creative 7560 in accordance with the size of the cross stitches. • Use only special embroidery threads for cross stitches done with the hand. z - You can change these patterns look as used to be sewn with the creative 7560 surprisingly quickly and easily....-54 consist of your work using the "sew slow" function (3). • Use embroidery foot No. 2 A. Tips for border embroideries. Cross stitches Cross stitch embroideries have been programmed into the machine with optimum stitch length and width, however you select the preprogrammed cross stitch borders or...
...8226; Always sew your creative 7560 in accordance with the size of the cross stitches. • Use only special embroidery threads for cross stitches done with the hand. z - You can change these patterns look as used to be sewn with the creative 7560 surprisingly quickly and easily....-54 consist of your work using the "sew slow" function (3). • Use embroidery foot No. 2 A. Tips for border embroideries. Cross stitches Cross stitch embroideries have been programmed into the machine with optimum stitch length and width, however you select the preprogrammed cross stitch borders or...
Owner's Manual
Page 70
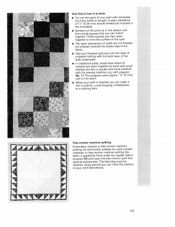
In free-motion machine quilting the fabric is quicker and more practical with templates you can match together. Using stencils you ...together to the seam. • When your quilt is finished, you can mark the outlines of your quilt with the sewing machine, e.g. with program No. 11.This program sews approx. 1/s" (3mm) next to form the surface of the quilt. ... is how it into a cushion, a wall hanging, a bedspread, or a clothing item. 11 F' Free-motion machine quilting Embroidery stitches or free-motion machine quilting are particularly suitable for solid-colored materials.
In free-motion machine quilting the fabric is quicker and more practical with templates you can match together. Using stencils you ...together to the seam. • When your quilt is finished, you can mark the outlines of your quilt with the sewing machine, e.g. with program No. 11.This program sews approx. 1/s" (3mm) next to form the surface of the quilt. ... is how it into a cushion, a wall hanging, a bedspread, or a clothing item. 11 F' Free-motion machine quilting Embroidery stitches or free-motion machine quilting are particularly suitable for solid-colored materials.

Owner's Manual
Page 76
Parts of the "Creative Fantasy 7560" embroidery unit: 2 I. Embroidery unit vefaasy7 Creative Fantasy embroidery foot 7560 card box and ""8102"0"fraHmooep(o(pfrtaiomnea)l extra) L 1 2 3 CRMoeenlteanalescetrtailncegkvefprolfruogartftroaecrmhtohinveginmgthaetchhehionhoeopop(fr(afmraem) e) 4 Fastening unit to the clip for connecting machine the embroidery [ E 5 6 7 ERGneugliedaagesienstgrlieptvreafrcokrfoernrgeamgoinvgingthetheemebmrobirdoeidryeryunuitnit 8 2 engaging tracks 9 Tightening screw L 1 0 Creative Fantasy card box 11 Embroidery foot E C L
Parts of the "Creative Fantasy 7560" embroidery unit: 2 I. Embroidery unit vefaasy7 Creative Fantasy embroidery foot 7560 card box and ""8102"0"fraHmooep(o(pfrtaiomnea)l extra) L 1 2 3 CRMoeenlteanalescetrtailncegkvefprolfruogartftroaecrmhtohinveginmgthaetchhehionhoeopop(fr(afmraem) e) 4 Fastening unit to the clip for connecting machine the embroidery [ E 5 6 7 ERGneugliedaagesienstgrlieptvreafrcokrfoernrgeamgoinvgingthetheemebmrobirdoeidryeryunuitnit 8 2 engaging tracks 9 Tightening screw L 1 0 Creative Fantasy card box 11 Embroidery foot E C L

Owner's Manual
Page 77
Always store the Creative Fantasy card in the machine. 8. Never transport the sewing machine with condensation, that may be used. Do not use . the embroidery unit This is not subjected to: objects, corrosive Handling: J Always protect dropped. I ] Room temperature - 25°C to...chemical products such as petrol or liquid chemicals to 80%. When carrying out maintenance work, alterations to it is a machine for is solely the ] 1 0. Only original PFAFF parts may be disconnected from the power J 6. Do not insert any stubborn dirt, use a Please note! ...
Always store the Creative Fantasy card in the machine. 8. Never transport the sewing machine with condensation, that may be used. Do not use . the embroidery unit This is not subjected to: objects, corrosive Handling: J Always protect dropped. I ] Room temperature - 25°C to...chemical products such as petrol or liquid chemicals to 80%. When carrying out maintenance work, alterations to it is a machine for is solely the ] 1 0. Only original PFAFF parts may be disconnected from the power J 6. Do not insert any stubborn dirt, use a Please note! ...

Owner's Manual
Page 81
1 Technical section Connecting/removing the embrojde unit Changing the presser foot Connecting the Power cord and foot control Switching the machine Ofl Lowering the feed dog Inserting/removiflg the Creative Fantasy card Inserting/removing the hoop/frame in/from the embroide unit Bringing the presser foot to embroidery/darning Position Page 6 Page 6 Page 7 Page 7 Page 7 Page 7 Page 8 Page 8 C 0 4C., C) 0 Cu C, C Ca,) g0 g 0 Ea, & 0 0 2 Cxu C) 5 Cu Cl, 1-
1 Technical section Connecting/removing the embrojde unit Changing the presser foot Connecting the Power cord and foot control Switching the machine Ofl Lowering the feed dog Inserting/removiflg the Creative Fantasy card Inserting/removing the hoop/frame in/from the embroide unit Bringing the presser foot to embroidery/darning Position Page 6 Page 6 Page 7 Page 7 Page 7 Page 7 Page 8 Page 8 C 0 4C., C) 0 Cu C, C Ca,) g0 g 0 Ea, & 0 0 2 Cxu C) 5 Cu Cl, 1-

Owner's Manual
Page 82
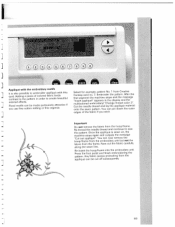
...holder. Take care to /from the or remove the embroidery unit machine when the machine is lightly pushed against the plastic guide. N L ...embroidery needle. 6 I Only attach to ensure that the guide fork is switched off and attach embroidery unit. Guide the embroidery foot with the pin facing to CnIforyetoacutiovtnreynFetocatnectdaalslythuecpafraodnllwoewmheibnnrgotihmdeeerseysmapbgaretoteiadrpnepryefraourmsnitianis the display; Then tighten the knurled screw again. r L L Connecting/removing the embroidery unit Bushing for connecting your Creative 7560...
...holder. Take care to /from the or remove the embroidery unit machine when the machine is lightly pushed against the plastic guide. N L ...embroidery needle. 6 I Only attach to ensure that the guide fork is switched off and attach embroidery unit. Guide the embroidery foot with the pin facing to CnIforyetoacutiovtnreynFetocatnectdaalslythuecpafraodnllwoewmheibnnrgotihmdeeerseysmapbgaretoteiadrpnepryefraourmsnitianis the display; Then tighten the knurled screw again. r L L Connecting/removing the embroidery unit Bushing for connecting your Creative 7560...
Owner's Manual
Page 86
... recommend using PFAFF embroidery needles which you a large selection of the Creative Fantasy 7560. The card contains 1 8 embroidery motifs and an embroidery monogram alphabet Many additional cards are also listed. The various Creative Fantasy cards offer you can purchase from your Creative 7560. Remember that the machine must be turned off to the machine (see "Technical section" page 6>. I I ____ creative 7560 •VV...
... recommend using PFAFF embroidery needles which you a large selection of the Creative Fantasy 7560. The card contains 1 8 embroidery motifs and an embroidery monogram alphabet Many additional cards are also listed. The various Creative Fantasy cards offer you can purchase from your Creative 7560. Remember that the machine must be turned off to the machine (see "Technical section" page 6>. I I ____ creative 7560 •VV...

Owner's Manual
Page 87
tIi1!I Now insert the card into the slot (47) in the display. hTinheen. Select the desired pattern group, e.g. 1 for em broidery pattern. 0 2 x C) 11 0 The following message appears in the display: CPlFe/a7s5e6s0elect: 1 Embroidery pattern 2 Embroidery monograms This message only appears with cards which have both embroidery patterns and monograms. On all further cards (except the monogram cards) the first 5 patterns are shown in the The machine can be left on while doing tmhiasc. press the "card" key (1 5). _____ _____ _____ A •-i'-
tIi1!I Now insert the card into the slot (47) in the display. hTinheen. Select the desired pattern group, e.g. 1 for em broidery pattern. 0 2 x C) 11 0 The following message appears in the display: CPlFe/a7s5e6s0elect: 1 Embroidery pattern 2 Embroidery monograms This message only appears with cards which have both embroidery patterns and monograms. On all further cards (except the monogram cards) the first 5 patterns are shown in the The machine can be left on while doing tmhiasc. press the "card" key (1 5). _____ _____ _____ A •-i'-

Owner's Manual
Page 89
...when the bobbin thread is running • Cover and insert frame "1 20" (or "80") out The sewing machine stops and the following messages appear in the display. Attach embroidery foot and bring sewing foot lifter to embroider. Lower feed dog By pressing the "ok" key, the selected ...available as an optional extra from your PFAFF dealer. If you start when the foot to embroidery/darning position OK? The embroidery foot must be attached. Attach the embroidery foot and set the presser foot lifter to .J pedal is not the case the machine does not start to embroider, the ...
...when the bobbin thread is running • Cover and insert frame "1 20" (or "80") out The sewing machine stops and the following messages appear in the display. Attach embroidery foot and bring sewing foot lifter to embroider. Lower feed dog By pressing the "ok" key, the selected ...available as an optional extra from your PFAFF dealer. If you start when the foot to embroidery/darning position OK? The embroidery foot must be attached. Attach the embroidery foot and set the presser foot lifter to .J pedal is not the case the machine does not start to embroider, the ...

Owner's Manual
Page 90
...the fabric must be facing upwards. The 1 20 up to 1 1 5 x 120 mm. the embroidery frame is patterns one frame included with the 1 20 frame. into the embroidery hoop There is unit It is for patterns sized up to 80 x 80 mm. hThirdioooneoograpy,pc-iwhfsnrtigeaaebmvriiteeleitc....20 frame. Place the embroidery stabilizer and the fabric on the right 14 size automa Tip: also Every pattern suitable for each selected pattern. Fitting the (frame) fabric into the specified frame as - 1. fine knitted fabrics, silk etc.) The machine displays the hoop-frame ...
...the fabric must be facing upwards. The 1 20 up to 1 1 5 x 120 mm. the embroidery frame is patterns one frame included with the 1 20 frame. into the embroidery hoop There is unit It is for patterns sized up to 80 x 80 mm. hThirdioooneoograpy,pc-iwhfsnrtigeaaebmvriiteeleitc....20 frame. Place the embroidery stabilizer and the fabric on the right 14 size automa Tip: also Every pattern suitable for each selected pattern. Fitting the (frame) fabric into the specified frame as - 1. fine knitted fabrics, silk etc.) The machine displays the hoop-frame ...

Owner's Manual
Page 92
Embroidery direction of the motifs Always make sure when hooping the fabric that the motif is embroidered as you sit in the display. Tip: You can rotate the motif by 900 steps within the hoop (see page 1 7). .1 1W i-j (t. ( I o:c PFAFF 1 16 I This is because it appears in front of the design to place a garment onto the machine through the hem. U;. The automatic default is easier to your left as it is with the top or head of the machine.
Embroidery direction of the motifs Always make sure when hooping the fabric that the motif is embroidered as you sit in the display. Tip: You can rotate the motif by 900 steps within the hoop (see page 1 7). .1 1W i-j (t. ( I o:c PFAFF 1 16 I This is because it appears in front of the design to place a garment onto the machine through the hem. U;. The automatic default is easier to your left as it is with the top or head of the machine.

Owner's Manual
Page 97
... you press the will also stop. Attention: tfuThosoeresteththmoeepb"rPtsohlooiewdweserersyweswwoinpiingtecgrhm"a.>taikocenhy.iniTmeh,mepemrdeasiacstheailnnyye. foot pedal just briefly, the machine c,'J cCc LiD 0 -C 0 22 I 1I Embroidery/single color cf ii ii it ii stttThhiegeeetnhbstmbeieoonatbnwtienb:ergiW ineantlh.hthee2Trnhebaeaenodmdbnbeibs3iern.donliotedhtertvrehiiarsnedigbaltdewenteoesninroestnichooenamflasmithcteleoenusdslidodetbheoaft faPteToehrmnroweeelybseed,ssrmmtiopistitbhprbcderelrheoasoeryfsiiesoddd.k(oees.ertreyTeetphda8ekepdteauahsgnleecetlaiuelwrn1cettahti8yelt>eod...
... you press the will also stop. Attention: tfuThosoeresteththmoeepb"rPtsohlooiewdweserersyweswwoinpiingtecgrhm"a.>taikocenhy.iniTmeh,mepemrdeasiacstheailnnyye. foot pedal just briefly, the machine c,'J cCc LiD 0 -C 0 22 I 1I Embroidery/single color cf ii ii it ii stttThhiegeeetnhbstmbeieoonatbnwtienb:ergiW ineantlh.hthee2Trnhebaeaenodmdbnbeibs3iern.donliotedhtertvrehiiarsnedigbaltdewenteoesninroestnichooenamflasmithcteleoenusdslidodetbheoaft faPteToehrmnroweeelybseed,ssrmmtiopistitbhprbcderelrheoasoeryfsiiesoddd.k(oees.ertreyTeetphda8ekepdteauahsgnleecetlaiuelwrn1cettahti8yelt>eod...
Owner's Manual
Page 98
...suggestion Thread-change color 3 Repeat the above procedure until the next thread change color 2 • Attach embroidery foot and bring lever to another color. 4 • U - The machine embroiders the first color segment and stops with key 8, thread the first color and begin to the middle...with various •j colors. Select a pattern, e.g. key. The machine finishes embro idering the last color, displays "finished" and moves to embroider. appears for every segment In the pattern list for each Creative Fantasy card, you will be changed to embro idery setting. After ...
...suggestion Thread-change color 3 Repeat the above procedure until the next thread change color 2 • Attach embroidery foot and bring lever to another color. 4 • U - The machine embroiders the first color segment and stops with key 8, thread the first color and begin to the middle...with various •j colors. Select a pattern, e.g. key. The machine finishes embro idering the last color, displays "finished" and moves to embroider. appears for every segment In the pattern list for each Creative Fantasy card, you will be changed to embro idery setting. After ...

Owner's Manual
Page 101
... position OK? • Lower feed dog If the feed dog machine does is pressed and is low OK? tAThofetertrehtsrhueemaddeibseprmelaabykroamgideeesrosiacngcguerartetdh,eppreosssitinounmabt ewr hkiecyh 9. Activate foot control The pattern skips back 6 stitches activate the foot control briefly. dog must be lowered in embroidery (see "Creative 7560, page 31, mode 32) • Needle thread broken or empty...
... position OK? • Lower feed dog If the feed dog machine does is pressed and is low OK? tAThofetertrehtsrhueemaddeibseprmelaabykroamgideeesrosiacngcguerartetdh,eppreosssitinounmabt ewr hkiecyh 9. Activate foot control The pattern skips back 6 stitches activate the foot control briefly. dog must be lowered in embroidery (see "Creative 7560, page 31, mode 32) • Needle thread broken or empty...
Owner's Manual
Page 144
...thread the needle thread and continue to embroider appliqué with this J card. Sr Appliqué with the embroidery motifs It is sewn on, the machine stops again and outputs the message 'Cut out appliqué". colored effects. Once the appliqué is also ...possible to sew the pattern. Adding a contrast to create beautiful - Important Do not remove the fabric from Creative Fantasy card no. 7. Re-insert the hoop/frame into the embroidery...
...thread the needle thread and continue to embroider appliqué with this J card. Sr Appliqué with the embroidery motifs It is sewn on, the machine stops again and outputs the message 'Cut out appliqué". colored effects. Once the appliqué is also ...possible to sew the pattern. Adding a contrast to create beautiful - Important Do not remove the fabric from Creative Fantasy card no. 7. Re-insert the hoop/frame into the embroidery...

Owner's Manual
Page 146
...such as terry cloth or velvet can be pinned on top of the terry cloth fabric. I a piece of embroidery fleece into the frame, fit f,.,. Take care, however, that the machine doesn't embroider over them. However, we recommend using em tfr broidery fleece and Solvy (available from the Tearaway ...fabric from your PEAFF dealer). Both the maxi stitches and the embroidery -J motifs of the frame so that the pins are close to fit into the hoop/frame and glue the terry cloth fabric onto it with the Creative Fantasy - 7560. I , If the terry cloth is too thick to the...
...such as terry cloth or velvet can be pinned on top of the terry cloth fabric. I a piece of embroidery fleece into the frame, fit f,.,. Take care, however, that the machine doesn't embroider over them. However, we recommend using em tfr broidery fleece and Solvy (available from the Tearaway ...fabric from your PEAFF dealer). Both the maxi stitches and the embroidery -J motifs of the frame so that the pins are close to fit into the hoop/frame and glue the terry cloth fabric onto it with the Creative Fantasy - 7560. I , If the terry cloth is too thick to the...

Owner's Manual
Page 154
It is particularly suitable for use with embroidery requiring frequent thread changes. The needle thread required can hold up through the appropriate thread g u ide. Place the spools separately onto the spindles and pull the thread up to 10 spools. J jLY Spool holder "Creative Fantasy Color Changer The spool holder is available as wished on your PFAFF dealer and is of great help with the embroidery unit and can then be threaded as an optional extra from your sewing machine. 79
It is particularly suitable for use with embroidery requiring frequent thread changes. The needle thread required can hold up through the appropriate thread g u ide. Place the spools separately onto the spindles and pull the thread up to 10 spools. J jLY Spool holder "Creative Fantasy Color Changer The spool holder is available as wished on your PFAFF dealer and is of great help with the embroidery unit and can then be threaded as an optional extra from your sewing machine. 79


