
Owner's Manual
Page 5
... 6:6 Common Stitch Creator pop-ups 6:6 7 Embroidery preparations 7:1 Embroidery unit overview 7:2 Built-in designs 7:2 Embroidery hoop overview 7:2 creative™ 4.0 Embroidery collection 7:3 Connect the embroidery unit 7:3 Remove the embroidery unit 7:3 To hoop the fabric 7:4 Slide on the hoop 7:4 Getting started embroidering 7:5 8 Embroidery mode - overview 9:2 Crosshair 9:2 Color list 9:2 Embroidery information 9:3 Option bar 9:4 More options 9:4 Speed control 9:4 Hoop position 9:5 Precise positioning 9:6 Common embroidery stitch-out pop-ups 9:9 10...
... 6:6 Common Stitch Creator pop-ups 6:6 7 Embroidery preparations 7:1 Embroidery unit overview 7:2 Built-in designs 7:2 Embroidery hoop overview 7:2 creative™ 4.0 Embroidery collection 7:3 Connect the embroidery unit 7:3 Remove the embroidery unit 7:3 To hoop the fabric 7:4 Slide on the hoop 7:4 Getting started embroidering 7:5 8 Embroidery mode - overview 9:2 Crosshair 9:2 Color list 9:2 Embroidery information 9:3 Option bar 9:4 More options 9:4 Speed control 9:4 Hoop position 9:5 Precise positioning 9:6 Common embroidery stitch-out pop-ups 9:9 10...
Owner's Manual
Page 10
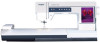
... 52. Thread net 56. Felt pad 58. creative™ 120 Square Hoop (120x120) 69. Level adjusting feet 51. Hoop clips Included hoops 68. Bobbins 62 66. USB Embroidery stick 59. Seam ripper 61. Brush 62. creative™ Elite Hoop (260x200) Included accessories not in picture 68 • Foot control • Foot control cord • Power cord •...
... 52. Thread net 56. Felt pad 58. creative™ 120 Square Hoop (120x120) 69. Level adjusting feet 51. Hoop clips Included hoops 68. Bobbins 62 66. USB Embroidery stick 59. Seam ripper 61. Brush 62. creative™ Elite Hoop (260x200) Included accessories not in picture 68 • Foot control • Foot control cord • Power cord •...
Owner's Manual
Page 80
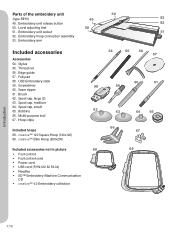
... C Embroidery unit socket D Embroidery hoop connection assembly E Embroidery arm Note: A larger embroidery unit, with embroidery area 360x350mm, is available to purchase at your machine. Embroidery hoop overview F Embroidery hoop connector G Outer hoop H Inner hoop I Quick release J Retaining screw F K Ribs for Àtting the clips L Center marks H G C L K J I 7:2 Built-in designs About 100 designs are included in the memory in your local authorized PFAFF®...
... C Embroidery unit socket D Embroidery hoop connection assembly E Embroidery arm Note: A larger embroidery unit, with embroidery area 360x350mm, is available to purchase at your machine. Embroidery hoop overview F Embroidery hoop connector G Outer hoop H Inner hoop I Quick release J Retaining screw F K Ribs for Àtting the clips L Center marks H G C L K J I 7:2 Built-in designs About 100 designs are included in the memory in your local authorized PFAFF®...

Owner's Manual
Page 81
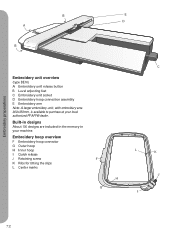
...-arm, see picture. This calibration will set your embroidery functions each design. Be sure to calibrate the machine with the embroidery hoop attached as this can damage the needle, presser foot, hoop and/or the embroidery unit. The suggested thread colors for positioning. Slide...The cover of stitches in the original packing material. Embroidery preparations creative™ 4.0 Embroidery collection Page through the creative™ 4.0 Embroidery collection for designs and fonts. If needed, use the level adjusting feet so that the embroidery arm does not bump into the socket. The design...
...-arm, see picture. This calibration will set your embroidery functions each design. Be sure to calibrate the machine with the embroidery hoop attached as this can damage the needle, presser foot, hoop and/or the embroidery unit. The suggested thread colors for positioning. Slide...The cover of stitches in the original packing material. Embroidery preparations creative™ 4.0 Embroidery collection Page through the creative™ 4.0 Embroidery collection for designs and fonts. If needed, use the level adjusting feet so that the embroidery arm does not bump into the socket. The design...
Owner's Manual
Page 82
... on top of the outer hoop by turning the retaining screw (B). Slide on the hoop Slide the hoop onto the embroidery unit from the embroidery arm, press the grey button on the screen (See chapter 8). When hooping stabilizer and fabric make sure that...hoop. The fabric should match the starting point of fabric, you . Note: When embroidering additional designs on the fabric and close the quick release. To remove the hoop from front to the new position on the same fabric, open the quick release, move the hoop to back until it clicks into the outer hoop. 4. B creative 4.0 creative...
... on top of the outer hoop by turning the retaining screw (B). Slide on the hoop Slide the hoop onto the embroidery unit from the embroidery arm, press the grey button on the screen (See chapter 8). When hooping stabilizer and fabric make sure that...hoop. The fabric should match the starting point of fabric, you . Note: When embroidering additional designs on the fabric and close the quick release. To remove the hoop from front to the new position on the same fabric, open the quick release, move the hoop to back until it clicks into the outer hoop. 4. B creative 4.0 creative...
Owner's Manual
Page 83
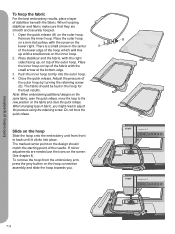
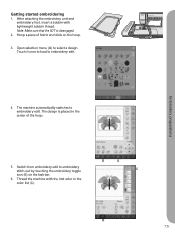
...the task bar. 6. Switch from embroidery edit to embroidery edit. Thread the machine with lightweight bobbin thread. Open selection menu (A) to embroidery edit. Embroidery preparations 4. Touch it once to load... to select a design. Note: Make sure that the IDT is placed in the color list (C). Hoop a piece of the hoop. 5. The machine automatically switches to embroidery stitch-out by touching the embroidery toggle icon (B) on the hoop. 3. B A C B 7:5 Getting started embroidering creative...
...the task bar. 6. Switch from embroidery edit to embroidery edit. Thread the machine with lightweight bobbin thread. Open selection menu (A) to embroidery edit. Embroidery preparations 4. Touch it once to load... to select a design. Note: Make sure that the IDT is placed in the color list (C). Hoop a piece of the hoop. 5. The machine automatically switches to embroidery stitch-out by touching the embroidery toggle icon (B) on the hoop. 3. B A C B 7:5 Getting started embroidering creative...
Owner's Manual
Page 84
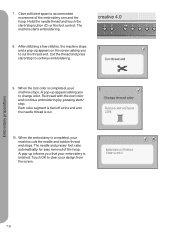
... a pop-up appears on the screen asking you to accommodate movement of the hoop. When the Àrst color is completed, your machine stops. Embroidery preparations 7:6 Clear sufÀcient space to cut . 10. When the embroidery is completed, your machine cuts the needle and bobbin thread and stops. 7.... thread and press start/stop button (D) or the foot control. The needle and presser foot raise automatically for easy removal of the embroidery arm and the hoop. Each color segment is tied off at the end and the needle thread is Ànished. A pop-up informs you to continue...
... a pop-up appears on the screen asking you to accommodate movement of the hoop. When the Àrst color is completed, your machine stops. Embroidery preparations 7:6 Clear sufÀcient space to cut . 10. When the embroidery is completed, your machine cuts the needle and bobbin thread and stops. 7.... thread and press start/stop button (D) or the foot control. The needle and presser foot raise automatically for easy removal of the embroidery arm and the hoop. Each color segment is tied off at the end and the needle thread is Ànished. A pop-up informs you to continue...
Owner's Manual
Page 86
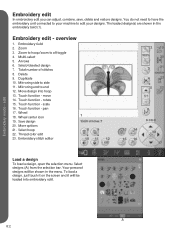
.... Your personal designs will be shown in the embroidery Àeld (1). You do not need to have the embroidery unit connected to your designs. Touch function - Select designs (A) from the selection bar. A 8:2 Embroidery mode - overview 1. Move design into embroidery edit. Touch function - Touch function - Wheel 18. Select hoop 22. Select/deselect design 7. Delete 9. To load...
.... Your personal designs will be shown in the embroidery Àeld (1). You do not need to have the embroidery unit connected to your designs. Touch function - Select designs (A) from the selection bar. A 8:2 Embroidery mode - overview 1. Move design into embroidery edit. Touch function - Touch function - Wheel 18. Select hoop 22. Select/deselect design 7. Delete 9. To load...
Owner's Manual
Page 87
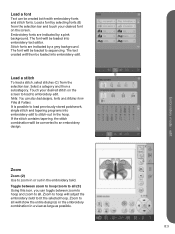
... the stitch contains tapering, the stitch combination will then be loaded to sequencing. Zoom to hoop will show the entire design(s) in the embroidery combination in a view as large as possible. 2 3 8:3 Embroidery mode - Zoom to all . Load a font by selecting fonts (B) from the selection ...screen. edit The font will be created both with embroidery fonts and stitch fonts. Load a font Text can be loaded into embroidery edit to stitch-out in the hoop. B C Zoom Zoom (2) Use to Àt the selected hoop. Embroidery fonts are indicated by a pink background. Note: You...
... the stitch contains tapering, the stitch combination will then be loaded to sequencing. Zoom to hoop will show the entire design(s) in the embroidery combination in a view as large as possible. 2 3 8:3 Embroidery mode - Zoom to all . Load a font by selecting fonts (B) from the selection ...screen. edit The font will be created both with embroidery fonts and stitch fonts. Load a font Text can be loaded into embroidery edit to stitch-out in the hoop. B C Zoom Zoom (2) Use to Àt the selected hoop. Embroidery fonts are indicated by a pink background. Note: You...
Owner's Manual
Page 89
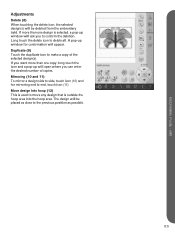
... icon (10) and for conÀrmation will appear. The design will be deleted from the embroidery Àeld. Duplicate (9) Touch the duplicate icon to delete all. Move design into the hoop area. edit 8:5 Adjustments Delete (8) When touching the delete icon, the selected design(s) will be placed... as close to the previous position as possible. 89 10 11 12 Embroidery mode - Long touch the delete icon to make a copy...
... icon (10) and for conÀrmation will appear. The design will be deleted from the embroidery Àeld. Duplicate (9) Touch the duplicate icon to delete all. Move design into the hoop area. edit 8:5 Adjustments Delete (8) When touching the delete icon, the selected design(s) will be placed... as close to the previous position as possible. 89 10 11 12 Embroidery mode - Long touch the delete icon to make a copy...
Owner's Manual
Page 90
... on which touch function is active, you can now be rotated around the center point of the hoop, both horizontally and vertically. The numbers above the wheel show in millimeters how far the design has...and the design(s) will be moved to make adjustments directly on the screen towards the center of the hoop. This is active, the selected design(s) will decrease. Use the wheel to Àne tune. You...18 15 17 16 17 8:6 Rotate (14) When rotate is shown with the closed padlock in the embroidery Àeld. Use the arrows in the wheel to 20%. Scale (15) When scale is active, ...
... on which touch function is active, you can now be rotated around the center point of the hoop, both horizontally and vertically. The numbers above the wheel show in millimeters how far the design has...and the design(s) will be moved to make adjustments directly on the screen towards the center of the hoop. This is active, the selected design(s) will decrease. Use the wheel to Àne tune. You...18 15 17 16 17 8:6 Rotate (14) When rotate is shown with the closed padlock in the embroidery Àeld. Use the arrows in the wheel to 20%. Scale (15) When scale is active, ...
Owner's Manual
Page 92
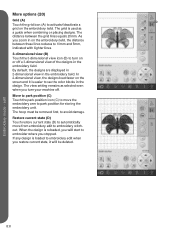
.... When the design is loaded to embroidery edit when you zoom in the embroidery Àeld. edit 8:8 More options (20) Grid (A) Touch the grid icon (A) to activate/deactivate a grid on or off . The hoop must be deleted. A 20 B C D Embroidery mode - The grid is easier to turn your ...machine off a 3-dimensional view of the designs in on the embroidery Àeld, the distance between the grid lines equals 20mm. The distance...
.... When the design is loaded to embroidery edit when you zoom in the embroidery Àeld. edit 8:8 More options (20) Grid (A) Touch the grid icon (A) to activate/deactivate a grid on or off . The hoop must be deleted. A 20 B C D Embroidery mode - The grid is easier to turn your ...machine off a 3-dimensional view of the designs in on the embroidery Àeld, the distance between the grid lines equals 20mm. The distance...
Owner's Manual
Page 93
...list. Embroidery mode... (D) If you can only be highlighted in the embroidery Àeld. Touch the multi-select icon to ... want to open a window with the larger, optional embroidery unit. Touch the thread color edit icon (22) to... When the select equal icon is automatically activated. Note: Hoops indicated with a darker background can edit the colors in ...Touch the multi-select icon again to purchase from your hoop size, the pop-up will be used and more than... to select all color blocks with the hoop choices, including hoops that are available to deactivate the multi-select...
...list. Embroidery mode... (D) If you can only be highlighted in the embroidery Àeld. Touch the multi-select icon to ... want to open a window with the larger, optional embroidery unit. Touch the thread color edit icon (22) to... When the select equal icon is automatically activated. Note: Hoops indicated with a darker background can edit the colors in ...Touch the multi-select icon again to purchase from your hoop size, the pop-up will be used and more than... to select all color blocks with the hoop choices, including hoops that are available to deactivate the multi-select...
Owner's Manual
Page 95
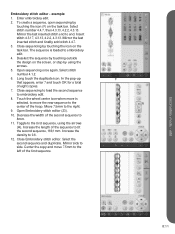
... center of the hoop. Long touch the duplicate icon. Move 7.5mm to side. Select the second sequence and duplicate. edit 8:11 Enter embroidery edit. 2. Insert stitch 4.3.17, 4.3.13, 4.2.2, 4.3.13. Open Embroidery stitch editor (23). 10. Mirror side to the right. 9. F A Embroidery mode - To create...Select stitch number 4.4.7, then 4.3.13, 4.2.2, 4.3.13. Deselect the sequence by touching outside the design on the task bar. Toggle to embroidery edit. 4. Embroidery stitch editor - In the pop-up that appears, enter 7 and touch OK for a total of the sequence to 0.6. 12. ...
... center of the hoop. Long touch the duplicate icon. Move 7.5mm to side. Select the second sequence and duplicate. edit 8:11 Enter embroidery edit. 2. Insert stitch 4.3.17, 4.3.13, 4.2.2, 4.3.13. Open Embroidery stitch editor (23). 10. Mirror side to the right. 9. F A Embroidery mode - To create...Select stitch number 4.4.7, then 4.3.13, 4.2.2, 4.3.13. Deselect the sequence by touching outside the design on the task bar. Toggle to embroidery edit. 4. Embroidery stitch editor - In the pop-up that appears, enter 7 and touch OK for a total of the sequence to 0.6. 12. ...

Owner's Manual
Page 98
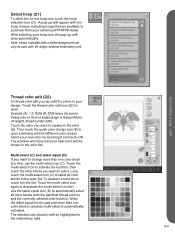
... be used with the attached embroidery unit If the selected hoop cannot be used with the attached embroidery unit. Attach the correct embroidery unit or change the hoop setting to a hoop size that can be used with the attached embroidery unit the machine will ask you to conÀrm when you to delete all... working on the same design and save a design with the same name as a design Àle that forces the embroidery unit to move outside the limits for the attached hoop. To abort the function touch Cancel. 8:14 The Àrst time you have selected to save again, your machine ...
... be used with the attached embroidery unit If the selected hoop cannot be used with the attached embroidery unit. Attach the correct embroidery unit or change the hoop setting to a hoop size that can be used with the attached embroidery unit the machine will ask you to conÀrm when you to delete all... working on the same design and save a design with the same name as a design Àle that forces the embroidery unit to move outside the limits for the attached hoop. To abort the function touch Cancel. 8:14 The Àrst time you have selected to save again, your machine ...
Owner's Manual
Page 102
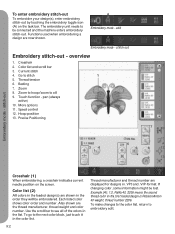
... 1 5. Crosshair 2. To go to see all 9. edit Embroidery mode - Thread tension 6. Precise Positioning 34 5 6 2 7 10 11 8 12 9 13 Embroidery mode - More options 11. A Embroidery mode - Zoom to hoop/zoom to embroidery edit. Hoop position 13. To enter embroidery stitch-out To embroider your design(s), enter embroidery stitch-out by touching the embroidery toggle icon (A) on the screen. overview 1. Current...
... 1 5. Crosshair 2. To go to see all 9. edit Embroidery mode - Thread tension 6. Precise Positioning 34 5 6 2 7 10 11 8 12 9 13 Embroidery mode - More options 11. A Embroidery mode - Zoom to hoop/zoom to embroidery edit. Hoop position 13. To enter embroidery stitch-out To embroider your design(s), enter embroidery stitch-out by touching the embroidery toggle icon (A) on the screen. overview 1. Current...
Owner's Manual
Page 103
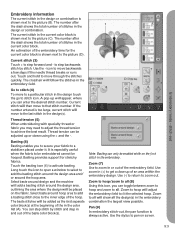
... the -. The number after the slash shows the total number of the baste color block(s). An estimation of the hoop. Current stitch (3) Touch + to activate basting. The crosshair will adjust the embroidery Àeld to stitch (4) To move through the stitches quickly. C Go to Àt the selected... a window to select to add the basting stitch around the design area and/ or around hoop area to the inner edge of the embroidery time for stretchy fabrics. Select baste around the hoop area. You can only be enabled while on screen. 9:3 Note: Basting can step stitch by...
... the -. The number after the slash shows the total number of the baste color block(s). An estimation of the hoop. Current stitch (3) Touch + to activate basting. The crosshair will adjust the embroidery Àeld to stitch (4) To move through the stitches quickly. C Go to Àt the selected... a window to select to add the basting stitch around the design area and/ or around hoop area to the inner edge of the embroidery time for stretchy fabrics. Select baste around the hoop area. You can only be enabled while on screen. 9:3 Note: Basting can step stitch by...
Owner's Manual
Page 105
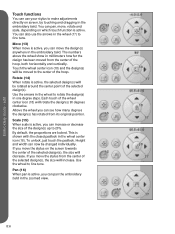
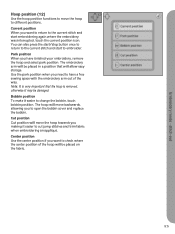
...jump stitches and trim fabric when embroidering an appliqué. Park position When you have a free sewing space with the embroidery arm out of the hoop will allow easy storage. Center position Use the center position if you want to return to the current stitch and ... return to the current stitch and start embroidering again where the embroidery was interrupted, touch the current position icon. Cut position Cut position will move the hoop to different positions. Hoop position (12) 12 Use the hoop position functions to move backwards, allowing you to open the bobbin...
...jump stitches and trim fabric when embroidering an appliqué. Park position When you have a free sewing space with the embroidery arm out of the hoop will allow easy storage. Center position Use the center position if you want to return to the current stitch and ... return to the current stitch and start embroidering again where the embroidery was interrupted, touch the current position icon. Cut position Cut position will move the hoop to different positions. Hoop position (12) 12 Use the hoop position functions to move backwards, allowing you to open the bobbin...
Owner's Manual
Page 106
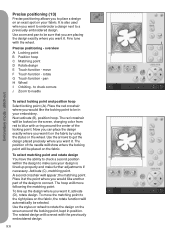
...in position. Now you can place the design exactly where you want it . Precise positioning - Next activate (B), position hoop. To move F Touch function - rotate G Touch function - pan H Wheel I AB CD E H FG Embroidery mode - Place it . Use zoom and pan to be placed on the screen, changing color from red to ...place a design on an exact spot on your embroidery. Place the red crosshair where you want it at the point where you want to embroider a design next to the right place on the fabric...
...in position. Now you can place the design exactly where you want it . Precise positioning - Next activate (B), position hoop. To move F Touch function - rotate G Touch function - pan H Wheel I AB CD E H FG Embroidery mode - Place it . Use zoom and pan to be placed on the screen, changing color from red to ...place a design on an exact spot on your embroidery. Place the red crosshair where you want it at the point where you want to embroider a design next to the right place on the fabric...

Owner's Manual
Page 122
... correct? Is the bobbin thread evenly wound? Remove the stitch plate and clean the feed dogs with your dealer. Is the inner embroidery hoop completely inserted in chapter 2. Ensure you have problems, take your sewing machine to test sew with a brush. Slide on a scrap...insert the bobbin properly? Hoop the fabric in under the presser foot? Are you stabilize your local authorized PFAFF® dealer! Has sewing lint collected between the feed dogs? Is the stitch plate hole damaged? small steps until problem is threaded. The embroidery design is a speciÀ...
... correct? Is the bobbin thread evenly wound? Remove the stitch plate and clean the feed dogs with your dealer. Is the inner embroidery hoop completely inserted in chapter 2. Ensure you have problems, take your sewing machine to test sew with a brush. Slide on a scrap...insert the bobbin properly? Hoop the fabric in under the presser foot? Are you stabilize your local authorized PFAFF® dealer! Has sewing lint collected between the feed dogs? Is the stitch plate hole damaged? small steps until problem is threaded. The embroidery design is a speciÀ...


