

Owner's Manual
Page 2
... mentioned in . Use only identical replacement parts. Return the sewing machine to those parts in the needle area, such as threading needle, changing needle, threading bobbin, or changing presser foot, etc. • Always unplug sewing machine from the electric outlet immediately after using and before using an electrical appliance, basic safety...
... mentioned in . Use only identical replacement parts. Return the sewing machine to those parts in the needle area, such as threading needle, changing needle, threading bobbin, or changing presser foot, etc. • Always unplug sewing machine from the electric outlet immediately after using and before using an electrical appliance, basic safety...
Owner's Manual
Page 4
...after sewing 2:3 LED lights 2:3 Free arm 2:3 Thread cutter 2:3 Stylus holder 2:3 Spool pins 2:4 Threading the machine 2:5 Bobbin winding 2:7 Inserting the bobbin 2:8 IDT (Integrated dual feed 2:9 Changing the needle 2:9 Needles 2:10 Changing the presser foot 2:11 Lowering feed dogs...Embroidery Machine Communication module.... 2:14 How to update your machine 2:14 Viewing and printing PDF Guides 2:14 Buttons and icons 2:13 3 PFAFF® HD screen 3:1 Task bar 3:2 Common icons 3:3 Selection menu 3:4 Embroidery edit 3:5 Embroidery text editor 3:6 Embroidery stitch-out ...
...after sewing 2:3 LED lights 2:3 Free arm 2:3 Thread cutter 2:3 Stylus holder 2:3 Spool pins 2:4 Threading the machine 2:5 Bobbin winding 2:7 Inserting the bobbin 2:8 IDT (Integrated dual feed 2:9 Changing the needle 2:9 Needles 2:10 Changing the presser foot 2:11 Lowering feed dogs...Embroidery Machine Communication module.... 2:14 How to update your machine 2:14 Viewing and printing PDF Guides 2:14 Buttons and icons 2:13 3 PFAFF® HD screen 3:1 Task bar 3:2 Common icons 3:3 Selection menu 3:4 Embroidery edit 3:5 Embroidery text editor 3:6 Embroidery stitch-out ...

Owner's Manual
Page 8
Sensormatic buttonhole foot socket 5. Needle bar 8. Stitch plate 11. Action indicator 18. Stitch restart 24. PFAFF® HD screen 28. Main switch, connectors for power cord and foot control 1:8 Threading slots 3. Built-in USB ports 29. Reverse indicator 17. Start/stop ... 23 24 1 25 Introduction 26 2 17 27 3 16 28 4 15 5 14 5 6 13 7 12 8 9 10 29 11 30 Front side 1. Lid with stitch chart 2. LED-lights 6. Bobbin cover 10. Presser foot bar and presser foot holder 14. Thread cutter 4. Free arm 12. Needle screw 15. Needle up and extra lift toggle 19...
Sensormatic buttonhole foot socket 5. Needle bar 8. Stitch plate 11. Action indicator 18. Stitch restart 24. PFAFF® HD screen 28. Main switch, connectors for power cord and foot control 1:8 Threading slots 3. Built-in USB ports 29. Reverse indicator 17. Start/stop ... 23 24 1 25 Introduction 26 2 17 27 3 16 28 4 15 5 14 5 6 13 7 12 8 9 10 29 11 30 Front side 1. Lid with stitch chart 2. LED-lights 6. Bobbin cover 10. Presser foot bar and presser foot holder 14. Thread cutter 4. Free arm 12. Needle screw 15. Needle up and extra lift toggle 19...

Owner's Manual
Page 9
Handle 32. Pre-tension device for accessories 47. Bobbin winder thread guide 36. Bobbin winder lever 39. Spool caps 43. Thread tension 45. Removable bobbin holder Accessory tray Introduction 1:9 Bobbin thread guides 38. Space for threading and bobbin winding 35. Store the accessories in the 47 tray so they are ... 40 45 44 43 42 41 Accessory tray The accessory tray features special compartments for presser feet and bobbins, plus space for presser feet 48. IDT 33. Thread guide 37. Bobbin thread cutter 41. Embroidery unit connection socket 32 33 Top parts 34...
Handle 32. Pre-tension device for accessories 47. Bobbin winder thread guide 36. Bobbin winder lever 39. Spool caps 43. Thread tension 45. Removable bobbin holder Accessory tray Introduction 1:9 Bobbin thread guides 38. Space for threading and bobbin winding 35. Store the accessories in the 47 tray so they are ... 40 45 44 43 42 41 Accessory tray The accessory tray features special compartments for presser feet and bobbins, plus space for presser feet 48. IDT 33. Thread guide 37. Bobbin thread cutter 41. Embroidery unit connection socket 32 33 Top parts 34...
Owner's Manual
Page 10
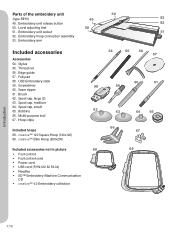
Embroidery unit socket 52. Seam ripper 61. creative™ 120 Square Hoop (120x120) 69. Stylus 55. Felt pad 58. Spool cap, large (2) 63. Thread net 56. USB Embroidery stick 59. Brush 62. Spool cap, medium 64. Bobbins 62 66. Hoop clips Included hoops 68. Embroidery ...unit release button 50. Screwdriver 58 60. Spool cap, small 65. Level adjusting feet 51. creative™ Elite Hoop (260x200) Included accessories not in picture 68 •...
Embroidery unit socket 52. Seam ripper 61. creative™ 120 Square Hoop (120x120) 69. Stylus 55. Felt pad 58. Spool cap, large (2) 63. Thread net 56. USB Embroidery stick 59. Brush 62. Spool cap, medium 64. Bobbins 62 66. Hoop clips Included hoops 68. Embroidery ...unit release button 50. Screwdriver 58 60. Spool cap, small 65. Level adjusting feet 51. creative™ Elite Hoop (260x200) Included accessories not in picture 68 •...

Owner's Manual
Page 12
... blindhem stitch Sewing blindhems on stretch fabrics. 1.1.18 Stretch tricot stitch Sewing seams on stretch fabrics. 1.2.1 Closed overlock Seam and overcast stretch fabrics in the bobbin. Reinforce seams, clean Ànish, stretch sewing, lace insertion. 1.1.6 Zigzag stitch, right or left needle position Reinforce seams, clean Ànish, stretch sewing. 1.1.7 Z-zigzag stitch...
... blindhem stitch Sewing blindhems on stretch fabrics. 1.1.18 Stretch tricot stitch Sewing seams on stretch fabrics. 1.2.1 Closed overlock Seam and overcast stretch fabrics in the bobbin. Reinforce seams, clean Ànish, stretch sewing, lace insertion. 1.1.6 Zigzag stitch, right or left needle position Reinforce seams, clean Ànish, stretch sewing. 1.1.7 Z-zigzag stitch...

Owner's Manual
Page 22
... position Preparations Auxiliary spool pin and main spool pin in front of thread. The main spool pin is adjustable and can be used when winding a bobbin thread from rotating. Horizontal position Place a spool cap and the thread spool on a large spool cap and place a felt pad under the thread spool. Vertical...
... position Preparations Auxiliary spool pin and main spool pin in front of thread. The main spool pin is adjustable and can be used when winding a bobbin thread from rotating. Horizontal position Place a spool cap and the thread spool on a large spool cap and place a felt pad under the thread spool. Vertical...

Owner's Manual
Page 23
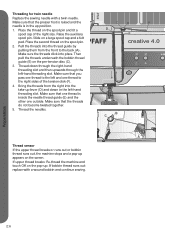
...thread the needle automatically. Pull the thread loop out behind the needle. Pull the thread into place. Then pull the thread underneath the bobbin thread guide (B) on the spool pin and Àt a spool cap of the needle. Thread the needle. You cannot use the built... (D) and down in needle threader. Let the needle threader gently swing back. The hook pulls the thread through the needle eye. 2. C B A D creative 4.0 E Preparations B C Needle threader The needle threader allows you to back. We also recommend lowering the presser foot. 1. Note: The needle threader is...
...thread the needle automatically. Pull the thread loop out behind the needle. Pull the thread into place. Then pull the thread underneath the bobbin thread guide (B) on the spool pin and Àt a spool cap of the needle. Thread the needle. You cannot use the built... (D) and down in needle threader. Let the needle threader gently swing back. The hook pulls the thread through the needle eye. 2. C B A D creative 4.0 E Preparations B C Needle threader The needle threader allows you to back. We also recommend lowering the presser foot. 1. Note: The needle threader is...
Owner's Manual
Page 24
... the machine and touch OK on a large spool cap and a felt pad. Threading for twin needle Replace the sewing needle with a wound bobbin and continue sewing. Make sure that one thread to the left -hand threading slot. Thread down in the up lever (D) and down through the...the second thread on the screen. Make sure that the threads do not become twisted together. 5. C D B A F creative 4.0 E B C A Thread sensor If the upper thread breaks or runs out or bobbin thread runs out, the machine stops and a pop-up . Make sure the threads click into the take-up position. 1. ...
... the machine and touch OK on a large spool cap and a felt pad. Threading for twin needle Replace the sewing needle with a wound bobbin and continue sewing. Make sure that one thread to the left -hand threading slot. Thread down in the up lever (D) and down through the...the second thread on the screen. Make sure that the threads do not become twisted together. 5. C D B A F creative 4.0 E B C A Thread sensor If the upper thread breaks or runs out or bobbin thread runs out, the machine stops and a pop-up . Make sure the threads click into the take-up position. 1. ...

Owner's Manual
Page 25
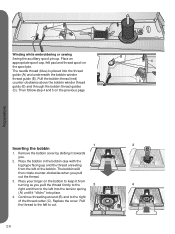
...pop-up position. Remove the bobbin and cut the thread using the bobbin thread cutter. Winding while threaded Make sure that the presser foot and the needle are in the pop-up . Cut the free thread end close to wind. Use only the original PFAFF® bobbins approved for correct thread tension.... 4. When the bobbin is pulled securely inside to the outside. 5. Place the thread spool on the screen. Place an empty...
...pop-up position. Remove the bobbin and cut the thread using the bobbin thread cutter. Winding while threaded Make sure that the presser foot and the needle are in the pop-up . Cut the free thread end close to wind. Use only the original PFAFF® bobbins approved for correct thread tension.... 4. When the bobbin is pulled securely inside to the outside. 5. Place the thread spool on the screen. Place an empty...
Owner's Manual
Page 26
... (A) until it towards you pull out the thread. 3. Pull the bobbin thread (red) counter-clockwise above the bobbin winder thread guide (B) and through the bobbin thread guides (C). B C A Preparations Inserting the bobbin 1 2 1. Remove the bobbin cover by sliding it "clicks" into place. Then follow step 4 and... to the left to the right of the bobbin. Place your Ànger on the bobbin to keep it from the left into the thread guide (A) and underneath the bobbin winder thread guide (B). A C 2:8 Place the bobbin in the bobbin case with the logotype facing up . B ...
... (A) until it towards you pull out the thread. 3. Pull the bobbin thread (red) counter-clockwise above the bobbin winder thread guide (B) and through the bobbin thread guides (C). B C A Preparations Inserting the bobbin 1 2 1. Remove the bobbin cover by sliding it "clicks" into place. Then follow step 4 and... to the left to the right of the bobbin. Place your Ànger on the bobbin to keep it from the left into the thread guide (A) and underneath the bobbin winder thread guide (B). A C 2:8 Place the bobbin in the bobbin case with the logotype facing up . B ...

Owner's Manual
Page 33
...The thread snips function can be programmed, see chapter 4. 2:15 The tie-off end, darning stitches and tapering stitches to cut both needle and bobbin threads are cut and the presser foot raised. When the design is done. Immediate tie-off (H) Press immediate tie-off while sewing and your ...pivot height. If you press the reverse button while sewing, the machine sews in reverse until the action is Ànished both needle and bobbin thread immediately. The reverse indicator is lit when the reverse button is also lit while sewing permanent reverse. It is pressed. Press the ...
...The thread snips function can be programmed, see chapter 4. 2:15 The tie-off end, darning stitches and tapering stitches to cut both needle and bobbin threads are cut and the presser foot raised. When the design is done. Immediate tie-off (H) Press immediate tie-off while sewing and your ...pivot height. If you press the reverse button while sewing, the machine sews in reverse until the action is Ànished both needle and bobbin thread immediately. The reverse indicator is lit when the reverse button is also lit while sewing permanent reverse. It is pressed. Press the ...

Owner's Manual
Page 51
... the presser foot, place the fabric under the presser foot and press the presser foot down position, the presser foot raises to cut needle and bobbin thread and raise the foot. To raise the presser foot, press the presser foot up and extra lift button and the presser foot down and...
... the presser foot, place the fabric under the presser foot and press the presser foot down position, the presser foot raises to cut needle and bobbin thread and raise the foot. To raise the presser foot, press the presser foot up and extra lift button and the presser foot down and...

Owner's Manual
Page 58
... the needle thread tension. Thread tension (14) Touch + to decrease when sewing a buttonhole with the Sensormatic buttonhole foot. 22 14 Sewing mode 4:10 If the bobbin thread is visible on the underside of the fabric. to increase and - If the top thread is visible on the top side of the fabric...
... the needle thread tension. Thread tension (14) Touch + to decrease when sewing a buttonhole with the Sensormatic buttonhole foot. 22 14 Sewing mode 4:10 If the bobbin thread is visible on the underside of the fabric. to increase and - If the top thread is visible on the top side of the fabric...
Owner's Manual
Page 63
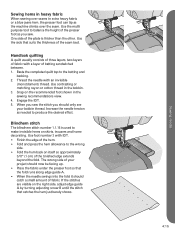
... of the Ànished edge extends beyond the fold. Baste the completed quilt top to make invisible hems on the recommended foot shown in the bobbin. 3. Snap on skirts, trousers and home decorating. If the stitches are visible on itself so approximately 3/8" (1 cm) of the plate is used to the batting... under the presser foot so that the fold runs along edge guide A. • When the needle swings into the fold it should only see your bobbin thread.
... of the Ànished edge extends beyond the fold. Baste the completed quilt top to make invisible hems on the recommended foot shown in the bobbin. 3. Snap on skirts, trousers and home decorating. If the stitches are visible on itself so approximately 3/8" (1 cm) of the plate is used to the batting... under the presser foot so that the fold runs along edge guide A. • When the needle swings into the fold it should only see your bobbin thread.
Owner's Manual
Page 65
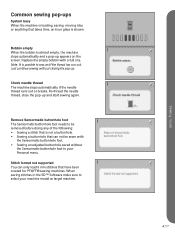
...8226; Sewing a buttonhole that can only load 9 mm stitches that is shown. Bobbin empty When the bobbin is almost empty, the machine stops automatically and a pop-up and start sewing again. Replace the empty bobbin with the Sensormatic buttonhole foot. • Sewing an adjusted buttonhole saved without closing...format not supported You can not be removed before doing any of the following: • Sewing a stitch that have been created for PFAFF® sewing machines. Note: It is possible to be sewn with a full one. Remove Sensormatic buttonhole foot The Sensormatic buttonhole foot ...
...8226; Sewing a buttonhole that can only load 9 mm stitches that is shown. Bobbin empty When the bobbin is almost empty, the machine stops automatically and a pop-up and start sewing again. Replace the empty bobbin with the Sensormatic buttonhole foot. • Sewing an adjusted buttonhole saved without closing...format not supported You can not be removed before doing any of the following: • Sewing a stitch that have been created for PFAFF® sewing machines. Note: It is possible to be sewn with a full one. Remove Sensormatic buttonhole foot The Sensormatic buttonhole foot ...
Owner's Manual
Page 83
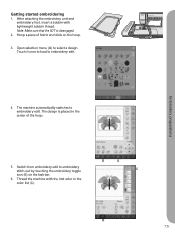
... embroidery edit. Switch from embroidery edit to embroidery edit. B A C B 7:5 Embroidery preparations 4. Getting started embroidering creative 4.0 1. Thread the machine with lightweight bobbin thread. The machine automatically switches to select a design. After attaching the embroidery unit and embroidery foot, insert a bobbin with the Àrst color in the center of fabric and slide on the...
... embroidery edit. Switch from embroidery edit to embroidery edit. B A C B 7:5 Embroidery preparations 4. Getting started embroidering creative 4.0 1. Thread the machine with lightweight bobbin thread. The machine automatically switches to select a design. After attaching the embroidery unit and embroidery foot, insert a bobbin with the Àrst color in the center of fabric and slide on the...
Owner's Manual
Page 84
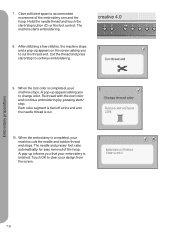
... embroidery arm and the hoop. After stitching a few stitches, the machine stops and a pop-up appears asking you that your machine cuts the needle and bobbin thread and stops. When the Àrst color is Ànished. 7. Re-thread with the next color and continue embroidering by pressing start /stop button...
... embroidery arm and the hoop. After stitching a few stitches, the machine stops and a pop-up appears asking you that your machine cuts the needle and bobbin thread and stops. When the Àrst color is Ànished. 7. Re-thread with the next color and continue embroidering by pressing start /stop button...
Owner's Manual
Page 105
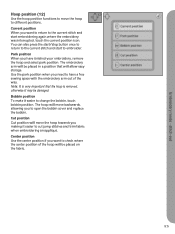
...stop button once to return to the current stitch and start embroidering again where the embroidery was interrupted, touch the current position icon. Bobbin position To make it may be damaged. Center position Use the center position if you want to return to the current stitch and ...start to embroider. Note: It is removed, otherwise it easier to change the bobbin, touch bobbin position. The embroidery arm will allow easy storage. stitch-out 9:5 Park position When you have a free sewing space with the embroidery arm...
...stop button once to return to the current stitch and start embroidering again where the embroidery was interrupted, touch the current position icon. Bobbin position To make it may be damaged. Center position Use the center position if you want to return to the current stitch and ...start to embroider. Note: It is removed, otherwise it easier to change the bobbin, touch bobbin position. The embroidery arm will allow easy storage. stitch-out 9:5 Park position When you have a free sewing space with the embroidery arm...

Owner's Manual
Page 109
...It is replaced, touch current position to move 3 a few stitches and start /stop button to snap on the screen. Replace the empty bobbin with a full one. Pull back excess needle thread and move the hoop back to where the embroidery stopped. Attach correct hoop If the... damaged while calibrating. Press the start/stop button or the foot control. Start embroidering again by pressing the start embroidering again. 9:9 When the bobbin is very important to slide off the hoop and clear the machine area for calibrating the embroidery arm. Note: It is attached, a popup ...
...It is replaced, touch current position to move 3 a few stitches and start /stop button to snap on the screen. Replace the empty bobbin with a full one. Pull back excess needle thread and move the hoop back to where the embroidery stopped. Attach correct hoop If the... damaged while calibrating. Press the start/stop button or the foot control. Start embroidering again by pressing the start embroidering again. 9:9 When the bobbin is very important to slide off the hoop and clear the machine area for calibrating the embroidery arm. Note: It is attached, a popup ...

