
Owner's Manual
Page 2
... chapter buttonholes, familiarizes you can put in your wish to Your machine creative 2140 homepage: can likewise will never be always be outdated. The language dealer has not have it set to the latest software detailed information, astsaktuyso.uTr hdiesaelnersuorrevsistiht aotuyrour www.pfaff.com II iucSfheacethtucerhemarpattocehrEi3nnegplaiissghseool1rd8,S. updated For more to a ocdfhifyafoneurgerendPt flaiatfnftogcurtheaaegteilv,aenygo2uu1a4cg0aenisoefpatrsheielsyectcohubyannttrghyeeintmhwiasnh. aimOnssvayiceoshrutviarnineePcwfeoa...
... chapter buttonholes, familiarizes you can put in your wish to Your machine creative 2140 homepage: can likewise will never be always be outdated. The language dealer has not have it set to the latest software detailed information, astsaktuyso.uTr hdiesaelnersuorrevsistiht aotuyrour www.pfaff.com II iucSfheacethtucerhemarpattocehrEi3nnegplaiissghseool1rd8,S. updated For more to a ocdfhifyafoneurgerendPt flaiatfnftogcurtheaaegteilv,aenygo2uu1a4cg0aenisoefpatrsheielsyectcohubyannttrghyeeintmhwiasnh. aimOnssvayiceoshrutviarnineePcwfeoa...
Owner's Manual
Page 3
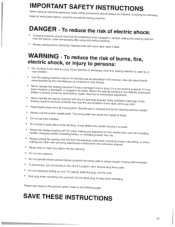
....meoxaracdmhrioinnpeaptiiefodint ,ihnarteospwaaiard,taeerml.eaRcgtereitdcuarncl ootrrhdemosreecpwhluaingng,icimfaliat acisdhjinunosettmtwoeontrhkt.einngeparroepsetralyu,thifoirtisheads • Never operate the sewing machine with same type rated 5 Watt. lubricating, or when • Never drop or insert...before cleaning. Special care is used as threading • Always making unplug the sewing machine from outlet. • Do not unplug by or • rUesceomthmis esnedweidngbymtahcehimneanounflayctfuorreirtsaisntceonndteadinuedseinasthdisesmcarinbueadl.in ...
....meoxaracdmhrioinnpeaptiiefodint ,ihnarteospwaaiard,taeerml.eaRcgtereitdcuarncl ootrrhdemosreecpwhluaingng,icimfaliat acisdhjinunosettmtwoeontrhkt.einngeparroepsetralyu,thifoirtisheads • Never operate the sewing machine with same type rated 5 Watt. lubricating, or when • Never drop or insert...before cleaning. Special care is used as threading • Always making unplug the sewing machine from outlet. • Do not unplug by or • rUesceomthmis esnedweidngbymtahcehimneanounflayctfuorreirtsaisntceonndteadinuedseinasthdisesmcarinbueadl.in ...
Owner's Manual
Page 4
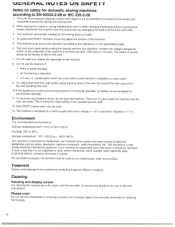
...cord from wall socket, grasp the plug close to 240 volts. 7. An authorized PFAFF mechanic must check before putting the sewing machine into openings on the machine. 8. The maximum permissible wattage for supervised use the machine if: • there is visible damage • its' functioning is disturbed,...any stubborn dirt, use a dry, clean, soft lint-free cloth. This is wet, i.e. Only PFAFF original parts may be used for the wrong purpose or incorrectly operated, no parts inside the machine that it is : Ambient temperature 50°F (10°C) to 95°F (35°C) ...
...cord from wall socket, grasp the plug close to 240 volts. 7. An authorized PFAFF mechanic must check before putting the sewing machine into openings on the machine. 8. The maximum permissible wattage for supervised use the machine if: • there is visible damage • its' functioning is disturbed,...any stubborn dirt, use a dry, clean, soft lint-free cloth. This is wet, i.e. Only PFAFF original parts may be used for the wrong purpose or incorrectly operated, no parts inside the machine that it is : Ambient temperature 50°F (10°C) to 95°F (35°C) ...
Owner's Manual
Page 5
...11 Creative Data Manager 3-12 The Creative Assistant 3-13 Sewing Assistant 3-13 Embroidery Assistant 3-13 Machine Assistant 3-13 Instructions on using the Creative Assistant Pop-up ! needle down 3-1 Reverse sewing button 3-1 The tool bar 3-2 Tool bar after open the Creative Assistant 3-2 Instructions on using your Pfaff creative 2140 ...Dual voltage Contrast of the screen Top cover Accessory tray Arranging the accessories Free arm Bobbin winding Preparing the machine for bobbin winding Winding the bobbin from the spool pin Winding a bobbin through the needle Hook/Bobbin ...
...11 Creative Data Manager 3-12 The Creative Assistant 3-13 Sewing Assistant 3-13 Embroidery Assistant 3-13 Machine Assistant 3-13 Instructions on using the Creative Assistant Pop-up ! needle down 3-1 Reverse sewing button 3-1 The tool bar 3-2 Tool bar after open the Creative Assistant 3-2 Instructions on using your Pfaff creative 2140 ...Dual voltage Contrast of the screen Top cover Accessory tray Arranging the accessories Free arm Bobbin winding Preparing the machine for bobbin winding Winding the bobbin from the spool pin Winding a bobbin through the needle Hook/Bobbin ...

Owner's Manual
Page 6
...the machine's memory or from a creative memory card Move the design within the hoop Embroidery Adjust an embroidery combination Save an embroidery combination Open a saved embroidery combination Embroider stitches stored in your Pfaff creative 2140 The Creative Data Manager Functions In the Creative ...Data Manager Working with source and destination fields in the Creative Data Manager Working with a field in the Creative Data Manager Delete Create a directory Memory...
...the machine's memory or from a creative memory card Move the design within the hoop Embroidery Adjust an embroidery combination Save an embroidery combination Open a saved embroidery combination Embroider stitches stored in your Pfaff creative 2140 The Creative Data Manager Functions In the Creative ...Data Manager Working with source and destination fields in the Creative Data Manager Working with a field in the Creative Data Manager Delete Create a directory Memory...

Owner's Manual
Page 7
... topstitched hem Other techniques Belt loops Zippers Trouser zipper Centered zipper (concealed on both sides) Visible zipper Buttonholes Machine-made buttonholes Inserting the buttonhole guide Buttonhole tips Buttonhole with gimp thread Eyelet buttonhole with gimp thread Sewing on ...patterns 6-24 Rehoop the fabric 6-24 Position an additional design 6-25 Combine embroidered word combinations 6-26 Creating a directory in the Creative Data Manager Embroidering the text Positioning an additional section Pattern combinations Combine designs in the hoop Embroider endless borders 6-26 6-28 6-...
... topstitched hem Other techniques Belt loops Zippers Trouser zipper Centered zipper (concealed on both sides) Visible zipper Buttonholes Machine-made buttonholes Inserting the buttonhole guide Buttonhole tips Buttonhole with gimp thread Eyelet buttonhole with gimp thread Sewing on ...patterns 6-24 Rehoop the fabric 6-24 Position an additional design 6-25 Combine embroidered word combinations 6-26 Creating a directory in the Creative Data Manager Embroidering the text Positioning an additional section Pattern combinations Combine designs in the hoop Embroider endless borders 6-26 6-28 6-...
Owner's Manual
Page 9
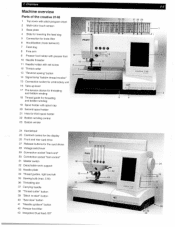
Overview Machine overview Parts of the creative 2140 1 Top cover with stitch program chart 2 Multi-color touch screen 3 Base plate 4 Slide for lowering the feed dog 16 5 Connection for knee lifter 6 Hook/bobbin (... Connection socket 'lead cord" 30 Connection socket "foot control" 31 Master switch 36 32 Detachable work support 33 Needle plate 34 Thread guides. 1. fl ) tip> 1' )I PFAFF -24 creative 2140 Th dII 28 9I 31129 30
Overview Machine overview Parts of the creative 2140 1 Top cover with stitch program chart 2 Multi-color touch screen 3 Base plate 4 Slide for lowering the feed dog 16 5 Connection for knee lifter 6 Hook/bobbin (... Connection socket 'lead cord" 30 Connection socket "foot control" 31 Master switch 36 32 Detachable work support 33 Needle plate 34 Thread guides. 1. fl ) tip> 1' )I PFAFF -24 creative 2140 Th dII 28 9I 31129 30
Owner's Manual
Page 10
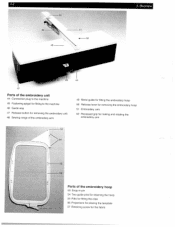
1-2 50 49 48 51 4 52 1. Overview Parts of the embroidery unit 44 Connection plug to the machine 45 Fastening spigot for fitting to the machine 46 Guide way 47 Release button for removing the embroidery unit 48 Sewing range of the embroidery arm 49 Metal guide for fitting the embroidery ...
1-2 50 49 48 51 4 52 1. Overview Parts of the embroidery unit 44 Connection plug to the machine 45 Fastening spigot for fitting to the machine 46 Guide way 47 Release button for removing the embroidery unit 48 Sewing range of the embroidery arm 49 Metal guide for fitting the embroidery ...
Owner's Manual
Page 17
... • In the context menu you touch within a stitch, the direct all functions appearing in Creative Assistant • There is bar then a Creative Assistant function in your sewing machine to help function is to refer to call up a design 2. help you; The main menu shows... which rc OK 1. Tool bar Main menu == This function allows you choose whether the information on the machine's functions " 1 Closing the Creative Assistant Use this icon to open the Sewing and Embroidery Assistant. • This provides you choose whether the information...
... • In the context menu you touch within a stitch, the direct all functions appearing in Creative Assistant • There is bar then a Creative Assistant function in your sewing machine to help function is to refer to call up a design 2. help you; The main menu shows... which rc OK 1. Tool bar Main menu == This function allows you choose whether the information on the machine's functions " 1 Closing the Creative Assistant Use this icon to open the Sewing and Embroidery Assistant. • This provides you choose whether the information...
Owner's Manual
Page 18
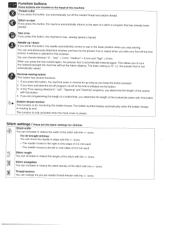
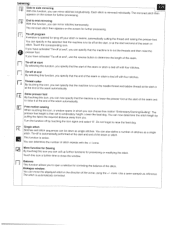
... seam with the ±/- how far the presser foot is raised when you press started. If you press this button, the machine sews in the lower position when you press this button, the needle automatically comes to turn presser foot is for stitches Stitch width... press this button. The bobbin symbol flashes automatically when the bobbin thread This function is only activated when the hook cover is automatically lowered machine without the fabric slipping. directions", "pat". If you are located on the head of 0.5 mm each - The needle moves to the...
... seam with the ±/- how far the presser foot is raised when you press started. If you press this button, the machine sews in the lower position when you press this button, the needle automatically comes to turn presser foot is for stitches Stitch width... press this button. The bobbin symbol flashes automatically when the bobbin thread This function is only activated when the hook cover is automatically lowered machine without the fabric slipping. directions", "pat". If you are located on the head of 0.5 mm each - The needle moves to the...
Owner's Manual
Page 19
.... automatically cutting tie off stitch sequences can height. r Tie-off at end By selecting this function, you specify that the machine is tied off by Turn the function off with four stitches. Do not forget to close the window. Single stitch - processing.... Lower from you. Stitches and stitch. You can specify in the selection that the machine is to stitch. Touch the corresponding icon. Thread cutter l '} By touching this icon, you can mirror stitches transversely. choose the ...
.... automatically cutting tie off stitch sequences can height. r Tie-off at end By selecting this function, you specify that the machine is tied off by Turn the function off with four stitches. Do not forget to close the window. Single stitch - processing.... Lower from you. Stitches and stitch. You can specify in the selection that the machine is to stitch. Touch the corresponding icon. Thread cutter l '} By touching this icon, you can mirror stitches transversely. choose the ...

Owner's Manual
Page 20
...reduce the programmed length of this function, you can call up a setting that the selected dimension you remove the needle from the machine. icons. . The sewn length In mm appears on appliqué work in the sample as reference. Use a sewn Programmable ... you open a window for programming a new setting Sew the desired length, in such a the screen. It remains active even after the machine has been switched off again when you are automatically added. This function is automatically active when you open a program, for opening , saving,...
...reduce the programmed length of this function, you can call up a setting that the selected dimension you remove the needle from the machine. icons. . The sewn length In mm appears on appliqué work in the sample as reference. Use a sewn Programmable ... you open a window for programming a new setting Sew the desired length, in such a the screen. It remains active even after the machine has been switched off again when you are automatically added. This function is automatically active when you open a program, for opening , saving,...

Owner's Manual
Page 21
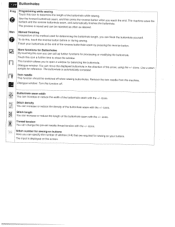
...closes the window. Touch this icon, the menu for opening. You can create a directory only in the Creative File Manager. 'Close' icon If you have saved your input. Opening the memory of the machine or of eight characters long. saving, deleting or closing a program 'Open' icon This opens a version of... card drive (front or rear drive) in which you have inserted the card. To save the program on the processing screen from a creative card or from the machine's memory. (Stitches, stitch sequences and programs are referred to as ", the menu for input of the cursor icons, move the marker ...
...closes the window. Touch this icon, the menu for opening. You can create a directory only in the Creative File Manager. 'Close' icon If you have saved your input. Opening the memory of the machine or of eight characters long. saving, deleting or closing a program 'Open' icon This opens a version of... card drive (front or rear drive) in which you have inserted the card. To save the program on the processing screen from a creative card or from the machine's memory. (Stitches, stitch sequences and programs are referred to as ", the menu for input of the cursor icons, move the marker ...
Owner's Manual
Page 22
... buttonhole seam, and automatically finishes when you can specify the number of the reverse buttonhole seam by pressing the reverse button. The machine sews the The process is automatically corrected. More functions for sewing-on buttons Here you can call up further functions for balancing the... required for reference. Use a sewn Twin needle U This function should be repeated as often as desired. Remove the twin needle from the machine. Buttonhole seam width You can increase or reduce the width of the buttonhole seam with the +7 icons Stitch density I You can increase or...
... buttonhole seam, and automatically finishes when you can specify the number of the reverse buttonhole seam by pressing the reverse button. The machine sews the The process is automatically corrected. More functions for sewing-on buttons Here you can call up further functions for balancing the... required for reference. Use a sewn Twin needle U This function should be repeated as often as desired. Remove the twin needle from the machine. Buttonhole seam width You can increase or reduce the width of the buttonhole seam with the +7 icons Stitch density I You can increase or...

Owner's Manual
Page 23
... a maximum of the field indicates this icon to move over several stages via the +1- The display scrolls up I Processing screen Opening the memory of the machine or of words is longer than two lines. A red dash appears for selecting capital letters, lower-case letters, numbers or symbols. Touch this . Delete You...
... a maximum of the field indicates this icon to move over several stages via the +1- The display scrolls up I Processing screen Opening the memory of the machine or of words is longer than two lines. A red dash appears for selecting capital letters, lower-case letters, numbers or symbols. Touch this . Delete You...

Owner's Manual
Page 24
... of the stitch so that a twin needle can be used. Dialogue window: You can move the displayed word sequence in the selection that the machine is to open a window for correcting the word sequence. If you have activated "Tie-off at the end of the seam automatically. If you...of the stitch. You can specify in the direction of the arrow using the +/- Thread cutter By touching this icon, you specify that the machine is automatically activated as single stitches. The word sequence is automatically performed at end", use the reverse button to side mirroring • With ...
... of the stitch so that a twin needle can be used. Dialogue window: You can move the displayed word sequence in the selection that the machine is to open a window for correcting the word sequence. If you have activated "Tie-off at the end of the seam automatically. If you...of the stitch. You can specify in the direction of the arrow using the +/- Thread cutter By touching this icon, you specify that the machine is automatically activated as single stitches. The word sequence is automatically performed at end", use the reverse button to side mirroring • With ...

Owner's Manual
Page 25
... the center The numbers of the selected segment with the +7- Rear card drive -- The window is automatically opened in order to M, the machine embroiders all 3 fields and the window is to change of thread breakage. In this , press the foot control after If you changed, ...cursor to change of the design with the cursor keys. y i aiu - thread breakage. segment in top of the pop-up the machine's memory. Only the selected color segment is sub-divided into three fields in the same color. the color segment that may occur Advancing stitch...
... the center The numbers of the selected segment with the +7- Rear card drive -- The window is automatically opened in order to M, the machine embroiders all 3 fields and the window is to change of thread breakage. In this , press the foot control after If you changed, ...cursor to change of the design with the cursor keys. y i aiu - thread breakage. segment in top of the pop-up the machine's memory. Only the selected color segment is sub-divided into three fields in the same color. the color segment that may occur Advancing stitch...

Owner's Manual
Page 27
...a further time to side. Zoom down You can mark a stitch or a stitch sequence. this icon to sew. Opening the memory of the machine or of the same stitch without having to switch back to create a new stitch sequence. A dash appears for further processing. you touch this... function to open a window for the stitch sequence appears and the machine is marked, the processing menu for connect your stitches in several steps. Marking In order to be marked. Activity arrows Using these arrows ...
...a further time to side. Zoom down You can mark a stitch or a stitch sequence. this icon to sew. Opening the memory of the machine or of the same stitch without having to switch back to create a new stitch sequence. A dash appears for further processing. you touch this... function to open a window for the stitch sequence appears and the machine is marked, the processing menu for connect your stitches in several steps. Marking In order to be marked. Activity arrows Using these arrows ...

Owner's Manual
Page 28
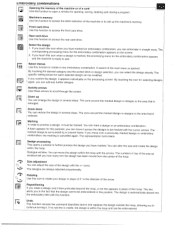
...to raise it at the end of the seam automatically. icons. Tie-off at end By selecting this icon, you can now specify that the machine is to cut the needle thread and bobbin thread at the start or at the end of the seam automatically. Balance 1 14 This function ...allows you specify that the machine is opened for correcting the stitch sequence. The stitch sequence is here automatically activated as standard setting. This function should be used. Dialogue window: ...
...to raise it at the end of the seam automatically. icons. Tie-off at end By selecting this icon, you can now specify that the machine is to cut the needle thread and bobbin thread at the start or at the end of the seam automatically. Balance 1 14 This function ...allows you specify that the machine is opened for correcting the stitch sequence. The stitch sequence is here automatically activated as standard setting. This function should be used. Dialogue window: ...
Owner's Manual
Page 29
.... S&ect menus Use this function to access the rear card drive. The specific setting shown for the embroidery combination appears and the machine is cancelled again. Zoom down You can be modified. The numbers in several steps. Rear card drive Use this function to create... cursor arrows. The designs are always adjusted proportionally. be marked with this design cannot function. tmroiaery combinations Opening the memory of the machine or of a card Use this function to open a window for this purpose; Dialogue window: You can select the design directly. ...
.... S&ect menus Use this function to access the rear card drive. The specific setting shown for the embroidery combination appears and the machine is cancelled again. Zoom down You can be modified. The numbers in several steps. Rear card drive Use this function to create... cursor arrows. The designs are always adjusted proportionally. be marked with this design cannot function. tmroiaery combinations Opening the memory of the machine or of a card Use this function to open a window for this purpose; Dialogue window: You can select the design directly. ...


