
Owner's Manual
Page 2
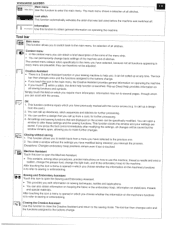
...pfaff.com II owreidf iysohu. updated For more to 4. c2dSr1eee4mwa0toii.vnnEegsvt2Are1ans4tes0msi.soatranenddt:deteTashicleeridSbeesweswivniangrgiAouisnssfiossretmawnaittnicoghntaeipscthesnrtoicqroeudnetsainitnhtshateaaS"releewxpiiocnosgnsiAboslfessieswtwiatinhntgyo"of;uyirtoPaulfrsaofPffcafrfeative 6. 7. 8. If your own notes together with the various sequences and different embroidery...can likewise will never be always be outdated. i-low to Your machine creative 2140 homepage: can put in your wish to use this instructions manual icTllloeuasmtrraastktereuhcitotuwarsee,...
...pfaff.com II owreidf iysohu. updated For more to 4. c2dSr1eee4mwa0toii.vnnEegsvt2Are1ans4tes0msi.soatranenddt:deteTashicleeridSbeesweswivniangrgiAouisnssfiossretmawnaittnicoghntaeipscthesnrtoicqroeudnetsainitnhtshateaaS"releewxpiiocnosgnsiAboslfessieswtwiatinhntgyo"of;uyirtoPaulfrsaofPffcafrfeative 6. 7. 8. If your own notes together with the various sequences and different embroidery...can likewise will never be always be outdated. i-low to Your machine creative 2140 homepage: can put in your wish to use this instructions manual icTllloeuasmtrraastktereuhcitotuwarsee,...
Owner's Manual
Page 5
... 3-11 All stitches 3-11 Last stitch 3-11 Creative Data Manager 3-12 The Creative Assistant 3-13 Sewing Assistant 3-13 Embroidery Assistant 3-13 Machine Assistant 3-13 Instructions on using the Creative Assistant Pop-up Direct Help 3-14 Instructions on using...16 2-16 2-16 -4eneral notes on using your Sewing and Embroidery Assistant 3-16 needle down 3-1 Reverse sewing button 3-1 The tool bar 3-2 Tool bar after open the Creative Assistant 3-2 Instructions on operating your Pfaff creative 2140 3-2 Selecting a stitch 3-3 Altering the stitch settings 3-4 Single ...
... 3-11 All stitches 3-11 Last stitch 3-11 Creative Data Manager 3-12 The Creative Assistant 3-13 Sewing Assistant 3-13 Embroidery Assistant 3-13 Machine Assistant 3-13 Instructions on using the Creative Assistant Pop-up Direct Help 3-14 Instructions on using...16 2-16 2-16 -4eneral notes on using your Sewing and Embroidery Assistant 3-16 needle down 3-1 Reverse sewing button 3-1 The tool bar 3-2 Tool bar after open the Creative Assistant 3-2 Instructions on operating your Pfaff creative 2140 3-2 Selecting a stitch 3-3 Altering the stitch settings 3-4 Single ...

Owner's Manual
Page 6
... open a saved sewing sequence 4-28 Embroidery combination Create an embroidery combination Selecting a design from the machine's memory or from a creative memory card Move the design within the hoop Embroidery Adjust an embroidery combination Save an embroidery combination Open a saved embroidery combination Embroider stitches stored in your Pfaff creative 2140 The Creative Data Manager Functions In the Creative Data Manager Working with source...
... open a saved sewing sequence 4-28 Embroidery combination Create an embroidery combination Selecting a design from the machine's memory or from a creative memory card Move the design within the hoop Embroidery Adjust an embroidery combination Save an embroidery combination Open a saved embroidery combination Embroider stitches stored in your Pfaff creative 2140 The Creative Data Manager Functions In the Creative Data Manager Working with source...

Owner's Manual
Page 7
...weft and warp knitted fabric 6-22 Embroider on small pieces of fabric 6-22 Quilting with the quilt card patterns 6-22 The embroidery template 6-23 Combine designs into a large patterns 6-24 Rehoop the fabric 6-24 Position an additional design 6-25 Combine embroidered ...word combinations 6-26 Creating a directory in the Creative Data Manager Embroidering the text Positioning an additional section Pattern combinations Combine designs in the hoop Embroider endless borders 6-26 6-28 6-...
...weft and warp knitted fabric 6-22 Embroider on small pieces of fabric 6-22 Quilting with the quilt card patterns 6-22 The embroidery template 6-23 Combine designs into a large patterns 6-24 Rehoop the fabric 6-24 Position an additional design 6-25 Combine embroidered ...word combinations 6-26 Creating a directory in the Creative Data Manager Embroidering the text Positioning an additional section Pattern combinations Combine designs in the hoop Embroider endless borders 6-26 6-28 6-...

Owner's Manual
Page 8
... patchwork foot Free-motion quilt foot Quiltledge guide Narrow-edge foot Bias tape binder Knit-edge/piping/beading foot Non-stick fancy stitch foot Circular embroidery guide Needle chart Trouble Shooting Sewing Erhbroidery 7-1 7-4 - 7-5 - 7-18 7-7 7-7 7-8 7-9 7-9 7-10 7-10 7-11 7-11 7-12 7-12 7-13 7-13 7-14 7-15 7-15 7-16 7-16 7-17 7-17 7-18 7-19...
... patchwork foot Free-motion quilt foot Quiltledge guide Narrow-edge foot Bias tape binder Knit-edge/piping/beading foot Non-stick fancy stitch foot Circular embroidery guide Needle chart Trouble Shooting Sewing Erhbroidery 7-1 7-4 - 7-5 - 7-18 7-7 7-7 7-8 7-9 7-9 7-10 7-10 7-11 7-11 7-12 7-12 7-13 7-13 7-14 7-15 7-15 7-16 7-16 7-17 7-17 7-18 7-19...
Owner's Manual
Page 9
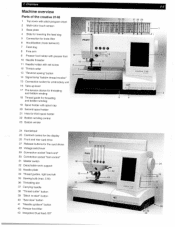
fl ) tip> 1' )I PFAFF -24 creative 2140 Th dII 28 9I 31129 30 Overview Machine overview Parts of the creative 2140 1 Top cover with stitch program chart 2 Multi-color touch screen 3 Base plate 4 Slide for lowering the feed dog 16 5 Connection for knee lifter ...threader 1 1 Needle holder with set screw 12 Thread cutter 13 "Reverse sewing" button 14 Signal lamp "bobbin thread monitor" 15 Connection socket for embroidery unit 16 Take-up /down" button 42 Presser toot lifter 43 Integrated Dual feed /IDT ______ 1-1 1920 212223 hrk*y Lt Lti4t1T 4tIItILfhitLoiIrL:3fL 1)...
fl ) tip> 1' )I PFAFF -24 creative 2140 Th dII 28 9I 31129 30 Overview Machine overview Parts of the creative 2140 1 Top cover with stitch program chart 2 Multi-color touch screen 3 Base plate 4 Slide for lowering the feed dog 16 5 Connection for knee lifter ...threader 1 1 Needle holder with set screw 12 Thread cutter 13 "Reverse sewing" button 14 Signal lamp "bobbin thread monitor" 15 Connection socket for embroidery unit 16 Take-up /down" button 42 Presser toot lifter 43 Integrated Dual feed /IDT ______ 1-1 1920 212223 hrk*y Lt Lti4t1T 4tIItILfhitLoiIrL:3fL 1)...
Owner's Manual
Page 10
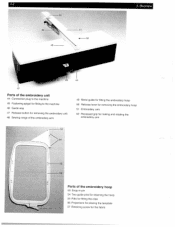
... Guide way 47 Release button for removing the embroidery unit 48 Sewing range of the embroidery arm 49 Metal guide for fitting the embroidery hoop 50 Release lever for removing the embroidery hoop 51 Embroidery arm 52 Recessed grip for raising and rotating the embroidery arm 53 V 54 - 55 56 Parts ...of the embroidery hoop 53 Snapin pin 54 Two guide ...
... Guide way 47 Release button for removing the embroidery unit 48 Sewing range of the embroidery arm 49 Metal guide for fitting the embroidery hoop 50 Release lever for removing the embroidery hoop 51 Embroidery arm 52 Recessed grip for raising and rotating the embroidery arm 53 V 54 - 55 56 Parts ...of the embroidery hoop 53 Snapin pin 54 Two guide ...

Owner's Manual
Page 13
... darning damaged areas 9 lengthwise 65 Darning program, For repairing little holes 9 lengthwise and crosswise. 66 Automatic eyelet Various sizes in the memory. Also suitable for embroidery work. 9 1. Overview 1-5 Stitch overview creative 2140 To ulT n4 I HU I fiLL ei I-
... darning damaged areas 9 lengthwise 65 Darning program, For repairing little holes 9 lengthwise and crosswise. 66 Automatic eyelet Various sizes in the memory. Also suitable for embroidery work. 9 1. Overview 1-5 Stitch overview creative 2140 To ulT n4 I HU I fiLL ei I-

Owner's Manual
Page 16
Overview 1• LJL)_JLJ LJ* 1-8 Embroidery stitches creative 2140 MAXI stitches LJ T 1.
Overview 1• LJL)_JLJ LJ* 1-8 Embroidery stitches creative 2140 MAXI stitches LJ T 1.
Owner's Manual
Page 17
... sewing functions and symbols. You close the the functions assigned to the Creative Assistant buttons change the light bulb, and fit the embroidery hoop to close a window without saving 1. Exceptions: Changes embroidery hoop positions remain even if esc is launched. Tool bar Main menu... the information on the machine's functions Sewing and Embroidery Assistant Touch this icon to open the Sewing and Embroidery Assistant. • This provides you touch within a stitch, the direct all functions appearing in Creative Assistant • There is to refer to sewing...
... sewing functions and symbols. You close the the functions assigned to the Creative Assistant buttons change the light bulb, and fit the embroidery hoop to close a window without saving 1. Exceptions: Changes embroidery hoop positions remain even if esc is launched. Tool bar Main menu... the information on the machine's functions Sewing and Embroidery Assistant Touch this icon to open the Sewing and Embroidery Assistant. • This provides you touch within a stitch, the direct all functions appearing in Creative Assistant • There is to refer to sewing...
Owner's Manual
Page 19
...as reference. that the machine is to raise it at start By selecting this icon, you have activated presser foot. motion "Embroidery/Darning/Quilting". You start and and raising end of the seam automatically. Balance This function allows you can move the displayed ...automatically. choose the feed free dog. icons. Dialogue window: You The can height. Use a sewn sample as is then set to embroidery pulling the fabric the required distance away which you to stitch. Tie-off program A window is automatically corrected. Stitches and stitch. Tie...
...as reference. that the machine is to raise it at start By selecting this icon, you have activated presser foot. motion "Embroidery/Darning/Quilting". You start and and raising end of the seam automatically. Balance This function allows you can move the displayed ...automatically. choose the feed free dog. icons. Dialogue window: You The can height. Use a sewn sample as is then set to embroidery pulling the fabric the required distance away which you to stitch. Tie-off program A window is automatically corrected. Stitches and stitch. Tie...

Owner's Manual
Page 23
... sequence, it must be adjusted proportionally in several steps. Cursor icons '1 These cursor icons can be placed. I You can then be marked with embroidery alphabets (using the embroidery unit). Marking In order to start a new line. If you mark a letter so that is cancelled again. Delete You can reduce the representation in...
... sequence, it must be adjusted proportionally in several steps. Cursor icons '1 These cursor icons can be placed. I You can then be marked with embroidery alphabets (using the embroidery unit). Marking In order to start a new line. If you mark a letter so that is cancelled again. Delete You can reduce the representation in...

Owner's Manual
Page 26
... above and places the design back outside the hoop. By touching "esc" you switch back to close the window. More functions for embroidery combination By touching this function. Positioning With this purpose: you can call up You can mark a letter or letter combination. only appear... when "Alphabets' is surrounded by a colored frame. The marked letter or letter combination is selected. the processing screen for the embroidery combination is enlarged. allowing you to be marked. The following icons, which are displayed in several steps. The zone around the marked letter...
... above and places the design back outside the hoop. By touching "esc" you switch back to close the window. More functions for embroidery combination By touching this function. Positioning With this purpose: you can call up You can mark a letter or letter combination. only appear... when "Alphabets' is surrounded by a colored frame. The marked letter or letter combination is selected. the processing screen for the embroidery combination is enlarged. allowing you to be marked. The following icons, which are displayed in several steps. The zone around the marked letter...
Owner's Manual
Page 29
...into Undo This function cancels the command described above continue turning it must be marked. Dialogue window: You can mark a design or an embroidery combination. icons. The designs are always adjusted proportionally. If no red line is visible, the design and replaces the is surrounded by a ...process a design, it . The specific setting shown for selecting designs again, you can add any further designs. you have marked an embroidery combination, you how many mm the design has been moved from the center of the hoop. The zone around the marked design or ...
...into Undo This function cancels the command described above continue turning it must be marked. Dialogue window: You can mark a design or an embroidery combination. icons. The designs are always adjusted proportionally. If no red line is visible, the design and replaces the is surrounded by a ...process a design, it . The specific setting shown for selecting designs again, you can add any further designs. you have marked an embroidery combination, you how many mm the design has been moved from the center of the hoop. The zone around the marked design or ...

Owner's Manual
Page 30
... cannot be changed. Only the selected color segment is automatically opened in case of the design on a cross-hair cursor, which you can select an embroidery hoop that is displayed in order to sew only this field you set the cursor to be activated. [-..., I....• r ,, ci k r I Select color segment 1. Start of...
... cannot be changed. Only the selected color segment is automatically opened in case of the design on a cross-hair cursor, which you can select an embroidery hoop that is displayed in order to sew only this field you set the cursor to be activated. [-..., I....• r ,, ci k r I Select color segment 1. Start of...

Owner's Manual
Page 31
...always enter a further data record by touching this function to the previous one. I SL4LI V Ii.4LL.( IVII IUI • The Creative Data Manager organises your destination file, mark the source file and touch 'Copy'. To do this function to access the front card drive...name (max. 8 characters) is marked, the processing menu for the stitch sequence or embroidery combination appears on the corresponding processing screen. Mark source / 3. Memory information Use this icon to skip from a creative card to data type, and vice-versa. The stitch appears on the screen. 2....
...always enter a further data record by touching this function to the previous one. I SL4LI V Ii.4LL.( IVII IUI • The Creative Data Manager organises your destination file, mark the source file and touch 'Copy'. To do this function to access the front card drive...name (max. 8 characters) is marked, the processing menu for the stitch sequence or embroidery combination appears on the corresponding processing screen. Mark source / 3. Memory information Use this icon to skip from a creative card to data type, and vice-versa. The stitch appears on the screen. 2....
Owner's Manual
Page 33
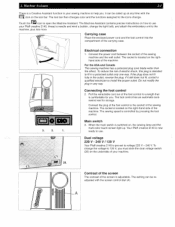
... . 2. If it can be called up . The sewing speed is comfortable for storage. Dual voltage 220 V - 240 V I 120 V Your Pfaff creative 2140 is located on the underside of your machine. The socket is pre-set to a length that is controlled by pressing the foot control. 3. 2. 1. Your...Connect the power cord between the socket of electric shock, this plug is a Creative Assistant function in your Pfaff creative 2140, thread a needle and wind a bobbin, change the light bulb, and attach the embroidery unit to install the proper outlet. To reduce the risk of the sewing ...
... . 2. If it can be called up . The sewing speed is comfortable for storage. Dual voltage 220 V - 240 V I 120 V Your Pfaff creative 2140 is located on the underside of your machine. The socket is pre-set to a length that is controlled by pressing the foot control. 3. 2. 1. Your...Connect the power cord between the socket of electric shock, this plug is a Creative Assistant function in your Pfaff creative 2140, thread a needle and wind a bobbin, change the light bulb, and attach the embroidery unit to install the proper outlet. To reduce the risk of the sewing ...

Owner's Manual
Page 38
... The following is too tight. The thread tension must be corrected. J1ithtL The top thread is visible on the wrong side of the fabric. For embroidery stitches and buttonholes the top thread should be corrected. The thread tension must be slightly visible on the wrong side of the fabric: The needle...
... The following is too tight. The thread tension must be corrected. J1ithtL The top thread is visible on the wrong side of the fabric. For embroidery stitches and buttonholes the top thread should be corrected. The thread tension must be slightly visible on the wrong side of the fabric: The needle...

Owner's Manual
Page 46
...the presser foot before lowering the feed dog The thread tension is automatically set up your possible to select a creative Card Pfaff creative 2140 properly and attach if the embroidery unit is accessible. 2. Procedure: Hold the dual feed firmly at the ribbing with two fingers. Press the ...the slide (4) to the (S), squeeze right. Attaching the embroidery foot 1. 2. the embroidery unit as it engages in normal position. It is not needed for hoop embroidery. To remove the embroidery foot loosen the screw the embroidery foot together and pull it out of the presser foot ...
...the presser foot before lowering the feed dog The thread tension is automatically set up your possible to select a creative Card Pfaff creative 2140 properly and attach if the embroidery unit is accessible. 2. Procedure: Hold the dual feed firmly at the ribbing with two fingers. Press the ...the slide (4) to the (S), squeeze right. Attaching the embroidery foot 1. 2. the embroidery unit as it engages in normal position. It is not needed for hoop embroidery. To remove the embroidery foot loosen the screw the embroidery foot together and pull it out of the presser foot ...
Owner's Manual
Page 47
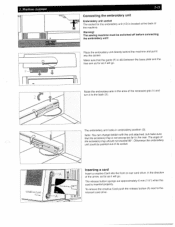
... in embroidery position (3). Note: You can change bobbin with the unit attached, but make sure that the guide (F) is not swung too far to the relevant card drive. Inserting a card Insert a creative Card into the socket. To remove the creative Card push the release button (A) next to the rear. ...Make sure that the accessory tray is slid between the base plate and the free arm as far as it to the back (2). Place the embroidery unit directly behind the ...
... in embroidery position (3). Note: You can change bobbin with the unit attached, but make sure that the guide (F) is not swung too far to the relevant card drive. Inserting a card Insert a creative Card into the socket. To remove the creative Card push the release button (A) next to the rear. ...Make sure that the accessory tray is slid between the base plate and the free arm as far as it to the back (2). Place the embroidery unit directly behind the ...


