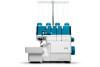

Features and Benefits
Page 1
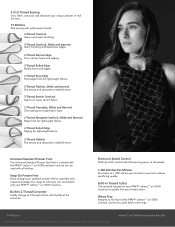
... Create more inspirational creations than ever before with the help of a lever. PFAFF.com FEATURE AND BENEFITS Air Threading Loopers With the PFAFF® admire™ air 5000 one -touch air threading overlock machine. Stitch Safety Lock Safety lockout prevents the machine from sewing when the front...Built-In Needle Threader Efficiently thread both the right and left position needles with the push of the PFAFF® admire™ air 5000 one -touch air threading overlock, you can effortlessly thread the machine loopers with an adjustable, built-in needle threader. Extra Presser Foot...
... Create more inspirational creations than ever before with the help of a lever. PFAFF.com FEATURE AND BENEFITS Air Threading Loopers With the PFAFF® admire™ air 5000 one -touch air threading overlock machine. Stitch Safety Lock Safety lockout prevents the machine from sewing when the front...Built-In Needle Threader Efficiently thread both the right and left position needles with the push of the PFAFF® admire™ air 5000 one -touch air threading overlock, you can effortlessly thread the machine loopers with an adjustable, built-in needle threader. Extra Presser Foot...
Features and Benefits
Page 2
...-In 2-Thread Converter Swiftly change your optional presser feet for specialty techniques to broaden the range of the PFAFF® admire™ air 5000 overlock machine to quickly trim your thread chain. Built-In Thread Cutter Conveniently located on super stretch fabric. 2-...Standard Presser Foot The Universal Standard Presser Foot that is included with the PFAFF® admire™ air 5000 overlock machine can accomplish with professional results: 4-Thread Overlock Seams and seam finishing. 3-Thread Overlock, (Wide and Narrow) Seam finishing and decorative edges. 3-Thread Narrow Edge...
...-In 2-Thread Converter Swiftly change your optional presser feet for specialty techniques to broaden the range of the PFAFF® admire™ air 5000 overlock machine to quickly trim your thread chain. Built-In Thread Cutter Conveniently located on super stretch fabric. 2-...Standard Presser Foot The Universal Standard Presser Foot that is included with the PFAFF® admire™ air 5000 overlock machine can accomplish with professional results: 4-Thread Overlock Seams and seam finishing. 3-Thread Overlock, (Wide and Narrow) Seam finishing and decorative edges. 3-Thread Narrow Edge...
Manual
Page 4
...Placing the Thread Spools on the Spool Pins Changing Thread 6 6 SEWING 28 Stitch Overview 28 7 Explanation of Icons/Colors 28 4-Thread Overlock 28 7 3-Thread Overlock, Wide (and Narrow) 29 7 3-Thread Narrow Edge 3-Thread Rolled Edge 29 29 8 3-Thread Picot Edge 29 8 3-Thread Flatlock..., Wide (and Narrow) 30 8 3-Thread Stretch Overlock 30 8 2-Thread Overedge, Wide (and Narrow) 30 8 2-Thread Wrapped Overlock, Wide (and Narrow) 30 2-Thread Rolled Edge 31 9 2-Thread Flatlock 31 9 Start Sewing 32 9 Pin ...
...Placing the Thread Spools on the Spool Pins Changing Thread 6 6 SEWING 28 Stitch Overview 28 7 Explanation of Icons/Colors 28 4-Thread Overlock 28 7 3-Thread Overlock, Wide (and Narrow) 29 7 3-Thread Narrow Edge 3-Thread Rolled Edge 29 29 8 3-Thread Picot Edge 29 8 3-Thread Flatlock..., Wide (and Narrow) 30 8 3-Thread Stretch Overlock 30 8 2-Thread Overedge, Wide (and Narrow) 30 8 2-Thread Wrapped Overlock, Wide (and Narrow) 30 2-Thread Rolled Edge 31 9 2-Thread Flatlock 31 9 Start Sewing 32 9 Pin ...
Manual
Page 6
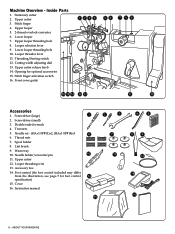
... switch 16. Needle set - (HAx1 SP#11)x2, (HAx1 SP#14)x3 6 6. Upper cutter 3. Looper selection lever 9. Screwdriver (small) 3. Upper cutter 12. Upper looper 5. 2-thread overlock converter 6. Lower looper threading hole 10. Upper cutter release knob 14. Waste tray 10. Cover 16. Inside Parts 1. Tweezers 5. Lint brush 9. Instruction manual 15 2 3 7 11...
... switch 16. Needle set - (HAx1 SP#11)x2, (HAx1 SP#14)x3 6 6. Upper cutter 3. Looper selection lever 9. Screwdriver (small) 3. Upper cutter 12. Upper looper 5. 2-thread overlock converter 6. Lower looper threading hole 10. Upper cutter release knob 14. Waste tray 10. Cover 16. Inside Parts 1. Tweezers 5. Lint brush 9. Instruction manual 15 2 3 7 11...
Manual
Page 7
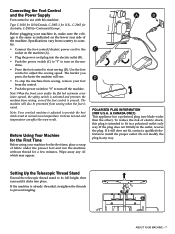
... does not fit, contact a qualified electrician to prevent tangling. If the machine is already threaded, straighten the threads to install the proper outlet. Note: Your overlock machine is adjusted to start sewing (D). Wipe away any way. Setting Up the Telescopic Thread Stand Extend the telescopic thread stand to its full height...
... does not fit, contact a qualified electrician to prevent tangling. If the machine is already threaded, straighten the threads to install the proper outlet. Note: Your overlock machine is adjusted to start sewing (D). Wipe away any way. Setting Up the Telescopic Thread Stand Extend the telescopic thread stand to its full height...
Manual
Page 8
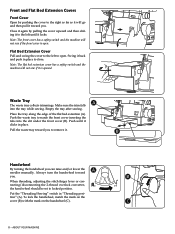
... not sew if it is open . Waste Tray A The waste tray collects trimmings. B When threading, adjusting the stitch finger lever or connecting/disconnecting the 2-thread overlock converter, the hand wheel should be set to open . Place the tray along the edge of the flat bed extention (A).
... not sew if it is open . Waste Tray A The waste tray collects trimmings. B When threading, adjusting the stitch finger lever or connecting/disconnecting the 2-thread overlock converter, the hand wheel should be set to open . Place the tray along the edge of the flat bed extention (A).
Manual
Page 11
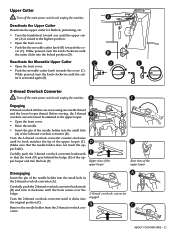
... the upper cutter for flatlock, pintucking, etc. • Turn the handwheel toward you until the upper cutter (A) is activated again (E). 2-thread Overlock Converter Turn off the main power switch and unplug the machine. While pressed, turn the knob clockwise until its hook matches the tip of the...the cutter is raised to the upper looper. • Open the front cover. • Raise the needle. • Insert the pin of the 2-thread overlock converter (B). B D E Upper view of the upper looper F Rear view of the upper looper Disengaging A Insert the pin of the needle holder into ...
... the upper cutter for flatlock, pintucking, etc. • Turn the handwheel toward you until the upper cutter (A) is activated again (E). 2-thread Overlock Converter Turn off the main power switch and unplug the machine. While pressed, turn the knob clockwise until its hook matches the tip of the...the cutter is raised to the upper looper. • Open the front cover. • Raise the needle. • Insert the pin of the 2-thread overlock converter (B). B D E Upper view of the upper looper F Rear view of the upper looper Disengaging A Insert the pin of the needle holder into ...
Manual
Page 12
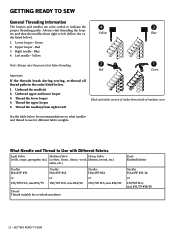
... what needles and thread to left (follow the or- Upper looper - Red 3. Unthread upper and lower looper 3. Thread the needle(s) from right to use for overlock machines Knits Knitted fabrics Needles HAx1SP #11-14 or 130/705 H-S, size #11/75-#14/90 12 - Right needle - Unthread the needle(s) 2. Lower looper - Blue...
... what needles and thread to left (follow the or- Upper looper - Red 3. Unthread upper and lower looper 3. Thread the needle(s) from right to use for overlock machines Knits Knitted fabrics Needles HAx1SP #11-14 or 130/705 H-S, size #11/75-#14/90 12 - Right needle - Unthread the needle(s) 2. Lower looper - Blue...
Manual
Page 18
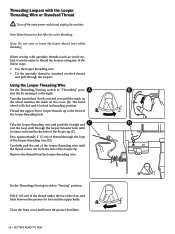
... be easier to thread the loopers using any of the below ways: • Use the looper threading wire • Tie the specialty thread to standard overlock thread and pull through the loop of the looper threading wire (D). The hand wheel will click and is locked in threading position. Thread the upper...
... be easier to thread the loopers using any of the below ways: • Use the looper threading wire • Tie the specialty thread to standard overlock thread and pull through the loop of the looper threading wire (D). The hand wheel will click and is locked in threading position. Thread the upper...

Manual
Page 25
... differential feed system consists of two sets of feed teeth arranged one behind the other to give perfect results when sewing on speciality fabrics. For overlock stitching on your fabric before sewing on normal fabric, set the differential feed adjusting dial (A) to "N" (A). ment. Always test A sew on a sample of your gar...
... differential feed system consists of two sets of feed teeth arranged one behind the other to give perfect results when sewing on speciality fabrics. For overlock stitching on your fabric before sewing on normal fabric, set the differential feed adjusting dial (A) to "N" (A). ment. Always test A sew on a sample of your gar...
Manual
Page 26
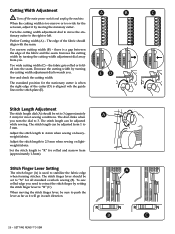
... rolled and narrow hem (approximately 1.5mm). Set the stitch length to "R" (C). Decrease the cutting width by setting the stitch finger lever to "R" for all standard overlock sewing (B). Stitch Length Adjustment The stitch length dial (A) should align with the seam. Perfect Cutting width (A) - Too narrow cutting width (B) - Cutting Width Adjustment A B C Turn off...
... rolled and narrow hem (approximately 1.5mm). Set the stitch length to "R" (C). Decrease the cutting width by setting the stitch finger lever to "R" for all standard overlock sewing (B). Stitch Length Adjustment The stitch length dial (A) should align with the seam. Perfect Cutting width (A) - Too narrow cutting width (B) - Cutting Width Adjustment A B C Turn off...
Manual
Page 28
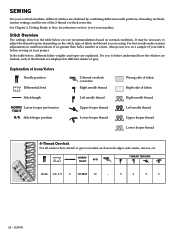
...In the table below are our recommendations based on normal conditions. SEWING For best results make tension adjustments in small increments of the 2-thread overlock converter. For you are explained. NORM/ TIGHT N/R THREAD TENSION Both 1.0~1.5 3 NORM N - 3 3 3 3 28 - See ...Chapter 2, Getting Ready to Sew, for references on your machine. Explanation of Icons/Colors Needle position Differential feed 2-thread overlock converter Right needle thread Wrong side of fabric Right side of grey. It may be necessary to better understand how the stitches are ...
...In the table below are our recommendations based on normal conditions. SEWING For best results make tension adjustments in small increments of the 2-thread overlock converter. For you are explained. NORM/ TIGHT N/R THREAD TENSION Both 1.0~1.5 3 NORM N - 3 3 3 3 28 - See ...Chapter 2, Getting Ready to Sew, for references on your machine. Explanation of Icons/Colors Needle position Differential feed 2-thread overlock converter Right needle thread Wrong side of fabric Right side of grey. It may be necessary to better understand how the stitches are ...
Manual
Page 29
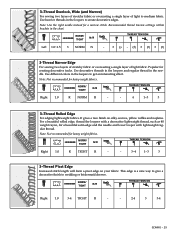
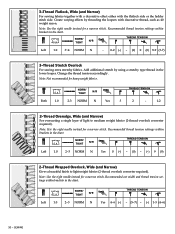
Note: Not recommended for creating decorative tucks. 3-Thread Overlock, Wide (and Narrow) For sewing two layers of stretchy fabric or overcasting a single layer of light fabric. It gives a nice finish on your fabric. This ...
Note: Not recommended for creating decorative tucks. 3-Thread Overlock, Wide (and Narrow) For sewing two layers of stretchy fabric or overcasting a single layer of light fabric. It gives a nice finish on your fabric. This ...
Manual
Page 30
...stretchy type thread in the chart. NORM/ TIGHT N/R THREAD TENSION Left 1.0 3~4 NORM N - 0-2 (-) - (0) 0 (0) 8-9 (3-7) 3-Thread Stretch Overlock For sewing extra stretchy fabrics. Change the thread tension accordingly. Both 1.0 NORM/ TIGHT N/R 2-3 NORM N Yes THREAD TENSION 3 2 - 1-2 2-Thread Overedge..., Wide (and Narrow) For overcasting a single layer of light to lightweight fabrics (2-thread overlock converter required). Note: Use the right needle instead for a narrow stitch. Note: Not recommended for a narrow stitch. Note:...
...stretchy type thread in the chart. NORM/ TIGHT N/R THREAD TENSION Left 1.0 3~4 NORM N - 0-2 (-) - (0) 0 (0) 8-9 (3-7) 3-Thread Stretch Overlock For sewing extra stretchy fabrics. Change the thread tension accordingly. Both 1.0 NORM/ TIGHT N/R 2-3 NORM N Yes THREAD TENSION 3 2 - 1-2 2-Thread Overedge..., Wide (and Narrow) For overcasting a single layer of light to lightweight fabrics (2-thread overlock converter required). Note: Use the right needle instead for a narrow stitch. Note: Not recommended for a narrow stitch. Note:...

Manual
Page 31
...Right 1.0 R NORM R Yes - 5 - (4~6) 2-Thread Flatlock For sewing stretchy fabrics together with a decorative effect either with decorative thread. (2-thread overlock converter required) Left 1.0 NORM/ TIGHT N/R 3-4 NORM N Yes THREAD TENSION 0-1 - - 6-9 SEWING - 31 Create varying effects by threading the ... gives a nice finish on silky scarves, pillow ruffles and napkins. Note: Not recommended for a beautiful satin edge (2-thread overlock converter required). Thread the looper with a decorative lightweight thread, such as 40 weight rayon for heavy weight fabrics. 2-Thread ...
...Right 1.0 R NORM R Yes - 5 - (4~6) 2-Thread Flatlock For sewing stretchy fabrics together with a decorative effect either with decorative thread. (2-thread overlock converter required) Left 1.0 NORM/ TIGHT N/R 3-4 NORM N Yes THREAD TENSION 0-1 - - 6-9 SEWING - 31 Create varying effects by threading the ... gives a nice finish on silky scarves, pillow ruffles and napkins. Note: Not recommended for a beautiful satin edge (2-thread overlock converter required). Thread the looper with a decorative lightweight thread, such as 40 weight rayon for heavy weight fabrics. 2-Thread ...
Manual
Page 34
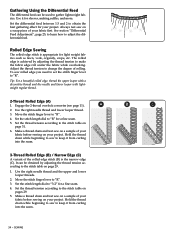
... upper looper with a decorative thread and the needle and lower looper with lightweight regular thread. 2-Thread Rolled Edge (A) 1. Engage the 2-thread overlock converter (see page 11). Set the stitch length dial to the stitch table on pages 29. 5. Hold the thread chain while beginning to ...Thread Rolled Edge (B) / Narrow Edge (C) A variant of rolling. Set the thread tension according to make the fabric edge roll under the fabric while overlocking. Use the right needle thread and the upper and lower looper threads. 2. Set the stitch length dial to "R". 3. SEWING Always test sew on a...
... upper looper with a decorative thread and the needle and lower looper with lightweight regular thread. 2-Thread Rolled Edge (A) 1. Engage the 2-thread overlock converter (see page 11). Set the stitch length dial to the stitch table on pages 29. 5. Hold the thread chain while beginning to ...Thread Rolled Edge (B) / Narrow Edge (C) A variant of rolling. Set the thread tension according to make the fabric edge roll under the fabric while overlocking. Use the right needle thread and the upper and lower looper threads. 2. Set the stitch length dial to "R". 3. SEWING Always test sew on a...
Manual
Page 35
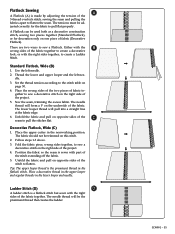
... (B) 1. Set the thread tension according to flatten the seam. Follow steps 1-3 above. 3. Ladder Stitch (D) D A ladder stitch is made by adjusting the tension of the 3-thread overlock stitch, sewing the seam and pulling the fabrics apart to the stitch table on this stitch. 2. Either with the B wrong sides of the fabric together...
... (B) 1. Set the thread tension according to flatten the seam. Follow steps 1-3 above. 3. Ladder Stitch (D) D A ladder stitch is made by adjusting the tension of the 3-thread overlock stitch, sewing the seam and pulling the fabrics apart to the stitch table on this stitch. 2. Either with the B wrong sides of the fabric together...
Manual
Page 37
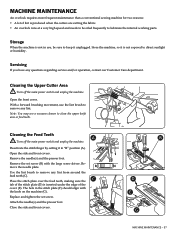
... the stitch finger by setting it is produced when the cutters are cutting the fabric. • An overlock runs at a very high speed and needs to be sure to remove any lint. MACHINE MAINTENANCE An overlock requires more frequent maintenance than a conventional sewing machine for two reasons: • A lot of the cover...
... the stitch finger by setting it is produced when the cutters are cutting the fabric. • An overlock runs at a very high speed and needs to be sure to remove any lint. MACHINE MAINTENANCE An overlock requires more frequent maintenance than a conventional sewing machine for two reasons: • A lot of the cover...
Manual
Page 42
... thread spool to ensure thread is not getting caught. Thread is pointing to threading position (page 15, 17). Compress thick layers with the mark on overlock. Solution: Make sure the looper selection lever is not unreeling smoothly off the thread spool. Solution: Trim the thread end. The Needle Threader does not...
... thread spool to ensure thread is not getting caught. Thread is pointing to threading position (page 15, 17). Compress thick layers with the mark on overlock. Solution: Make sure the looper selection lever is not unreeling smoothly off the thread spool. Solution: Trim the thread end. The Needle Threader does not...


