
Features and Benefits
Page 1
... automatic gathering. Stitch Safety Lock Safety lockout prevents the machine from sewing when the front cover is open. Can be used for several layers or heavy fabrics. Adjustable Settings Adjust stitch length, cutting width, and presser foot pressure for the ideal setting for optimal visibility. Lay-In Tension For quick and convenient threading. Built-In Needle Threader Efficiently thread both the right and left position needles with the push of a lever. Differential Feed Adjustable for perfectly even seams, no stretching of the seam...
... automatic gathering. Stitch Safety Lock Safety lockout prevents the machine from sewing when the front cover is open. Can be used for several layers or heavy fabrics. Adjustable Settings Adjust stitch length, cutting width, and presser foot pressure for the ideal setting for optimal visibility. Lay-In Tension For quick and convenient threading. Built-In Needle Threader Efficiently thread both the right and left position needles with the push of a lever. Differential Feed Adjustable for perfectly even seams, no stretching of the seam...

Features and Benefits
Page 2
Waste Tray Attaches to the front of the PFAFF® admire™ air 5000 overlock machine to 2-thread stitches with the flip of the converter. Item Number 471066026. Built-In 2-Thread Converter Swiftly change your optional presser feet for lightweight fabrics. 2-Thread Flatlock Flat seams and decorative embellishment. Built-In Thread Cutter Conveniently located on super stretch fabric. 2-Thread Overedge, (Wide and Narrow) Overcasting for single fabric layer. 2-Thread Wrapped Overlock, (Wide and Narrow) Edge finish...
Waste Tray Attaches to the front of the PFAFF® admire™ air 5000 overlock machine to 2-thread stitches with the flip of the converter. Item Number 471066026. Built-In 2-Thread Converter Swiftly change your optional presser feet for lightweight fabrics. 2-Thread Flatlock Flat seams and decorative embellishment. Built-In Thread Cutter Conveniently located on super stretch fabric. 2-Thread Overedge, (Wide and Narrow) Overcasting for single fabric layer. 2-Thread Wrapped Overlock, (Wide and Narrow) Edge finish...

Manual
Page 2
... threading needle, changing needle, threading bobbin, or changing presser foot, etc. • Never drop or insert any object into water. To reduce the risk of Double-Insulated Appliances. Return the sewing machine to the nearest authorized dealer or service center for Servicing of electric shock: • A sewing machine should be followed, including the following: Read all moving parts. DANGER - WARNING - See instructions for examination, repair, electrical or mechanical adjustment. • Never operate the sewing machine...
... threading needle, changing needle, threading bobbin, or changing presser foot, etc. • Never drop or insert any object into water. To reduce the risk of Double-Insulated Appliances. Return the sewing machine to the nearest authorized dealer or service center for Servicing of electric shock: • A sewing machine should be followed, including the following: Read all moving parts. DANGER - WARNING - See instructions for examination, repair, electrical or mechanical adjustment. • Never operate the sewing machine...

Manual
Page 3
Cleaning and user maintenance shall not be used with foot control of the user and the product. The noise level under normal operating conditions is less than 80dB. Children should be supervised to ensure that on a double-insulated product, nor should be to the product. The machine must be added to the benefit of type C-1028 for USA/Canada, C-2065 for Australia...
Cleaning and user maintenance shall not be used with foot control of the user and the product. The noise level under normal operating conditions is less than 80dB. Children should be supervised to ensure that on a double-insulated product, nor should be to the product. The machine must be added to the benefit of type C-1028 for USA/Canada, C-2065 for Australia...
Manual
Page 4
...Upper Cutter 40 Threading the Left Needle 22 Troubleshooting Specifications 40 42 Using the Needle Threader 24 Differential Feed Adjustment 25 Presser Foot Pressure Adjustment 25 Cutting Width Adjustment 26 Stitch Length Adjustment 26 Inside Parts Accessories Connecting the Foot Control and the Power Supply Before Using Your Machine for the First Time Setting Up the Telescopic Thread Stand Front and Flat Bed Extension Covers Front Cover Flat Bed Extension Cover Waste Tray Handwheel Presser Foot Lifter Changing the Presser Foot Presser Foot Guide Lines Needle Information Changing...
...Upper Cutter 40 Threading the Left Needle 22 Troubleshooting Specifications 40 42 Using the Needle Threader 24 Differential Feed Adjustment 25 Presser Foot Pressure Adjustment 25 Cutting Width Adjustment 26 Stitch Length Adjustment 26 Inside Parts Accessories Connecting the Foot Control and the Power Supply Before Using Your Machine for the First Time Setting Up the Telescopic Thread Stand Front and Flat Bed Extension Covers Front Cover Flat Bed Extension Cover Waste Tray Handwheel Presser Foot Lifter Changing the Presser Foot Presser Foot Guide Lines Needle Information Changing...
Manual
Page 5
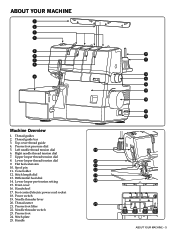
...Spool pin 11. Power switch 19. Thread guide bar 3. Presser foot pressure dial 5. Thread cutter 25 21. Thread guides 2. Flat bed extension 21 10. Differential feed dial 14. Presser foot 24. Top cover thread guide 4. Lower looper thread tension dial 20 9. Stitch length dial 23 13. Left needle thread tension dial 19 6. Cone holder 22 12. Handwheel 17. Stitch plate 25. Front cover 16. Foot control/electric power cord socket 18. Needle threader lever 20. Presser foot lifter 22. Lower looper pre-tension setting 24 15. Needle threader...
...Spool pin 11. Power switch 19. Thread guide bar 3. Presser foot pressure dial 5. Thread cutter 25 21. Thread guides 2. Flat bed extension 21 10. Differential feed dial 14. Presser foot 24. Top cover thread guide 4. Lower looper thread tension dial 20 9. Stitch length dial 23 13. Left needle thread tension dial 19 6. Cone holder 22 12. Handwheel 17. Stitch plate 25. Front cover 16. Foot control/electric power cord socket 18. Needle threader lever 20. Presser foot lifter 22. Lower looper pre-tension setting 24 15. Needle threader...
Manual
Page 6
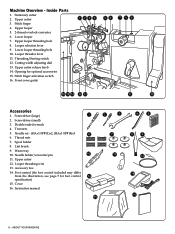
... threader lever 11. Screwdriver (small) 3. Spool holder 8. Needle holder/converter pin 10 11. Looper selection lever 9. Opening for foot control 13 specification) 15. Foot control (the foot control included may differ from the illustration, see page 7 for optional accessories 15. Stitch finger activation switch 16. Looper threading wire 13. Machine Overview - Stationary cutter 2. Stitch finger 4. Lower looper 7. Upper looper threading hole 8. Lower looper threading hole 10. Threading/Sewing switch 12. Cutting width adjusting dial 13. Upper...
... threader lever 11. Screwdriver (small) 3. Spool holder 8. Needle holder/converter pin 10 11. Looper selection lever 9. Opening for foot control 13 specification) 15. Foot control (the foot control included may differ from the illustration, see page 7 for optional accessories 15. Stitch finger activation switch 16. Looper threading wire 13. Machine Overview - Stationary cutter 2. Stitch finger 4. Lower looper 7. Upper looper threading hole 8. Lower looper threading hole 10. Threading/Sewing switch 12. Cutting width adjusting dial 13. Upper...
Manual
Page 7
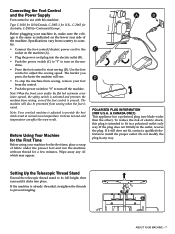
... extension cover is/are opened, the safety switch is activated and prevents the machine from country to country. • Connect the foot control/electric power cord to the socket on the ma- Before Using Your Machine for the First Time Before using your machine in, make sure the voltage is the same as indicated on the lower rear side of fabric under the presser foot and run the machine...
... extension cover is/are opened, the safety switch is activated and prevents the machine from country to country. • Connect the foot control/electric power cord to the socket on the ma- Before Using Your Machine for the First Time Before using your machine in, make sure the voltage is the same as indicated on the lower rear side of fabric under the presser foot and run the machine...
Manual
Page 10
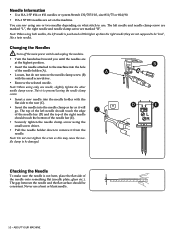
... needle is positioned a little higher up than the right needle (they are marked "R". A C B D E Checking the Needle To make sure the needle is to prevent loosing the needle clamp screw. • Insert a new needle into the hole of the needle holder (A). • Loosen, but do not remove the needle clamp screw (B) with the flat side to remove it will go. Note: When using the small screw driver. • Pull the needle holder down to the rear (C). • Insert...
... needle is positioned a little higher up than the right needle (they are marked "R". A C B D E Checking the Needle To make sure the needle is to prevent loosing the needle clamp screw. • Insert a new needle into the hole of the needle holder (A). • Loosen, but do not remove the needle clamp screw (B) with the flat side to remove it will go. Note: When using the small screw driver. • Pull the needle holder down to the rear (C). • Insert...
Manual
Page 11
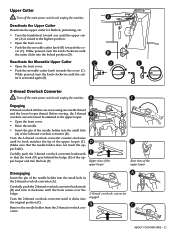
... the upper looper. • Open the front cover. • Raise the needle. • Insert the pin of the needle holder into the small hole (A) of the needle holder into the hole (F). ver (C). Carfully push the 2-thread overlock converter backwards so that the needle holder does not touch the upper knife). Before sewing, the 2-thread overlock converter must be attached to the highest position. • Open the front cover. • Push the the movable cutter knob...
... the upper looper. • Open the front cover. • Raise the needle. • Insert the pin of the needle holder into the small hole (A) of the needle holder into the hole (F). ver (C). Carfully push the 2-thread overlock converter backwards so that the needle holder does not touch the upper knife). Before sewing, the 2-thread overlock converter must be attached to the highest position. • Open the front cover. • Push the the movable cutter knob...
Manual
Page 13
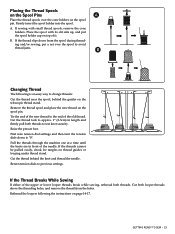
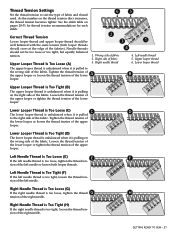
... avoid thread jams. B Changing Thread The following the instructions on thread guides or looping under thread stand. Remove the thread spool and place the new thread on the spool pin. Return tension dials to "0". Cut both looper threads above the threading holes, and remove the thread from the spool during thread- First note tension dial settings and then turn the tension dials down from the holes. Cut the thread tails to test knot security. Pull the threads through the machine one at a time...
... avoid thread jams. B Changing Thread The following the instructions on thread guides or looping under thread stand. Remove the thread spool and place the new thread on the spool pin. Return tension dials to "0". Cut both looper threads above the threading holes, and remove the thread from the spool during thread- First note tension dial settings and then turn the tension dials down from the holes. Cut the thread tails to test knot security. Pull the threads through the machine one at a time...
Manual
Page 26
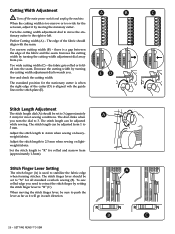
... overlock sewing (B). To sew rolled edge you . GETTING READY TO SEW B C The edge of the cutter (D) is too narrow or too wide for rolled and narrow hem (approximately 1.5mm). Adjust the stitch length to "R" (C). When the cutting width is aligned wih the guide line on the stitch plate (E). Cutting Width Adjustment A B C Turn off the main power switch and unplug the machine. Turn the cutting width adjustment dial...
... overlock sewing (B). To sew rolled edge you . GETTING READY TO SEW B C The edge of the cutter (D) is too narrow or too wide for rolled and narrow hem (approximately 1.5mm). Adjust the stitch length to "R" (C). When the cutting width is aligned wih the guide line on the stitch plate (E). Cutting Width Adjustment A B C Turn off the main power switch and unplug the machine. Turn the cutting width adjustment dial...
Manual
Page 27
... the thread tension of the lower looper or loosen the thread tension of the left needle thread is pulling on the thread tension discs increases, the thread tension becomes tighter. See the stitch table on the wrong side of the fabric. GETTING READY TO SEW - 27 Lower Looper Thread is Too Tight (D) The lower looper thread is unbalanced when it is too loose, tighten the thread ten- Thread Tension Settings Set the thread tension to suit the type...
... the thread tension of the lower looper or loosen the thread tension of the left needle thread is pulling on the thread tension discs increases, the thread tension becomes tighter. See the stitch table on the wrong side of the fabric. GETTING READY TO SEW - 27 Lower Looper Thread is Too Tight (D) The lower looper thread is unbalanced when it is too loose, tighten the thread ten- Thread Tension Settings Set the thread tension to suit the type...
Manual
Page 28
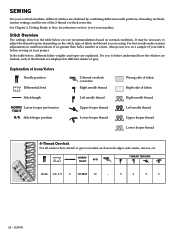
... results make tension adjustments in the table below , different fabric weights and types are using. Stitch Overview The settings shown in small increments of fabric and thread you to better understand how the stitches are formed, each of the threads are our recommendations based on a sample of fabric Stitch length Left needle thread Right needle thread NORM/ Lower looper pre-tension TIGHT N/R Stitch finger position Upper looper thread Lower looper thread Left needle thread Upper looper thread Lower looper thread 4-Thread Overlock For all seams where stretch or...
... results make tension adjustments in the table below , different fabric weights and types are using. Stitch Overview The settings shown in small increments of fabric and thread you to better understand how the stitches are formed, each of the threads are our recommendations based on a sample of fabric Stitch length Left needle thread Right needle thread NORM/ Lower looper pre-tension TIGHT N/R Stitch finger position Upper looper thread Lower looper thread Left needle thread Upper looper thread Lower looper thread 4-Thread Overlock For all seams where stretch or...
Manual
Page 32
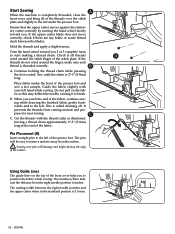
... called chaining off. Start Sewing A When the machine is threaded correctly. B A. Place fabric under the presser foot. Pin Placement (D) Insert straight pins to remove and are any fabric or waste thread stuck between the right needle position and the upper cutter when in inches. SEWING If the threads do not wind around the finger, make sure each thread is completely threaded, close the front cover and bring all threads D wind around the stitch finger of the stitch plate. Do not...
... called chaining off. Start Sewing A When the machine is threaded correctly. B A. Place fabric under the presser foot. Pin Placement (D) Insert straight pins to remove and are any fabric or waste thread stuck between the right needle position and the upper cutter when in inches. SEWING If the threads do not wind around the finger, make sure each thread is completely threaded, close the front cover and bring all threads D wind around the stitch finger of the stitch plate. Do not...
Manual
Page 34
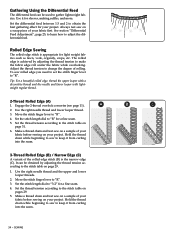
Set the differential feed between 1.5 and 2 to obtain the best gathering effect for a fine seam. 4. Use the right needle thread and lower looper thread. 3. Make a thread chain and test sew on a sample of your project. Set the thread tension according to the stitch table on your fabric before sewing on page 29. 1. The rolled edge is appropriate for sleeves, making ruffles, and more. Adjust the thread tension to change the degree of the rolled edge...
Set the differential feed between 1.5 and 2 to obtain the best gathering effect for a fine seam. 4. Use the right needle thread and lower looper thread. 3. Make a thread chain and test sew on a sample of your project. Set the thread tension according to the stitch table on your fabric before sewing on page 29. 1. The rolled edge is appropriate for sleeves, making ruffles, and more. Adjust the thread tension to change the degree of the rolled edge...
Manual
Page 37
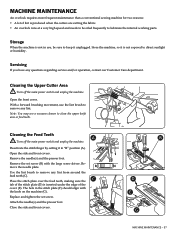
... covers. With a forward brushing movement, use the lint brush to lubricate the internal working parts. Note: You may use , be oiled frequently to remove any questions regarding service and/or operation, contact our Customer Care department. B D F E G MACHINE MAINTENANCE - 37 Cleaning the Upper Cutter Area Turn off the main power switch and unplug the machine. Remove the set screw. Place the stitch plate over the feed teeth, making sure the C tab of the stitch plate (D) is inserted...
... covers. With a forward brushing movement, use the lint brush to lubricate the internal working parts. Note: You may use , be oiled frequently to remove any questions regarding service and/or operation, contact our Customer Care department. B D F E G MACHINE MAINTENANCE - 37 Cleaning the Upper Cutter Area Turn off the main power switch and unplug the machine. Remove the set screw. Place the stitch plate over the feed teeth, making sure the C tab of the stitch plate (D) is inserted...
Manual
Page 40
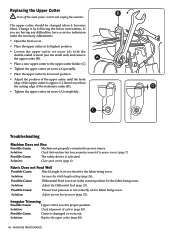
... unplug the machine. Change it becomes blunt. D • Tighten the upper cutter set too short for fabric being sewn. Possible Cause: Presser foot pressure is not set screw (A) with the double-ended wrench (use the small end) and remove the upper cutter (B). Solution: Check alignment of the stationary cutter (D). Solution: Adjust the Differential Feed (page 25). Fabric Does not Feed Well Possible Cause: Stitch Length is not in the correct position for the fabric being...
... unplug the machine. Change it becomes blunt. D • Tighten the upper cutter set too short for fabric being sewn. Possible Cause: Presser foot pressure is not set screw (A) with the double-ended wrench (use the small end) and remove the upper cutter (B). Solution: Check alignment of the stationary cutter (D). Solution: Adjust the Differential Feed (page 25). Fabric Does not Feed Well Possible Cause: Stitch Length is not in the correct position for the fabric being...
Manual
Page 41
... the correct size for the fabric (page 12). MACHINE MAINTENANCE - 41 Check the thread spool to deflect. Differential Feed is set in the needle clamp. Manually pulling fabric from pulling fabric manually; Refrain from behind presser foot while sewing which causes needles to ensure thread is not unreeling smoothly off the thread spool. allow feed teeth to a longer setting (page 26). Thread is not getting caught. Replace needle(s) (page 10). Thread tension is not set too tight. Use a needle size that machine is...
... the correct size for the fabric (page 12). MACHINE MAINTENANCE - 41 Check the thread spool to deflect. Differential Feed is set in the needle clamp. Manually pulling fabric from pulling fabric manually; Refrain from behind presser foot while sewing which causes needles to ensure thread is not unreeling smoothly off the thread spool. allow feed teeth to a longer setting (page 26). Thread is not getting caught. Replace needle(s) (page 10). Thread tension is not set too tight. Use a needle size that machine is...
Manual
Page 42
... mm Presser Foot Rise 5-7 mm Weight 7.8 kg 42 -MACHINE MAINTENANCE Solution: Set the Threading/Sewing switch to the correct looper (page 15, 17). Solution: Pull out approximately 12" (30 cm) of thread into the looper threader hole. Solution: Set the handwheel in threading position (page 8, 15, 17). Specifications Sewing Speed Maximum 1300 rpm Number of Needles/Needles 1-2 of type HAx1SP, size: #11-14 Stitch Length 1-5 mm Stitch Width 3.3-7.5 mm Number of Threads 2, 3, 4 Differential Feed Ratio 0.5-2.0 Type of cutters (page...
... mm Presser Foot Rise 5-7 mm Weight 7.8 kg 42 -MACHINE MAINTENANCE Solution: Set the Threading/Sewing switch to the correct looper (page 15, 17). Solution: Pull out approximately 12" (30 cm) of thread into the looper threader hole. Solution: Set the handwheel in threading position (page 8, 15, 17). Specifications Sewing Speed Maximum 1300 rpm Number of Needles/Needles 1-2 of type HAx1SP, size: #11-14 Stitch Length 1-5 mm Stitch Width 3.3-7.5 mm Number of Threads 2, 3, 4 Differential Feed Ratio 0.5-2.0 Type of cutters (page...


