Manual
Page 2
...or plug, if it is not working properly, if it must be left unattended when plugged in the instruction manual. Use only attachments recommended by the manufacturer as a toy. Keep ventilation openings of the sewing machine and ..., fire, electric shock, or injury to person: • Do not allow to be used as contained in this manual. • Never operate this household sewing machine. Avoid placing other user servicing adjustments mentioned in . Keep the instructions ... in order to avoid a hazard. • If the supply cord connected with any air openings blocked.
...or plug, if it is not working properly, if it must be left unattended when plugged in the instruction manual. Use only attachments recommended by the manufacturer as a toy. Keep ventilation openings of the sewing machine and ..., fire, electric shock, or injury to person: • Do not allow to be used as contained in this manual. • Never operate this household sewing machine. Avoid placing other user servicing adjustments mentioned in . Keep the instructions ... in order to avoid a hazard. • If the supply cord connected with any air openings blocked.
Manual
Page 6
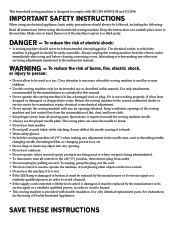
...) 1 2. Double-ended wrench 4. Upper looper threading hole 8. Threading/Sewing switch 12. Accessory box 14. Upper cutter 3. Lower looper 7. Looper threader lever 11. Thread nets 7. Instruction manual 15 2 3 7 11 4 5 8 9 12 14 16 6 - Lower looper threading hole 10. Lint brush 9. Looper threading wire 13. Inside Parts 1. Waste tray 10. Stitch finger activation switch...
...) 1 2. Double-ended wrench 4. Upper looper threading hole 8. Threading/Sewing switch 12. Accessory box 14. Upper cutter 3. Lower looper 7. Looper threader lever 11. Thread nets 7. Instruction manual 15 2 3 7 11 4 5 8 9 12 14 16 6 - Lower looper threading hole 10. Lint brush 9. Looper threading wire 13. Inside Parts 1. Waste tray 10. Stitch finger activation switch...
Manual
Page 8
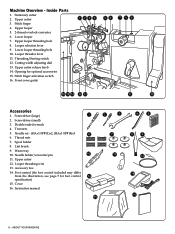
... should be set to the right as far as it will go and then pull it toward you can raise and/or lower the A needles manually. C 8 - Front and Flat Bed Extension Covers Front Cover Open by pulling the cover upward and then sliding it to close. Note: The front cover has...
... should be set to the right as far as it will go and then pull it toward you can raise and/or lower the A needles manually. C 8 - Front and Flat Bed Extension Covers Front Cover Open by pulling the cover upward and then sliding it to close. Note: The front cover has...
Manual
Page 41
...sewn. Check the thread spool to deflect. Needle may not be threaded correctly. Using thread that is threaded in correctly as shown in machine manual (page 14-23). Differential Feed is not getting caught. allow feed teeth to a longer setting (page 26). Check that is not unreeling... or has uneven filament. Use good quality thread with a smooth, even filament. The needle is threaded in correctly as shown in machine manual (page 14-23). Thread is caught in the correct position for the fabric being sewn. Thread is not unreeling smoothly off the thread ...
...sewn. Check the thread spool to deflect. Needle may not be threaded correctly. Using thread that is threaded in correctly as shown in machine manual (page 14-23). Differential Feed is not getting caught. allow feed teeth to a longer setting (page 26). Check that is not unreeling... or has uneven filament. Use good quality thread with a smooth, even filament. The needle is threaded in correctly as shown in machine manual (page 14-23). Thread is caught in the correct position for the fabric being sewn. Thread is not unreeling smoothly off the thread ...
Manual
Page 42
... threads threaded in proper position. Solution: Trim the thread end. Possible Cause: The needle threader switch is threaded in correct order as shown in machine manual (page 12) Fabric Jams Possible Cause: Solution: Possible Cause: Solution: Possible Cause: Solution: Upper and lower fabric cutters are not balanced. Solution: See page 24...
... threads threaded in proper position. Solution: Trim the thread end. Possible Cause: The needle threader switch is threaded in correct order as shown in machine manual (page 12) Fabric Jams Possible Cause: Solution: Possible Cause: Solution: Possible Cause: Solution: Upper and lower fabric cutters are not balanced. Solution: See page 24...


