

Owner's Manual
Page 7
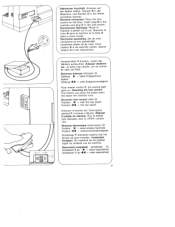
... use as threading needle, changing making any adjustments in or drop into any air openings blocked. plug, if it is necessary when this sewing machine if manufacturer as contained it has a damaged cord or in the instruction manual. Never drop or insert any object into water or other user servicing adjustments mentioned in this manual. Keep fingers away from outlet. Always unplug lubricating, or sewing machine from the electrical outlet when removing covers...
... use as threading needle, changing making any adjustments in or drop into any air openings blocked. plug, if it is necessary when this sewing machine if manufacturer as contained it has a damaged cord or in the instruction manual. Never drop or insert any object into water or other user servicing adjustments mentioned in this manual. Keep fingers away from outlet. Always unplug lubricating, or sewing machine from the electrical outlet when removing covers...
Owner's Manual
Page 9
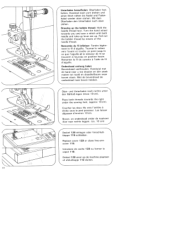
... ler näht die Pfaff. Operating the foot control: The farther you press the pedal down the faster the machine runs. Abaisser Ia pédale du rheostat. Rheostat electronique (interrupteur QI Position ' demi-vitesse maximale Position '41 = vitessemaximaleintégrale Schakelaar P indrukken waarna ook het lampje zal gaan branden. Anlasser niedertre ten. the sewing light goes on the floor. Voetpedaal...
... ler näht die Pfaff. Operating the foot control: The farther you press the pedal down the faster the machine runs. Abaisser Ia pédale du rheostat. Rheostat electronique (interrupteur QI Position ' demi-vitesse maximale Position '41 = vitessemaximaleintégrale Schakelaar P indrukken waarna ook het lampje zal gaan branden. Anlasser niedertre ten. the sewing light goes on the floor. Voetpedaal...
Owner's Manual
Page 16
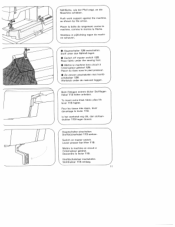
...bobbin thread by means of afsluitkapje 119 sluiten. Place both needle and take-up lever are up the bobbin thread: Hold the needle thread...119. Handrad nach vorn drehen und einen Stich nähen bis Nadel und Faden ...Replace cover 129 or close free-arm cover 119. Remontée du fil inférieur: Tendre legere ment le fil d'aiguille. legen (etwa 10cm). Boven- Onderdraad omhoog halen: Bovendraad vasthouden. Met de bovendraad de onderdraad naar boven trekken. 4 Ober- Turn the hand wheel towards you and sew a stitch until both threads towards the right under the sewing foot...
...bobbin thread by means of afsluitkapje 119 sluiten. Place both needle and take-up lever are up the bobbin thread: Hold the needle thread...119. Handrad nach vorn drehen und einen Stich nähen bis Nadel und Faden ...Replace cover 129 or close free-arm cover 119. Remontée du fil inférieur: Tendre legere ment le fil d'aiguille. legen (etwa 10cm). Boven- Onderdraad omhoog halen: Bovendraad vasthouden. Met de bovendraad de onderdraad naar boven trekken. 4 Ober- Turn the hand wheel towards you and sew a stitch until both threads towards the right under the sewing foot...
Owner's Manual
Page 17
... lever 113 higher. Stoffdrückerhebel 113 senken. Descendre Ic levier 113. Switch on master switch. Stoff unter den Nahfug legen. • Switch off master switch 125. Hoofdschakelaar inschakelen. Placer Ia boite de rangement contre a machine, comme le montre Ia flèche. Place fabric under the sewing foot. Stofdrukker 113 omlaag. Push work support against the machine...
... lever 113 higher. Stoffdrückerhebel 113 senken. Descendre Ic levier 113. Switch on master switch. Stoff unter den Nahfug legen. • Switch off master switch 125. Hoofdschakelaar inschakelen. Placer Ia boite de rangement contre a machine, comme le montre Ia flèche. Place fabric under the sewing foot. Stofdrukker 113 omlaag. Push work support against the machine...
Owner's Manual
Page 20
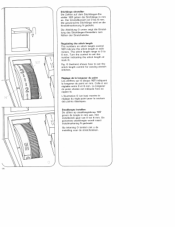
... gewenste steeklengte wordt naast instelmarkering N gedraaid. Turn the control to set the stitch length control for sewing stretch stitches. Op tekening 0 londer) ziet u de instelling voor de stretchsteken. Regulating the stitch length The numbers on stitch length control 107 indicate the stitch length in mm aan. Der Einstellbereich st 0 bis 6 mm... est indiquee face au repére N. Het instelbereik gaat van 0 tot 6 mm. The stitch length range is 0 to set the number indicating the stitch length at mark N. Celle-ci est reglable entre 0 et 6 mm. 4 Stichlange einstellen Die Zahlen ...
... gewenste steeklengte wordt naast instelmarkering N gedraaid. Turn the control to set the stitch length control for sewing stretch stitches. Op tekening 0 londer) ziet u de instelling voor de stretchsteken. Regulating the stitch length The numbers on stitch length control 107 indicate the stitch length in mm aan. Der Einstellbereich st 0 bis 6 mm... est indiquee face au repére N. Het instelbereik gaat van 0 tot 6 mm. The stitch length range is 0 to set the number indicating the stitch length at mark N. Celle-ci est reglable entre 0 et 6 mm. 4 Stichlange einstellen Die Zahlen ...

Owner's Manual
Page 23
... of the buttons on page 71. All stitches and stitch combinations are listed in the stitch program chart on your machine determine the programs and combinations that can be sewn. 0 2-mm zigzag stitch Elastic triple zigzag stitch, 2 mm E 3.5-mm zigzag stitch Elastic triple zigzag stitch, 3.5 mm F 5-mm zigzag stitch Elastic triple zigzag stitch, 5 mm G Straight stitch Elastic triple straight stitch 17 Buttons for buttonholing Button B is also used as clearing button for releasing the pushed buttons and for setting the left needle position (see page...
... of the buttons on page 71. All stitches and stitch combinations are listed in the stitch program chart on your machine determine the programs and combinations that can be sewn. 0 2-mm zigzag stitch Elastic triple zigzag stitch, 2 mm E 3.5-mm zigzag stitch Elastic triple zigzag stitch, 3.5 mm F 5-mm zigzag stitch Elastic triple zigzag stitch, 5 mm G Straight stitch Elastic triple straight stitch 17 Buttons for buttonholing Button B is also used as clearing button for releasing the pushed buttons and for setting the left needle position (see page...

Owner's Manual
Page 26
...gelijktijdig in width. N Selecting stretch stitches Push the button G required and turn the stitch length control as far as it will go (symbol I. By also pressing button G, all elastic triple zigzag stitches can be halved in te toetsen.... 20 Reglage des points elastiques Appuyer sur Ia touche G et régler le reglepoint de (a longueur de points sur le symbole , jusqu'a Ia butée. Stretchstiche einstellen Taste G tippen und Stichlängen-Einsteller bis zum Anschlag auf Symbol stel Alle Stretch-3fach-Zickzack-Stiche...
...gelijktijdig in width. N Selecting stretch stitches Push the button G required and turn the stitch length control as far as it will go (symbol I. By also pressing button G, all elastic triple zigzag stitches can be halved in te toetsen.... 20 Reglage des points elastiques Appuyer sur Ia touche G et régler le reglepoint de (a longueur de points sur le symbole , jusqu'a Ia butée. Stretchstiche einstellen Taste G tippen und Stichlängen-Einsteller bis zum Anschlag auf Symbol stel Alle Stretch-3fach-Zickzack-Stiche...

Owner's Manual
Page 27
N4 [i [jH Stichlage einstell en bei Geradstich: Stichiage links: Taste B tippen Stichlage Mitte: Taste 0 tippen N Selecting the needle position for straight stitching: Left needle position: push button B Central needle position: push button G Deport du point droit: Deport a gauche: appuyer sur a touche B Deport au milieu: appuyer sur Ia touche 0 Naaldstand instellen: Naaldstand links: toets B indrukken Naaldstand midden: toets G indrukken 21
N4 [i [jH Stichlage einstell en bei Geradstich: Stichiage links: Taste B tippen Stichlage Mitte: Taste 0 tippen N Selecting the needle position for straight stitching: Left needle position: push button B Central needle position: push button G Deport du point droit: Deport a gauche: appuyer sur a touche B Deport au milieu: appuyer sur Ia touche 0 Naaldstand instellen: Naaldstand links: toets B indrukken Naaldstand midden: toets G indrukken 21
Owner's Manual
Page 29
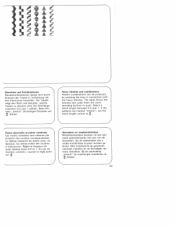
Die Tabelle zeigt den Stich und darunter, welche Tasten zu drücken sind. The table shows the stitches and under them the corre sponding buttons to push. Select a stitch length between 0.5 and 1 If the patterns are marked "stretch", set the stitch length control at Points décoratifs et points combines Los motifs combines sont obtenus par pression des touches correspondantes. Regler a longueur...
Die Tabelle zeigt den Stich und darunter, welche Tasten zu drücken sind. The table shows the stitches and under them the corre sponding buttons to push. Select a stitch length between 0.5 and 1 If the patterns are marked "stretch", set the stitch length control at Points décoratifs et points combines Los motifs combines sont obtenus par pression des touches correspondantes. Regler a longueur...
Owner's Manual
Page 30
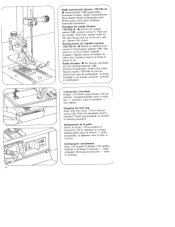
...Changing the needle (System • 130/705 H): Switch off master switch 125. Loosen screw N. Take out the needle...237;a machine hors circuit a l'interrupteur gdndral 125. Dropping the feed dog Open free arm cover 119 or remove cover 1 ...feed dog dropped) or toward o (sewing position). Richtung 0 schuiven weer in de houder schuiven. Schraube festdrehen. Stoftransport uitschakelen: KIep 119 openen of dekse) 129 opti))en. 4 Nadel auswechseln (System 130/705 H): • Hauptschalter 125 ausschalten. Push new needle (with its flat side facing rear up as far as it will go. Tighten the screw...
...Changing the needle (System • 130/705 H): Switch off master switch 125. Loosen screw N. Take out the needle...237;a machine hors circuit a l'interrupteur gdndral 125. Dropping the feed dog Open free arm cover 119 or remove cover 1 ...feed dog dropped) or toward o (sewing position). Richtung 0 schuiven weer in de houder schuiven. Schraube festdrehen. Stoftransport uitschakelen: KIep 119 openen of dekse) 129 opti))en. 4 Nadel auswechseln (System 130/705 H): • Hauptschalter 125 ausschalten. Push new needle (with its flat side facing rear up as far as it will go. Tighten the screw...

Owner's Manual
Page 31
...sewing foot, push the red button N. Druk op rode knop N. Fitting the sewing foot: lower the presser bar lifter and move the foot so that pins 0 snap into grooves P. R and Q are for fitting accessories... es accessoires. a Changement de Ia semelle du pied: • Mettre Ia machine hors circuit I'interrupteur general 125. De naaivoet is naaivoethouderschroef. s st die NOhfufThalterschraube...Changing the sewing foot: Switch off master switch 125. Enfoncer le bouton rouge N; a semelle est libérée. S is the sewing foot retaining screw. S est Ia vis de fixation du support...
...sewing foot, push the red button N. Druk op rode knop N. Fitting the sewing foot: lower the presser bar lifter and move the foot so that pins 0 snap into grooves P. R and Q are for fitting accessories... es accessoires. a Changement de Ia semelle du pied: • Mettre Ia machine hors circuit I'interrupteur general 125. De naaivoet is naaivoethouderschroef. s st die NOhfufThalterschraube...Changing the sewing foot: Switch off master switch 125. Enfoncer le bouton rouge N; a semelle est libérée. S is the sewing foot retaining screw. S est Ia vis de fixation du support...
Owner's Manual
Page 48
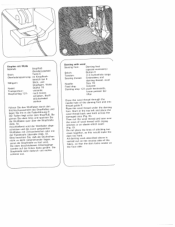
.....eSliBleee (Abb. N Darning with wool Sewing foot: Darning toot (special accessory) Stitch: Tension: Sewing thread: Button E 3 in buttonhole range Embroidery and darning thread, wool Needle: Size 70 Feed dog: lowered Darning stop 121: push backwards, lower presser bar lifter Draw the wool thread through the needle hole of wool thread with zigzag stitches or an elastic-stitch seam (Fig. 0). nt.geDie Stopfsteile sieht dadurch von rechts schöner aus. the wool thread and sew over the rows of the darning foot and into thread guide P.
.....eSliBleee (Abb. N Darning with wool Sewing foot: Darning toot (special accessory) Stitch: Tension: Sewing thread: Button E 3 in buttonhole range Embroidery and darning thread, wool Needle: Size 70 Feed dog: lowered Darning stop 121: push backwards, lower presser bar lifter Draw the wool thread through the needle hole of wool thread with zigzag stitches or an elastic-stitch seam (Fig. 0). nt.geDie Stopfsteile sieht dadurch von rechts schöner aus. the wool thread and sew over the rows of the darning foot and into thread guide P.
Owner's Manual
Page 50
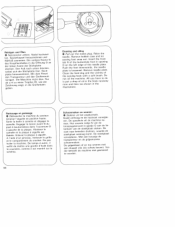
Die Maschine nicht Olen. Clean the feed dog and the vicinity of the needle plate. Engager le tenon avant N dii a pied boutonnières dans l'ouvorture 0 a gauche de Ia plaque. Abaisser a a semelle et Ia plaque aiguille...252;cken, wobei sich die Stichplatte lost. Remove bobbin case and let sewing toot snap out. Vor dor behooft do machine no men. Spulenkapsel herausnehmen und NähtuR ausrasten. Stich platte herausnehmen. Insert the front tab N of the buttonhole foot in opening 0 on the left edge of the sewing hook with a soft brush. Sortir Ia boite canette...
Die Maschine nicht Olen. Clean the feed dog and the vicinity of the needle plate. Engager le tenon avant N dii a pied boutonnières dans l'ouvorture 0 a gauche de Ia plaque. Abaisser a a semelle et Ia plaque aiguille...252;cken, wobei sich die Stichplatte lost. Remove bobbin case and let sewing toot snap out. Vor dor behooft do machine no men. Spulenkapsel herausnehmen und NähtuR ausrasten. Stich platte herausnehmen. Insert the front tab N of the buttonhole foot in opening 0 on the left edge of the sewing hook with a soft brush. Sortir Ia boite canette...

Owner's Manual
Page 54
... heavily dressed materials, organdy and glass cambric. Fabric weight: light Needle size 60 70 75 Fabric weight: medium Needle size 80 90 Fabric weight: heavy Needle size 100 110 120 Neede points System and No. Seams topstitched with left-twist groove Light ball point long eye Imitation leathers, plastic materials, plastic sheeting and oilcloth. Neede chart Using the adequate needle ensures better processing of microfibers. 48
... heavily dressed materials, organdy and glass cambric. Fabric weight: light Needle size 60 70 75 Fabric weight: medium Needle size 80 90 Fabric weight: heavy Needle size 100 110 120 Neede points System and No. Seams topstitched with left-twist groove Light ball point long eye Imitation leathers, plastic materials, plastic sheeting and oilcloth. Neede chart Using the adequate needle ensures better processing of microfibers. 48

Owner's Manual
Page 55
... zigzag patterns 705HZWl 80 80 80 0.5-1.5 mm 0.5-1.5 mm 0.5-1.5 mm wide narrow I 1.6mm 2.0 mm Special hemstitching twin needle [1 130/705 H-ZWI-HO [If 80 100 I 2.0-3.0 mm very narrow - 2.0-3.0 mm very narrow - eedle chart System&No. Stitch length [j 130/705 H-ZWI 2.5 mm 80 2.5 mm 130/705 H-ZWI 80 90 [100 2.5 mm 2.5 mm 3.0 mm Stitch width - - - - - Ornamentations Ornamentations Ornamentations Decorative hem stitching...
... zigzag patterns 705HZWl 80 80 80 0.5-1.5 mm 0.5-1.5 mm 0.5-1.5 mm wide narrow I 1.6mm 2.0 mm Special hemstitching twin needle [1 130/705 H-ZWI-HO [If 80 100 I 2.0-3.0 mm very narrow - 2.0-3.0 mm very narrow - eedle chart System&No. Stitch length [j 130/705 H-ZWI 2.5 mm 80 2.5 mm 130/705 H-ZWI 80 90 [100 2.5 mm 2.5 mm 3.0 mm Stitch width - - - - - Ornamentations Ornamentations Ornamentations Decorative hem stitching...
Owner's Manual
Page 62
... H needle. Check threading. Bobbin case improperly inserted. Insert new needle. Only guide the material lightly. Thread too thick, knotty or hard. Thread machine properly and check both tensions. 56 Needle bent or blunt. Needle too thin or too thick. Insert new needle. During bobbin winding, do not hold thread in as far as it will go . Use thicker needle. 2. Machine threaded improperly. Thread tension too high. Needle bent and strikes needle plate because workpiece is not uniform Tension out of adjustment. Check upper and lower tensions. Use...
... H needle. Check threading. Bobbin case improperly inserted. Insert new needle. Only guide the material lightly. Thread too thick, knotty or hard. Thread machine properly and check both tensions. 56 Needle bent or blunt. Needle too thin or too thick. Insert new needle. During bobbin winding, do not hold thread in as far as it will go . Use thicker needle. 2. Machine threaded improperly. Thread tension too high. Needle bent and strikes needle plate because workpiece is not uniform Tension out of adjustment. Check upper and lower tensions. Use...
Owner's Manual
Page 63
...Remove needle plate and clean out lint. Remove thread ends and put a drop of feed dog. Disengage thumb-wheel: set at all Lint has accumulated between tooth rows of oil into hook raceway. 7. Fundamental rules NtBfhoeeeofvtoe.mrreIafrseuytxneocruhasahtwnhagirvtiecenahgdt.oeeTdilthehmiaesvraeicsshtephiwnaeeritnmiugcnaucflleaohsroilsntyeto,hirmeernvpeeeoenridtsalfneao,trpswaiwehcsieehtcnohorfct ohfwfialfhdbirrmleiecna, subatnereerdessaurwrroteihutectnohds.es1ww2ii5nt.cgh off ) 57 Machine feeds irregularly or not at dot. 8. Push feed-lowering control to the left. 6. The machine does not sew...
...Remove needle plate and clean out lint. Remove thread ends and put a drop of feed dog. Disengage thumb-wheel: set at all Lint has accumulated between tooth rows of oil into hook raceway. 7. Fundamental rules NtBfhoeeeofvtoe.mrreIafrseuytxneocruhasahtwnhagirvtiecenahgdt.oeeTdilthehmiaesvraeicsshtephiwnaeeritnmiugcnaucflleaohsroilsntyeto,hirmeernvpeeeoenridtsalfneao,trpswaiwehcsieehtcnohorfct ohfwfialfhdbirrmleiecna, subatnereerdessaurwrroteihutectnohds.es1ww2ii5nt.cgh off ) 57 Machine feeds irregularly or not at dot. 8. Push feed-lowering control to the left. 6. The machine does not sew...
Owner's Manual
Page 70
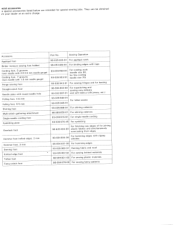
... needle gaugei Cording foot, 7 grooves (twin needle wi. Accessory Appliqué foot Binder (remove sewing foot holder( Cording foot, 5 grooves (twin needle with zigzag 98-694804-00 stitches 98-694401-00 For hemming edges 93-035 960-9 1 Darning fabric and wool 93-035 957-91 For sewing knitted materials 98-694801-00 For sewing plastic materials 98-694 879-00 For sewing fancy patterns Needle plate with round needle hole Felling foot, 4.5 mm Felling foot, 6.5 mm Shirring foot Multi-stitch gathering attachment Single-needle cording foot Eyeletting plate Overlock foot Hemmer foot...
... needle gaugei Cording foot, 7 grooves (twin needle wi. Accessory Appliqué foot Binder (remove sewing foot holder( Cording foot, 5 grooves (twin needle with zigzag 98-694804-00 stitches 98-694401-00 For hemming edges 93-035 960-9 1 Darning fabric and wool 93-035 957-91 For sewing knitted materials 98-694801-00 For sewing plastic materials 98-694 879-00 For sewing fancy patterns Needle plate with round needle hole Felling foot, 4.5 mm Felling foot, 6.5 mm Shirring foot Multi-stitch gathering attachment Single-needle cording foot Eyeletting plate Overlock foot Hemmer foot...
Owner's Manual
Page 71
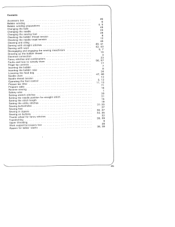
... and combinations Faults and how to remedy them Fingertip controls Inserting the bobbin Inserting the bobbin case Lowering the feed dog Needle chart Needle thread tension Operating the foot control Presser bar lifter Program table Reverse sewing Safety rules Setting stretch stitches Setting the needle position for straight stitch Setting the stitch length Setting the utility stitches Sewing buttonholes Sewing feet Sewing in zippers Sewing on buttons Thumb wheel for fancy stitches Topstitching Upper threading Work support/accessory box Zippers for ladies' slacks 26 6 4, 5 45 24 25 8 12 44...
... and combinations Faults and how to remedy them Fingertip controls Inserting the bobbin Inserting the bobbin case Lowering the feed dog Needle chart Needle thread tension Operating the foot control Presser bar lifter Program table Reverse sewing Safety rules Setting stretch stitches Setting the needle position for straight stitch Setting the stitch length Setting the utility stitches Sewing buttonholes Sewing feet Sewing in zippers Sewing on buttons Thumb wheel for fancy stitches Topstitching Upper threading Work support/accessory box Zippers for ladies' slacks 26 6 4, 5 45 24 25 8 12 44...
Owner's Manual
Page 77
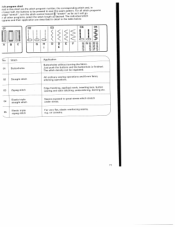
....hd, in programs Stitch 01 Buttonholes 02 Straight stitch 03 Zigzag stitch 04 Elastic triple straight stitch Elastic triple zigzag stitch Application N Buttonholes without turning the fabric. Just push the buttons and the buttonhole is finished. All ordinary sewing operations and 6-mm fancy stitching operations. The stitch density can be regulated. Edge finishing, appliqué work, inserting lace, button sewing and satin stitching, embroidering, darning etc. For very flat, elastic reinforcing seams, e.g. Seams exposed to great stress which stretch under stress.
....hd, in programs Stitch 01 Buttonholes 02 Straight stitch 03 Zigzag stitch 04 Elastic triple straight stitch Elastic triple zigzag stitch Application N Buttonholes without turning the fabric. Just push the buttons and the buttonhole is finished. All ordinary sewing operations and 6-mm fancy stitching operations. The stitch density can be regulated. Edge finishing, appliqué work, inserting lace, button sewing and satin stitching, embroidering, darning etc. For very flat, elastic reinforcing seams, e.g. Seams exposed to great stress which stretch under stress.


