
Owner's Manual
Page 4
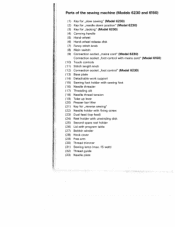
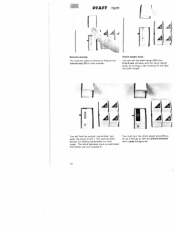
... ,,foot control with mains cord" (Model 6150) (10) Touch controls (11) Stitch length knob (1 2) Connection socket ,,foot control" (Model 6230) (13) Base plate (14) Detachable work support (1 5) Sewing foot holder with sewing foot (16) Needle threader (17) Threading slit (1 8) Needle thread tension (19) Take-up lever (20) Presser bar lifter (21) Key for ,,reverse sewing" (22) Needle holder with fixing screw (23) Dual feed (top feed) (24) Reel holder with unwinding disk (25) Second spare reel holder (26) Lid with program table (27) Bobbin winder (28) Hook cover (29) Free arm (30) Thread trimmer...
... ,,foot control with mains cord" (Model 6150) (10) Touch controls (11) Stitch length knob (1 2) Connection socket ,,foot control" (Model 6230) (13) Base plate (14) Detachable work support (1 5) Sewing foot holder with sewing foot (16) Needle threader (17) Threading slit (1 8) Needle thread tension (19) Take-up lever (20) Presser bar lifter (21) Key for ,,reverse sewing" (22) Needle holder with fixing screw (23) Dual feed (top feed) (24) Reel holder with unwinding disk (25) Second spare reel holder (26) Lid with program table (27) Bobbin winder (28) Hook cover (29) Free arm (30) Thread trimmer...
Owner's Manual
Page 5
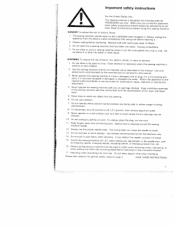
... not working pro dropped or damaged, or dropped into water or other user servicing adjustments mentioned removing covers, in this sewing machine only for a sewing machine that has fallen into a tub or sink. To disconnect, turn all moving parts machine needle. Hold plug when rewinding into cord reel Do not allow to off (.01 position, then remove plug from the electric outlet when when making any other liquid. attachments recommended...
... not working pro dropped or damaged, or dropped into water or other user servicing adjustments mentioned removing covers, in this sewing machine only for a sewing machine that has fallen into a tub or sink. To disconnect, turn all moving parts machine needle. Hold plug when rewinding into cord reel Do not allow to off (.01 position, then remove plug from the electric outlet when when making any other liquid. attachments recommended...
Owner's Manual
Page 6
... domestic sewing machines according to the indications on the specification plate. 6. The user must be adjusted by its function is disturbed, it is a high-quality electro nic-mechanical appliance; When leaving the machine, during work or when changing mechanical parts or accessories, always disconnect the machine from the mains by hitting or dropping. Do not use a dry, clean and soft cloth which the user can repair. there...
... domestic sewing machines according to the indications on the specification plate. 6. The user must be adjusted by its function is disturbed, it is a high-quality electro nic-mechanical appliance; When leaving the machine, during work or when changing mechanical parts or accessories, always disconnect the machine from the mains by hitting or dropping. Do not use a dry, clean and soft cloth which the user can repair. there...

Owner's Manual
Page 8
... Accessories and needles Accessory compartment Applique Appliqué foot Bias tape binder . Bobbin winding . . . Foot control . . . . Inserting patches . . . Faults. . . . Free arm. . . . Elastic stitches Electrical connection . Fancy elastic knob. . Hemstitching . . . Linen buttonhole Linen buttonhole with straight stitch . Dual fabric feed Elastic stitch . Hand wheel release disk Hem with the twin needle . Fancy stitch table . . Bobbin thread tension . . Detachable work Lamp . . . . . Closed overlock stitch...
... Accessories and needles Accessory compartment Applique Appliqué foot Bias tape binder . Bobbin winding . . . Foot control . . . . Inserting patches . . . Faults. . . . Free arm. . . . Elastic stitches Electrical connection . Fancy elastic knob. . Hemstitching . . . Linen buttonhole Linen buttonhole with straight stitch . Dual fabric feed Elastic stitch . Hand wheel release disk Hem with the twin needle . Fancy stitch table . . Bobbin thread tension . . Detachable work Lamp . . . . . Closed overlock stitch...
Owner's Manual
Page 9
Lowering the feed dog Main switch Maintenance and faults Monograms Multi4oot gathering foot. Needle thread tension Needle threader Nonelastic stitches - Oiling . Reverse sewing. Stitch length control j Straight stitch Stretch triple straight stitch. Quilting ..... . - Right needle position Roll hemming Safety notes Serging with the overlock foot Serging with zigzag stitch Setting stretch stitch . Sewing chart Sewing feet lspecial accessories( Sewing feet (standard accessories( Sewing lamp Sewing on buttons Sewing problems . . Shell edging...
Lowering the feed dog Main switch Maintenance and faults Monograms Multi4oot gathering foot. Needle thread tension Needle threader Nonelastic stitches - Oiling . Reverse sewing. Stitch length control j Straight stitch Stretch triple straight stitch. Quilting ..... . - Right needle position Roll hemming Safety notes Serging with the overlock foot Serging with zigzag stitch Setting stretch stitch . Sewing chart Sewing feet lspecial accessories( Sewing feet (standard accessories( Sewing lamp Sewing on buttons Sewing problems . . Shell edging...

Owner's Manual
Page 10
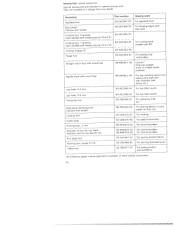
... D/E/F G HI H Zigzag stitch in various widths Straight stitch, needle position, left needle position For all straight stitch and topstitch sewing jobs, up to 6 mm stitch length For all sewing and topstitching work . For all sewing and topstitching jobs requiring a right needle position For securing seams invisibly on stronger fabrics HD Blind stitch, narrow For securing seams invisibly on light fabrics i.e. for blouses or bedclothes For serging and appliqué work requiring left Straight stitch, needle position, center Straight stitch, needle position, right Blind stitch, wide...
... D/E/F G HI H Zigzag stitch in various widths Straight stitch, needle position, left needle position For all straight stitch and topstitch sewing jobs, up to 6 mm stitch length For all sewing and topstitching work . For all sewing and topstitching jobs requiring a right needle position For securing seams invisibly on stronger fabrics HD Blind stitch, narrow For securing seams invisibly on light fabrics i.e. for blouses or bedclothes For serging and appliqué work requiring left Straight stitch, needle position, center Straight stitch, needle position, right Blind stitch, wide...

Owner's Manual
Page 12
... a covering stitch for stretch material lG Closed overlock stitch, A closing and serging seam, also for sewing narrow on lace K Opened overlock stitch A closing and serging seam for stronger material that does not fray so much KO Peacock stitch with zigzag A decorative, stretch stitch for topstitching and fancy edges KG Peacock stitch with straight stitch A decorative stitch for patchwork and quilting IF Penant stitch A decorative, stretch stitch, also suitable as seams in various widths Stretch triple straight stitch, needle position...
... a covering stitch for stretch material lG Closed overlock stitch, A closing and serging seam, also for sewing narrow on lace K Opened overlock stitch A closing and serging seam for stronger material that does not fray so much KO Peacock stitch with zigzag A decorative, stretch stitch for topstitching and fancy edges KG Peacock stitch with straight stitch A decorative stitch for patchwork and quilting IF Penant stitch A decorative, stretch stitch, also suitable as seams in various widths Stretch triple straight stitch, needle position...

Owner's Manual
Page 29
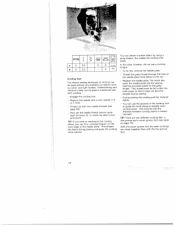
darning, the feed dog has to 5 For embroidering. I I A I JI Setting the need'e thread tension Set the required amount on the needle thread tension (18) using mark A The normal setting for sewing is lowered. 27 Now the feed dog is 4 to be dropped. Lowering the feed dog For certain sewing work, e g. darning and buttonhole sewing between 2 and 3. To do this, open the hook cover and press slide B fully to the right.
darning, the feed dog has to 5 For embroidering. I I A I JI Setting the need'e thread tension Set the required amount on the needle thread tension (18) using mark A The normal setting for sewing is lowered. 27 Now the feed dog is 4 to be dropped. Lowering the feed dog For certain sewing work, e g. darning and buttonhole sewing between 2 and 3. To do this, open the hook cover and press slide B fully to the right.
Owner's Manual
Page 30
... the symbol buttonhole bet ween the figure 0 arid 1. The stitch becomes more concentrated the farther you turn towards O You must turn the stitch length knob (11) as far as the reverse key (21) is kept pressed. PFAFF tiptr 1 11A) L fl1 Al Reverse sewing The machine sews in this range. Li AA You will go to sew the stretch stitches with the stitch length knob, by...
... the symbol buttonhole bet ween the figure 0 arid 1. The stitch becomes more concentrated the farther you turn towards O You must turn the stitch length knob (11) as far as the reverse key (21) is kept pressed. PFAFF tiptr 1 11A) L fl1 Al Reverse sewing The machine sews in this range. Li AA You will go to sew the stretch stitches with the stitch length knob, by...

Owner's Manual
Page 31
... by half. Important: When sewing with utility stitches with a grey background are stretch stitches, i.e. PFAFF tiptronic 6230 ' I A 1 T- 4AAA Pushbutton controls Setting utility stitches Under the id (26) you cliagnhtfeidnd on the bushbutton controls. If the right button is pressed the program is selec ted and the machine is pressed again the width of the grey area. On models 6150 and 6230 if tkheey G is...
... by half. Important: When sewing with utility stitches with a grey background are stretch stitches, i.e. PFAFF tiptronic 6230 ' I A 1 T- 4AAA Pushbutton controls Setting utility stitches Under the id (26) you cliagnhtfeidnd on the bushbutton controls. If the right button is pressed the program is selec ted and the machine is pressed again the width of the grey area. On models 6150 and 6230 if tkheey G is...

Owner's Manual
Page 37
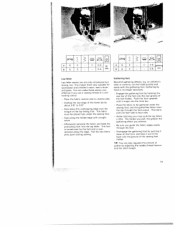
When you do not need to the - Sew one stitch. rear by changing the needle position, e.g. Then you press the foot control the machine will only make sure it on. topstitching a collar or sewing in the middle - key G Needle position on the left - top feed. Place the fabric under the sewing foot. - Repeat this as many times as required. Needle position on the right - Needle position in a zipper. finish the work. You have to 6 mm...
When you do not need to the - Sew one stitch. rear by changing the needle position, e.g. Then you press the foot control the machine will only make sure it on. topstitching a collar or sewing in the middle - key G Needle position on the left - top feed. Place the fabric under the sewing foot. - Repeat this as many times as required. Needle position on the right - Needle position in a zipper. finish the work. You have to 6 mm...

Owner's Manual
Page 40
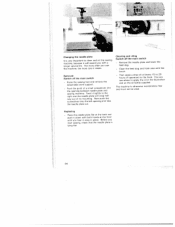
Now lower the presser bar lifter; Insert the sewing foot. - Remove the sewing foot and lower the feed dog. - Now sew with sewing thread and knot ii. 39 Then release with key B and the needle automatically goes into the left . Wrap the stem with a few stitches. Sewing on two and fourhole buttons with stems - Place a match between the holes of the button and sew it on as described on the button. Make sure that the needle also...
Now lower the presser bar lifter; Insert the sewing foot. - Remove the sewing foot and lower the feed dog. - Now sew with sewing thread and knot ii. 39 Then release with key B and the needle automatically goes into the left . Wrap the stem with a few stitches. Sewing on two and fourhole buttons with stems - Place a match between the holes of the button and sew it on as described on the button. Make sure that the needle also...
Owner's Manual
Page 52
... gathering seam on the elastic thread. After sewing you determine the amount of - reverse side of the elastic thread until these are sewn. Raise the sewing foot and place the elastic thread around the needle. The grooves in the fabric. Lower the sewing foot again and sew a few starting stitches using program -. Finally, knot the threads and the elastic. - Make a few - gather by pulling both elastic threads. The needle must not be at all with elastic threads. TIP: The cording foot (special accessory...
... gathering seam on the elastic thread. After sewing you determine the amount of - reverse side of the elastic thread until these are sewn. Raise the sewing foot and place the elastic thread around the needle. The grooves in the fabric. Lower the sewing foot again and sew a few starting stitches using program -. Finally, knot the threads and the elastic. - Make a few - gather by pulling both elastic threads. The needle must not be at all with elastic threads. TIP: The cording foot (special accessory...
Owner's Manual
Page 70
... with the help of an eyelet plate Ispecial accessory). To complete this it for this utility stitches such as a zigzag stitch, blind stitch, elastic stitch or fancy stitches (Models 6150, 6230). Remove the sewing foot. For classic eyelet embroidery, program E or F are suitable for the first few stitches. Isee page 511. dery hoop. selected program. Set the presser bar lifter in the middle cutout of the fabric threads and push the fabric over the pin in...
... with the help of an eyelet plate Ispecial accessory). To complete this it for this utility stitches such as a zigzag stitch, blind stitch, elastic stitch or fancy stitches (Models 6150, 6230). Remove the sewing foot. For classic eyelet embroidery, program E or F are suitable for the first few stitches. Isee page 511. dery hoop. selected program. Set the presser bar lifter in the middle cutout of the fabric threads and push the fabric over the pin in...
Owner's Manual
Page 73
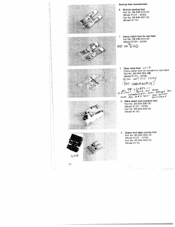
rV 1fA1 $4 A S'T 3 Blind stitch and overlock foot Part No. 98-694 890-00 (Model 6120- 6230) Part No. 98-694 845-00 (Model 6110) 4 Zipper and edge sewing foot Part No. 98-694 884-00 (Model 6120-6230> Part No. 98-694 843-00 (Model 61101 K. 72 Sewing feet (accessories) o Normal sewing foot Part No. 98-694 816-00 (Model 6120-6230) Part No. 98-694 847-00 (Modell 6110) Fancy stitch foot for top feed Part No. 98...
rV 1fA1 $4 A S'T 3 Blind stitch and overlock foot Part No. 98-694 890-00 (Model 6120- 6230) Part No. 98-694 845-00 (Model 6110) 4 Zipper and edge sewing foot Part No. 98-694 884-00 (Model 6120-6230> Part No. 98-694 843-00 (Model 61101 K. 72 Sewing feet (accessories) o Normal sewing foot Part No. 98-694 816-00 (Model 6120-6230) Part No. 98-694 847-00 (Modell 6110) Fancy stitch foot for top feed Part No. 98...
Owner's Manual
Page 75
... use straight stitch in middle needle position! Accessory Appliqué foot Bias binder (remove foot holder( Cording foot, 5 grooves (twin needles with needle spacing 1 6 to 20) Cording foot, 7 grooves (twirl needles with needle spacing 1.6 to 2.0) Cording tongue (2( Fringe foot Part number 93-042941-91 98-053484-91 93-042950-91 93-042953-91 93.03595245 93-042 943-91 Sewing work For appliqué work For binding edges with bias tape For cording work (needle size 801 For sewing loop embroidery Straight stitch foot with round hole Needle plate with...
... use straight stitch in middle needle position! Accessory Appliqué foot Bias binder (remove foot holder( Cording foot, 5 grooves (twin needles with needle spacing 1 6 to 20) Cording foot, 7 grooves (twirl needles with needle spacing 1.6 to 2.0) Cording tongue (2( Fringe foot Part number 93-042941-91 98-053484-91 93-042950-91 93-042953-91 93.03595245 93-042 943-91 Sewing work For appliqué work For binding edges with bias tape For cording work (needle size 801 For sewing loop embroidery Straight stitch foot with round hole Needle plate with...
Owner's Manual
Page 76
... the front bar. Disengage the gathering foot by hand is overstitched along the folded edge with the gathering foot. You can make these seams very effective if you guide the fabric edges evenly through the foot cutout. Pull the two fabric plies apart during sewing Gathering foot Beautiful gathering effects, e.g. Place the fabric to the back over by adjusting the needle thread tension and the stitch length. 75 L t erit a n foot - The fabric must pull...
... the front bar. Disengage the gathering foot by hand is overstitched along the folded edge with the gathering foot. You can make these seams very effective if you guide the fabric edges evenly through the foot cutout. Pull the two fabric plies apart during sewing Gathering foot Beautiful gathering effects, e.g. Place the fabric to the back over by adjusting the needle thread tension and the stitch length. 75 L t erit a n foot - The fabric must pull...
Owner's Manual
Page 77
... cording foot to guide the work along an already sewn cording seam. The notch bet - During sewing the cording pull the material lightly. - Replace the needle with two needle threads Isee page 64). - Thread up with a twin needle 11.6 or 2 mml. - this , remove the needle plate. - Thread the gimp thread through the hole of cording can be used without any problems on fabrics such as cotton and light wollens Underclothing and children's wear can use a cording tongue. - ween the needle plate...
... cording foot to guide the work along an already sewn cording seam. The notch bet - During sewing the cording pull the material lightly. - Replace the needle with two needle threads Isee page 64). - Thread up with a twin needle 11.6 or 2 mml. - this , remove the needle plate. - Thread the gimp thread through the hole of cording can be used without any problems on fabrics such as cotton and light wollens Underclothing and children's wear can use a cording tongue. - ween the needle plate...
Owner's Manual
Page 84
... brush. Then apply a drop of a small screwdriver into the left opening between needle plate and sewing machine. Push the point of oil every 15 to 20 - Clean the feed dog and hook area with both hands at the back and - hours of operation) to apply the oil in place. Cleaning and oiling Switch off the main switch Raise the sewing foot and remove the - detachable work support. The more care...
... brush. Then apply a drop of a small screwdriver into the left opening between needle plate and sewing machine. Push the point of oil every 15 to 20 - Clean the feed dog and hook area with both hands at the back and - hours of operation) to apply the oil in place. Cleaning and oiling Switch off the main switch Raise the sewing foot and remove the - detachable work support. The more care...
Owner's Manual
Page 86
... through the winding tension. Only use , Needle is not properly inserted Remedy: Push needle fully upwards, flat side facing the back Use needle system 130/705 H. Remove needle plate, remove lint with large eye (System 130 NI. When leaving the machine, are any children nearby. 86 switch off before sewing feet and needles fabric. Needle is too thick. 3. Needle thread breaks See reasons above Adjust thread tension Only use good threads Use needle with brush. The bobbin thread is too...
... through the winding tension. Only use , Needle is not properly inserted Remedy: Push needle fully upwards, flat side facing the back Use needle system 130/705 H. Remove needle plate, remove lint with large eye (System 130 NI. When leaving the machine, are any children nearby. 86 switch off before sewing feet and needles fabric. Needle is too thick. 3. Needle thread breaks See reasons above Adjust thread tension Only use good threads Use needle with brush. The bobbin thread is too...


