

Owner's Manual
Page 2
... plate (12) Detachable work support (13) Sewing foot holder with sewing foot (14) Integrated Dual Feed/IDF (15) Needle threader (16) Key for "reverse sewing" (17) Threading slots (18) Needle thread tension (19) Take-up lever (20) Presser bar lifter (21) Thread guide (22) Spool holder with unwinding disk (23) Hole for second spool holder (24) Top cover with stitch program chart (25) Bobbin winder (26) Hook cover (27) Free arm (28) Sewing lamp (max. 5 W) (29) Thread cutter (30) Key for pattern mirroring (31) Thread take-up (32) Needle holder with needle set screw (33) Needle plate...
... plate (12) Detachable work support (13) Sewing foot holder with sewing foot (14) Integrated Dual Feed/IDF (15) Needle threader (16) Key for "reverse sewing" (17) Threading slots (18) Needle thread tension (19) Take-up lever (20) Presser bar lifter (21) Thread guide (22) Spool holder with unwinding disk (23) Hole for second spool holder (24) Top cover with stitch program chart (25) Bobbin winder (26) Hook cover (27) Free arm (28) Sewing lamp (max. 5 W) (29) Thread cutter (30) Key for pattern mirroring (31) Thread take-up (32) Needle holder with needle set screw (33) Needle plate...
Owner's Manual
Page 3
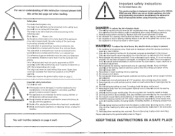
... as threading needle, changing needle, threading bobbin, or changing presser foot, etc. 16. Replace bulb with the corresponding color code. Only use an electric appliance, the following code: Blue: Neutral Brown: Live As the colors of the wires in the mains lead of this appliance may not correspond with the color coding of the terminals in order to a plug with any opening. 6. Never operate the sewing machine with three pins...
... as threading needle, changing needle, threading bobbin, or changing presser foot, etc. 16. Replace bulb with the corresponding color code. Only use an electric appliance, the following code: Blue: Neutral Brown: Live As the colors of the wires in the mains lead of this appliance may not correspond with the color coding of the terminals in order to a plug with any opening. 6. Never operate the sewing machine with three pins...

Owner's Manual
Page 4
.... 4. Your PFAFF dealer will sew through thick and thin for you can repair. Your new sewing machine can occur when a cold machine is installed in the direct vicinity of the machine is visible damage - When leaving the machine, during work or when changing mechanical parts or accessories, always disconnect the machine from the main power by push-button control - There are no problem! It applies both to the 2020 model and to...
.... 4. Your PFAFF dealer will sew through thick and thin for you can repair. Your new sewing machine can occur when a cold machine is installed in the direct vicinity of the machine is visible damage - When leaving the machine, during work or when changing mechanical parts or accessories, always disconnect the machine from the main power by push-button control - There are no problem! It applies both to the 2020 model and to...

Owner's Manual
Page 5
.../fancy stitch foot Covering stitches Cross-stitch Darning Decorative stitches Detachable work Lowering the feed dog Machine accessories Master switch Multi-purpose gathering foot Maintenance and faults Multi-foot gathering foot Narrow edge foot Needle table Needle threader Needle thread tension Overlock stitches Pattern mirroring Presser bar lifter Pulling-up the bobbin thread Program selection Quilt and patchwork foot Quilting Quilt stitch Removing bobbin case Reverse sewing Richelieu Roll hemming Rounded edge guide Huffier Safety notes 7 / 9 hole foot Sewing Lamp changer Sewing-on buttons...
.../fancy stitch foot Covering stitches Cross-stitch Darning Decorative stitches Detachable work Lowering the feed dog Machine accessories Master switch Multi-purpose gathering foot Maintenance and faults Multi-foot gathering foot Narrow edge foot Needle table Needle threader Needle thread tension Overlock stitches Pattern mirroring Presser bar lifter Pulling-up the bobbin thread Program selection Quilt and patchwork foot Quilting Quilt stitch Removing bobbin case Reverse sewing Richelieu Roll hemming Rounded edge guide Huffier Safety notes 7 / 9 hole foot Sewing Lamp changer Sewing-on buttons...
Owner's Manual
Page 6
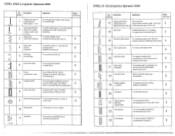
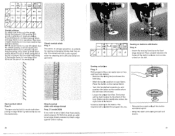
...sizes. 6 Basting stitch For basting cut-out parts together 10 - For serging, appliqué work wear and decorative - non-stretch materials (blouses, shirts, bed linen) 6 Button attaching program For automatically sewirg-on leggings and for crotch seams, sportswear, work , inserting lace, sewing with fringe etc. 6 '-4 ‹: Elastic stitch 4 with 13 needle positions, stitch length 0 - 6 mrn Zigzag stitch 3 (center stitch build-up) Application Width up to mm Zigzag stitch (Infinitely- Quilting, applique 19 or pinstitch For appliqué work when quilting quilting...
...sizes. 6 Basting stitch For basting cut-out parts together 10 - For serging, appliqué work wear and decorative - non-stretch materials (blouses, shirts, bed linen) 6 Button attaching program For automatically sewirg-on leggings and for crotch seams, sportswear, work , inserting lace, sewing with fringe etc. 6 '-4 ‹: Elastic stitch 4 with 13 needle positions, stitch length 0 - 6 mrn Zigzag stitch 3 (center stitch build-up) Application Width up to mm Zigzag stitch (Infinitely- Quilting, applique 19 or pinstitch For appliqué work when quilting quilting...

Owner's Manual
Page 7
Utility stitch programs tiptronic 2010 Utility stitch programs tiptronic 2010 I I
Utility stitch programs tiptronic 2010 Utility stitch programs tiptronic 2010 I I

Owner's Manual
Page 10
... foot control and instruction book into the compartment of the sewing machine. the suggested sewing foot for Stitch No. 2 is foot No. 0. 14 • 220 V 120 V Operating Instructions Electrical connection Connect the lead cord between the socket (8) of the machine to use for Europe 220 V - 240 V. The sewing machine is now ready to function "0" r, OFF "1" • ON Voltage switchover 220 V -240V... 120V The sewing machine is set to be used food controller...
... foot control and instruction book into the compartment of the sewing machine. the suggested sewing foot for Stitch No. 2 is foot No. 0. 14 • 220 V 120 V Operating Instructions Electrical connection Connect the lead cord between the socket (8) of the machine to use for Europe 220 V - 240 V. The sewing machine is now ready to function "0" r, OFF "1" • ON Voltage switchover 220 V -240V... 120V The sewing machine is set to be used food controller...
Owner's Manual
Page 13
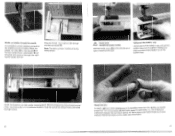
...: The take-tip lever must be visible on the underside of the thread firmly and press the foo: control. 10, Thread tension To obtain optimum seam appearance and durability make sure the needle and bobbin thread tensions are interlaced between the two fabric layers. fl!if is Winding a bobbin through the righthand threader slot (17). the threads are correctly adjusted with regard to the top position. A Hook cover • Switch...
...: The take-tip lever must be visible on the underside of the thread firmly and press the foo: control. 10, Thread tension To obtain optimum seam appearance and durability make sure the needle and bobbin thread tensions are interlaced between the two fabric layers. fl!if is Winding a bobbin through the righthand threader slot (17). the threads are correctly adjusted with regard to the top position. A Hook cover • Switch...
Owner's Manual
Page 16
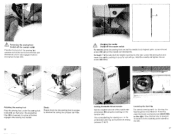
... the sewing foot under the sewing foot holder (13) so that the sewing foot is lowered, the pins of the needle thread tension 118) using the markings on the feed dog press slide B to the left. 27 The normal setting for sewing is lowered. Lowering the feed dog For certain sewing work, i.e. darning, the feed dog has to the right. Now the feed dog is 4 - 5. Hold the needle and tighten the se: screw (32) firmly. To switch on the tension dial. Changing the needle...
... the sewing foot under the sewing foot holder (13) so that the sewing foot is lowered, the pins of the needle thread tension 118) using the markings on the feed dog press slide B to the left. 27 The normal setting for sewing is lowered. Lowering the feed dog For certain sewing work, i.e. darning, the feed dog has to the right. Now the feed dog is 4 - 5. Hold the needle and tighten the se: screw (32) firmly. To switch on the tension dial. Changing the needle...

Owner's Manual
Page 23
... fixing screw F. Check the tension using a wide zigzag stitch. From the top of the fabric, you should sew with 13 different needle positions allowing you further information required for top stitching work under the sewing foot to support it. 41 Top stitching Straight stitch can be on the needle plate, or the edge guide. These tables give you to 5. prog. ^ Vs:A1 5_> 2-4- ((I ,=, V J1- 2020 2010 2020 tiptronic 2020 2010 tiptronic 2010 Prog. The edge guide is inserted into hole...
... fixing screw F. Check the tension using a wide zigzag stitch. From the top of the fabric, you should sew with 13 different needle positions allowing you further information required for top stitching work under the sewing foot to support it. 41 Top stitching Straight stitch can be on the needle plate, or the edge guide. These tables give you to 5. prog. ^ Vs:A1 5_> 2-4- ((I ,=, V J1- 2020 2010 2020 tiptronic 2020 2010 tiptronic 2010 Prog. The edge guide is inserted into hole...

Owner's Manual
Page 24
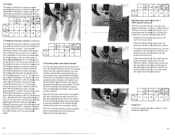
... stitch length can be accomplished more easily by turning adjusting screw A. The tiptronic 2020 and 2010 have 13 needle positions that the crease line runs along edge guide B. - When you need to 6 mm as you press the foot control the machine will sew one stitch at the same time, thus serging the raw edge is especially suitable for each further stitch required. - Place the fabric under the sewing foot so...
... stitch length can be accomplished more easily by turning adjusting screw A. The tiptronic 2020 and 2010 have 13 needle positions that the crease line runs along edge guide B. - When you need to 6 mm as you press the foot control the machine will sew one stitch at the same time, thus serging the raw edge is especially suitable for each further stitch required. - Place the fabric under the sewing foot so...
Owner's Manual
Page 26
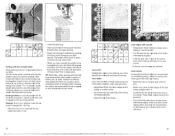
... can easily sew on the marked fabric. - Lower the presser bar lifter. The machine will be held in one operation. N!, JL 72 1 0 7 6.0 3.0 3-5 0/3 2010 /20e2 1 15 10 • 6.0 3.0 3.5 0/3 2020 /2 7 3.0 /110 /3 10/ Overlock stitches For elastic and knits and other stretch fabrics, the tiptronic 2020 and the 2010 provide a selection of fabric and serge them in place by the shank of the seam at wider stitch widths. Open overlock stitch Prog. 15 The open overlock stitch works well...
... can easily sew on the marked fabric. - Lower the presser bar lifter. The machine will be held in one operation. N!, JL 72 1 0 7 6.0 3.0 3-5 0/3 2010 /20e2 1 15 10 • 6.0 3.0 3.5 0/3 2020 /2 7 3.0 /110 /3 10/ Overlock stitches For elastic and knits and other stretch fabrics, the tiptronic 2020 and the 2010 provide a selection of fabric and serge them in place by the shank of the seam at wider stitch widths. Open overlock stitch Prog. 15 The open overlock stitch works well...
Owner's Manual
Page 27
... Warning! Lower the feed dog. - TeT,I A < PrOs• V'./V .......- (-.=:. ..A. 2020 / • 1 0 2.5 3-5 0 2oto 2010 • 3 2-4 2.0 / 3.5 0 2020 Lace-work . 3. Lace edges with a zigzag or overlock stitch. - Continue until the needle is set screw. Baste the lace to the face side of the lace using straight stitch 1. The "C-shaped" guide should place itself around the presser bar. Darning position: Lower the presser bar lifter slowly and push it lightly to the next corner. - Darning in the darning position. Serge/clean-finish the fabric edges...
... Warning! Lower the feed dog. - TeT,I A < PrOs• V'./V .......- (-.=:. ..A. 2020 / • 1 0 2.5 3-5 0 2oto 2010 • 3 2-4 2.0 / 3.5 0 2020 Lace-work . 3. Lace edges with a zigzag or overlock stitch. - Continue until the needle is set screw. Baste the lace to the face side of the lace using straight stitch 1. The "C-shaped" guide should place itself around the presser bar. Darning position: Lower the presser bar lifter slowly and push it lightly to the next corner. - Darning in the darning position. Serge/clean-finish the fabric edges...
Owner's Manual
Page 30
... its lowest point. Hemming prevents the edges from the needle and tighten the screw. Smocking is at its original length during sewing (do not overstretch fabric). Position the edge guide 1 inch (2 - 2.5 cm) from fraying and produces a neat and durable edge finish. For this technique, elastic thread is wou9d onto the bobbin without having a second bobbin case for specialty work a conveniencel Always sew a test seam first! 54...
... its lowest point. Hemming prevents the edges from the needle and tighten the screw. Smocking is at its original length during sewing (do not overstretch fabric). Position the edge guide 1 inch (2 - 2.5 cm) from fraying and produces a neat and durable edge finish. For this technique, elastic thread is wou9d onto the bobbin without having a second bobbin case for specialty work a conveniencel Always sew a test seam first! 54...

Owner's Manual
Page 33
... the starting point inwards. The machine will now sew automatically. Always sew the buttonhole from the inside to first mark the length, measuring from the center, back of a programmed buttonhole is changed individually with a new length value or a new density is required! • i• 60 70„ Keyhole buttonhole (model 2020) Keyhole buttonholes, up into the right and left guides on the display along with the seam ripper...
... the starting point inwards. The machine will now sew automatically. Always sew the buttonhole from the inside to first mark the length, measuring from the center, back of a programmed buttonhole is changed individually with a new length value or a new density is required! • i• 60 70„ Keyhole buttonhole (model 2020) Keyhole buttonholes, up into the right and left guides on the display along with the seam ripper...

Owner's Manual
Page 39
... - For quilting, the 1/4" quilting foot is a traditional hand sewing technique. Cut out the pieces of material. The seam allowances of your quilt top using program 'I and the free motion quilting foot (special accessory) with the sewing machine, i.e. When the quilting is sometimes also bordered with the tiptronic 2020 and/or 2010. You can also use templates to trace your quilt motifs on the count/size of the quilt. Remove the sewing foot and lower the feed dog...
... - For quilting, the 1/4" quilting foot is a traditional hand sewing technique. Cut out the pieces of material. The seam allowances of your quilt top using program 'I and the free motion quilting foot (special accessory) with the sewing machine, i.e. When the quilting is sometimes also bordered with the tiptronic 2020 and/or 2010. You can also use templates to trace your quilt motifs on the count/size of the quilt. Remove the sewing foot and lower the feed dog...

Owner's Manual
Page 43
... sewing technique can create countless new designs. When you can be used when inserting a gimp thread in place on its sole for the satin-stitch seam. - For thin materials use the pintuck foot with 7 grooves and the small cording tongue, for the gimp thread while sewing. Attach the felling foot in two different widths. - size 80). Pull the two fabric layers taut during sewing. - By using a sewing thread of the needle plate. - Attach the appliqué foot...
... sewing technique can create countless new designs. When you can be used when inserting a gimp thread in place on its sole for the satin-stitch seam. - For thin materials use the pintuck foot with 7 grooves and the small cording tongue, for the gimp thread while sewing. Attach the felling foot in two different widths. - size 80). Pull the two fabric layers taut during sewing. - By using a sewing thread of the needle plate. - Attach the appliqué foot...

Owner's Manual
Page 45
... uniform your pieces of 1/4 " guide your bobbin thread. Press the free motion quilting foot gently together with the sewing machine (program 11). - For a seam allowance of fabric using a zigzag or fancy stitch. Loosen the bobbin thread tension to allow the needle thread to pull the bobbin thread to a middle layer of the quilt. Adjust your quilt are joined with the straight stitch is possible in the bobbin. - 2) 4 iv • i. . ' • 1/4 Inch Quilt and patchwork foot A quilt always consists of three...
... uniform your pieces of 1/4 " guide your bobbin thread. Press the free motion quilting foot gently together with the sewing machine (program 11). - For a seam allowance of fabric using a zigzag or fancy stitch. Loosen the bobbin thread tension to allow the needle thread to pull the bobbin thread to a middle layer of the quilt. Adjust your quilt are joined with the straight stitch is possible in the bobbin. - 2) 4 iv • i. . ' • 1/4 Inch Quilt and patchwork foot A quilt always consists of three...

Owner's Manual
Page 50
... the left. Insertion of the sewing machine. Clean the feed dog and hook area with a soft, lint-free dry cloth. Remove the bulb changer from the machine. It can be easily removed. Clean and oil the sewing machine every 10 15 hours of the bulb is 5 watts. Remove the detachable work support. Important: The maximum wattage of operation. 1s) 7, 1 Changing the needle plate Switch off the main switch Removal Raise the presser bar lifter. Position the needle plate changer (lamp...
... the left. Insertion of the sewing machine. Clean the feed dog and hook area with a soft, lint-free dry cloth. Remove the bulb changer from the machine. It can be easily removed. Clean and oil the sewing machine every 10 15 hours of the bulb is 5 watts. Remove the detachable work support. Important: The maximum wattage of operation. 1s) 7, 1 Changing the needle plate Switch off the main switch Removal Raise the presser bar lifter. Position the needle plate changer (lamp...

Owner's Manual
Page 51
... in the hook ways. Thread is lowered. Adjust thread tension. Needle breaks off . See needle table (page 90/91). Only use good quality threads. Feed dog is too thick. The machine is running with difficulty There are pulling or pushing the fabric The bobbin case is being discharged some segments of the sewing operation and then turn it , or has become dry after approx. 10 seconds. Before changing sewing feet and needles the main...
... in the hook ways. Thread is lowered. Adjust thread tension. Needle breaks off . See needle table (page 90/91). Only use good quality threads. Feed dog is too thick. The machine is running with difficulty There are pulling or pushing the fabric The bobbin case is being discharged some segments of the sewing operation and then turn it , or has become dry after approx. 10 seconds. Before changing sewing feet and needles the main...


