
Owner's Manual
Page 5
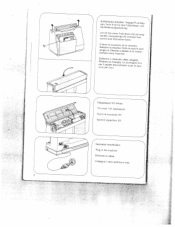
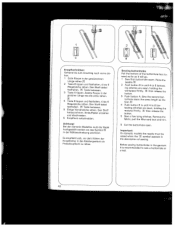
Plug in the machine Brancher le cable. 2 Collegare il cavo elettrico a rete. control the cover. Fold down the caring Compartment N contains foot and Instruction book. a drREa'neanmlbgeaevptseltorrelieledarechopeauoovismgetnaracteclehe.inpdDeeea.dnIaaslevaaeltcisaeastetneo.Ntiscoent zpRSieooirbnllaiieilvptpaaeerrredelauailiescomod,a'panevirgvclihiaaim.o Lednoetloslaceovmpaelpirgalreettotais.Ntrue Klappdeckel 101 Tilt cover 101 backwards. ::: c::r:o Netzkabel anschlielen. ( N 4 'V ( -.- 2 I dpKieeonf.BfeFeradhciaheunbNuenagstbsahfnüelrbeeditneu.nnTgFr.uaFgeagnnIaifsser und Lift ...
Plug in the machine Brancher le cable. 2 Collegare il cavo elettrico a rete. control the cover. Fold down the caring Compartment N contains foot and Instruction book. a drREa'neanmlbgeaevptseltorrelieledarechopeauoovismgetnaracteclehe.inpdDeeea.dnIaaslevaaeltcisaeastetneo.Ntiscoent zpRSieooirbnllaiieilvptpaaeerrredelauailiescomod,a'panevirgvclihiaaim.o Lednoetloslaceovmpaelpirgalreettotais.Ntrue Klappdeckel 101 Tilt cover 101 backwards. ::: c::r:o Netzkabel anschlielen. ( N 4 'V ( -.- 2 I dpKieeonf.BfeFeradhciaheunbNuenagstbsahfnüelrbeeditneu.nnTgFr.uaFgeagnnIaifsser und Lift ...
Owner's Manual
Page 7
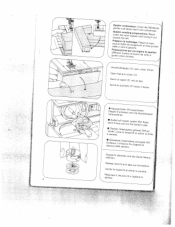
... 121 vers Ia bas. nkapsel • Switch off master latch N and pull out switch 104. Rilasciare spohina. Aprire lo sportello 121 verso 1 basso. 4 hK*elarHapaupuespzNteshcaehnnah./teebre1n04unadusdsicehSalpteunle. a•'rcraTdnhetu'trtneLe.revflenrtelerrluopqtueeutr général 104 sur N et retirer Ia bolte cS•aopDilseiusvliaanrsedeeril1rleachIsi'puLosnhitnienoraru.Nttoeretopgr/hnecr/epaale 104. Klappe N nehmen. Open free arm cover 121. 4 4 - 4tugBSonrwopedbiauefbreredinnnthtuhewvneodwinrloedbdfrieitke...
... 121 vers Ia bas. nkapsel • Switch off master latch N and pull out switch 104. Rilasciare spohina. Aprire lo sportello 121 verso 1 basso. 4 hK*elarHapaupuespzNteshcaehnnah./teebre1n04unadusdsicehSalpteunle. a•'rcraTdnhetu'trtneLe.revflenrtelerrluopqtueeutr général 104 sur N et retirer Ia bolte cS•aopDilseiusvliaanrsedeeril1rleachIsi'puLosnhitnienoraru.Nttoeretopgr/hnecr/epaale 104. Klappe N nehmen. Open free arm cover 121. 4 4 - 4tugBSonrwopedbiauefbreredinnnthtuhewvneodwinrloedbdfrieitke...
Owner's Manual
Page 17
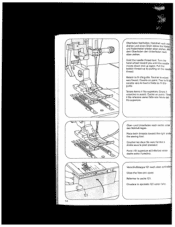
... sotto Il piedino. -'I Pull the bobbin thread up again. Chiudere bo sportelbo 121 verso 'alto. 2 I 4 Verschlu1.klappe 121 nach oben schlieBer Close the free arm cover. Tirar - Oberfaden festhalten. Hold the needle thread taut, Turn the hand wheel toward the right unde the sewing foot. Cucire un purto. Place both threads toward you until the needle moves down and up by...
... sotto Il piedino. -'I Pull the bobbin thread up again. Chiudere bo sportelbo 121 verso 'alto. 2 I 4 Verschlu1.klappe 121 nach oben schlieBer Close the free arm cover. Tirar - Oberfaden festhalten. Hold the needle thread taut, Turn the hand wheel toward the right unde the sewing foot. Cucire un purto. Place both threads toward you until the needle moves down and up by...
Owner's Manual
Page 18
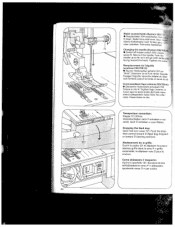
Place fabric under the sewing foot. • Tournar I'interrupteur général 104 'Arrêt' Placer du tissu sous le pied pres seur. • Disinserire I 15 To insert extra-thick fabric plies raise lever 114 Pour les tissus trés ...switch. bar • Tourner levier 114. ente 4 •114Hsaeunpktsecnh, a(lNterset indsiechSatletellnu.nS7 g tzoufmfdSrtüocpkieenr)h. Lower presser shows the darning position). Avvicinare ii piano variabile 107 alla macchina. 4 N • Hauptschalter 104 ausscha)ten. I Swing work support 107 back against the free arm. ...
Place fabric under the sewing foot. • Tournar I'interrupteur général 104 'Arrêt' Placer du tissu sous le pied pres seur. • Disinserire I 15 To insert extra-thick fabric plies raise lever 114 Pour les tissus trés ...switch. bar • Tourner levier 114. ente 4 •114Hsaeunpktsecnh, a(lNterset indsiechSatletellnu.nS7 g tzoufmfdSrtüocpkieenr)h. Lower presser shows the darning position). Avvicinare ii piano variabile 107 alla macchina. 4 N • Hauptschalter 104 ausscha)ten. I Swing work support 107 back against the free arm. ...
Owner's Manual
Page 25
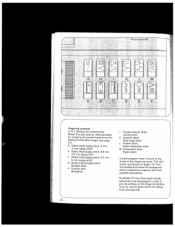
...A, B, C: Buttons for buttonholing Button B is also used as clearing button for releasing the pushed buttons and for setting the left stitch length (see page 28. 22 To do so, set the white dot at the setting mark, see page 27). D Elastic triple zigzag stitch, 2 mm 2-mm zigzag stitch E Elastic triple zigzag stitch, 3.5 mm 3.5 mm zigzag stich F Elastic triple zigzag stitch, 5.0 mm 5-mm zigzag stitch G Elastic triple straight stitch Straight stitch H Pullover stich Blindstitch Closed overlock stitch Joining stitch K Overlock stitch Shell-edge stitch L Feather stitch Elastic decorative stitch...
...A, B, C: Buttons for buttonholing Button B is also used as clearing button for releasing the pushed buttons and for setting the left stitch length (see page 28. 22 To do so, set the white dot at the setting mark, see page 27). D Elastic triple zigzag stitch, 2 mm 2-mm zigzag stitch E Elastic triple zigzag stitch, 3.5 mm 3.5 mm zigzag stich F Elastic triple zigzag stitch, 5.0 mm 5-mm zigzag stitch G Elastic triple straight stitch Straight stitch H Pullover stich Blindstitch Closed overlock stitch Joining stitch K Overlock stitch Shell-edge stitch L Feather stitch Elastic decorative stitch...
Owner's Manual
Page 29
...am Ende dieser Anleitung mit Nähhinweisen. and stretch-stitch combina tions The various stitch combinations are shown in the chart on the inside of the hinged top cover and at the end of this booklet, together with sewing instruc tions. Ad esempio il punto invisibile elastico:...227;nge zwischen 1 und 4 Utihty- For example, if you want to sew an elastic blindstitch, push buttons M and F, select a stitch length between 1 and 4. Nutz- Le combinazioni dei punti utili con i punti flexi (stretch>: Le combinazioni dei punti sono indicate sulla tabella dei programmi nel coperchio e al...
...am Ende dieser Anleitung mit Nähhinweisen. and stretch-stitch combina tions The various stitch combinations are shown in the chart on the inside of the hinged top cover and at the end of this booklet, together with sewing instruc tions. Ad esempio il punto invisibile elastico:...227;nge zwischen 1 und 4 Utihty- For example, if you want to sew an elastic blindstitch, push buttons M and F, select a stitch length between 1 and 4. Nutz- Le combinazioni dei punti utili con i punti flexi (stretch>: Le combinazioni dei punti sono indicate sulla tabella dei programmi nel coperchio e al...
Owner's Manual
Page 34
... tiptrOniC Controls of the electronic system Needle positions "up" and "down" After sewing the needle is interrupted. Push the dropfeed control to flash when the bobbin thread is obtained, then holding the fabric in its "up . Electronic top speed selection By pressing the "sew slow" button, the SsAtcuIonpipatnpdme.gteihWecsdpepaahotecostweeaarnadnmenlriyyogbeoofhesutftyipvmtgopehauoerereeirdeesis.nmdnsedoaetafihcdtcfihalwsaeitnnioblrdelrue. When you press and release the foot pedal the machine sews one stitch. Close free arm cover 121. Important: Free arm cover 121...
... tiptrOniC Controls of the electronic system Needle positions "up" and "down" After sewing the needle is interrupted. Push the dropfeed control to flash when the bobbin thread is obtained, then holding the fabric in its "up . Electronic top speed selection By pressing the "sew slow" button, the SsAtcuIonpipatnpdme.gteihWecsdpepaahotecostweeaarnadnmenlriyyogbeoofhesutftyipvmtgopehauoerereeirdeesis.nmdnsedoaetafihcdtcfihalwsaeitnnioblrdelrue. When you press and release the foot pedal the machine sews one stitch. Close free arm cover 121. Important: Free arm cover 121...
Owner's Manual
Page 44
...For sewing buttonholes use light sewing thread. JI 41 Oberfadenspannung in der vorderen Nocke 0 em klemmen. This is how the buttonhole length is hold in the illustra tion: Place the thread over the back ridge, and pull it taut so that it tasto C. Inserire come segue... it fib rinforzo: appoggiare it piedino per l'occhiello: Premere it is determined. J N Réglage de Ia boutonniere: Appuyer sur Ia touche C. Régler Ia densite des points clans Ia zone bouton nière N. Usare per occhietli N. KnopflochfuI anbringen. Buttonhole setting: Push button...
...For sewing buttonholes use light sewing thread. JI 41 Oberfadenspannung in der vorderen Nocke 0 em klemmen. This is how the buttonhole length is hold in the illustra tion: Place the thread over the back ridge, and pull it taut so that it tasto C. Inserire come segue... it fib rinforzo: appoggiare it piedino per l'occhiello: Premere it is determined. J N Réglage de Ia boutonniere: Appuyer sur Ia touche C. Régler Ia densite des points clans Ia zone bouton nière N. Usare per occhietli N. KnopflochfuI anbringen. Buttonhole setting: Push button...
Owner's Manual
Page 45
... nähen. Remove the fabric, pull the filler cord taut and trim. 6 Cut the buttonhole open. Es empfiehlt sich, vor dem Nahen der Knopflöcher in the garment it is recommended to sew a buttonhole as it will go. 1 Sew first buttonhole seam. Ct] 4 ...Sew the second but tonhole seam the same length as the first. [1] 4 Push button B in the description of the buttonhole foot for ward as far as a test. 42 Erste Raupe in until 4 to 6 bartack ng stitches are sewn, holding the workpiece firmly, [1] then release the button. 3 Push button A. Important: On tipmatic models the needle...
... nähen. Remove the fabric, pull the filler cord taut and trim. 6 Cut the buttonhole open. Es empfiehlt sich, vor dem Nahen der Knopflöcher in the garment it is recommended to sew a buttonhole as it will go. 1 Sew first buttonhole seam. Ct] 4 ...Sew the second but tonhole seam the same length as the first. [1] 4 Push button B in the description of the buttonhole foot for ward as far as a test. 42 Erste Raupe in until 4 to 6 bartack ng stitches are sewn, holding the workpiece firmly, [1] then release the button. 3 Push button A. Important: On tipmatic models the needle...
Owner's Manual
Page 47
... Kolbenseite nach hinten) gang ubedI ladeflhII oben schieben. Push the needle up as far as it will go (with its flat side facing toward 0 (sewing position). Svitare Ia vite N. Dropping the feed dog: Open free arm cover 121. Spostare Ia eva dell'abbassatore verso P = abbassato, spostando verso 0 = per cucire. / 44 Loosen screw N. Versenkschieber nach P schieben = ver senkt, nach 0 schieben = zum Nä...
... Kolbenseite nach hinten) gang ubedI ladeflhII oben schieben. Push the needle up as far as it will go (with its flat side facing toward 0 (sewing position). Svitare Ia vite N. Dropping the feed dog: Open free arm cover 121. Spostare Ia eva dell'abbassatore verso P = abbassato, spostando verso 0 = per cucire. / 44 Loosen screw N. Versenkschieber nach P schieben = ver senkt, nach 0 schieben = zum Nä...
Owner's Manual
Page 48
...una goccia d'olio net crochet, come da disegno. 45 Clean the bobbin thread monitor as instructed on page 59. Only apply a drop of oil in the sewing hook area with a soft brush. Cleaning and oiling N Pull out the mains plug. Tilt the needle plate up at the back (N) and take it out (0). Clean the feed dog and the parts in the hook...,hntwie geben. 4 Reinigen und Olen: Netzstecker ziehen. Do not oil the machine. Con un pennello pulire ii e ditsretalrsufpizboiorntiaintfoaerrpeioargae.II561v3ap.nuNolioscncreolcushbeergitfu.iecIIanrcdeoonIatlreollo macchina.
...una goccia d'olio net crochet, come da disegno. 45 Clean the bobbin thread monitor as instructed on page 59. Only apply a drop of oil in the sewing hook area with a soft brush. Cleaning and oiling N Pull out the mains plug. Tilt the needle plate up at the back (N) and take it out (0). Clean the feed dog and the parts in the hook...,hntwie geben. 4 Reinigen und Olen: Netzstecker ziehen. Do not oil the machine. Con un pennello pulire ii e ditsretalrsufpizboiorntiaintfoaerrpeioargae.II561v3ap.nuNolioscncreolcushbeergitfu.iecIIanrcdeoonIatlreollo macchina.
Owner's Manual
Page 49
... hold it out. Insert the new bulb so that its pins slide in direzione ...Come sostitUire Ia lampadina: En Togliere Ia spina dalla presa a muro. Chiu dere il coperchio della macchina e alzare Ia maniglia. Inserire il lineale di guida tra ii frontalino e a testa della macchina nellIa apertura 0.. Togliere ii lineale. Lineal herausneh men. 4--Changing the light bulb: Pull out the mains plug. Pull out the edge guide...use sowie durch den Ausschnitt Q stecken. Enga ger Ie guide-bord dans Ia fente entre le capot et le carter ainsi que dans Ia rainure 0.. U 46 Close the hinged top cover...
... hold it out. Insert the new bulb so that its pins slide in direzione ...Come sostitUire Ia lampadina: En Togliere Ia spina dalla presa a muro. Chiu dere il coperchio della macchina e alzare Ia maniglia. Inserire il lineale di guida tra ii frontalino e a testa della macchina nellIa apertura 0.. Togliere ii lineale. Lineal herausneh men. 4--Changing the light bulb: Pull out the mains plug. Pull out the edge guide...use sowie durch den Ausschnitt Q stecken. Enga ger Ie guide-bord dans Ia fente entre le capot et le carter ainsi que dans Ia rainure 0.. U 46 Close the hinged top cover...
Owner's Manual
Page 54
... make sure be largely avoided. the needles stitch into the Decorative and zigzag patterns 130/705 H-ZWI 80 80 80 0.5-1.5mm 0.5-1.5 mm 0.5-1.5 mm Special hemstitching twin needle p 130/705 H-ZWI-I-fo 80 100 2.0-3.0 mm 2.0-3.0mm wide narrow narrow very narrow very narrow 1.6mm 2.0 mm 2.5 mm Ornamentations Ornamentations Ornamentations Decorative hem stitching effect Heavily dressed fabrics are par ticularly suitable. 51 Needle...
... make sure be largely avoided. the needles stitch into the Decorative and zigzag patterns 130/705 H-ZWI 80 80 80 0.5-1.5mm 0.5-1.5 mm 0.5-1.5 mm Special hemstitching twin needle p 130/705 H-ZWI-I-fo 80 100 2.0-3.0 mm 2.0-3.0mm wide narrow narrow very narrow very narrow 1.6mm 2.0 mm 2.5 mm Ornamentations Ornamentations Ornamentations Decorative hem stitching effect Heavily dressed fabrics are par ticularly suitable. 51 Needle...
Owner's Manual
Page 61
... reasons. Insert new needle. Allow machine feed to needle table. Use first-class thread only. Needle thread breaks For any of the above . Needle bent. Bobbin thread wound unevenly. Insert thicker needle. Regulate thread tensions. Machine threaded incorrectly. Seam is pushed or pulled. Check upper and lower tensions. During bobbin winding, do not hold thread in hand, but pass it in as for thread used. 2. Needle bent and strikes needle plate because work alone. Thread too thick, knotty or hard. Only guide the material lightly. Kinks appear...
... reasons. Insert new needle. Allow machine feed to needle table. Use first-class thread only. Needle thread breaks For any of the above . Needle bent. Bobbin thread wound unevenly. Insert thicker needle. Regulate thread tensions. Machine threaded incorrectly. Seam is pushed or pulled. Check upper and lower tensions. During bobbin winding, do not hold thread in hand, but pass it in as for thread used. 2. Needle bent and strikes needle plate because work alone. Thread too thick, knotty or hard. Only guide the material lightly. Kinks appear...
Owner's Manual
Page 62
... not work (tiptronic) Thread ends and dirt have collected in the free arm cover over the indicator lamp, in the hook raceway, in the bobbin case, behind the hook and on the push-buttons Fancy-stitch thumb-wheel is engaged Disengage thumb-wheel: set at right.) Remove needle plate and clean out lint. Set drop-feed control at all Lint has accumulated between tooth rows of oil into hook raceway. 7. Remove thread ends and dirt. Feed dog dropped. (Drop-feed control...
... not work (tiptronic) Thread ends and dirt have collected in the free arm cover over the indicator lamp, in the hook raceway, in the bobbin case, behind the hook and on the push-buttons Fancy-stitch thumb-wheel is engaged Disengage thumb-wheel: set at right.) Remove needle plate and clean out lint. Set drop-feed control at all Lint has accumulated between tooth rows of oil into hook raceway. 7. Remove thread ends and dirt. Feed dog dropped. (Drop-feed control...
Owner's Manual
Page 69
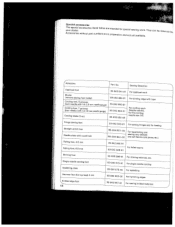
... 953-91 93-035 952-46 Sewing Operation. For appliqué work For binding edge with tape For cording work . Special accessories The special accessories listed below are in intended for special preparation and not sewing work (Needle size 80, for fine cording needle size 70) Fringe sewing foot Straight-stitch foot Needle plate with round hole Felling foot, 4.5 mm Felling foot, 6.5 mm 93-042 943-91 For sewing fringes and for basting 98-694 821-CO 98...
... 953-91 93-035 952-46 Sewing Operation. For appliqué work For binding edge with tape For cording work . Special accessories The special accessories listed below are in intended for special preparation and not sewing work (Needle size 80, for fine cording needle size 70) Fringe sewing foot Straight-stitch foot Needle plate with round hole Felling foot, 4.5 mm Felling foot, 6.5 mm 93-042 943-91 For sewing fringes and for basting 98-694 821-CO 98...
Owner's Manual
Page 79
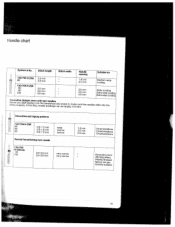
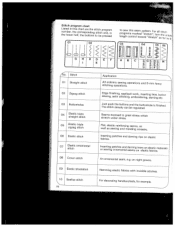
... 6-mm fancy 02 Zigzag stitch 03 Buttonholes 04 Elastic triple straight stitch 05 Elastic triple zigzag stitch 06 Elastic stitch 07 Elastic ornamental stitch sEedwgiengfi,nsisahtiinngs,tiatpchpilniqgu, éemwobrrko,idienrsienrgti,ndgarlnacineg, button etc. Just push The stitch the buttons density can and the buttonhole be regulated. Seams stretch exposed to great under stress. patches and darning rips on night gowns. 09 Elastic blindstitch 10 Scallop stitch 76 Hemming elastic fabrics with invisible stitches. Stitch program chart tnLhuiesmtelbodewrin...
... 6-mm fancy 02 Zigzag stitch 03 Buttonholes 04 Elastic triple straight stitch 05 Elastic triple zigzag stitch 06 Elastic stitch 07 Elastic ornamental stitch sEedwgiengfi,nsisahtiinngs,tiatpchpilniqgu, éemwobrrko,idienrsienrgti,ndgarlnacineg, button etc. Just push The stitch the buttons density can and the buttonhole be regulated. Seams stretch exposed to great under stress. patches and darning rips on night gowns. 09 Elastic blindstitch 10 Scallop stitch 76 Hemming elastic fabrics with invisible stitches. Stitch program chart tnLhuiesmtelbodewrin...
Owner's Manual
Page 80
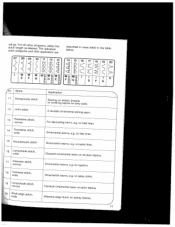
...8226;-i L -Th M5f. G. 0 C) :r D FG Stitch 11 Honeycomb stitch 12 Joint stitch 13 Florentine stitch, narrow 14 Florentine stitch, wide Application Sewing on or covering elastic seams threads on dainty fabrics. 77 I - A durable ornamental joining seam. Ornamental seams, e.g. Ornamental seams, e.g. Classical ornamental seam on table linen. on plain fabrics. Ornamental seams, e.g. Classical ornamental seam on table cloths. on all plain fabrics. sswttiiilttlcchhgopl.ernFogogtrrhaamlal ssodtahenesdrirtephdreo.igrTrhaaepmpsiln,icdsaievtiliodencutaaltrhee...
...8226;-i L -Th M5f. G. 0 C) :r D FG Stitch 11 Honeycomb stitch 12 Joint stitch 13 Florentine stitch, narrow 14 Florentine stitch, wide Application Sewing on or covering elastic seams threads on dainty fabrics. 77 I - A durable ornamental joining seam. Ornamental seams, e.g. Ornamental seams, e.g. Classical ornamental seam on table linen. on plain fabrics. Ornamental seams, e.g. Classical ornamental seam on table cloths. on all plain fabrics. sswttiiilttlcchhgopl.ernFogogtrrhaamlal ssodtahenesdrirtephdreo.igrTrhaaepmpsiln,icdsaievtiliodencutaaltrhee...
Owner's Manual
Page 81
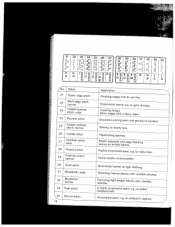
21 22 23 24 25 26 27 ._ . .( .
21 22 23 24 25 26 27 ._ . .( .

Owner's Manual
Page 82
D. C) :,- C) CD r. 36 37 38 ll ll ll ll Jl -il II II 39 40 /11 ji \II /11 M \fl 41 \\\ /\\ Th li -JI ll /11 \ll M \' /\\ LH L°' I-IC,, I -. C:z) 42 'II 'It I U) L ,.+ 1 C) 43 N II N II N I_ lCD C) 44 XI I ,-4. C) 45 \) D. zC). K9. G. IL_C- ,, CD '-4.
D. C) :,- C) CD r. 36 37 38 ll ll ll ll Jl -il II II 39 40 /11 ji \II /11 M \fl 41 \\\ /\\ Th li -JI ll /11 \ll M \' /\\ LH L°' I-IC,, I -. C:z) 42 'II 'It I U) L ,.+ 1 C) 43 N II N II N I_ lCD C) 44 XI I ,-4. C) 45 \) D. zC). K9. G. IL_C- ,, CD '-4.


