
Owner's Manual
Page 2
... thread Buttonholing Carrying case Carrying handle Cleaning Electrical connection Electronic bobbin thread monitor Electronic top speed selector Finger-tip stitch buttons Foot control Fuse Light bulb Machine feed Needle Needle position Oiling Presser bar lifter Reverse sewing Safety rules Sewing feet Sewing mechanism Slot-threading Special sewing feet Spool of thread Stitch length Stitch program chart Straight-stitch needle position Stretch stitches Top cover Thread cutter Thread tensions Trouble shooting Upper threading Utility stitches Utility/stretch stitch combinations Winding Work support...
... thread Buttonholing Carrying case Carrying handle Cleaning Electrical connection Electronic bobbin thread monitor Electronic top speed selector Finger-tip stitch buttons Foot control Fuse Light bulb Machine feed Needle Needle position Oiling Presser bar lifter Reverse sewing Safety rules Sewing feet Sewing mechanism Slot-threading Special sewing feet Spool of thread Stitch length Stitch program chart Straight-stitch needle position Stretch stitches Top cover Thread cutter Thread tensions Trouble shooting Upper threading Utility stitches Utility/stretch stitch combinations Winding Work support...

Owner's Manual
Page 3
i 113 112 111 14 110 115 116 109 108 LI 107 L
i 113 112 111 14 110 115 116 109 108 LI 107 L
Owner's Manual
Page 5
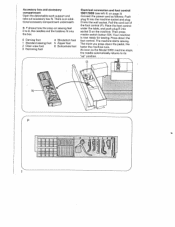
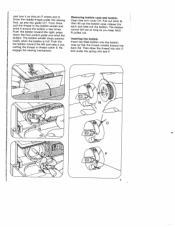
.... 0 Darning foot 1 Standard sewing foot 2 Clear-view foot 3 Hemming foot 4 Blindstitch foot 5 Zipper foot 6 Buttonhole foot Electrical connection and foot control 1067/1069 (see left ill. Pull the cord out of the foot control (P). The machine starts sewing. Press down the pedal, the faster the machine runs. Then press master switch button 104. There is now ready for sewing. P shows how the snap-on the machine. on page 3) Connect the power cord as the Model 1069 machine stops, the needle automatically...
.... 0 Darning foot 1 Standard sewing foot 2 Clear-view foot 3 Hemming foot 4 Blindstitch foot 5 Zipper foot 6 Buttonhole foot Electrical connection and foot control 1067/1069 (see left ill. Pull the cord out of the foot control (P). The machine starts sewing. Press down the pedal, the faster the machine runs. Then press master switch button 104. There is now ready for sewing. P shows how the snap-on the machine. on page 3) Connect the power cord as the Model 1069 machine stops, the needle automatically...
Owner's Manual
Page 6
The machine starts sewing. Your machine is now ready for sewing. Electronic foot control (R): Position = half the top speed Position 44 = full top speed Before you press down the foot pedal. The cord must not twist as it . Press master switch button 104. To replace the cord in the machine (N). at right) Push plug 0 into the machine socket and plug P into the control. It will rewind into the foot control automatically. Place the foot control under...
The machine starts sewing. Your machine is now ready for sewing. Electronic foot control (R): Position = half the top speed Position 44 = full top speed Before you press down the foot pedal. The cord must not twist as it . Press master switch button 104. To replace the cord in the machine (N). at right) Push plug 0 into the machine socket and plug P into the control. It will rewind into the foot control automatically. Place the foot control under...

Owner's Manual
Page 8
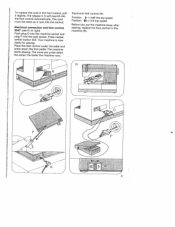
Threading the needle Thread the needle from you . Disengaging the sewing mechanism Hold the hand wheel steady and turn the stop motion knob towards you . 5 To re-engage the sewing mechanism turn the stop motion knob away from front to the left thread guide on the needle holder. One is then pulled into the right of the guide. This disen gages the sewing mechanism. into the left of guide 0 and the right of thread guide, the other into the slot the other to the threads to back.
Threading the needle Thread the needle from you . Disengaging the sewing mechanism Hold the hand wheel steady and turn the stop motion knob towards you . 5 To re-engage the sewing mechanism turn the stop motion knob away from front to the left thread guide on the needle holder. One is then pulled into the right of the guide. This disen gages the sewing mechanism. into the left of guide 0 and the right of thread guide, the other into the slot the other to the threads to back.
Owner's Manual
Page 9
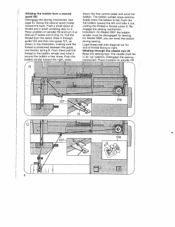
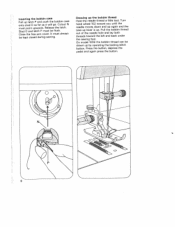
... the thread in the illustration, making sure the thread is full. Winding the bobbin from the spool, draw it so that pin P enters slot 0 (Fig. 0). The bobbin winder stops automa tically when the bobbin is positioned between the guide and tension spring R. Winding through guide 125 and then into guide 127, as shown in thread cutter S. On Model 1069, you can wind the bobbin during sewing. Place a bobbin on spindle 119 4 6 Disengage the sewing mechanism...
... the thread in the illustration, making sure the thread is full. Winding the bobbin from the spool, draw it so that pin P enters slot 0 (Fig. 0). The bobbin winder stops automa tically when the bobbin is positioned between the guide and tension spring R. Winding through guide 125 and then into guide 127, as shown in thread cutter S. On Model 1069, you can wind the bobbin during sewing. Place a bobbin on spindle 119 4 6 Disengage the sewing mechanism...
Owner's Manual
Page 10
... bobbin Open free arm cover 121. The bobbin cannot fall out as long as you keep latch N pulled out. Draw the needle thread under the spring into eye P. 7 Pull out latch N, then lift out the bobbin case, release the latch and take it out, cutting the thread in thread cutter S. Reengage the sewing mechanism. Push the full bobbin toward the right, press down the foot control pedal and wind the bobbin. Inserting...
... bobbin Open free arm cover 121. The bobbin cannot fall out as long as you keep latch N pulled out. Draw the needle thread under the spring into eye P. 7 Pull out latch N, then lift out the bobbin case, release the latch and take it out, cutting the thread in thread cutter S. Reengage the sewing mechanism. Push the full bobbin toward the right, press down the foot control pedal and wind the bobbin. Inserting...
Owner's Manual
Page 11
... model 1069 the bobbin thread can be drawn up . Press the button, depress the pedal and again press the button. 8 Turn hand wheel 102 toward the left and back under the sewing foot. Pull the bobbin thread out of the needle hole and lay both threads toward you until the needle moves down and up again and the take-up lever is up by operating the basting stitch button...
... model 1069 the bobbin thread can be drawn up . Press the button, depress the pedal and again press the button. 8 Turn hand wheel 102 toward the left and back under the sewing foot. Pull the bobbin thread out of the needle hole and lay both threads toward you until the needle moves down and up again and the take-up lever is up by operating the basting stitch button...

Owner's Manual
Page 14
Reverse sewing Press button 117. Fig. 0 shows how to 6 mm. The stitch length range is opposite mark N. Regulating the stitch length The numbers on push buttons). Turn the control so that the number indicating the stitch length desired is 0 to set the stitch length control for sewing stretch stitches (red stitch symbols on stitch length control 106 indicate the stitch length in millimeters. As long as you keep this button depressed, the machine sews backwards. 11
Reverse sewing Press button 117. Fig. 0 shows how to 6 mm. The stitch length range is opposite mark N. Regulating the stitch length The numbers on push buttons). Turn the control so that the number indicating the stitch length desired is 0 to set the stitch length control for sewing stretch stitches (red stitch symbols on stitch length control 106 indicate the stitch length in millimeters. As long as you keep this button depressed, the machine sews backwards. 11

Owner's Manual
Page 15
...stitch G Elastic triple straight stitch Straight stitch H Pullover stitch Blindstitch I Closed overlock stitch Joining stitch K Overlock stitch Shell-edge stitch L Feather stitch Elastic decorative stitch M Honeycomb stitch Elastic stitch Atiishnsisasitldistbeocohoorfekpptlrherotoegdarhunaicdmnegdsechdhooanwtrotsppiasacgllfoeovssuetinr2t.dc6hToethonsis2tahcn9ehdaorft stitch combinations together with their possible applications. 12 Finger-tip controls A, B, C: Buttons Button B is also for buttonholing used as clearing for releasing the pushed buttons setting the left stitch length...
...stitch G Elastic triple straight stitch Straight stitch H Pullover stitch Blindstitch I Closed overlock stitch Joining stitch K Overlock stitch Shell-edge stitch L Feather stitch Elastic decorative stitch M Honeycomb stitch Elastic stitch Atiishnsisasitldistbeocohoorfekpptlrherotoegdarhunaicdmnegdsechdhooanwtrotsppiasacgllfoeovssuetinr2t.dc6hToethonsis2tahcn9ehdaorft stitch combinations together with their possible applications. 12 Finger-tip controls A, B, C: Buttons Button B is also for buttonholing used as clearing for releasing the pushed buttons setting the left stitch length...

Owner's Manual
Page 19
Operating controls of electronic system of Model 1069 "needle down" button with indicator light N "sew slow" button with indicator light 0 "basting stitch" button with indicator light P Operating controls of electronic system of Model 1067 "sew slow" button with indicator light 0. 16 Important On Model 1067 the bobbin winder must always be disengaged for sewing.
Operating controls of electronic system of Model 1069 "needle down" button with indicator light N "sew slow" button with indicator light 0 "basting stitch" button with indicator light P Operating controls of electronic system of Model 1067 "sew slow" button with indicator light 0. 16 Important On Model 1067 the bobbin winder must always be disengaged for sewing.

Owner's Manual
Page 20
... bobbin is always retained at its "up " position. Important: Free arm cover 121 must be varied at any speed. When you press the "needle down" button, indica tor light N lights up " and "down in the fabric (for each basting stitch. Place the fabric under the sewing foot until the length of the needle remains the same at will. At the same time indicator light 0 lights up . The button can be pressed during sew...
... bobbin is always retained at its "up " position. Important: Free arm cover 121 must be varied at any speed. When you press the "needle down" button, indica tor light N lights up " and "down in the fabric (for each basting stitch. Place the fabric under the sewing foot until the length of the needle remains the same at will. At the same time indicator light 0 lights up . The button can be pressed during sew...

Owner's Manual
Page 23
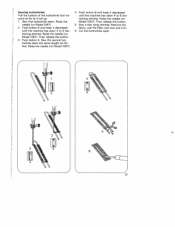
... sewing buttonholes. 20 This serves to determine the buttonhole length. Blindstitch guide R is adjusted by turning screw Q. 0 Zipper foot. Push bracket W toward the back and hold it in the buttonhole range. Insert the filler cord as follows (C): Place it over the rear lug of the stitch length control (Q). P Darning foot. Raise the needle bar. Insert the pin of the foot in hole U and attach the foot so that it rests against screw X. Press button C (N). Tighten screw V. Use a thin thread for stitching...
... sewing buttonholes. 20 This serves to determine the buttonhole length. Blindstitch guide R is adjusted by turning screw Q. 0 Zipper foot. Push bracket W toward the back and hold it in the buttonhole range. Insert the filler cord as follows (C): Place it over the rear lug of the stitch length control (Q). P Darning foot. Raise the needle bar. Insert the pin of the foot in hole U and attach the foot so that it rests against screw X. Press button C (N). Tighten screw V. Use a thin thread for stitching...
Owner's Manual
Page 24
... the needle (on Model 1067). Then release the button. 5 Sew a few tying stitches. Sew the second but tonhole seam the same length as it depressed until the machine has sewn 4 to 6 bartacking stitches. Remove the fabric, pull the filler cord taut and trim. 6 Cut the buttonhole open. B 21 Raise the needle (on Model 1067) 2 Push button B and keep it will go. 1 Sew first buttonhole seam. Sewing buttonholes Pull the bottom of the buttonhole foot for...
... the needle (on Model 1067). Then release the button. 5 Sew a few tying stitches. Sew the second but tonhole seam the same length as it depressed until the machine has sewn 4 to 6 bartacking stitches. Remove the fabric, pull the filler cord taut and trim. 6 Cut the buttonhole open. B 21 Raise the needle (on Model 1067) 2 Push button B and keep it will go. 1 Sew first buttonhole seam. Sewing buttonholes Pull the bottom of the buttonhole foot for...

Owner's Manual
Page 25
... the light bulb up and turn it toward 0. Cleaning and oiling Tilt needle plate 108 up the carrying handle, Take the edge guide out of the sewing hook with the edge guide and hold it out (0). Clean the bobbin thread monitor of oil in the illustration below. 22 Insert the new bulb so that its original position and pull out the edge guide. Close the hinged top cover and swing...
... the light bulb up and turn it toward 0. Cleaning and oiling Tilt needle plate 108 up the carrying handle, Take the edge guide out of the sewing hook with the edge guide and hold it out (0). Clean the bobbin thread monitor of oil in the illustration below. 22 Insert the new bulb so that its original position and pull out the edge guide. Close the hinged top cover and swing...
Owner's Manual
Page 26
... the power cord plug whenever you want to change fuse, needle, sewing foot, bobbin or needle plate, when you clean and oil the machine, or when you have to use only a 15-watt light bulb in with a screwdriver, release it and take it clockwise a quarter turn. Se careful when sewing that your fingers will not be obtained from your local Pfaff dealer. Pull fuse 0 out of holder N. Changing the...
... the power cord plug whenever you want to change fuse, needle, sewing foot, bobbin or needle plate, when you clean and oil the machine, or when you have to use only a 15-watt light bulb in with a screwdriver, release it and take it clockwise a quarter turn. Se careful when sewing that your fingers will not be obtained from your local Pfaff dealer. Pull fuse 0 out of holder N. Changing the...
Owner's Manual
Page 27
... on top and bottom of adjustment. Check upper and lower tensions. Needle too thin or too thick. Insert new needle. Machine threaded improperly. Check threading. Seam is strikes pushed needle plate or pulled. Thread too thick, knotty or hard. Wrong needle used . Regulate thread tensions. During thread bobbin winding, do in hand, but pass it in as for thread used . Needle bent. See Needle and Thread Chart. Machine skips stitches Needle not inserted correctly. Needle bent or blunt. Needle too thin for as...
... on top and bottom of adjustment. Check upper and lower tensions. Needle too thin or too thick. Insert new needle. Machine threaded improperly. Check threading. Seam is strikes pushed needle plate or pulled. Thread too thick, knotty or hard. Wrong needle used . Regulate thread tensions. During thread bobbin winding, do in hand, but pass it in as for thread used . Needle bent. See Needle and Thread Chart. Machine skips stitches Needle not inserted correctly. Needle bent or blunt. Needle too thin for as...

Owner's Manual
Page 28
put a drop of feed dog. the lamp goes out. lamp lights up, but the machine is set for basting. between tooth Remove needle plate and clean Out lint. stitch (on Model 1069) Take the press the indicator foot from the foot control basting stitch button; Feed dog dropped. is faulty. The machine sews only one The machine is not Insert new fuse. running 11. Fundamental rules Never foot. Remove thread ends and oil into hook raceway. and 10. If off the rymuonausathetarhvrseewatidoteclhde.amTvehaictshhiiens...
put a drop of feed dog. the lamp goes out. lamp lights up, but the machine is set for basting. between tooth Remove needle plate and clean Out lint. stitch (on Model 1069) Take the press the indicator foot from the foot control basting stitch button; Feed dog dropped. is faulty. The machine sews only one The machine is not Insert new fuse. running 11. Fundamental rules Never foot. Remove thread ends and oil into hook raceway. and 10. If off the rymuonausathetarhvrseewatidoteclhde.amTvehaictshhiiens...

Owner's Manual
Page 29
Stitch 01 Straight stitch Application N All ordinary sewing operations and 6-mm fancy stitching operations. 02 Zigzag stitch 03 Buttonholes 04 Elastic triple straight stitch 05 Elastic triple zigzag stitch 06 Elastic stitch 07 Elastic ornamental stitch Edge finishing, appliqué work, inserting lace, button sewing, satin stitching, embroidering, darning etc. Inserting patches and darning rips on night gowns. 09 Elastic blindstitch Hemming elastic fabrics with invisible stitches. 10 Scallop stitch 26 For decorating handkerchiefs, for instance. on elastic fabrics. C) C)...
Stitch 01 Straight stitch Application N All ordinary sewing operations and 6-mm fancy stitching operations. 02 Zigzag stitch 03 Buttonholes 04 Elastic triple straight stitch 05 Elastic triple zigzag stitch 06 Elastic stitch 07 Elastic ornamental stitch Edge finishing, appliqué work, inserting lace, button sewing, satin stitching, embroidering, darning etc. Inserting patches and darning rips on night gowns. 09 Elastic blindstitch Hemming elastic fabrics with invisible stitches. 10 Scallop stitch 26 For decorating handkerchiefs, for instance. on elastic fabrics. C) C)...
Owner's Manual
Page 33
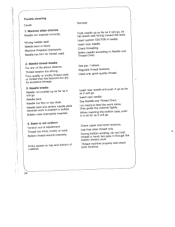
...-needle cording foot Eyeletting plate Overlock foot Hemmêr foot (rolled edge>. 2 mm jlon foot . - Sewing Operation Appliqué foot Cording set consisting of: Cording foot. 5 grooves (twin needle with 1.8-2.5 mm needle gauge> Cording foot, 7 grooves (twin needle with zigzag stitches 98-694 801-00 For sewing plastic materials PFAFF-HANDELSGESELLSCHAFT für Haushaltnähmaschinen m.b.H. 7500 KarIsruhe41 West Germany Printed in West Germany Subject to alterations in design. No. Special accessories The special accessories listed below are intended for basting Straight...
...-needle cording foot Eyeletting plate Overlock foot Hemmêr foot (rolled edge>. 2 mm jlon foot . - Sewing Operation Appliqué foot Cording set consisting of: Cording foot. 5 grooves (twin needle with 1.8-2.5 mm needle gauge> Cording foot, 7 grooves (twin needle with zigzag stitches 98-694 801-00 For sewing plastic materials PFAFF-HANDELSGESELLSCHAFT für Haushaltnähmaschinen m.b.H. 7500 KarIsruhe41 West Germany Printed in West Germany Subject to alterations in design. No. Special accessories The special accessories listed below are intended for basting Straight...


