
Pfaff Tiptronic 1147 Support Question
Pfaff Tiptronic 1147 Support Question
Find answers below for this question about Pfaff Tiptronic 1147.Need a Pfaff Tiptronic 1147 manual? We have 1 online manual for this item!
Question posted by susanbutler24 on March 4th, 2014
Tipmatic 1147 Light Comes On Machine But When I Push The Foot Down To Sew Nothi
is there a fuse I need to change where is it
Current Answers
Related Pfaff Tiptronic 1147 Manual Pages
Owner's Manual - Page 2
... Electrical connection Electronic bobbin thread monitor Electronic top speed selector Finger-tip stitch buttons Foot control
Fuse
Light bulb Machine feed
Needle Needle position
Oiling Presser bar lifter Reverse sewing Safety rules Sewing feet Sewing mechanism Slot-threading Special sewing feet Spool of thread Stitch length Stitch program chart Straight-stitch needle position Stretch stitches...
Owner's Manual - Page 3

i
113
112
111 14
110
115
116
109
108
LI
107
L
Owner's Manual - Page 5
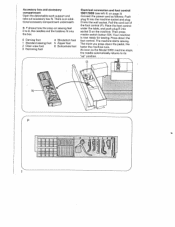
... more you press down the foot control. Place the foot control under the table, and push plug R into the box.
0 Darning foot 1 Standard sewing foot 2 Clear-view foot 3 Hemming foot
4 Blindstitch foot 5 Zipper foot 6 Buttonhole foot
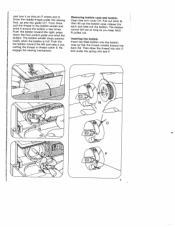
Electrical connection and foot control
1067/1069 (see left ill. Press down the pedal, the faster the machine runs. The machine starts sewing. There is now ready...
Owner's Manual - Page 6
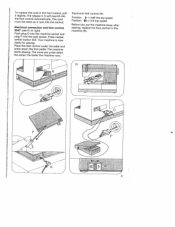
... the top speed
Position 44 = full top speed
Before you press down the foot pedal. at right) Push plug 0 into the machine socket and plug P into the foot control automatically. The more you put the machine away after sewing, replace the foot control in the foot control, pull it slightly, the release it runs into the control. Place...
Owner's Manual - Page 7

Large spools of thread:
use small spools small unreeling discs
only. holder: use
large
unreeling Push the spool pin
disc. and two- needle sewing.
n, sdltohrtaewPneaoennddeleitnhhtrooeladthdeer.
4 Seize the spool holder by lug S and
swing it backwards as far as It is used for bobbin winding
it will go. Upper threading ...
Owner's Manual - Page 9
... (see page 5), Swing the second spool holder toward the_right, press
down the foot control pedal and wind the bobbin. On Model 1069, you can wind the bobbin during sewing.
Push the bobbin winder toward the back. Important: On Model 1067 the bobbin winder must be disengaged for end of thread and a small unreeling...
Owner's Manual - Page 10
... to the bobbin winder and wind it out, cutting the thread in thread cutter S. Push the full bobbin toward the right, press down the foot control pedal and wind the bobbin. Pull out latch N, then lift out the bobbin ... bobbin a few times. Then draw the thread into slot 0 and under the sewing foot, up and into eye P.
7 The bobbin cannot fall out as long as you keep latch N pulled out.
Owner's Manual - Page 11
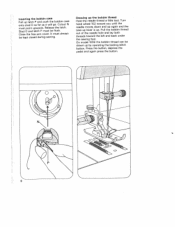
...Pull up the bobbin thread Hold the needle thread a little taut. Cutout N must always be kept closed during sewing. Stud 0 and latch P must be drawn up . Press the button, depress the pedal and again press ... It must point upwards. Turn hand wheel 102 toward the left and back under the sewing foot. Drawing up latch P and push the bobbin case onto stud 0 as far as it will go. Pull the bobbin...
Owner's Manual - Page 12

TTltRtohhhhacereriaesetmaetaehdddatrshecaecahitnduinstttoehectweeutthritontbewegarccafkuriosdtotoaettfn.hrtePhsoluebobllltaipqctarhkunee.esdsDwseplrroouartlwblkatrthoh.ueemt of its slot. sewing foot
is
lowered
for
sewing. PLNerev=esrsTywe1ohr1hue4ebesrahleeramwtsolioiwfnfvotgeaeurrrfdtohpoyeotoswuiitsoitorronkai,srs:aetuidsr.en(tBthheeefonhreeaenddle
o
P
= TaioDalnnyhntasdleuetryhnrn....
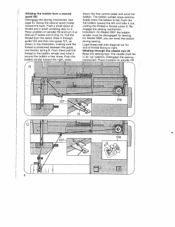
Owner's Manual - Page 14

... set the stitch length control for sewing stretch stitches (red
stitch symbols on stitch length control 106 indicate the stitch length in millimeters. Regulating the stitch length The numbers on push buttons). Fig. 0 shows how to 6 mm. As long as you keep this button depressed, the machine sews backwards.
11
Reverse sewing Press button 117.
Owner's Manual - Page 19

Important On Model 1067 the bobbin winder must always be disengaged for sewing. Operating controls of electronic system of Model 1069 "needle down" button with indicator light N "sew slow" button with indicator light 0 "basting stitch" button with indicator light P
Operating controls of electronic system of Model 1067 "sew slow" button with indicator light 0.
16
Owner's Manual - Page 20

...). Move the fabric under the sewing foot. Each time you have finished basting move your machine can be varied at any speed. Repeat this button again, the indicator light goes off , the needle moves upwards and is obtained, then holding the fabric in the fabric (for each basting stitch. Push the dropfeed control to flash...
Owner's Manual - Page 21
... secure the sewing foot holder on the presser bar. Hole R and screw Q are used for attaching an edge guide and the darning foot. TCbmsaenouhawdtaktrioneenhnlggoesialnuNdfsrgo.eeioWttttshhitnhuueeendpnssdleea0eawcwrteeittinahnnwcgetgheitfrishfonseoogwysotloitaopnutugsresPlfhw.eofPiottnhltahgechaefnoroedltodd.hteer
Lower presser bar lifter 114 and at the same time reposition the sewing foot so that...
Owner's Manual - Page 23

... front
lug D. Blindstitch guide R is
adjusted by turning screw Q. 0 Zipper foot.
Release bracket W so that it in hole U and attach the foot so that it there. Use a thin thread for stitching along scale F. Special sewing feet N Blindstitch foot. Push bracket W toward the back and hold it rests against screw X. Insert the pin of the stitch...
Owner's Manual - Page 24
... the bottom of the buttonhole foot for ward as far as the first. Raise the needle (on Model 1067) 2 Push button B and keep it depressed until the machine has sewn 4 to 6 bartacking stitches. Sew the second but tonhole seam the same length as it depressed
until the machine has sewn 4 to 6 bartacking stitches. Raise the...
Owner's Manual - Page 25

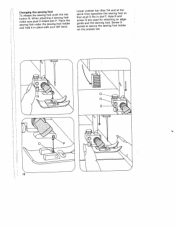
... 108 up the carrying handle, Take the edge guide out of the sewing hook with the edge guide and hold it toward 0. Do not oil the machine because it out. All you have to do is put a drop...in the hook raceway now and then, as instructed on page 25. Changing the light bulb Switch off the machine and pull out the power cord plug. Push it up , turn it toward N and take it into the slot...
Owner's Manual - Page 26
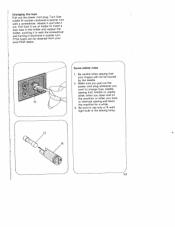
... safety rules 1. Make sure you pull out the power cord plug whenever you want to change fuse, needle, sewing foot, bobbin or needle plate, when you clean and oil the machine, or when you have to use only a 15-watt light bulb in with a screwdriver, release it and take it clockwise a quarter turn with the screwdriver...
Owner's Manual - Page 27
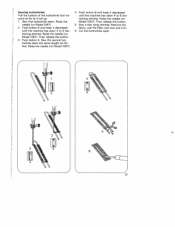
...inserted correctly. Insert system 130/705 H needle. Check threading. Poroothr-rqeuaadlitthyaot rhkansobtteycothmreeatdoousderdy, by excessive storage.
3.
Seam is
strikes pushed
needle plate or pulled.
See par. 1 above reasons.
Machine threaded improperly. Insert new needle.
Select needle according to Needle and Thread Chart.
2.
lnsert new needle. Needle bent and...
Owner's Manual - Page 28

...
lights
up,
but
the
machine is set for basting. If off the
rymuonausathetarhvrseewatidoteclhde.amTvehaictshhiiens empauarcntihlceiunslsea,rthleyevreiemnipsfooarrtpaainestchweorhotef nwfahbcihrleiicl,dbureenndseuarrreethtaeorosseuwwndiitn.cgh Machine runs with difficulty
Thread ends in hook raceway.
and
10. running
11. The machine sews only one The machine is not Insert new fuse...
Owner's Manual - Page 29

...which stretch under stress.
III II
iii
ni
CD
ill
GD
•"$,,
GDM
CD
C-D
-
Just push the buttons and the buttonhole is finished.
Flat, elastic reinforcing seams, as well as it
01
I ...decorating handkerchiefs, for instance. Inserting patches and darning rips on elastic materials or sewing ornamental seams on elastic fabrics.
08 Crown stitch
An ornamental seam, e.g.
...
Similar Questions

Sewing Machine Pfaff 1222e Sews On Its Own
What is wrong with my sewing machine it sews on its own very fast even if i donot press the pedal
What is wrong with my sewing machine it sews on its own very fast even if i donot press the pedal
(Posted by elizabethpizzuto 1 year ago)

How To Oil Pfaff 927? Is This Machine Suppose To Sew Fast?
(Posted by annamae319 8 years ago)

My Pfaff 7530 Was Moved Across The Country When Plugged In Light Comes On But It
Will not operate I have changed the batteries what can I do?
Will not operate I have changed the batteries what can I do?
(Posted by susanyork8 9 years ago)

Satin Stitch
Hi I have a Pfaff 1147 tiptronic. It is about 38 years old. Still in perfect condition and works lik...
Hi I have a Pfaff 1147 tiptronic. It is about 38 years old. Still in perfect condition and works lik...
(Posted by jessicapaff 9 years ago)

The Screen On My Pfaff 7550 Lights Up But Is Blank. The Machine Will Not Sew
(Posted by arnman21 9 years ago)