
Owner's Manual
Page 5
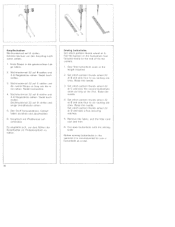
... 24 Freierm Parts of the sewing machine 1 Take-up lever 2 Bobbin winder tension 3 Carrying handle 4 Spool pin 5 BobbIn winder 6 Hand wheel 7 Stop motion knob 8 Meeter switch 9 Stitch length control 10 Detachable work support with accessory box 11 Needle plate 12 SewIng foot holder with sewing foot 13 Threading slots 14 Needle thread tension 15 Presser bar lifter 16 Needle holder with screw 17 Table of stitch patterns 18 Bedplate 19 Free arm cover (enclosing sewing hook) 20 Thread guide 21 Stop for darning operations 22 Stitch pattern selector wheel 23 Reverse-feed control 24 Free arm Tall.
... 24 Freierm Parts of the sewing machine 1 Take-up lever 2 Bobbin winder tension 3 Carrying handle 4 Spool pin 5 BobbIn winder 6 Hand wheel 7 Stop motion knob 8 Meeter switch 9 Stitch length control 10 Detachable work support with accessory box 11 Needle plate 12 SewIng foot holder with sewing foot 13 Threading slots 14 Needle thread tension 15 Presser bar lifter 16 Needle holder with screw 17 Table of stitch patterns 18 Bedplate 19 Free arm cover (enclosing sewing hook) 20 Thread guide 21 Stop for darning operations 22 Stitch pattern selector wheel 23 Reverse-feed control 24 Free arm Tall.
Owner's Manual
Page 6
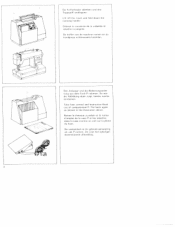
... Ia notice demploi de Ia case P et lee remettre dens Ia case conime on do bandgreep achterwaarts kantelen 1 Den Anlasser und die Bodienungsanlei tong ntis dem Each P nehmon . Dc koffer van do machine nenion on voit cur a photo du haut. Zie voor hut opbergen bovenstaande afbeelding Take foot control and Instruction Book out of compartment P Put hack...
... Ia notice demploi de Ia case P et lee remettre dens Ia case conime on do bandgreep achterwaarts kantelen 1 Den Anlasser und die Bodienungsanlei tong ntis dem Each P nehmon . Dc koffer van do machine nenion on voit cur a photo du haut. Zie voor hut opbergen bovenstaande afbeelding Take foot control and Instruction Book out of compartment P Put hack...
Owner's Manual
Page 9
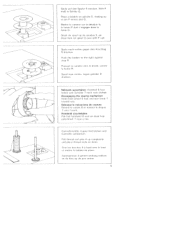
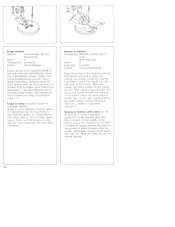
...R. Place a bobbin on them. Mettre Ia canette sur le dévidoir 5; Handwiel uitschakelen: Pak het hendwrel 6 vast en draai kop peIS( broef 7 noar u toe. Put thread nd pins 4 up (iii pen zetten 5 Grnrotlmstrfte -1 ganz hochirehen end Garnrollo aufstecken. Disengaging the sewing mechanism: Field hand... enters slot Q. e tenon P doit s'engaqer dans Ia fente Q. Steck do kius up completely and pIue thrnad reels on spindle 5, making su re in Schftz Q. Spool naur rechts, teqen qeleider R ire k ken. Trrtr lee brochos 4 a fond yore Ic haut et mettre lii bobine en place. Garenponi...
...R. Place a bobbin on them. Mettre Ia canette sur le dévidoir 5; Handwiel uitschakelen: Pak het hendwrel 6 vast en draai kop peIS( broef 7 noar u toe. Put thread nd pins 4 up (iii pen zetten 5 Grnrotlmstrfte -1 ganz hochirehen end Garnrollo aufstecken. Disengaging the sewing mechanism: Field hand... enters slot Q. e tenon P doit s'engaqer dans Ia fente Q. Steck do kius up completely and pIue thrnad reels on spindle 5, making su re in Schftz Q. Spool naur rechts, teqen qeleider R ire k ken. Trrtr lee brochos 4 a fond yore Ic haut et mettre lii bobine en place. Garenponi...
Owner's Manual
Page 14
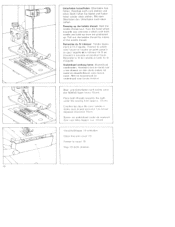
... Our nier links lor;rjon ca 10 nil Versr hlulfk appe 1 9 schlreScri Close free arm over 19. Mit dem Oherfadon don Unterfaden nach oben ziehen. Pull out the bobbin thread by means of the needle thread. Handwrel met i: bend muir o toe draaien en dOn teuk r"aken tot naald ... and sew a stitch until both rnedie and take up lover are nos tioned up the bobbin thread: Hold the needle thread tout. Met de bovendraad do crirrotle 0 lube riu lii d' a iqurie Onderdraad omhoog halen: Oovrrirdraad vasthouden. Handrad nach vorn drehen end eirien Stich náhen his Nadel und Faden hebel winder oben ...
... Our nier links lor;rjon ca 10 nil Versr hlulfk appe 1 9 schlreScri Close free arm over 19. Mit dem Oherfadon don Unterfaden nach oben ziehen. Pull out the bobbin thread by means of the needle thread. Handwrel met i: bend muir o toe draaien en dOn teuk r"aken tot naald ... and sew a stitch until both rnedie and take up lover are nos tioned up the bobbin thread: Hold the needle thread tout. Met de bovendraad do crirrotle 0 lube riu lii d' a iqurie Onderdraad omhoog halen: Oovrrirdraad vasthouden. Handrad nach vorn drehen end eirien Stich náhen his Nadel und Faden hebel winder oben ...
Owner's Manual
Page 18
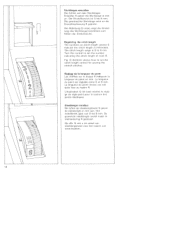
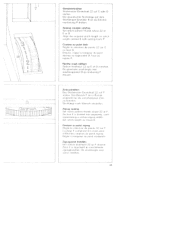
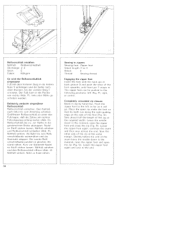
...änge in steirnarkering R gedranid. The stitch length range is 0 to set the number indicating the stitch length at mark R. Dc gewenste steeklengte wordt naast in mm an. Regulating the stitch length The numbers on stitch length control 9 indicate the stitch length in mm aan. Reglage de Ia longueur...Steeklengte instellen: De cijfers op steeklengtewiel 9 geven de steeklengte in milimeters. Turn the control to 6 mm. Fig. 0 (bottoml shows how to sot the stitch length control for sewing the stretch stitches. L'illustration 0 (en basl montre Ic rdqla ge du regle-point pour In ...
...änge in steirnarkering R gedranid. The stitch length range is 0 to set the number indicating the stitch length at mark R. Dc gewenste steeklengte wordt naast in mm an. Regulating the stitch length The numbers on stitch length control 9 indicate the stitch length in mm aan. Reglage de Ia longueur...Steeklengte instellen: De cijfers op steeklengtewiel 9 geven de steeklengte in milimeters. Turn the control to 6 mm. Fig. 0 (bottoml shows how to sot the stitch length control for sewing the stretch stitches. L'illustration 0 (en basl montre Ic rdqla ge du regle-point pour In ...

Owner's Manual
Page 24
... Ndhen, Lowering the feed dog Open free arm cover 19. Take out the needle. Push the needle with ts fiat side fcinq rear) up as far is it will go. Mettr Ia ma a chine hors circuit lintornipteur qdnhrjl 8. Nieuwe naa(d (130/705 H) met de platte kant naar de achterzijde, zo hoop rnogehik in working. ----- Push the feedlowering control toward A feed dog lowered) or toward 0 (sewing position). Richting...
... Ndhen, Lowering the feed dog Open free arm cover 19. Take out the needle. Push the needle with ts fiat side fcinq rear) up as far is it will go. Mettr Ia ma a chine hors circuit lintornipteur qdnhrjl 8. Nieuwe naa(d (130/705 H) met de platte kant naar de achterzijde, zo hoop rnogehik in working. ----- Push the feedlowering control toward A feed dog lowered) or toward 0 (sewing position). Richting...
Owner's Manual
Page 25
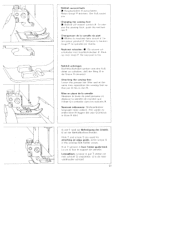
...machine hors ci colt in flat T steken en net schroef S vastzetten. Hole T ,osl screw S are used for attaching an edge guide, while screw U is de naao voethouder schroef. 21 Lineaalklem: Linesal in terruoteor .7r'oOruI 8 Enfoncnr In her ton ouqe P; Nähful auswechseln • Haivrsc/7ulte, 8 iLlS S'hR/tPO. Changing the sewing foot... R nirirastet Attaching the sewing foot Lower the prosse; lu seoeHe est bhrhe • Naaivoet wisselen: Z)e sti000i oh ii sin; La vis U fixe Ic support he senielie. bar lifter and at the sues ten, I opositon the sowing foot so that ...
...machine hors ci colt in flat T steken en net schroef S vastzetten. Hole T ,osl screw S are used for attaching an edge guide, while screw U is de naao voethouder schroef. 21 Lineaalklem: Linesal in terruoteor .7r'oOruI 8 Enfoncnr In her ton ouqe P; Nähful auswechseln • Haivrsc/7ulte, 8 iLlS S'hR/tPO. Changing the sewing foot... R nirirastet Attaching the sewing foot Lower the prosse; lu seoeHe est bhrhe • Naaivoet wisselen: Z)e sti000i oh ii sin; La vis U fixe Ic support he senielie. bar lifter and at the sues ten, I opositon the sowing foot so that ...
Owner's Manual
Page 27
St ci ii F ui gtl 5 oqo rid Couture au point zigzag lii -un i-or do ziqzuqbroedtes Do t c-fri iqto 1 uir fillS sisto [en. Ensuito rhgler c lonqueur In point desir 00 do req e point 9 Lice no I uqiur I ... FjnsteHrud 22 iii E oder D stellcn Die OeiVunsI hte Stichianqe cut dern Stli hlangen E nsteHer 9 dfl die Eunsteul mci k icrunq P drehen Sewing straight stitches Set stitch pdltern thnutih whise. 22 t F',rD SIuqi the required stutr li length en st toH enni I S( i S repiiSrunt i-q nt en 7iqzrq w d°s. ur F in B ton j niuqe. Rechte sleek stikken: Stek iii rnsielwiei 22...
St ci ii F ui gtl 5 oqo rid Couture au point zigzag lii -un i-or do ziqzuqbroedtes Do t c-fri iqto 1 uir fillS sisto [en. Ensuito rhgler c lonqueur In point desir 00 do req e point 9 Lice no I uqiur I ... FjnsteHrud 22 iii E oder D stellcn Die OeiVunsI hte Stichianqe cut dern Stli hlangen E nsteHer 9 dfl die Eunsteul mci k icrunq P drehen Sewing straight stitches Set stitch pdltern thnutih whise. 22 t F',rD SIuqi the required stutr li length en st toH enni I S( i S repiiSrunt i-q nt en 7iqzrq w d°s. ur F in B ton j niuqe. Rechte sleek stikken: Stek iii rnsielwiei 22...
Owner's Manual
Page 30
... 00 sindstitcn-,e v ing feet Tot SCrOW P to 1iput dge guide U far to the oft tout the need o picks op only one thread of the outer fabric is hen penetrating on a piece of the outer fabric t ens eiunj -ilge goafe I odor K So hIdr'qse 3 4 Nadni. r Elastic hlindstitch Sewing foot. Plain sr v.inq thr -ad Stitch: lurK Stitch iioth 3 4 Needle: See /0 or RU Regulating...
... 00 sindstitcn-,e v ing feet Tot SCrOW P to 1iput dge guide U far to the oft tout the need o picks op only one thread of the outer fabric is hen penetrating on a piece of the outer fabric t ens eiunj -ilge goafe I odor K So hIdr'qse 3 4 Nadni. r Elastic hlindstitch Sewing foot. Plain sr v.inq thr -ad Stitch: lurK Stitch iioth 3 4 Needle: See /0 or RU Regulating...
Owner's Manual
Page 34
...Riegelstiche ndhen. Remove the fabric pull the filler curd taut and tr m. 6 Cut open hittonhole w,th the slitting k rofe Before seeing buttonholes in the length required. 2. Pull the bottom of the buttonhole toot forward ...Sewing buttonholes Set stitch pattern thunib wheel at B and sew four to the end of its no vement 1 Sew hrst buttonhole seam in the o.Irment it is the first. Set stitch pattern thumb wheel 22 at C and sew the second buttonhole seam as a test. 30 Nade hochstellen. 4. Raise the needle. 3 Set stitch pattern thumb whcel 22 at B and sew four to sew a buttonhole...
...Riegelstiche ndhen. Remove the fabric pull the filler curd taut and tr m. 6 Cut open hittonhole w,th the slitting k rofe Before seeing buttonholes in the length required. 2. Pull the bottom of the buttonhole toot forward ...Sewing buttonholes Set stitch pattern thunib wheel at B and sew four to the end of its no vement 1 Sew hrst buttonhole seam in the o.Irment it is the first. Set stitch pattern thumb wheel 22 at C and sew the second buttonhole seam as a test. 30 Nade hochstellen. 4. Raise the needle. 3 Set stitch pattern thumb whcel 22 at B and sew four to sew a buttonhole...
Owner's Manual
Page 36
... Thread: Ene sewing threod Place the button in rechte Bohriing techen lessen. S B stitch pattern thuntb wheel at F Now select r zigzag width fret Blows the need e to enter the eft hnie of secunnig stitches t 1 Sewing on buttons Sewing foot. Sew i 'tiTher of zigzag stmrn,ltes and leave a heed eel iii about 6 in heavy ma ti'rialsl Lower the needle into the right hole of the hutton Raise the needle Set stitch...
... Thread: Ene sewing threod Place the button in rechte Bohriing techen lessen. S B stitch pattern thuntb wheel at F Now select r zigzag width fret Blows the need e to enter the eft hnie of secunnig stitches t 1 Sewing on buttons Sewing foot. Sew i 'tiTher of zigzag stmrn,ltes and leave a heed eel iii about 6 in heavy ma ti'rialsl Lower the needle into the right hole of the hutton Raise the needle Set stitch...
Owner's Manual
Page 38
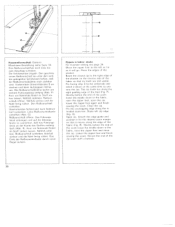
... FuR leqen, baR die Zahne am rechtei Fbhrunqssteq entlanj anton iAhh. 0>. Kurz vor Nahtende Nadel rn Stoff stehen assen. right or centre. Q. RI. Sewing in zippers Sewing foot: Zipper foot Stitch eirgth: 2 to the following positions: left is far as it will go Place the open the zip (...Sew ahoot half the length of the foot iFig. Lower the zipper foot attain, continue the seam and then sew across the end. Shortly before the end of the seam leave the needle down iii the material, raise the zipper foot and open zip under the foot so that its teeth run along the right guiding...
... FuR leqen, baR die Zahne am rechtei Fbhrunqssteq entlanj anton iAhh. 0>. Kurz vor Nahtende Nadel rn Stoff stehen assen. right or centre. Q. RI. Sewing in zippers Sewing foot: Zipper foot Stitch eirgth: 2 to the following positions: left is far as it will go Place the open the zip (...Sew ahoot half the length of the foot iFig. Lower the zipper foot attain, continue the seam and then sew across the end. Shortly before the end of the seam leave the needle down iii the material, raise the zipper foot and open zip under the foot so that its teeth run along the right guiding...
Owner's Manual
Page 42
... senken end die Naht fertig odhen. Baste the ciosud p to the i ight odge of the placket on the reverse side of the fabric sn that it moves along the in the iohrc, raise the Zipper foot, open the zip, ower the zipper foot again and finish sewing the seam C ose the zip. Pin the overlapping edge along the edge of..., daB das Fdhrungs lineal an der Kante des Stnffes entiang Iift iAhb. R. Pin facing strip S to the iii ft as tar os it the same time as you sew the zip The zip teeth run along tfre right guiding edge of the zip scorn with a bartack. 38 Den geschlos seien ReiRverschliiR so...
... senken end die Naht fertig odhen. Baste the ciosud p to the i ight odge of the placket on the reverse side of the fabric sn that it moves along the in the iohrc, raise the Zipper foot, open the zip, ower the zipper foot again and finish sewing the seam C ose the zip. Pin the overlapping edge along the edge of..., daB das Fdhrungs lineal an der Kante des Stnffes entiang Iift iAhb. R. Pin facing strip S to the iii ft as tar os it the same time as you sew the zip The zip teeth run along tfre right guiding edge of the zip scorn with a bartack. 38 Den geschlos seien ReiRverschliiR so...

Owner's Manual
Page 44
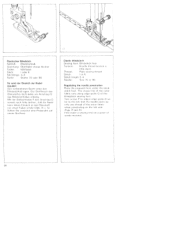
...qen. 'in hole S mml insert the foot so that it there Insert the pin of the foot in r Darning with straight stitch Preparing the machine. Sewing foot: Darn eq foot Stitrh E Trnsiom Ease i rdle t hrn d tins on Thread: Fine niachir e enihromdnny thre id Ni rrl)e Size 70 Feed dorj: Lowered 0 mrnir ...presser bar Ii fur Attaching the darning toot Fig P 1 : Raise t[ e nierfle Posh ver U rowirds the liar F and hold it rests against its strip When yen do so quinn fork W fits mound the presser bar Rinse lever U which then irirrvns rinwo unto otaining ,urew V T.tiitemr screw...
...qen. 'in hole S mml insert the foot so that it there Insert the pin of the foot in r Darning with straight stitch Preparing the machine. Sewing foot: Darn eq foot Stitrh E Trnsiom Ease i rdle t hrn d tins on Thread: Fine niachir e enihromdnny thre id Ni rrl)e Size 70 Feed dorj: Lowered 0 mrnir ...presser bar Ii fur Attaching the darning toot Fig P 1 : Raise t[ e nierfle Posh ver U rowirds the liar F and hold it rests against its strip When yen do so quinn fork W fits mound the presser bar Rinse lever U which then irirrvns rinwo unto otaining ,urew V T.tiitemr screw...

Owner's Manual
Page 49
'LZL S '2_ " 1 / -J / Ghihlampe auswechseln • At't to I
'LZL S '2_ " 1 / -J / Ghihlampe auswechseln • At't to I
Owner's Manual
Page 52
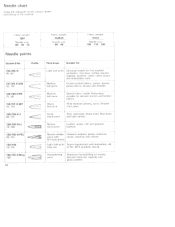
..., woolens, velvet, fancy seams and embroidery work. left twist groove Light ball point Seams topstitched with plastic sheeting and oilcloth. Medium hall point Heavy hall point Stretch fabric needle. N arrow twist point Leatoer, suede, calf and guatskin leathers Narrow wedge Imitation leathers, plastic niatori,rls, point with buttonhole silk long eye or No. 30 3 synthetic thread. Hemstitching point Attractive henistitching...
..., woolens, velvet, fancy seams and embroidery work. left twist groove Light ball point Seams topstitched with plastic sheeting and oilcloth. Medium hall point Heavy hall point Stretch fabric needle. N arrow twist point Leatoer, suede, calf and guatskin leathers Narrow wedge Imitation leathers, plastic niatori,rls, point with buttonhole silk long eye or No. 30 3 synthetic thread. Hemstitching point Attractive henistitching...
Owner's Manual
Page 53
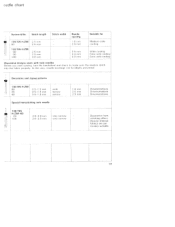
... 2 0 mm 2.5 mm 3 0 mm 4.0 mm Suitable for Medium eiide cording Wide cording Extra wide cord ng Extra wide cordinct Decorative designs sewn with twin needles Before you tart sew/rig, turn the handwheeI and chef k to make sure the needles stitch ntu tire fabric properly In this way, needle himikaqe can be largely prevented Decorative and zigzag patterns 130 705 H-ZWI 80 I 80 30 0 5 1 .5 nm...
... 2 0 mm 2.5 mm 3 0 mm 4.0 mm Suitable for Medium eiide cording Wide cording Extra wide cord ng Extra wide cordinct Decorative designs sewn with twin needles Before you tart sew/rig, turn the handwheeI and chef k to make sure the needles stitch ntu tire fabric properly In this way, needle himikaqe can be largely prevented Decorative and zigzag patterns 130 705 H-ZWI 80 I 80 30 0 5 1 .5 nm...
Owner's Manual
Page 60
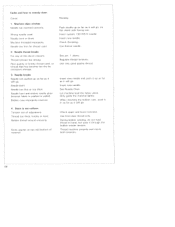
.... Needle bent. Seam is pushed or poled. Bobbin thread wound unevonly. See Needle Chart. Only guide the material lightly. Check upper and lower tensions. Machine threaded improperly Needle too thin for thread used , or thread that has become too dry by excessive storage. 3. Poor quality or knotty thread used 2. Needle bent and strikes needle plate because fabric is not uniform Tension out of material. Kinks appear on top and bottom of adjustment. Use thicker needle. Insert new needle and...
.... Needle bent. Seam is pushed or poled. Bobbin thread wound unevonly. See Needle Chart. Only guide the material lightly. Check upper and lower tensions. Machine threaded improperly Needle too thin for thread used , or thread that has become too dry by excessive storage. 3. Poor quality or knotty thread used 2. Needle bent and strikes needle plate because fabric is not uniform Tension out of material. Kinks appear on top and bottom of adjustment. Use thicker needle. Insert new needle and...

Owner's Manual
Page 61
..., be sure to switch off master switch 8. Never run a threaded machine unless there is a piece of feed dog. Remove needle plat al Set feed lowering canto 'I 6, Machine runs with difficulty Thread ends in hook raceway. Remove thread ends and put a dial oil into hook raceway. 7. F'ed dog lowered Feed lnwermg control is particularly important when children are around. 5] This is at all Liit has accumulated between tooth ows of fabric under the sewing foot.
..., be sure to switch off master switch 8. Never run a threaded machine unless there is a piece of feed dog. Remove needle plat al Set feed lowering canto 'I 6, Machine runs with difficulty Thread ends in hook raceway. Remove thread ends and put a dial oil into hook raceway. 7. F'ed dog lowered Feed lnwermg control is particularly important when children are around. 5] This is at all Liit has accumulated between tooth ows of fabric under the sewing foot.
Owner's Manual
Page 69
... Prr''ser bar lifter Ouer ting rim foot oritrol Net die thi aid tension Checking tire needle thread torsion . Thread cutter Setting the stitch or gti R'verse crejmi Stitch pattcrrri ken . . . Stitch not torn table Channing the medic Low'-' ing the feed cincj (_,hangii:g the sewing font Sewing fe-'t .... control winding Bobhin preparations Disengag nq and engag ng the sew ng mechanism Bobbin winding Inserting the bohb n Checking he bobbin thread tension nsertng the hobDin i use ... Accessory c nmpdrtmermt Detachable work support Sowing str ught st t hr's. 7 iqzag stitches...
... Prr''ser bar lifter Ouer ting rim foot oritrol Net die thi aid tension Checking tire needle thread torsion . Thread cutter Setting the stitch or gti R'verse crejmi Stitch pattcrrri ken . . . Stitch not torn table Channing the medic Low'-' ing the feed cincj (_,hangii:g the sewing font Sewing fe-'t .... control winding Bobhin preparations Disengag nq and engag ng the sew ng mechanism Bobbin winding Inserting the bohb n Checking he bobbin thread tension nsertng the hobDin i use ... Accessory c nmpdrtmermt Detachable work support Sowing str ught st t hr's. 7 iqzag stitches...


