Manual
Page 2
...; A sewing machine should always be used as threading needle, changing needle, threading bobbin, or changing presser foot, etc. • Never drop or insert any object into water. This household sewing machine is designed to a third party. WARNING -TO REDUCE THE RISK OF BURNS, FIRE, ELECTRIC SHOCK, OR INJURY TO PERSON: • Do not allow to operate the machine. To unplug, grasp the plug, not the cord. • The foot control is used to...
...; A sewing machine should always be used as threading needle, changing needle, threading bobbin, or changing presser foot, etc. • Never drop or insert any object into water. This household sewing machine is designed to a third party. WARNING -TO REDUCE THE RISK OF BURNS, FIRE, ELECTRIC SHOCK, OR INJURY TO PERSON: • Do not allow to operate the machine. To unplug, grasp the plug, not the cord. • The foot control is used to...
Manual
Page 4
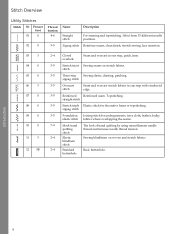
...Cleaning the machine 32 Unpacking 10 Connect to the power supply 10 Pack away after sewing 11 Free arm 11 Replacing the stitch plate 32 Troubleshooting 33 Technical specification 34 Leveling the machine base plate 11 Thread cutter 11 Spool pins 12 Threading the machine 13 Needle threader 14 Threading for twin needle 15 Bobbin winding 16 Inserting the bobbin 17 Presser foot pressure 17 Thread tension 18 Needles 19 Changing the needle 19 Lowering feed dogs 20 Presser foot lift 20 Changing the presser foot 20 Function buttons and indicators 21 Reverse 21 Start...
...Cleaning the machine 32 Unpacking 10 Connect to the power supply 10 Pack away after sewing 11 Free arm 11 Replacing the stitch plate 32 Troubleshooting 33 Technical specification 34 Leveling the machine base plate 11 Thread cutter 11 Spool pins 12 Threading the machine 13 Needle threader 14 Threading for twin needle 15 Bobbin winding 16 Inserting the bobbin 17 Presser foot pressure 17 Thread tension 18 Needles 19 Changing the needle 19 Lowering feed dogs 20 Presser foot lift 20 Changing the presser foot 20 Function buttons and indicators 21 Reverse 21 Start...

Manual
Page 5
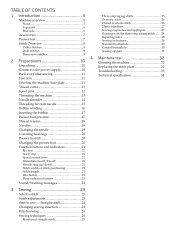
Built-in needle threader 5. Needle bar 7. Presser foot lift 11. Handwheel 5 Thread cutter 3. Presser foot 15. Speed control lever 18. Needle screw 12. Threading slots 2. LED lamp 4. Lower thread guide 10. Bobbin cover 9. Needle thread guide 13. Buttons and LED Display 19. Buttonhole lever 6. Stitch plate 8. 1 Introduction Machine overview Front Introduction 1. Presser foot bar and presser foot holder 14. Free arm 17. Accessory tray 16.
Built-in needle threader 5. Needle bar 7. Presser foot lift 11. Handwheel 5 Thread cutter 3. Presser foot 15. Speed control lever 18. Needle screw 12. Threading slots 2. LED lamp 4. Lower thread guide 10. Bobbin cover 9. Needle thread guide 13. Buttons and LED Display 19. Buttonhole lever 6. Stitch plate 8. 1 Introduction Machine overview Front Introduction 1. Presser foot bar and presser foot holder 14. Free arm 17. Accessory tray 16.
Manual
Page 7
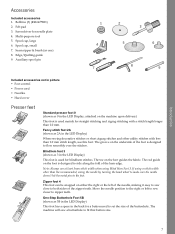
... designed to zipper teeth. The groove on either the right or the left to sew closer to ride along the fold of the buttonhole. If using Blind Hem Foot 3. Accessories Included accessories 1. The toe on the machine upon delivery) This foot is used to fit that button size. 7 Seam ripper & brush (as 0 in picture • Foot control • Power cord • Needles • Hard cover Presser feet Standard presser foot 0 (shown as one) 8. Auxiliary spool pin Introduction Included accessories...
... designed to zipper teeth. The groove on either the right or the left to sew closer to ride along the fold of the buttonhole. If using Blind Hem Foot 3. Accessories Included accessories 1. The toe on the machine upon delivery) This foot is used to fit that button size. 7 Seam ripper & brush (as 0 in picture • Foot control • Power cord • Needles • Hard cover Presser feet Standard presser foot 0 (shown as one) 8. Auxiliary spool pin Introduction Included accessories...
Manual
Page 8
... look of hand quilting by using monofilament needle quilting thread and increase needle thread tension. Zigzag stitch Reinforce seams, clean finish, stretch sewing, lace insertion. 03 3 04 0 05 0 06 3 07 0 08 0 09 0 10 0 11 3 12 5B 2-4 Closed overlock Seam and overcast in one step, patch, hem. 3-5 Stretch tricot Sewing seams on woven and stretch fabrics. 2-4 Standard Basic buttonhole. Topstitching. buttonhole Introduction 8 stitch 3-5 Three-step Sewing elastic, darning, patching. zigzag stitch 3-5 Foundation Joining stitch for decorative hems or...
... look of hand quilting by using monofilament needle quilting thread and increase needle thread tension. Zigzag stitch Reinforce seams, clean finish, stretch sewing, lace insertion. 03 3 04 0 05 0 06 3 07 0 08 0 09 0 10 0 11 3 12 5B 2-4 Closed overlock Seam and overcast in one step, patch, hem. 3-5 Stretch tricot Sewing seams on woven and stretch fabrics. 2-4 Standard Basic buttonhole. Topstitching. buttonhole Introduction 8 stitch 3-5 Three-step Sewing elastic, darning, patching. zigzag stitch 3-5 Foundation Joining stitch for decorative hems or...
Manual
Page 11
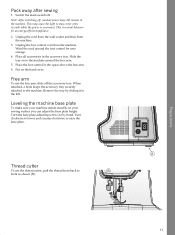
.... Free arm To use the thread cutter, pull the thread from the machine. 3. When attached, a hook keeps the accessory tray securely attached to raise the base plate. Wind the cord around the free arm. 5. Unplug the foot control cord from the machine. Note: After switching off, residual power may cause the light to front as shown (B). 11 Put on your sewing surface you can adjust the base plate height. Leveling the machine base plate To make sure your machine...
.... Free arm To use the thread cutter, pull the thread from the machine. 3. When attached, a hook keeps the accessory tray securely attached to raise the base plate. Wind the cord around the free arm. 5. Unplug the foot control cord from the machine. Note: After switching off, residual power may cause the light to front as shown (B). 11 Put on your sewing surface you can adjust the base plate height. Leveling the machine base plate To make sure your machine...
Manual
Page 12
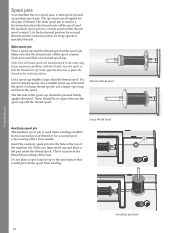
... Auxiliary spool pin 12 The spool pins are designed for all thread spools are manufactured in the vertical position. If you experience problems with a twin needle. There should be no space between the spool cap and the thread spool. Insert the auxiliary spool pin into the hole at the top of thread or for large spools or specialty threads. This is to prevent the thread from a second spool of the machine (A). Main spool pin Place a spool cap...
... Auxiliary spool pin 12 The spool pins are designed for all thread spools are manufactured in the vertical position. If you experience problems with a twin needle. There should be no space between the spool cap and the thread spool. Insert the auxiliary spool pin into the hole at the top of thread or for large spools or specialty threads. This is to prevent the thread from a second spool of the machine (A). Main spool pin Place a spool cap...
Manual
Page 15
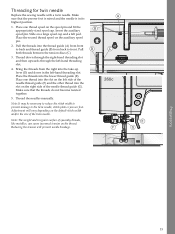
... the lower thread guide (E). Bring the threads from back to the twin needle, stitch plate or presser foot. Reducing the tension will vary depending on the right side of the twin needle. Slide on the spool pin and fit the appropriately sized spool cap. Make sure that the presser foot is raised and the needle is in the left-hand threading slot. Adjustment will prevent needle breakage. 15 Thread down in its highest position. 1. Place the threads...
... the lower thread guide (E). Bring the threads from back to the twin needle, stitch plate or presser foot. Reducing the tension will vary depending on the right side of the twin needle. Slide on the spool pin and fit the appropriately sized spool cap. Make sure that the presser foot is raised and the needle is in the left-hand threading slot. Adjustment will prevent needle breakage. 15 Thread down in its highest position. 1. Place the threads...
Manual
Page 17
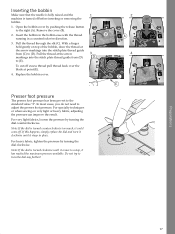
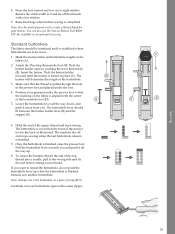
... adjust the presser foot pressure. Replace the bobbin cover. Remove the cover (B). 2. Presser foot pressure The presser foot pressure has been pre-set to the right (A). For very light fabrics, loosen the pressure by turning the dial clockwise. Open the bobbin cover by pushing the release button to the standard value "2". For specialty techniques or when sewing on top of the bobbin, draw the thread at point (E). 4. Pull the thread at the arrow markings into the stitch plate thread guide from (D) to (D). Insert...
... adjust the presser foot pressure. Replace the bobbin cover. Remove the cover (B). 2. Presser foot pressure The presser foot pressure has been pre-set to the right (A). For very light fabrics, loosen the pressure by turning the dial clockwise. Open the bobbin cover by pushing the release button to the standard value "2". For specialty techniques or when sewing on top of the bobbin, draw the thread at point (E). 4. Pull the thread at the arrow markings into the stitch plate thread guide from (D) to (D). Insert...
Manual
Page 18
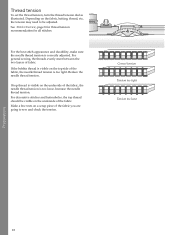
... of the fabric, the needle thread tension is visible on the fabric, batting, thread, etc, the tension may need to sew and check the tension. Reduce the needle thread tension. Make a few tests on the underside of the fabric, the needle thread tension is correctly adjusted. Correct tension Tension too tight Tension too loose Preparations 18 See Stitch Overview, page 8 for thread tension recommendation for all stitches. For decorative stitches and buttonholes, the top thread should be adjusted. If the bobbin thread is...
... of the fabric, the needle thread tension is visible on the fabric, batting, thread, etc, the tension may need to sew and check the tension. Reduce the needle thread tension. Make a few tests on the underside of the fabric, the needle thread tension is correctly adjusted. Correct tension Tension too tight Tension too loose Preparations 18 See Stitch Overview, page 8 for thread tension recommendation for all stitches. For decorative stitches and buttonholes, the top thread should be adjusted. If the bobbin thread is...
Manual
Page 21
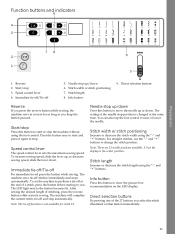
...presser foot recommendation on the LED display. Immediate tie-off/Tie-off stitches immediately and stops automatically. Info button 9. Speed control lever The speed control lever sets the maximum sewing speed. The setting of the 27 buttons you press the reverse button while sewing, the machine sews in reverse for stitch 12. For straight stitches, use the "-" and "+" buttons to decrease sewing speed, slide the lever down . Stitch length Increase or decrease the stitch length using the "-" and "+" buttons. Needle stop position is the center position. To increase sewing speed...
...presser foot recommendation on the LED display. Immediate tie-off/Tie-off stitches immediately and stops automatically. Info button 9. Speed control lever The speed control lever sets the maximum sewing speed. The setting of the 27 buttons you press the reverse button while sewing, the machine sews in reverse for stitch 12. For straight stitches, use the "-" and "+" buttons to decrease sewing speed, slide the lever down . Stitch length Increase or decrease the stitch length using the "-" and "+" buttons. Needle stop position is the center position. To increase sewing speed...
Manual
Page 24
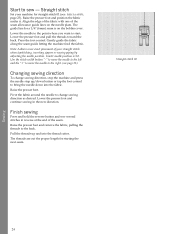
... guide lines on the bobbin cover. Lower the needle to the point where you want to sew - Note: Achieve more exact placement of your machine for starting the next seam. Straight stitch Set your straight stitch when topstitching, inserting zippers or sewing piping by adjusting the needle position. Center needle position is on the needle plate. Pull the threads up /down into the thread cutter. The threads are cut the proper length for straight stitch 01 (see page 21). Raise the presser foot. Start...
... guide lines on the bobbin cover. Lower the needle to the point where you want to sew - Note: Achieve more exact placement of your machine for starting the next seam. Straight stitch Set your straight stitch when topstitching, inserting zippers or sewing piping by adjusting the needle position. Center needle position is on the needle plate. Pull the threads up /down into the thread cutter. The threads are cut the proper length for straight stitch 01 (see page 21). Raise the presser foot. Start...
Manual
Page 26
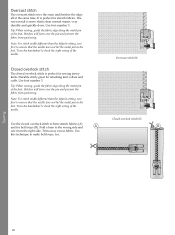
... foot. Use foot number 3. Note: For stitch width different than the default setting, test first to hem stretch fabrics (A) and for sewing jersey knits. Stitches will form over the pin and prevent the fabric from puckering. Use the closed overlock stitch is perfect for belt loops (B). Trim away excess fabric. Tip: When sewing, guide the fabric edge along the metal pin of the needle. Fold a hem to make belt loops, too. Closed overlock stitch The closed overlock stitch...
... foot. Use foot number 3. Note: For stitch width different than the default setting, test first to hem stretch fabrics (A) and for sewing jersey knits. Stitches will form over the pin and prevent the fabric from puckering. Use the closed overlock stitch is perfect for belt loops (B). Trim away excess fabric. Tip: When sewing, guide the fabric edge along the metal pin of the needle. Fold a hem to make belt loops, too. Closed overlock stitch The closed overlock stitch...
Manual
Page 28
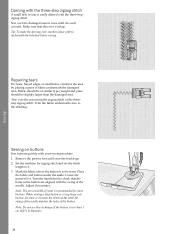
... covered. Set the machine for zigzag stitch and set width of 3mm is recommended for most buttons. Lower the presser foot. Note: The pre-set the stitch length to check that the rows overlap. Repairing tears For tears, frayed edges or small holes, reinforce the area by placing a piece of similar type/weight and piece should be sewn. Sewing on buttons Sew buttons quickly with the three-step zigzag stitch. Remove the presser foot and lower the feed dogs...
... covered. Set the machine for zigzag stitch and set width of 3mm is recommended for most buttons. Lower the presser foot. Note: The pre-set the stitch length to check that the rows overlap. Repairing tears For tears, frayed edges or small holes, reinforce the area by placing a piece of similar type/weight and piece should be sewn. Sewing on buttons Sew buttons quickly with the three-step zigzag stitch. Remove the presser foot and lower the feed dogs...
Manual
Page 29
Sewing 4. Push the button holder forward until the button is finished. 7. Lower the buttonhole lever all the way up when the buttonhole is completed. The machine ties off the threads with a seam ripper. 00 00 0 29 To secure the bartack, thread the end of the upper thread and start position and buttonhole length on Button Foot #820 473-96, available as illustrated. Press the foot control and sew six to create a thread shank for your garment...
Sewing 4. Push the button holder forward until the button is finished. 7. Lower the buttonhole lever all the way up when the buttonhole is completed. The machine ties off the threads with a seam ripper. 00 00 0 29 To secure the bartack, thread the end of the upper thread and start position and buttonhole length on Button Foot #820 473-96, available as illustrated. Press the foot control and sew six to create a thread shank for your garment...

Manual
Page 31
... the zipper, attach the foot in the right presser foot position (A). Attach the Zipper Foot 4 so the needle is on the right side of the foot. Sewing zippers The Zipper Foot 4 can be inserted (use straight stitch with stitch length 4mm, thread tension 2). Press the seam open seam allowance, aligning the bottom zipper stop with the zipper foot on top of the zipper. Attach Zipper Foot 4 so the needle is on the left of the needle, making it easy to sew both sides of the open . Sew the two fabrics...
... the zipper, attach the foot in the right presser foot position (A). Attach the Zipper Foot 4 so the needle is on the right side of the foot. Sewing zippers The Zipper Foot 4 can be inserted (use straight stitch with stitch length 4mm, thread tension 2). Press the seam open seam allowance, aligning the bottom zipper stop with the zipper foot on top of the zipper. Attach Zipper Foot 4 so the needle is on the left of the needle, making it easy to sew both sides of the open . Sew the two fabrics...
Manual
Page 32
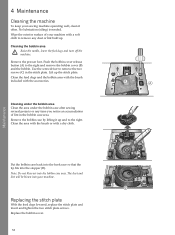
... with the accessories. The dust and lint will be blown into the bobbin case area. Replace the bobbin cover. 32 Maintenance 4 Maintenance Cleaning the machine To keep your sewing machine operating well, clean it up and to the right. Put the bobbin case back into the hook race so that the tip fits into the stopper (D). Remove the presser foot. Cleaning the bobbin area Raise the needle, lower the feed dogs and turn off the machine. Wipe...
... with the accessories. The dust and lint will be blown into the bobbin case area. Replace the bobbin cover. 32 Maintenance 4 Maintenance Cleaning the machine To keep your sewing machine operating well, clean it up and to the right. Put the bobbin case back into the hook race so that the tip fits into the stopper (D). Remove the presser foot. Cleaning the bobbin area Raise the needle, lower the feed dogs and turn off the machine. Wipe...
Manual
Page 33
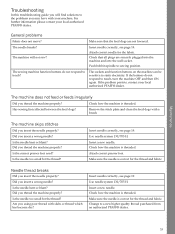
... presser foot used? Check how the machine is threaded. Are you insert a wrong needle? Change to static electricity. The sockets and function buttons on the machine can be sensitive to a new higher quality thread purchased from an authorized PFAFF® dealer. 33 Is the needle too small for the fabric. Make sure the needle is correct for the thread? Has sewing lint collected between the feed dogs? Did you thread the machine properly? Insert a new needle...
... presser foot used? Check how the machine is threaded. Are you insert a wrong needle? Change to static electricity. The sockets and function buttons on the machine can be sensitive to a new higher quality thread purchased from an authorized PFAFF® dealer. 33 Is the needle too small for the fabric. Make sure the needle is correct for the thread? Has sewing lint collected between the feed dogs? Did you thread the machine properly? Insert a new needle...
Manual
Page 34
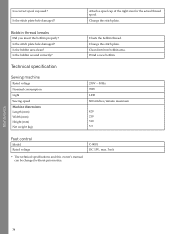
... technical specifications and this owner's manual can be changed without prior notice. Attach a spool cap of the right size for the actual thread spool. Change the stitch plate. Clean lint from bobbin area. C-8001 DC 15V, max. 3mA Maintenance 34 Technical specification Sewing machine Rated voltage Nominal consumption Light Sewing speed Machine dimensions: Length (mm) Width (mm) Height (mm) Net weight (kg) Check the bobbin thread. Is the bobbin area clean? Is the stitch plate hole damaged? Bobbin thread breaks Did you insert the bobbin...
... technical specifications and this owner's manual can be changed without prior notice. Attach a spool cap of the right size for the actual thread spool. Change the stitch plate. Clean lint from bobbin area. C-8001 DC 15V, max. 3mA Maintenance 34 Technical specification Sewing machine Rated voltage Nominal consumption Light Sewing speed Machine dimensions: Length (mm) Width (mm) Height (mm) Net weight (kg) Check the bobbin thread. Is the bobbin area clean? Is the stitch plate hole damaged? Bobbin thread breaks Did you insert the bobbin...
Brochure
Page 3
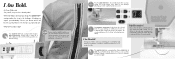
... icon of your individuality. With smart features and a unique design, the smarter by pfaff™ sewing machine line is a unique reflection of the stitch you want to sew and start /stop sewing. By pressing the start sewing. Use the stitches to lower the presser foot. An information system display clearly shows the selected stitch. Mix fabrics with automatic stitch width and length settings. The result is up safety. I Am Detailed! As Oscar...
... icon of your individuality. With smart features and a unique design, the smarter by pfaff™ sewing machine line is a unique reflection of the stitch you want to sew and start /stop sewing. By pressing the start sewing. Use the stitches to lower the presser foot. An information system display clearly shows the selected stitch. Mix fabrics with automatic stitch width and length settings. The result is up safety. I Am Detailed! As Oscar...


