
Owner's Manual
Page 2
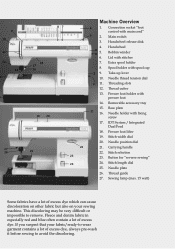
... that your sewing machine. Main switch 3. Extra spool holder 8. Thread cutter 13. Needle plate 26. Thread guide 27. Take-up lever 10. Stitch length dial 25. Fleece and denim fabric in especially red and blue often contain a lot of excess dye, always pre-wash it before sewing to avoid the discoloring. Handwheel Bobbin winder Lid with presser foot 14. Needle thread tension dial 1 11. Needle holder with spool cap 2 9. Spool holder with Àxing screw 17. Threading slots 12. Sewing lamp (max...
... that your sewing machine. Main switch 3. Extra spool holder 8. Thread cutter 13. Needle plate 26. Thread guide 27. Take-up lever 10. Stitch length dial 25. Fleece and denim fabric in especially red and blue often contain a lot of excess dye, always pre-wash it before sewing to avoid the discoloring. Handwheel Bobbin winder Lid with presser foot 14. Needle thread tension dial 1 11. Needle holder with spool cap 2 9. Spool holder with Àxing screw 17. Threading slots 12. Sewing lamp (max...
Owner's Manual
Page 5
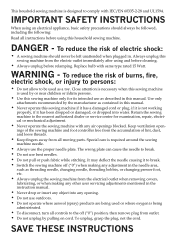
... SAFETY INSTRUCTIONS When using and before cleaning. • Always unplug before relamping. Always unplug this household sewing machine. Special care is required around the sewing machine needle. • Always use bent needles. • Do not pull or push fabric while stitching. The wrong plate can cause the needle to the off ("0") when making any adjustment in the needle area, such as threading needle, changing needle, threading bobbin, or changing presser foot, etc. • Always unplug the sewing machine...
... SAFETY INSTRUCTIONS When using and before cleaning. • Always unplug before relamping. Always unplug this household sewing machine. Special care is required around the sewing machine needle. • Always use bent needles. • Do not pull or push fabric while stitching. The wrong plate can cause the needle to the off ("0") when making any adjustment in the needle area, such as threading needle, changing needle, threading bobbin, or changing presser foot, etc. • Always unplug the sewing machine...
Owner's Manual
Page 6
...Bobbin case 1:8 Buttonhole 2:12 Threading the needle 1:10 Button sewing 2:14 Needle threader 1:11 Hemming with the twin needle 2:15 Pulling up the bobbin thread 1:12 Smocking 2:15 Presser foot lifter 1:13 Gathering 2:16 Thread cutter 1:12 Darning 2:17 Changing the presser foot 1:13 Sewing on zippers 2:19 IDT System/Integrated Dual Feed 1:14 Stabilizing edges 2:22 Changing the needle 1:15 Sewing lace 2:23 Needle thread tension 1:15 Shell edging 2:24 Lowering the feed dog 1:15 Stitch width dial 1:16 Needle position dial 1:16 Reverse sewing 1:17 Stitch length...
...Bobbin case 1:8 Buttonhole 2:12 Threading the needle 1:10 Button sewing 2:14 Needle threader 1:11 Hemming with the twin needle 2:15 Pulling up the bobbin thread 1:12 Smocking 2:15 Presser foot lifter 1:13 Gathering 2:16 Thread cutter 1:12 Darning 2:17 Changing the presser foot 1:13 Sewing on zippers 2:19 IDT System/Integrated Dual Feed 1:14 Stabilizing edges 2:22 Changing the needle 1:15 Sewing lace 2:23 Needle thread tension 1:15 Shell edging 2:24 Lowering the feed dog 1:15 Stitch width dial 1:16 Needle position dial 1:16 Reverse sewing 1:17 Stitch length...
Owner's Manual
Page 10
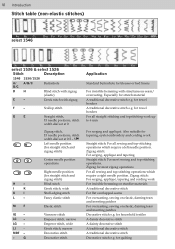
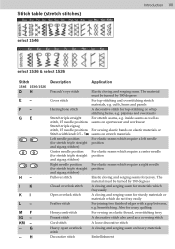
..., 15 needle positions, stitch width dial set at overlapped seams For overcasting, sewing on elastic, darning tears and inserting patches For overcasting, sewing on elastic, darning tears and inserting patches Decorative stitch e.g. LC - for quilting for towel borders A traditional decorative stitch e.g. H - Right needle position (for stretch material A traditional decorative stitch e.g. Also suitable for most sewing and top-stitching operations. LG - LI - Zigzag stitch: For serging, appliqué and tapering. Zigzag for tapering, eyelet embroidery and cording work...
..., 15 needle positions, stitch width dial set at overlapped seams For overcasting, sewing on elastic, darning tears and inserting patches For overcasting, sewing on elastic, darning tears and inserting patches Decorative stitch e.g. LC - for quilting for towel borders A traditional decorative stitch e.g. H - Right needle position (for stretch material A traditional decorative stitch e.g. Also suitable for most sewing and top-stitching operations. LG - LI - Zigzag stitch: For serging, appliqué and tapering. Zigzag for tapering, eyelet embroidery and cording work...
Owner's Manual
Page 11
..., hems and panels A decorative stitch for crazy quilting For sewing on elastic thread, overstitching terry A decorative stitch also used as seams on sportswear and workwear For sewing elastic bands on elastic materials or seams on heavy materials Embellishment hemstitching. H Description Application Peacock's eye stitch Cover stitch Herringbone stitch Stretch triple straight stitch, 15 needle positions Stretch triple zigzag stitch, 15 needle positions Stitch width knob 0.5 - 5 Left needle position (for stretch triple straight and zigzag stitches) Center needle position (for stretch...
..., hems and panels A decorative stitch for crazy quilting For sewing on elastic thread, overstitching terry A decorative stitch also used as seams on sportswear and workwear For sewing elastic bands on elastic materials or seams on heavy materials Embellishment hemstitching. H Description Application Peacock's eye stitch Cover stitch Herringbone stitch Stretch triple straight stitch, 15 needle positions Stretch triple zigzag stitch, 15 needle positions Stitch width knob 0.5 - 5 Left needle position (for stretch triple straight and zigzag stitches) Center needle position (for stretch...
Owner's Manual
Page 15
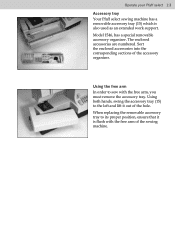
... numbered. When replacing the removable accessory tray to its proper position, ensure that it out of the hole. Sort the enclosed accessories into the corresponding sections of the sewing machine. 1:3 Using both hands, swing the accessory tray (15) to sew with the free arm of the accessory organizer. Using the free arm In order to the left and lift it is also used as an extended work support. Model 1546, has a special removable accessory...
... numbered. When replacing the removable accessory tray to its proper position, ensure that it out of the hole. Sort the enclosed accessories into the corresponding sections of the sewing machine. 1:3 Using both hands, swing the accessory tray (15) to sew with the free arm of the accessory organizer. Using the free arm In order to the left and lift it is also used as an extended work support. Model 1546, has a special removable accessory...
Owner's Manual
Page 27
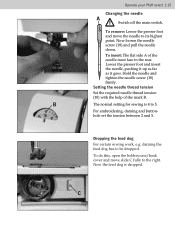
... goes. Hold the needle and tighten the needle screw (18) Àrmly. Now the feed dog is 4 to its highest point. Now loosen the needle screw (18) and pull the needle down. darning the feed dog has to the right. B The normal setting for sewing is dropped. To do this, open the bobbin case/hook cover and move the needle to 5. Dropping the feed dog For certain sewing work, e.g. C 1:15 To remove: Lower the presser foot and move slide...
... goes. Hold the needle and tighten the needle screw (18) Àrmly. Now the feed dog is 4 to its highest point. Now loosen the needle screw (18) and pull the needle down. darning the feed dog has to the right. B The normal setting for sewing is dropped. To do this, open the bobbin case/hook cover and move the needle to 5. Dropping the feed dog For certain sewing work, e.g. C 1:15 To remove: Lower the presser foot and move slide...
Owner's Manual
Page 29
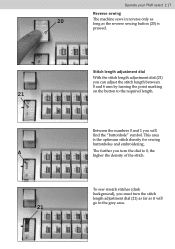
... the point marking on the button to 0, the higher the density of the stitch. The further you will go in the grey area. 1:17 Between the numbers 0 and 1 you turn the stitch length adjustment dial (21) as far as the reverse sewing button (20) is the optimum stitch density for sewing buttonholes and embroidering. Operate your Pfaff select 1:17 Reverse sewing 20 The machine sews in reverse only as long as...
... the point marking on the button to 0, the higher the density of the stitch. The further you will go in the grey area. 1:17 Between the numbers 0 and 1 you turn the stitch length adjustment dial (21) as far as the reverse sewing button (20) is the optimum stitch density for sewing buttonholes and embroidering. Operate your Pfaff select 1:17 Reverse sewing 20 The machine sews in reverse only as long as...
Owner's Manual
Page 35
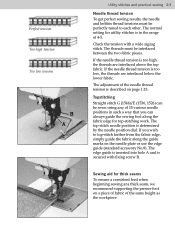
... inserted into hole A and is too low, the threads are interlaced above the top fabric. The top-stitch needle position is described on the needle plate or use the edge guide (standard accessory No.8). The threads must be perfectly tuned to top-stitch farther from the fabric edge, simply guide the fabric along the fabric edge for thick seams To ensure a consistent feed when beginning sewing at a thick seam, we recommend supporting the presser foot...
... inserted into hole A and is too low, the threads are interlaced above the top fabric. The top-stitch needle position is described on the needle plate or use the edge guide (standard accessory No.8). The threads must be perfectly tuned to top-stitch farther from the fabric edge, simply guide the fabric along the fabric edge for thick seams To ensure a consistent feed when beginning sewing at a thick seam, we recommend supporting the presser foot...

Owner's Manual
Page 36
... other needle position). You can be guided along edge guide B. Please ensure that the needle is very useful. For overcasting difÀcult materials, blind stitch foot No. 3 is at its highest position when adjusting the needle position. When sewing, the thread lies over the edge alternately. It is also suitable for overcasting with adjusting screw A. C A B G 2- 1-2 E 2- 1-2 E 2- 1-2 3-5 0/1 3-5 0/1 3-5 0/1 Zigzag stitch In addition to overlock stitching, zigzag stitch G, stitch width 5 , is easier to 6 mm. The stitch length can adjust this case...
... other needle position). You can be guided along edge guide B. Please ensure that the needle is very useful. For overcasting difÀcult materials, blind stitch foot No. 3 is at its highest position when adjusting the needle position. When sewing, the thread lies over the edge alternately. It is also suitable for overcasting with adjusting screw A. C A B G 2- 1-2 E 2- 1-2 E 2- 1-2 3-5 0/1 3-5 0/1 3-5 0/1 Zigzag stitch In addition to overlock stitching, zigzag stitch G, stitch width 5 , is easier to 6 mm. The stitch length can adjust this case...
Owner's Manual
Page 38
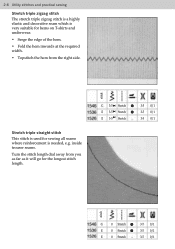
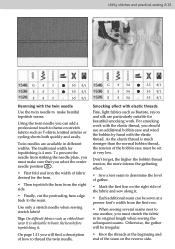
... straight stitch This stitch is used for sewing all seams where reinforcement is very suitable for hems on T-shirts and underwear. • Serge the edge of the hem. • Fold the hem inwards at the required width. • Topstitch the hem from you as far as it will go for the longest stitch length. 2:6 Utility stitches and practical sewing Stretch triple zigzag stitch The stretch triple zigzag stitch is a highly elastic...
... straight stitch This stitch is used for sewing all seams where reinforcement is very suitable for hems on T-shirts and underwear. • Serge the edge of the hem. • Fold the hem inwards at the required width. • Topstitch the hem from you as far as it will go for the longest stitch length. 2:6 Utility stitches and practical sewing Stretch triple zigzag stitch The stretch triple zigzag stitch is a highly elastic...
Owner's Manual
Page 41
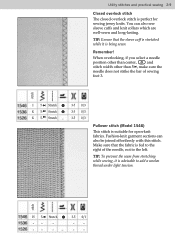
... thread under light tension. TIP: To prevent the seam from stretching while sewing, it is being sewn. TIP: Ensure that the fabric is fed to the left. When overlocking, if you select a needle position other than center, and stitch width other than 5 , make sure the needle does not strike the bar of the needle, not to the right of sewing foot 3. Stretch K 5- Stretch -- - -- - 3-5 0/1 - - - - Utility stitches and practical sewing 2:9 Closed overlock stitch The closed overlock stitch...
... thread under light tension. TIP: To prevent the seam from stretching while sewing, it is being sewn. TIP: Ensure that the fabric is fed to the left. When overlocking, if you select a needle position other than center, and stitch width other than 5 , make sure the needle does not strike the bar of the needle, not to the right of sewing foot 3. Stretch K 5- Stretch -- - -- - 3-5 0/1 - - - - Utility stitches and practical sewing 2:9 Closed overlock stitch The closed overlock stitch...
Owner's Manual
Page 44
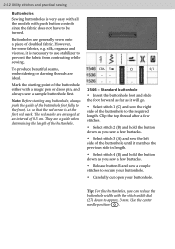
... with the stitch width dial (27) down to approx. 3 mm. stitch CBA 5 -- Mark the starting any buttonhole, always push the guide of doubled fabric. They are ideal. Clip the top thread after a few stitches. • Select stitch 2 (B) and hold the button down as it is very easy with all the models with a magic pen or dress pin, and always sew a sample buttonhole Àrst. Buttonholes are arranged...
... with the stitch width dial (27) down to approx. 3 mm. stitch CBA 5 -- Mark the starting any buttonhole, always push the guide of doubled fabric. They are ideal. Clip the top thread after a few stitches. • Select stitch 2 (B) and hold the button down as it is very easy with all the models with a magic pen or dress pin, and always sew a sample buttonhole Àrst. Buttonholes are arranged...
Owner's Manual
Page 47
... or cycling shorts both quickly and easily. Don't forget, the higher the bobbin thread tension, the more intense the gathering effect. • Sew a test seam to baste the hem before topstitching it. Use only a stretch needle when sewing stretch fabric! For smocking work . The traditional width for beautiful smocking work with elastic threads Fine, light fabrics such as ribbed knitwear it . • Each additional seam can be sewn at a presser foot's width from the...
... or cycling shorts both quickly and easily. Don't forget, the higher the bobbin thread tension, the more intense the gathering effect. • Sew a test seam to baste the hem before topstitching it. Use only a stretch needle when sewing stretch fabric! For smocking work . The traditional width for beautiful smocking work with elastic threads Fine, light fabrics such as ribbed knitwear it . • Each additional seam can be sewn at a presser foot's width from the...
Owner's Manual
Page 61
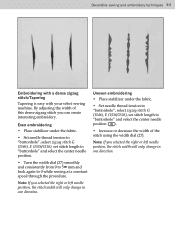
... this dense zigzag stitch you selected the right or left needle position, the stitch width will only change in one direction. 3:5 Decorative sewing and embroidery techniques 3:5 Embroidering with a dense zigzag stitch/Tapering Tapering is easy with your select sewing machine. Note: If you can create interesting embroidery. Uneven embroidering • Place stabilizer under the fabric. • Set needle thread tension to "buttonhole", select zigzag stitch G (1546), E (1536/1526), set stitch length to 0 while sewing at a constant speed through the...
... this dense zigzag stitch you selected the right or left needle position, the stitch width will only change in one direction. 3:5 Decorative sewing and embroidery techniques 3:5 Embroidering with a dense zigzag stitch/Tapering Tapering is easy with your select sewing machine. Note: If you can create interesting embroidery. Uneven embroidering • Place stabilizer under the fabric. • Set needle thread tension to "buttonhole", select zigzag stitch G (1546), E (1536/1526), set stitch length to 0 while sewing at a constant speed through the...
Owner's Manual
Page 64
... with a stitch width 3-5 mm. • Remove the presser foot. This is very effective on the needle plate, making sure pin A Àts in the middle cutout of the fabric threads and push the fabric over the pin in an embroidery hoop. Then push the plate down at the darning position (see page 2:17). • Place the eyelet plate on blouses, bed or table linen. Cut one -of-a-kind design is important...
... with a stitch width 3-5 mm. • Remove the presser foot. This is very effective on the needle plate, making sure pin A Àts in the middle cutout of the fabric threads and push the fabric over the pin in an embroidery hoop. Then push the plate down at the darning position (see page 2:17). • Place the eyelet plate on blouses, bed or table linen. Cut one -of-a-kind design is important...
Owner's Manual
Page 68
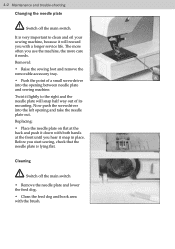
... opening between needle plate and sewing machine. Cleaning Switch off the main switch. Removal: • Raise the sewing foot and remove the removable accessory tray. • Push the point of its mounting. Replacing: • Place the needle plate on Áat at the back and push it needs. 4:2 Maintenance and trouble-shooting Changing the needle plate Switch off the main switch • Remove the needle plate and lower the feed dog. • Clean the feed dog and hook area with a longer service...
... opening between needle plate and sewing machine. Cleaning Switch off the main switch. Removal: • Raise the sewing foot and remove the removable accessory tray. • Push the point of its mounting. Replacing: • Place the needle plate on Áat at the back and push it needs. 4:2 Maintenance and trouble-shooting Changing the needle plate Switch off the main switch • Remove the needle plate and lower the feed dog. • Clean the feed dog and hook area with a longer service...
Owner's Manual
Page 70
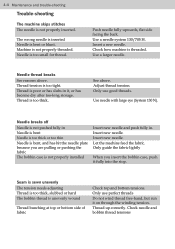
... N). Insert new needle. Let the machine feed the fabric. Only guide the fabric lightly When you are pulling or pushing the fabric The bobbin case is poor or has slubs in . Thread up correctly. Thread is not properly inserted. See above . 4:4 Maintenance and trouble-shooting Trouble-shooting The machine skips stitches The needle is too thick. The wrong needle is inserted Needle is too small for thread. Needle is bent or blunt. Only use perfect threads Do not wind thread free...
... N). Insert new needle. Let the machine feed the fabric. Only guide the fabric lightly When you are pulling or pushing the fabric The bobbin case is poor or has slubs in . Thread up correctly. Thread is not properly inserted. See above . 4:4 Maintenance and trouble-shooting Trouble-shooting The machine skips stitches The needle is too thick. The wrong needle is inserted Needle is too small for thread. Needle is bent or blunt. Only use perfect threads Do not wind thread free...
Owner's Manual
Page 72
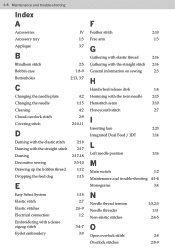
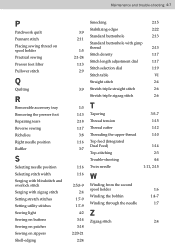
... Bobbin case Buttonholes 2:5 1:8-9 2:13, 3:7 C Changing the needle plate Changing the needle Cleaning Closed overlock stitch Covering stitch 4:2 1:15 4:2 2:9 2:10-11 D Darning with the elastic stitch 2:18 Darning with the straight stitch 2:17 Darning 2:17-18 Decorative sewing 3:3-10 Drawing up the bobbin thread 1:12 Dropping the feed dog 1:15 E Easy Select System Elastic stitch Elastic stitches Electrical connection Embroidering with a dense zigzag stitch Eyelet embroidery 1:18 2:7 2:6-9 1:2 3:4-7 3:8 4:6 F Feather stitch 2:10 Free arm 1:3 G Gathering with elastic...
... Bobbin case Buttonholes 2:5 1:8-9 2:13, 3:7 C Changing the needle plate Changing the needle Cleaning Closed overlock stitch Covering stitch 4:2 1:15 4:2 2:9 2:10-11 D Darning with the elastic stitch 2:18 Darning with the straight stitch 2:17 Darning 2:17-18 Decorative sewing 3:3-10 Drawing up the bobbin thread 1:12 Dropping the feed dog 1:15 E Easy Select System Elastic stitch Elastic stitches Electrical connection Embroidering with a dense zigzag stitch Eyelet embroidery 1:18 2:7 2:6-9 1:2 3:4-7 3:8 4:6 F Feather stitch 2:10 Free arm 1:3 G Gathering with elastic...
Owner's Manual
Page 73
... Pullover stitch Q Quilting R Removable accessory tray Removing the presser foot Repairing tears Reverse sewing Richelieu Right needle position RufÁer S Selecting needle position Selecting stitch width Serging with blindstitch and overlock stitch Serging with zigzag stitch Setting stretch stitches Setting utility stitches Sewing light Sewing on buttons Sewing on patches Sewing on zippers Shell-edging 3:9 2:11 1:5 2:1-24 1:13 2:9 3:9 1:3 1:13 2:18 1:17 3:8 1:16 3:7 1:16 1:16 2:5,8-9 2:4 1:7-9 1:7-9 4:2 3:14 3:18 2:20-21 2:24 Smocking 2:15 Stabilizing edges 2:22 Standard buttonhole...
... Pullover stitch Q Quilting R Removable accessory tray Removing the presser foot Repairing tears Reverse sewing Richelieu Right needle position RufÁer S Selecting needle position Selecting stitch width Serging with blindstitch and overlock stitch Serging with zigzag stitch Setting stretch stitches Setting utility stitches Sewing light Sewing on buttons Sewing on patches Sewing on zippers Shell-edging 3:9 2:11 1:5 2:1-24 1:13 2:9 3:9 1:3 1:13 2:18 1:17 3:8 1:16 3:7 1:16 1:16 2:5,8-9 2:4 1:7-9 1:7-9 4:2 3:14 3:18 2:20-21 2:24 Smocking 2:15 Stabilizing edges 2:22 Standard buttonhole...


