
Owner's Manual
Page 2
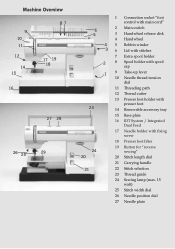
Machine Overview 9 10 11 12 14 15 87 17 19 18 16 27 28 26 25 29 6 5 4 3 2 1 23 24 20 21 1 Connection socket "foot control with ... 16 IDT System / Integrated Dual Feed 17 Needle holder with Àxing screw 18 Presser foot lifter 19 Button for "reverse sewing" 20 Stitch length dial 21 Carrying handle 22 Stitch selection 23 Thread guide 24 Sewing lamp (max. 15 watt) 25 Stitch width dial 26 Needle position dial 27 Needle plate
Machine Overview 9 10 11 12 14 15 87 17 19 18 16 27 28 26 25 29 6 5 4 3 2 1 23 24 20 21 1 Connection socket "foot control with ... 16 IDT System / Integrated Dual Feed 17 Needle holder with Àxing screw 18 Presser foot lifter 19 Button for "reverse sewing" 20 Stitch length dial 21 Carrying handle 22 Stitch selection 23 Thread guide 24 Sewing lamp (max. 15 watt) 25 Stitch width dial 26 Needle position dial 27 Needle plate
Owner's Manual
Page 4
... suspect that your fabric/ready-to-wear garment contains a lot of excess dye, always pre-wash it before sewing/embroidering to remove. Totally Stylish Sewing Congratulations! To learn your sewing machine. Some fabrics have purchased a top quality Pfaff sewing machine whith unique features. discoloration on other fabric but also on your C l a s s i c S t y l e 1 5 2 5 , follow the instructions for the select1536...
... suspect that your fabric/ready-to-wear garment contains a lot of excess dye, always pre-wash it before sewing/embroidering to remove. Totally Stylish Sewing Congratulations! To learn your sewing machine. Some fabrics have purchased a top quality Pfaff sewing machine whith unique features. discoloration on other fabric but also on your C l a s s i c S t y l e 1 5 2 5 , follow the instructions for the select1536...
Owner's Manual
Page 5
... use as threading needle, changing needle, threading bobbin, or changing presser foot, etc. • Always unplug the sewing machine from the electric outlet immediately after using this sewing machine if it has a damaged cord or plug, if it is not working properly, if it to break. •...products are being used as contained in this manual. • Never operate this household sewing machine. Always unplug this manual. Use only attachments recommended by pulling on cord. ings of the sewing machine and foot controller free from the accumulation of lint, dust, and loose threads. •...
... use as threading needle, changing needle, threading bobbin, or changing presser foot, etc. • Always unplug the sewing machine from the electric outlet immediately after using this sewing machine if it has a damaged cord or plug, if it is not working properly, if it to break. •...products are being used as contained in this manual. • Never operate this household sewing machine. Always unplug this manual. Use only attachments recommended by pulling on cord. ings of the sewing machine and foot controller free from the accumulation of lint, dust, and loose threads. •...
Owner's Manual
Page 12
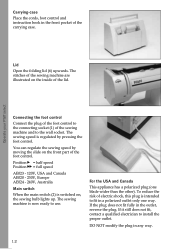
...qualiÀed electrician to the connecting socket (1) of the foot control. The stitches of the sewing machine are illustrated on the front part of the sewing machine and to use. Operate your Pfaff select Connecting the foot control Connect the plug of the foot control to install the proper outlet.... You can regulate the sewing speed by pressing the foot control. Carrying-case Place the ...
...qualiÀed electrician to the connecting socket (1) of the foot control. The stitches of the sewing machine are illustrated on the front part of the sewing machine and to use. Operate your Pfaff select Connecting the foot control Connect the plug of the foot control to install the proper outlet.... You can regulate the sewing speed by pressing the foot control. Carrying-case Place the ...
Owner's Manual
Page 13
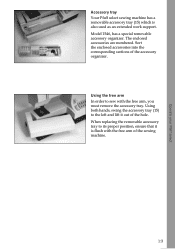
Using the free arm In order to sew with the free arm of the sewing machine. 1:3 1:3 The enclosed accessories are numbered. Sort the enclosed accessories into the corresponding sections of the hole. Using both hands, swing the accessory tray (15) to ... organizer. When replacing the removable accessory tray to the left and lift it is also used as an extended work support. Operate your Pfaff select Accessory tray Your Pfaff select sewing machine has a removable accessory tray (15) which is Áush with the free arm, you must remove the accessory tray. Model 1546, has...
Using the free arm In order to sew with the free arm of the sewing machine. 1:3 1:3 The enclosed accessories are numbered. Sort the enclosed accessories into the corresponding sections of the hole. Using both hands, swing the accessory tray (15) to ... organizer. When replacing the removable accessory tray to the left and lift it is also used as an extended work support. Operate your Pfaff select Accessory tray Your Pfaff select sewing machine has a removable accessory tray (15) which is Áush with the free arm, you must remove the accessory tray. Model 1546, has...
Owner's Manual
Page 24
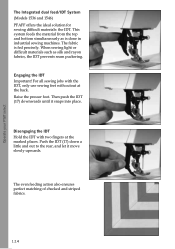
... fed precisely. Engaging the IDT Important! Disengaging the IDT Hold the IDT with cutout at the marked places. For all sewing jobs with the IDT, only use sewing feet with two Àngers at the back. The even feeding action also ensures perfect matching of checked and striped fabrics...rear, and let it snaps into place. Operate your Pfaff select The Integrated dual feed/IDT System (Models 1536 and 1546) PFAFF offers the ideal solution for sewing difÀcult materials: the IDT. The fabric is done in industrial sewing machines. This system feeds the material from the top and ...
... fed precisely. Engaging the IDT Important! Disengaging the IDT Hold the IDT with cutout at the marked places. For all sewing jobs with the IDT, only use sewing feet with two Àngers at the back. The even feeding action also ensures perfect matching of checked and striped fabrics...rear, and let it snaps into place. Operate your Pfaff select The Integrated dual feed/IDT System (Models 1536 and 1546) PFAFF offers the ideal solution for sewing difÀcult materials: the IDT. The fabric is done in industrial sewing machines. This system feeds the material from the top and ...
Owner's Manual
Page 27
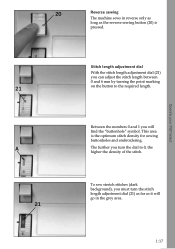
...) is the optimum stitch density for sewing buttonholes and embroidering. Between the numbers 0 and 1 you can adjust the stitch length between 0 and 6 mm by turning the point marking on the button to 0, the higher the density of the stitch. Operate your Pfaff select 21 A 21 Stitch length adjustment... dial With the stitch length adjustment dial (21) you will go in reverse only as long as it will Ànd the "buttonhole" symbol. 20 Reverse sewing The machine sews in the grey area. 1:17 1:17 ...
...) is the optimum stitch density for sewing buttonholes and embroidering. Between the numbers 0 and 1 you can adjust the stitch length between 0 and 6 mm by turning the point marking on the button to 0, the higher the density of the stitch. Operate your Pfaff select 21 A 21 Stitch length adjustment... dial With the stitch length adjustment dial (21) you will go in reverse only as long as it will Ànd the "buttonhole" symbol. 20 Reverse sewing The machine sews in the grey area. 1:17 1:17 ...
Owner's Manual
Page 28
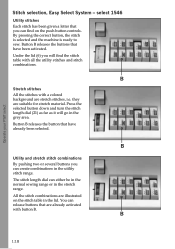
... Ànd the stitch table with all the utility stitches and stitch combinations. You can either be in the normal sewing range or in the lid. Operate your Pfaff select Stitch selection, Easy Select System - they are stretch stitches, i.e. The stitch length dial can release buttons that...are already activated with a colored background are suitable for stretch material. By pressing the correct button, the stitch is selected and the machine is ready to sew. Under the lid (6) you will go in the utility stitch range. B Utility and stretch stitch combinations By pushing two or ...
... Ànd the stitch table with all the utility stitches and stitch combinations. You can either be in the normal sewing range or in the lid. Operate your Pfaff select Stitch selection, Easy Select System - they are stretch stitches, i.e. The stitch length dial can release buttons that...are already activated with a colored background are suitable for stretch material. By pressing the correct button, the stitch is selected and the machine is ready to sew. Under the lid (6) you will go in the utility stitch range. B Utility and stretch stitch combinations By pushing two or ...
Owner's Manual
Page 42
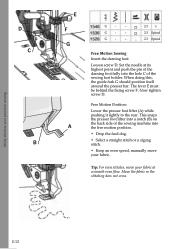
...foot lifter (A) while pushing it lightly to the rear. Utility stitches and practical sewing stitch D C B E F G A G - - G - - Tip: For even stitches, move your fabric at its highest point and push the pin of the sewing foot holder. When doing this, the guide fork G should position itself around ...at a smooth even Áow. Now tighten screw D. This snaps the presser foot lifter into a notch (B) on the back side of the sewing machine into the hole C of the darning foot fully into the free motion position. • Drop the feed dog. • Select a straight stitch...
...foot lifter (A) while pushing it lightly to the rear. Utility stitches and practical sewing stitch D C B E F G A G - - G - - Tip: For even stitches, move your fabric at its highest point and push the pin of the sewing foot holder. When doing this, the guide fork G should position itself around ...at a smooth even Áow. Now tighten screw D. This snaps the presser foot lifter into a notch (B) on the back side of the sewing machine into the hole C of the darning foot fully into the free motion position. • Drop the feed dog. • Select a straight stitch...
Owner's Manual
Page 48
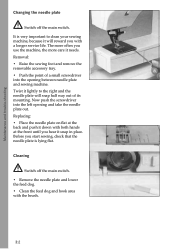
Removal: • Raise the sewing foot and remove the removable accessory tray. • Push the point of its mounting. Now push the screwdriver... • Place the needle plate on Áat at the back and push it down with the brush. 3:2 Before you start sewing, check that the needle plate is very important to the right and the needle plate will reward you with a longer service life. Cleaning... hear it will snap half way out of a small screwdriver into the left opening between needle plate and sewing machine. Twist it needs. It is lying Áat the front until you use the...
Removal: • Raise the sewing foot and remove the removable accessory tray. • Push the point of its mounting. Now push the screwdriver... • Place the needle plate on Áat at the back and push it down with the brush. 3:2 Before you start sewing, check that the needle plate is very important to the right and the needle plate will reward you with a longer service life. Cleaning... hear it will snap half way out of a small screwdriver into the left opening between needle plate and sewing machine. Twist it needs. It is lying Áat the front until you use the...
Owner's Manual
Page 49
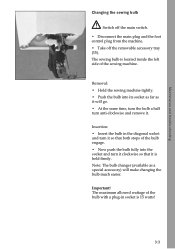
Removal: • Hold the sewing machine tightly. • Push the bulb into the socket and turn it clockwise so that both stops of the bulb engage. • Now push the bulb ... the same time, turn the bulb a half turn it so that it . The maximum allowed wattage of the sewing machine. Important! Insertion: • Insert the bulb in socket is held Àrmly. The sewing bulb is located inside the left side of the bulb with a plug-in the diagonal socket and turn anti...
Removal: • Hold the sewing machine tightly. • Push the bulb into the socket and turn it clockwise so that both stops of the bulb engage. • Now push the bulb ... the same time, turn the bulb a half turn it so that it . The maximum allowed wattage of the sewing machine. Important! Insertion: • Insert the bulb in socket is held Àrmly. The sewing bulb is located inside the left side of the bulb with a plug-in the diagonal socket and turn anti...
Owner's Manual
Page 51
...teeth rows. Remove the threads. This is lowered, slide A (see page 1:15) to switch off the main switch. Machine does not feed or feeds irregularly Sewing lint has collected between the feed Remove needle plate, remove lint with difÀculty There are nearby. Feed dog is ...important if children are thread remnants in it. Do not start the threaded machine without fabric in the hook race. Before you replace sewing feet or needles, you leave the machine, even for a short time, do not forget to left. brush.
...teeth rows. Remove the threads. This is lowered, slide A (see page 1:15) to switch off the main switch. Machine does not feed or feeds irregularly Sewing lint has collected between the feed Remove needle plate, remove lint with difÀculty There are nearby. Feed dog is ...important if children are thread remnants in it. Do not start the threaded machine without fabric in the hook race. Before you replace sewing feet or needles, you leave the machine, even for a short time, do not forget to left. brush.


