
Owner's Manual
Page 2
... is not working properly, if it to break. • Switch the sewing machine off ("0") position, then remove plug from outlet. • Do not unplug by the manufacturer as threading needle, changing needle, threading bobbin, or changing presser foot, etc. • Always unplug the sewing machine from the electrical outlet when removing covers, lubricating, or when making...
... is not working properly, if it to break. • Switch the sewing machine off ("0") position, then remove plug from outlet. • Do not unplug by the manufacturer as threading needle, changing needle, threading bobbin, or changing presser foot, etc. • Always unplug the sewing machine from the electrical outlet when removing covers, lubricating, or when making...
Owner's Manual
Page 5
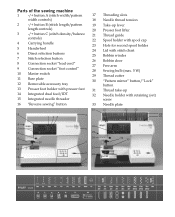
Parts of the sewing machine 1 -/+ button A (stitch width/pattern 17 width controls) 18 2 -/+ button B (stitch length/pattern 19 length controls) 20 3 -/+ button C (stitch density/balance 21 controls) 22 4 Carrying handle ... 30 5 29 28 6 27 7 26 8 9 10 Threading slots Needle thread tension Take-up lever Presser foot lifter Thread guide Spool holder with spool cap Hole for second spool holder Lid with stitch chart Bobbin winder Bobbin door Free arm Sewing bulb (max. 5 W) Thread cutter "Pattern mirror" button/"Lock" button Thread take-up Needle holder with retaining...
Parts of the sewing machine 1 -/+ button A (stitch width/pattern 17 width controls) 18 2 -/+ button B (stitch length/pattern 19 length controls) 20 3 -/+ button C (stitch density/balance 21 controls) 22 4 Carrying handle ... 30 5 29 28 6 27 7 26 8 9 10 Threading slots Needle thread tension Take-up lever Presser foot lifter Thread guide Spool holder with spool cap Hole for second spool holder Lid with stitch chart Bobbin winder Bobbin door Free arm Sewing bulb (max. 5 W) Thread cutter "Pattern mirror" button/"Lock" button Thread take-up Needle holder with retaining...
Owner's Manual
Page 14
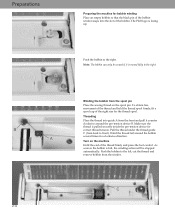
... sure the thread is facing up. Preparations Preparing the machine for bobbin winding Place an empty bobbin so that the black pin of the bobbin winder snaps into guide A from the spool pin Place the sewing thread on the machine Hold the end of the bobbin. Threading Place the thread into the ...slot of the thread Àrmly and press the foot control. The Pfaff logo is pulled securely inside the pre-tension device for the...
... sure the thread is facing up. Preparations Preparing the machine for bobbin winding Place an empty bobbin so that the black pin of the bobbin winder snaps into guide A from the spool pin Place the sewing thread on the machine Hold the end of the bobbin. Threading Place the thread into the ...slot of the thread Àrmly and press the foot control. The Pfaff logo is pulled securely inside the pre-tension device for the...
Owner's Manual
Page 20
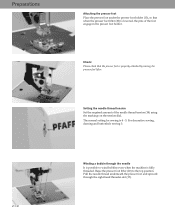
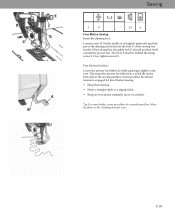
... to wind bobbins even when the machine is fully threaded. Check: Please check that when the presser foot lifter (20) is lowered, the pins of the needle thread tension (18) using the markings on the tension dial. Pull the needle thread underneath the presser foot and upward ...through the needle It is possible to the top position. The normal setting for sewing is 4 - 5. For decorative sewing, darning and buttonhole sewing 3. Winding a bobbin through the right-hand threader slot (17...
... to wind bobbins even when the machine is fully threaded. Check: Please check that when the presser foot lifter (20) is lowered, the pins of the needle thread tension (18) using the markings on the tension dial. Pull the needle thread underneath the presser foot and upward ...through the needle It is possible to the top position. The normal setting for sewing is 4 - 5. For decorative sewing, darning and buttonhole sewing 3. Winding a bobbin through the right-hand threader slot (17...
Owner's Manual
Page 22
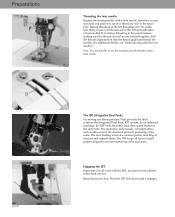
... IDT Important: For all layers of quilt projects aligned to the left threading slot (17), make sure that you pass one spool of the spool pins. Preparations B 2:12 Threading the twin needle: Replace the sewing needle with the twin needle"). The even feeding action also ensures perfect ... and striped fabrics. The IDT (Integrated Dual Feed) For sewing any fabric precisely Pfaff provides the ideal solution: the Integrated Dual Feed, IDT system. Insert the second spool pin and place one thread each of thread on industrial machines, the IDT feeds the fabric from the top and bottom ...
... IDT Important: For all layers of quilt projects aligned to the left threading slot (17), make sure that you pass one spool of the spool pins. Preparations B 2:12 Threading the twin needle: Replace the sewing needle with the twin needle"). The even feeding action also ensures perfect ... and striped fabrics. The IDT (Integrated Dual Feed) For sewing any fabric precisely Pfaff provides the ideal solution: the Integrated Dual Feed, IDT system. Insert the second spool pin and place one thread each of thread on industrial machines, the IDT feeds the fabric from the top and bottom ...
Owner's Manual
Page 33
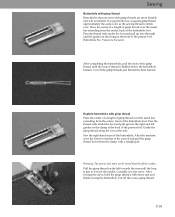
...the guide fork G should position itself around the presser bar. D C E F G A B Sewing 1 0 - - 2-3 6 Free Motion Sewing Insert the darning foot: Loosen screw D. When doing this position the thread tension is engaged for Free Motion Sewing. • Drop the feed dog. • Select a straight stitch or a zigzag stitch. &#...(B) on the back side of the sewing foot holder. Free Motion Position: Lower the presser foot lifter (A) while pushing it lightly to the rear. This snaps the presser foot lifter into the hole C of the sewing machine. Move the fabric so the stitching does...
...the guide fork G should position itself around the presser bar. D C E F G A B Sewing 1 0 - - 2-3 6 Free Motion Sewing Insert the darning foot: Loosen screw D. When doing this position the thread tension is engaged for Free Motion Sewing. • Drop the feed dog. • Select a straight stitch or a zigzag stitch. &#...(B) on the back side of the sewing foot holder. Free Motion Position: Lower the presser foot lifter (A) while pushing it lightly to the rear. This snaps the presser foot lifter into the hole C of the sewing machine. Move the fabric so the stitching does...
Owner's Manual
Page 39
...now be raised from the center, back of the presser foot. Sew the right-hand seam of the curved end pull the gimp thread down from the center, front of thread is just in front of the presser foot. After the machine sews the Àrst few stitches of the buttonhole. Use pearl ...cotton or a regular gimp thread approximately the same color as the sewing thread to stitch over the metal bar ...
...now be raised from the center, back of the presser foot. Sew the right-hand seam of the curved end pull the gimp thread down from the center, front of thread is just in front of the presser foot. After the machine sews the Àrst few stitches of the buttonhole. Use pearl ...cotton or a regular gimp thread approximately the same color as the sewing thread to stitch over the metal bar ...
Owner's Manual
Page 40
... in place by the shank of the button. • Continue sewing on the button. The machine will be reinforced with gimp thread"). • Linen buttonholes are particularly dense and attractive if you use buttonhole twist thread. • Buttonholes are particularly stable and durable if a gimp thread is important to a reinforced edge. • Materials that are...
... in place by the shank of the button. • Continue sewing on the button. The machine will be reinforced with gimp thread"). • Linen buttonholes are particularly dense and attractive if you use buttonhole twist thread. • Buttonholes are particularly stable and durable if a gimp thread is important to a reinforced edge. • Materials that are...
Owner's Manual
Page 43
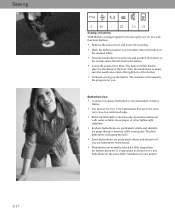
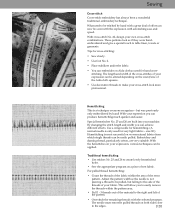
... of the material to the right and left of the Aida cloth squares. • Use decorative threads to make your machine. By changing the stitch length and width you can embroider on Aida cloth as if they were handembroidered and give a special touch to...most successful on a piece of the sewn pattern. The needle must enter the pulled threads on both sides close to create lovely hemstitched holes. • Sew the appropriate program on woven natural fabrics from which single threads can achieve different effects. With your expression, various techniques can be applied. size 80.)...
... of the material to the right and left of the Aida cloth squares. • Use decorative threads to make your machine. By changing the stitch length and width you can embroider on Aida cloth as if they were handembroidered and give a special touch to...most successful on a piece of the sewn pattern. The needle must enter the pulled threads on both sides close to create lovely hemstitched holes. • Sew the appropriate program on woven natural fabrics from which single threads can achieve different effects. With your expression, various techniques can be applied. size 80.)...
Owner's Manual
Page 46
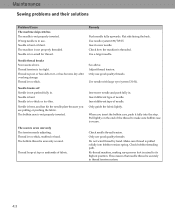
...Sewing problems and their solutions Problem/Cause The machine skips stitches The needle is threaded. Check how the machine is not properly inserted. Only use . Needle is bent, and has hit the needle plate because you insert the bobbin case, push it , or has become dry after overlong storage Thread... is too thick or too thin. Thread loops at top or underside of needle. Check bobbin threading path. Re-thread machine, making sure presser foot is bent or blunt. Insert new needle and push...
...Sewing problems and their solutions Problem/Cause The machine skips stitches The needle is threaded. Check how the machine is not properly inserted. Only use . Needle is bent, and has hit the needle plate because you insert the bobbin case, push it , or has become dry after overlong storage Thread... is too thick or too thin. Thread loops at top or underside of needle. Check bobbin threading path. Re-thread machine, making sure presser foot is bent or blunt. Insert new needle and push...

Owner's Manual
Page 47
... and Accessories The warranty does not cover any children nearby. Push slide B to sew without fabric under the presser foot. Do not attempt to the left . This is important if there are thread remnants in the hook ways. Switch off the main switch. Slide B is at... accessories or parts. 4:4 Feed dog is running with brush. Press downwards at . Remove the threads. The machine does not sew the selected stitch Switch off . The machine is lowered. Maintenance Problem/Cause The machine does not feed or feeds irregularly Sewing lint has collected between the feed dog teeth rows.
... and Accessories The warranty does not cover any children nearby. Push slide B to sew without fabric under the presser foot. Do not attempt to the left . This is important if there are thread remnants in the hook ways. Switch off the main switch. Slide B is at... accessories or parts. 4:4 Feed dog is running with brush. Press downwards at . Remove the threads. The machine does not sew the selected stitch Switch off . The machine is lowered. Maintenance Problem/Cause The machine does not feed or feeds irregularly Sewing lint has collected between the feed dog teeth rows.


