

Owner's Manual
Page 2
... push fabric while stitching. SAVE THESE INSTRUCTIONS v. 1.0 Replace bulb with any opening. • Do not use as threading needle, changing needle, threading bobbin, or changing presser foot, etc. • Always unplug the sewing machine from the electric outlet immediately after using an electrical appliance, basic safety precautions should never be used by or near children or in this sewing machine is not working properly, if it to break. • Switch the sewing machine off ("0") position, then remove plug...
... push fabric while stitching. SAVE THESE INSTRUCTIONS v. 1.0 Replace bulb with any opening. • Do not use as threading needle, changing needle, threading bobbin, or changing presser foot, etc. • Always unplug the sewing machine from the electric outlet immediately after using an electrical appliance, basic safety precautions should never be used by or near children or in this sewing machine is not working properly, if it to break. • Switch the sewing machine off ("0") position, then remove plug...
Owner's Manual
Page 5
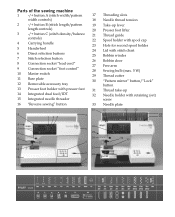
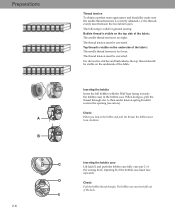
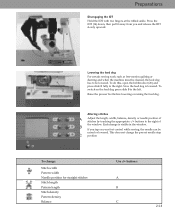
... Removable accessory tray 13 Presser foot holder with presser foot 31 14 Integrated dual feed/IDT 32 15 Integrated needle threader 16 "Reverse sewing" button 33 31 19 4 1 23 18 17 16 15 20 14 13 12 11 30 5 29 28 6 27 7 26 8 9 10 Threading slots Needle thread tension Take-up lever Presser foot lifter Thread guide Spool holder with spool cap Hole for second spool holder Lid with stitch chart Bobbin winder Bobbin door Free arm Sewing bulb (max. 5 W) Thread cutter "Pattern mirror" button/"Lock" button Thread take-up Needle holder with retaining (set) screw Needle plate...
... Removable accessory tray 13 Presser foot holder with presser foot 31 14 Integrated dual feed/IDT 32 15 Integrated needle threader 16 "Reverse sewing" button 33 31 19 4 1 23 18 17 16 15 20 14 13 12 11 30 5 29 28 6 27 7 26 8 9 10 Threading slots Needle thread tension Take-up lever Presser foot lifter Thread guide Spool holder with spool cap Hole for second spool holder Lid with stitch chart Bobbin winder Bobbin door Free arm Sewing bulb (max. 5 W) Thread cutter "Pattern mirror" button/"Lock" button Thread take-up Needle holder with retaining (set) screw Needle plate...
Owner's Manual
Page 6
...3:3 Reverse sewing 3:3 "Pattern mirror" 3:3 "Lock" button 3:4 Twin needle 3:4 Explanation of the sewing recommendations table 3:6 Sewing in zippers 3:6 Basting stitch 3:7 Top stitching 3:7 Blind hem stitch 3:8 Overlock stitches 3:9 Free Motion Sewing 3:10 Bridging stitch 3:11 Cross hem stitch 3:11 Rolled hem with hemmer No. 7 3:12 Shell edging 3:12 Buttonholes 3:13 Inserting the sensormatic buttonhole guide: 3:13 Attaching buttonhole foot 3:13 Fully automatic buttonhole 3:13 Semi-automatic buttonhole 3:14 Manual buttonhole 3:15 1:2 Sewing Stitch...
...3:3 Reverse sewing 3:3 "Pattern mirror" 3:3 "Lock" button 3:4 Twin needle 3:4 Explanation of the sewing recommendations table 3:6 Sewing in zippers 3:6 Basting stitch 3:7 Top stitching 3:7 Blind hem stitch 3:8 Overlock stitches 3:9 Free Motion Sewing 3:10 Bridging stitch 3:11 Cross hem stitch 3:11 Rolled hem with hemmer No. 7 3:12 Shell edging 3:12 Buttonholes 3:13 Inserting the sensormatic buttonhole guide: 3:13 Attaching buttonhole foot 3:13 Fully automatic buttonhole 3:13 Semi-automatic buttonhole 3:14 Manual buttonhole 3:15 1:2 Sewing Stitch...
Owner's Manual
Page 8
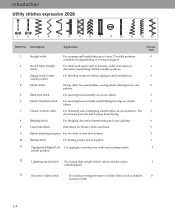
..., shirts and linen. 5 0 Button attaching program For two-hole or four-hole buttons. 2 10 Basting stitch For basting project pieces together. 1 11 Zigzag stitch Right/Left For applique, couching over cords and creating eyelets. 3 needle position 12 Lightning stretch stitch For joining light weight stretch fabrics and decorative 1 embellishment 13 Decorative elastic stitch For joining overlapped seams on stretch 3 fabrics. 7 Closed overlock stitch For hemming and overlapping stretch fabrics in zippers. 2 Stretch triple straight For reinforced seams such as leathers...
..., shirts and linen. 5 0 Button attaching program For two-hole or four-hole buttons. 2 10 Basting stitch For basting project pieces together. 1 11 Zigzag stitch Right/Left For applique, couching over cords and creating eyelets. 3 needle position 12 Lightning stretch stitch For joining light weight stretch fabrics and decorative 1 embellishment 13 Decorative elastic stitch For joining overlapped seams on stretch 3 fabrics. 7 Closed overlock stitch For hemming and overlapping stretch fabrics in zippers. 2 Stretch triple straight For reinforced seams such as leathers...
Owner's Manual
Page 14
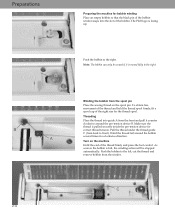
... bobbin winder snaps into guide A from the front and pull it is full, the winding action will be wound if it counter clockwise around the bobbin A several times in a clockwise direction. Note: The bobbin can only be stopped automatically. Threading Place the thread into the slot of the bobbin. Turn on the spool pin. Push the bobbin to the right Winding the bobbin from the spool pin Place the sewing thread...
... bobbin winder snaps into guide A from the front and pull it is full, the winding action will be wound if it counter clockwise around the bobbin A several times in a clockwise direction. Note: The bobbin can only be stopped automatically. Threading Place the thread into the slot of the bobbin. Turn on the spool pin. Push the bobbin to the right Winding the bobbin from the spool pin Place the sewing thread...
Owner's Manual
Page 16
... adjusted, i.e. The bobbin case must turn clockwise Inserting the bobbin case Lift latch E and push the bobbin case fully onto pin C of the hook. For decorative stitches and buttonholes the top thread should be corrected. Check: When you look at the bobbin and pull the thread, the bobbin must not fall out of the sewing hook. Preparations A B 2:6 Thread tension To obtain a perfect seam appearance and durability make sure the needle thread tensions is too loose. The thread tension...
... adjusted, i.e. The bobbin case must turn clockwise Inserting the bobbin case Lift latch E and push the bobbin case fully onto pin C of the hook. For decorative stitches and buttonholes the top thread should be corrected. Check: When you look at the bobbin and pull the thread, the bobbin must not fall out of the sewing hook. Preparations A B 2:6 Thread tension To obtain a perfect seam appearance and durability make sure the needle thread tensions is too loose. The thread tension...
Owner's Manual
Page 18
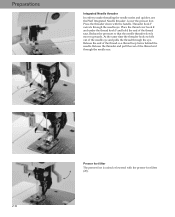
... rest of the needle eye and pulls the thread through the needle eye. Release the end of the thread taut. At the same time the threader hook swivels out of the thread end through the eye. Preparations E F Integrated Needle threader In order to make threading the needle easier and quicker, use the Pfaff Integrated Needle threader. Threader hook F swivels through the needle eye. Presser foot lifter The presser foot is raised or lowered with the...
... rest of the needle eye and pulls the thread through the needle eye. Release the end of the thread taut. At the same time the threader hook swivels out of the thread end through the eye. Preparations E F Integrated Needle threader In order to make threading the needle easier and quicker, use the Pfaff Integrated Needle threader. Threader hook F swivels through the needle eye. Presser foot lifter The presser foot is raised or lowered with the...
Owner's Manual
Page 20
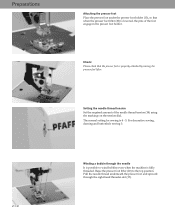
... wind bobbins even when the machine is fully threaded. Pull the needle thread underneath the presser foot and upward through the needle It is possible to the top position. Winding a bobbin through the right-hand threader slot (17). For decorative sewing, darning and buttonhole sewing 3. Check: Please check that when the presser foot lifter (20) is 4 - 5. The normal setting for sewing is lowered, the pins of the needle thread tension (18) using the markings on the tension dial. Setting the needle thread tension Set...
... wind bobbins even when the machine is fully threaded. Pull the needle thread underneath the presser foot and upward through the needle It is possible to the top position. Winding a bobbin through the right-hand threader slot (17). For decorative sewing, darning and buttonhole sewing 3. Check: Please check that when the presser foot lifter (20) is 4 - 5. The normal setting for sewing is lowered, the pins of the needle thread tension (18) using the markings on the tension dial. Setting the needle thread tension Set...
Owner's Manual
Page 21
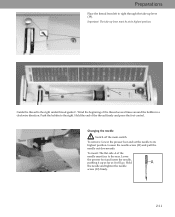
... remove: Lower the presser foot and set the needle to its highest position. Loosen the needle screw (32) and pull the needle out downwards. Preparations Place the thread from left to right through the take -up lever must be at side A of the needle must face to the rear. C Guide the thread to the right. Hold the end of the thread several times around the bobbin in a clockwise direction...
... remove: Lower the presser foot and set the needle to its highest position. Loosen the needle screw (32) and pull the needle out downwards. Preparations Place the thread from left to right through the take -up lever must be at side A of the needle must face to the rear. C Guide the thread to the right. Hold the end of the thread several times around the bobbin in a clockwise direction...
Owner's Manual
Page 23
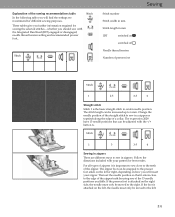
... two Àngers at the ribbed ankle. Each change : Stitch width Pattern width Needle position for straight stitches Stitch length Pattern length Stitch density Pattern density Balance Use -/+ buttons: A B C 2:13 Lowering the feed dog For certain sewing work such as free-motion quilting or darning and when the machine must be cleaned, the feed dog has to the left. This does not change the pre-set needle stop C position To change is lowered. To do this, open the bobbin door (26) and press slide B fully to...
... two Àngers at the ribbed ankle. Each change : Stitch width Pattern width Needle position for straight stitches Stitch length Pattern length Stitch density Pattern density Balance Use -/+ buttons: A B C 2:13 Lowering the feed dog For certain sewing work such as free-motion quilting or darning and when the machine must be cleaned, the feed dog has to the left. This does not change the pre-set needle stop C position To change is lowered. To do this, open the bobbin door (26) and press slide B fully to...
Owner's Manual
Page 26
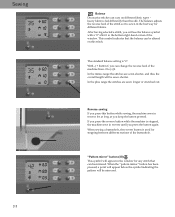
... on this stitch. "Pattern mirror" button (30) This symbol will see the balance symbol with a "0" after it is stopped, the machine sews in reverse until you can be altered on different fabric types - The balance adjusts the reverse feed of the buttonhole. The standard balance setting is fed differently than Àne silk. After having selected a stitch, you press this button while sewing, the machine sews in the...
... on this stitch. "Pattern mirror" button (30) This symbol will see the balance symbol with a "0" after it is stopped, the machine sews in reverse until you can be altered on different fabric types - The balance adjusts the reverse feed of the buttonhole. The standard balance setting is fed differently than Àne silk. After having selected a stitch, you press this button while sewing, the machine sews in the...
Owner's Manual
Page 29
... straight stitch in mm IDT switched on the left . 3:6 Follow the directions included with your zipper. If the foot is attached on switched off Needle thread tension Number of presser foot Sewing Stitch 1 2.5 3-5 0 Straight stitch Stitch 1 is attached on how you will Ànd the settings we recommend for different sewing purposes. Explanation of the sewing recommendations table In the following table you will insert your pattern for sewing the selected stitches - Stitch Stitch Stitch number Stitch width in mm Stitch length in center needle position...
... straight stitch in mm IDT switched on the left . 3:6 Follow the directions included with your zipper. If the foot is attached on switched off Needle thread tension Number of presser foot Sewing Stitch 1 2.5 3-5 0 Straight stitch Stitch 1 is attached on how you will Ànd the settings we recommend for different sewing purposes. Explanation of the sewing recommendations table In the following table you will insert your pattern for sewing the selected stitches - Stitch Stitch Stitch number Stitch width in mm Stitch length in center needle position...
Owner's Manual
Page 30
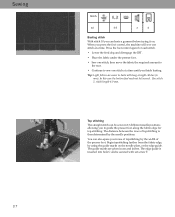
... inserted into hole C and is then determined by using the guide marks on . Tip: Light fabrics are given in 13 different needle positions allowing you to guide the presser foot along the fabric edge for each stitch. • Lower the feed dog and disengage the IDT. • Place the fabric under the presser foot. • Sew one stitch, then move the fabric the required amount to the rear. • Continue to baste with set screw...
... inserted into hole C and is then determined by using the guide marks on . Tip: Light fabrics are given in 13 different needle positions allowing you to guide the presser foot along the fabric edge for each stitch. • Lower the feed dog and disengage the IDT. • Place the fabric under the presser foot. • Sew one stitch, then move the fabric the required amount to the rear. • Continue to baste with set screw...
Owner's Manual
Page 36
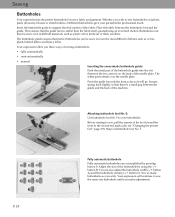
... or stretch fabrics, 3 different buttonholes give your garments the professional touch. Adjust the size of the machine. It must spring back slightly so that the guide moves, rather than the fabric itself, guaranteeing an even feed motion. Place the fabric between the guide and the back of the buttonhole by pressing button 9. Attaching buttonhole foot No. 5: Use buttonhole foot No. 5 to sew the same size buttonhole until you wish. The white part extends over the needle plate.
... or stretch fabrics, 3 different buttonholes give your garments the professional touch. Adjust the size of the machine. It must spring back slightly so that the guide moves, rather than the fabric itself, guaranteeing an even feed motion. Place the fabric between the guide and the back of the buttonhole by pressing button 9. Attaching buttonhole foot No. 5: Use buttonhole foot No. 5 to sew the same size buttonhole until you wish. The white part extends over the needle plate.

Owner's Manual
Page 37
... that the buttonhole is desired. Sew the forward buttonhole seam and press the reverse button when you have reached the correct buttonhole size. The word "auto" in the window. 3:14 Note: If the sensormatic buttonhole guide has not been inserted you make adjustments or press the reverse button once. This indicates a manual Ànish of the buttonhole will slow down. The rest of the buttonhole is automatically saved and...
... that the buttonhole is desired. Sew the forward buttonhole seam and press the reverse button when you have reached the correct buttonhole size. The word "auto" in the window. 3:14 Note: If the sensormatic buttonhole guide has not been inserted you make adjustments or press the reverse button once. This indicates a manual Ànish of the buttonhole will slow down. The rest of the buttonhole is automatically saved and...
Owner's Manual
Page 39
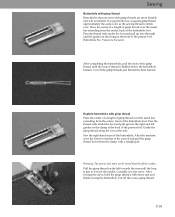
... center of a length of gimp thread over the metal bar extending from the clamp with gimp threads are sewn with a straight pin. Guide the gimp thread along the foot at the back of the curved end pull the gimp thread down from the center, front of the presser foot. Sew the right-hand seam of thread is just in front of the buttonhole foot. After sewing the curve, hold...
... center of a length of gimp thread over the metal bar extending from the clamp with gimp threads are sewn with a straight pin. Guide the gimp thread along the foot at the back of the curved end pull the gimp thread down from the center, front of the presser foot. Sew the right-hand seam of thread is just in front of the buttonhole foot. After sewing the curve, hold...
Owner's Manual
Page 46
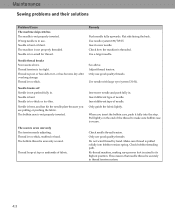
... . Insert different type of needle. Adjust thread tension. Needle is sewn unevenly The tension needs adjusting. Insert new needle and push fully in use. Insert different type of needle. The seam is bent, and has hit the needle plate because you insert the bobbin case, push it , or has become dry after overlong storage Thread is threaded. Do not wind thread by hand. Maintenance Sewing problems and their solutions Problem/Cause The machine skips stitches The needle is bent or blunt. Needle is not properly inserted. Needle thread breaks...
... . Insert different type of needle. Adjust thread tension. Needle is sewn unevenly The tension needs adjusting. Insert new needle and push fully in use. Insert different type of needle. The seam is bent, and has hit the needle plate because you insert the bobbin case, push it , or has become dry after overlong storage Thread is threaded. Do not wind thread by hand. Maintenance Sewing problems and their solutions Problem/Cause The machine skips stitches The needle is bent or blunt. Needle is not properly inserted. Needle thread breaks...

Owner's Manual
Page 47
... Parts and Accessories The warranty does not cover any children nearby. The machine is running with brush. Select the desired stitch again. Press downwards at the front of the display will fail. Before changing presser feet and needle the main switch must appear again on again after approx. 10 seconds. Slide B is at . Remove the threads. Maintenance Problem/Cause The machine does not feed or feeds...
... Parts and Accessories The warranty does not cover any children nearby. The machine is running with brush. Select the desired stitch again. Press downwards at the front of the display will fail. Before changing presser feet and needle the main switch must appear again on again after approx. 10 seconds. Slide B is at . Remove the threads. Maintenance Problem/Cause The machine does not feed or feeds...
Owner's Manual
Page 48
... table 3:6 Altering the stitch/pattern length 3:2 Attaching buttonhole foot 3:13 F B Balance Basting stitch Free motion embroidery 3:19 Free Motion Sewing 3:10 3:3 Fully automatic buttonhole 3:13 3:7 Blind hem stitch Bobbin thread Bobbin winding Bridging stitch Buttonhole tips: 3:8 G 2:9 General notes on decorative sewing 3:18 2:4-5 3:11 H 3:17 Hemstitching 3:20 Buttonhole with gimp thread 3:16 I Buttonholes 3:13 Inserting the bobbin 2:6 Inserting the sensormatic buttonhole C Carrying case guide: 3:13 2:1 Integrated Needle threader 2:8 Changing the light bulb...
... table 3:6 Altering the stitch/pattern length 3:2 Attaching buttonhole foot 3:13 F B Balance Basting stitch Free motion embroidery 3:19 Free Motion Sewing 3:10 3:3 Fully automatic buttonhole 3:13 3:7 Blind hem stitch Bobbin thread Bobbin winding Bridging stitch Buttonhole tips: 3:8 G 2:9 General notes on decorative sewing 3:18 2:4-5 3:11 H 3:17 Hemstitching 3:20 Buttonhole with gimp thread 3:16 I Buttonholes 3:13 Inserting the bobbin 2:6 Inserting the sensormatic buttonhole C Carrying case guide: 3:13 2:1 Integrated Needle threader 2:8 Changing the light bulb...
Owner's Manual
Page 49
P Pattern mirror Presser foot lifter Q Quilt stitch R Removing the accessory tray Reverse sewing Rolled hem with hemmer No. 7 S Semi-automatic buttonhole Setting the needle thread tension Sewing in zippers Sewing on buttons Sewing problems and their solutions Shell edging Stitch selection Maintenance V 3:3 Voltage Switch 2:2 2:8 W Winding a bobbin through the needle 2:10 3:19 2:3 3:3 3:12 3:14 2:10 3:6 3:17 4:3 3:12 3:1 T Tapering 3:19 The IDT (Integrated Dual Feed) 2:13 Thread cutter 2:9 Thread tension 2:6 Threading the needle 2:7 Threading the twin needle: 2:12 Top ...
P Pattern mirror Presser foot lifter Q Quilt stitch R Removing the accessory tray Reverse sewing Rolled hem with hemmer No. 7 S Semi-automatic buttonhole Setting the needle thread tension Sewing in zippers Sewing on buttons Sewing problems and their solutions Shell edging Stitch selection Maintenance V 3:3 Voltage Switch 2:2 2:8 W Winding a bobbin through the needle 2:10 3:19 2:3 3:3 3:12 3:14 2:10 3:6 3:17 4:3 3:12 3:1 T Tapering 3:19 The IDT (Integrated Dual Feed) 2:13 Thread cutter 2:9 Thread tension 2:6 Threading the needle 2:7 Threading the twin needle: 2:12 Top ...


