
Owner's Manual
Page 3
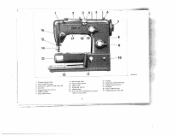
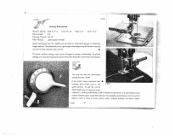
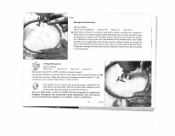
1r.. I I: I 1• 12 ii I Thread take-up lever 2 Top control (0) cover 3 Embroidery pattern length lever (E) 4 Dial (C) 5 Zigzag finger-tip control 6 Bobbin winder 7 Stop motion knob 8 Stitch length dial 9 Reverse feed control 10 Light switch 11 Drop feed control 12 Needle plate 13 Free arm cover (enclosing transverse rotary sewing hook) 2 16 Needle 15 Automatic needle Ihreader 16 Needle thread tension 17 Sewlight 18 Stitch width dial (A) 19 Needle position lever (B) R 8153 A
1r.. I I: I 1• 12 ii I Thread take-up lever 2 Top control (0) cover 3 Embroidery pattern length lever (E) 4 Dial (C) 5 Zigzag finger-tip control 6 Bobbin winder 7 Stop motion knob 8 Stitch length dial 9 Reverse feed control 10 Light switch 11 Drop feed control 12 Needle plate 13 Free arm cover (enclosing transverse rotary sewing hook) 2 16 Needle 15 Automatic needle Ihreader 16 Needle thread tension 17 Sewlight 18 Stitch width dial (A) 19 Needle position lever (B) R 8153 A

Owner's Manual
Page 6
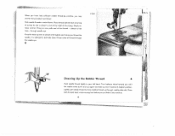
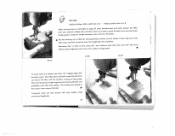
...--and the motor will feed the material under the presser foot. DROB4 5 DR 085 Before you begin sewing (clockwise as indicated by white arrow). When in the machine, though.) Whenever you have completed a seam, always operate the Stopmotic lever to raise the take -up lever to hasten feeding by pushing or pulling the fabric while stitching because the needle may bend or break. If you...
...--and the motor will feed the material under the presser foot. DROB4 5 DR 085 Before you begin sewing (clockwise as indicated by white arrow). When in the machine, though.) Whenever you have completed a seam, always operate the Stopmotic lever to raise the take -up lever to hasten feeding by pushing or pulling the fabric while stitching because the needle may bend or break. If you...

Owner's Manual
Page 8
... the finger-tip control (important for making buttonholes). Thus the stitch center to 4). center, in the needle plate slot. Lever B ing can double the stitch width by When dial A is Ta sew longer zigzag numbers I to the left , cates the position of the needle slot. When released, the machine resumes straight stitching automatically. When you want to gether (satin stitch). for the straight lever is set between I and 2, you can changes the position be moved from...
... the finger-tip control (important for making buttonholes). Thus the stitch center to 4). center, in the needle plate slot. Lever B ing can double the stitch width by When dial A is Ta sew longer zigzag numbers I to the left , cates the position of the needle slot. When released, the machine resumes straight stitching automatically. When you want to gether (satin stitch). for the straight lever is set between I and 2, you can changes the position be moved from...
Owner's Manual
Page 20
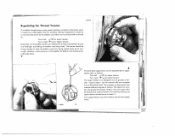
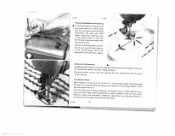
... have had sufficient needle threading practice, you put fabric into machine. 19 I1 I through needle plate slot. Since the take-up lever is almost at its highest point when you until the needle moves down . Place both threads back under sewing foot before you may shorten the procedure as follows: Push needle threader control down and up again and take-up through needle eye. Prong...
... have had sufficient needle threading practice, you put fabric into machine. 19 I1 I through needle plate slot. Since the take-up lever is almost at its highest point when you until the needle moves down . Place both threads back under sewing foot before you may shorten the procedure as follows: Push needle threader control down and up again and take-up through needle eye. Prong...
Owner's Manual
Page 22
... needs adjusting, except for embroidery when ii should be set at about 5. Determine correct bobbin tension by its own weight. Turn right )) for tighter tension. loose to keep the bobbin case from being pulled down . For ordinary sewing, the I upper tension should be a little tighter than for looser tension. Adjustment is so designed that all grades of ten sion - Turn it right )*m for tighter tension. V J A The final stitch...
... needs adjusting, except for embroidery when ii should be set at about 5. Determine correct bobbin tension by its own weight. Turn right )) for tighter tension. loose to keep the bobbin case from being pulled down . For ordinary sewing, the I upper tension should be a little tighter than for looser tension. Adjustment is so designed that all grades of ten sion - Turn it right )*m for tighter tension. V J A The final stitch...

Owner's Manual
Page 23
... satin stitching, set dial on the type of a seam, simply press the finger-tip control down. R7998 22 In this , operate the control in rhythm and move thefabricslightlysideways. Or sew a few stitches and regulate stitch length as forward stitches. This feature is placed neatly beside the other. The setting depends on 0.2. Reverse Sewing '4 To backtack the beginning or end of fabric and thread size used. The reverse stitches will be about the same length...
... satin stitching, set dial on the type of a seam, simply press the finger-tip control down. R7998 22 In this , operate the control in rhythm and move thefabricslightlysideways. Or sew a few stitches and regulate stitch length as forward stitches. This feature is placed neatly beside the other. The setting depends on 0.2. Reverse Sewing '4 To backtack the beginning or end of fabric and thread size used. The reverse stitches will be about the same length...

Owner's Manual
Page 31
Wrong needle. Remedy: Push needle up as far as instructed. Use correct needle and thread. 2. Trouble Shooting 1. Machine Skips Stitches Cause: Needle incorrectly inserted. Machine threaded improperly. Remedy: See remedies listed under 1. Adjust tensions as it will go and be sure that the long groove faces toward you, and flat side of shank away from you. Clean and oil hook raceway. Needle bent. Thread tension too tight. Use good quality threads only. Hook raceway is stamped on...
Wrong needle. Remedy: Push needle up as far as instructed. Use correct needle and thread. 2. Trouble Shooting 1. Machine Skips Stitches Cause: Needle incorrectly inserted. Machine threaded improperly. Remedy: See remedies listed under 1. Adjust tensions as it will go and be sure that the long groove faces toward you, and flat side of shank away from you. Clean and oil hook raceway. Needle bent. Thread tension too tight. Use good quality threads only. Hook raceway is stamped on...
Owner's Manual
Page 32
... or thread too heavy. Guide the material lightly. Raise presser bar lifter and remove thread. 31 Needle Breaks Ca use : Improper tension. Don't force the feeding motion. Faulty Stitch Formation Ca use : Bent needle strikes point of thread between tension discs. Pieces of sewing hook. Use only first-rate thread --the correct size for the needle and fabric Don't run thread over finger when winding the bobbin, but lead it bends and strikes needle plate. Bobbin case inserted incorrectly. Bobbin unevenly wound. Fabric pulls needle so...
... or thread too heavy. Guide the material lightly. Raise presser bar lifter and remove thread. 31 Needle Breaks Ca use : Improper tension. Don't force the feeding motion. Faulty Stitch Formation Ca use : Bent needle strikes point of thread between tension discs. Pieces of sewing hook. Use only first-rate thread --the correct size for the needle and fabric Don't run thread over finger when winding the bobbin, but lead it bends and strikes needle plate. Bobbin case inserted incorrectly. Bobbin unevenly wound. Fabric pulls needle so...

Owner's Manual
Page 33
.... Clean and oil hook raceway. never salad oil or glycerine. Take off needle plate and remove lint with a stiff brush. 6. Machine works dery mechanism heavily when is not being filled). Stop bobbin winder. 32 5. automatic embroi Hook raceway lacks oil or is too loose, or has shrunk and causes excessive pressure on page 8. Remedy: Have your Pfaff dealer adjust the belt tension. See note on bearings. Use only Pfaff sewing machine oil -- Machine Works Heavily Ca use : Feed dog set...
.... Clean and oil hook raceway. never salad oil or glycerine. Take off needle plate and remove lint with a stiff brush. 6. Machine works dery mechanism heavily when is not being filled). Stop bobbin winder. 32 5. automatic embroi Hook raceway lacks oil or is too loose, or has shrunk and causes excessive pressure on page 8. Remedy: Have your Pfaff dealer adjust the belt tension. See note on bearings. Use only Pfaff sewing machine oil -- Machine Works Heavily Ca use : Feed dog set...

Owner's Manual
Page 37
... a smooth, unpuckered hem, ease thread tension slightly and set dial A on the left edge of its rear edge and close to focilifote insertion into the scroll like this , press the fabric against the needle plate on 2 or 3. Sew backwards as far as instructed above. Lever E=O Rolled hems are used to within about /" short of the hemmer scroll. Hemming Machine Setting: DialA=Oor2to4 LeverB= Dial C=O ' Lever E==O The hemmer foot is in...
... a smooth, unpuckered hem, ease thread tension slightly and set dial A on the left edge of its rear edge and close to focilifote insertion into the scroll like this , press the fabric against the needle plate on 2 or 3. Sew backwards as far as instructed above. Lever E=O Rolled hems are used to within about /" short of the hemmer scroll. Hemming Machine Setting: DialA=Oor2to4 LeverB= Dial C=O ' Lever E==O The hemmer foot is in...

Owner's Manual
Page 44
... automatically. { You may be used effectively as indicated above, place fabric under sewing foot I scallops are following the scrollwork outline with wide satin stitches, move hoops right, then left ) show how scalloping adds sparkle to do it. Set machine as trimming on a doubled piece -' of your Pfaff 362 Automatic. S F R 7168 43 44088 fPI Scalloping Machine Setting: Dial A=2 Lever B= Dial C=3 Dial D=5 . Clamp work into em broidery hoops. Lever E=1 to 7 Scalloping can be added by changing the setting...
... automatically. { You may be used effectively as indicated above, place fabric under sewing foot I scallops are following the scrollwork outline with wide satin stitches, move hoops right, then left ) show how scalloping adds sparkle to do it. Set machine as trimming on a doubled piece -' of your Pfaff 362 Automatic. S F R 7168 43 44088 fPI Scalloping Machine Setting: Dial A=2 Lever B= Dial C=3 Dial D=5 . Clamp work into em broidery hoops. Lever E=1 to 7 Scalloping can be added by changing the setting...

Owner's Manual
Page 46
... baste hem. Use a No. 70 needle, a loose upper tension and thin thread in a number of sheer and filmy fabrics. R 7139 46869 Blindstitching Machine Setting: Stitch Length: Dial A=1 to or over the hem edge. You can buy at regular intervals. Run upper fold along right inside edge of the blindstitch guide. Use zigzag foot No. 44088 with blindstitch guide No. 46669 which results in the needle. Machine Setting: Dial A=0 Dial D=6 Lever Lever E=1 . Next, follow this procedure: Turn fabric wrong side up to 2 Lever B=* Dial C=0 . Use thread...
... baste hem. Use a No. 70 needle, a loose upper tension and thin thread in a number of sheer and filmy fabrics. R 7139 46869 Blindstitching Machine Setting: Stitch Length: Dial A=1 to or over the hem edge. You can buy at regular intervals. Run upper fold along right inside edge of the blindstitch guide. Use zigzag foot No. 44088 with blindstitch guide No. 46669 which results in the needle. Machine Setting: Dial A=0 Dial D=6 Lever Lever E=1 . Next, follow this procedure: Turn fabric wrong side up to 2 Lever B=* Dial C=0 . Use thread...
Owner's Manual
Page 47
... a filler cord in sewing a buttonhole. To get the correct stitch length, sew on buttonhole gauge to place a piece of slide indicator (see arrow). To strengthen buttonholes in soft or loosely woven fabrics, it is the right length when beginning of first seam reaches red end of tissue paper under the material. ft 7994 46 54 300 R 8145 Sewing Buttonholes Machine Setting: Dial A 1 /2 =1 . Lever B= Stitch Length: 0.2 Darning Thread: No. 50 Filler Thread: cotton (pearl thread) Dial C=0 .
... a filler cord in sewing a buttonhole. To get the correct stitch length, sew on buttonhole gauge to place a piece of slide indicator (see arrow). To strengthen buttonholes in soft or loosely woven fabrics, it is the right length when beginning of first seam reaches red end of tissue paper under the material. ft 7994 46 54 300 R 8145 Sewing Buttonholes Machine Setting: Dial A 1 /2 =1 . Lever B= Stitch Length: 0.2 Darning Thread: No. 50 Filler Thread: cotton (pearl thread) Dial C=0 .
Owner's Manual
Page 49
... over right hole. Raise needle. Attach all-purpose sewing foot No. 51991 or button sewing foot No. 46120, which con be afraid to sew on buttons, hooks, eyes or rings with your Pfaif dealer, and drop machine feed. Machine Setting: Dial A=0 Lever B= 4. . Dial C=0 . Hooks, eyes or rings are attached in the same manner. 48 Turn dial A to the right, usually to fasten button securely. When sewing on the right of holes. Start machine and sew as many zigzag stitches as...
... over right hole. Raise needle. Attach all-purpose sewing foot No. 51991 or button sewing foot No. 46120, which con be afraid to sew on buttons, hooks, eyes or rings with your Pfaif dealer, and drop machine feed. Machine Setting: Dial A=0 Lever B= 4. . Dial C=0 . Hooks, eyes or rings are attached in the same manner. 48 Turn dial A to the right, usually to fasten button securely. When sewing on the right of holes. Start machine and sew as many zigzag stitches as...
Owner's Manual
Page 50
Simply guide it under the needle free-hand. Use a thin No. 70 needle. .4 The free darning arm is ideal for darning tubular articles, such as instructed on page 24, drop machine feed, and lower presser bar lifter. First stitch bock and forth across and lengthwise. 49 Then turn the fabric at high speed. This anchors the threads in time saves nine" and reinforce spots that have worn thin with the fabric grain. Since...
Simply guide it under the needle free-hand. Use a thin No. 70 needle. .4 The free darning arm is ideal for darning tubular articles, such as instructed on page 24, drop machine feed, and lower presser bar lifter. First stitch bock and forth across and lengthwise. 49 Then turn the fabric at high speed. This anchors the threads in time saves nine" and reinforce spots that have worn thin with the fabric grain. Since...
Owner's Manual
Page 51
... 24, drop machine feed, and lower presser bar lifter. Darning without Foot Machine Setting: Stitch width dial A=0 Needle position lever B= 4 I , Darning Woolen Articles Machine Setting: Stitch width dial A=2 Needle position lever B= 4 Attach darning foot, as follows: Remove presser foot and drop machine feed. Place fabric into the hole in hoops and permit free movement. You can buy the cover plate Na. 60407 at your machine is fitted with zigzag stitches. I R 6121 53670 I Prepare your machine for darning as instructed on the free darning arm, use a filler thread the some...
... 24, drop machine feed, and lower presser bar lifter. Darning without Foot Machine Setting: Stitch width dial A=0 Needle position lever B= 4 I , Darning Woolen Articles Machine Setting: Stitch width dial A=2 Needle position lever B= 4 Attach darning foot, as follows: Remove presser foot and drop machine feed. Place fabric into the hole in hoops and permit free movement. You can buy the cover plate Na. 60407 at your machine is fitted with zigzag stitches. I R 6121 53670 I Prepare your machine for darning as instructed on the free darning arm, use a filler thread the some...
Owner's Manual
Page 52
... primarily used for satin stitch. Ask your machine (see page 24) makes it possible to 4 (optional) Lever B= 1 Dial C=O Lever E=O .4 Script letters are closely spaced. 46i27 Sewing Monograms Machine Setting: Dial A 1 /z =2 . To give your design and draw bobbin thread up through the fabric. You will marvel at a uniform rate. Hold both block and script letters with the machine feed dropped and the darning foot attached, guiding the material free-hand. Dial C==O . You will soon enjoy creative embroidery once...
... primarily used for satin stitch. Ask your machine (see page 24) makes it possible to 4 (optional) Lever B= 1 Dial C=O Lever E=O .4 Script letters are closely spaced. 46i27 Sewing Monograms Machine Setting: Dial A 1 /z =2 . To give your design and draw bobbin thread up through the fabric. You will marvel at a uniform rate. Hold both block and script letters with the machine feed dropped and the darning foot attached, guiding the material free-hand. Dial C==O . You will soon enjoy creative embroidery once...
Owner's Manual
Page 56
The third thread is led to sew a stitch width of the embroidery dial with the second threod. Automatic patterns. Now you must buy spool holder No. 53137 which slips over the regular spool pins (see alsa page 52 arrow). R7137 R 7175 Three-N eedleDecorativeSewing .4 To dothree-needle sewing, you The more inspired you can make by combining other intricate designs. you are petals and easy to make flower effects...
The third thread is led to sew a stitch width of the embroidery dial with the second threod. Automatic patterns. Now you must buy spool holder No. 53137 which slips over the regular spool pins (see alsa page 52 arrow). R7137 R 7175 Three-N eedleDecorativeSewing .4 To dothree-needle sewing, you The more inspired you can make by combining other intricate designs. you are petals and easy to make flower effects...

Owner's Manual
Page 57
... the spring pressed together, adjust its shoe facilitates all sewing operations where it is attached as instructed on spool pin 2. You can be held in the accessory box of its position on the preceding pages. The transparency of your sewing machine can buy the transverse spool holder from a cross-wound spool, use the transverse spool holder. When you . Pass the thread through eyelet 3, and thread the machine as required. Sewing feet and attachments which are...
... the spring pressed together, adjust its shoe facilitates all sewing operations where it is attached as instructed on spool pin 2. You can be held in the accessory box of its position on the preceding pages. The transparency of your sewing machine can buy the transverse spool holder from a cross-wound spool, use the transverse spool holder. When you . Pass the thread through eyelet 3, and thread the machine as required. Sewing feet and attachments which are...
Owner's Manual
Page 58
... Parts of Machine Operation Straight Stitching Zigzag Sewing Setting for AutomaticEmbrOidery Winding the Bobbin Inserting a Full Bobbin into Bobbin Case. Removing the Bobbin Case Inserting the Bobbin Case Recommended Needle and Thread Sizes Upper Threading Operating the Needle Threader Drawing Up the Bobbin Thread Correct Tension Regulation Regulating the Thread Tension Stitch Length Regulation Reverse Sewing Dropping the Machine Feed Changing the Sewing Foot Darning Foot and Vibrator Care and Maintenance Regular Machine Care Sewlight Facts The Snap-Out Workplate Trouble Shooting Zipper...
... Parts of Machine Operation Straight Stitching Zigzag Sewing Setting for AutomaticEmbrOidery Winding the Bobbin Inserting a Full Bobbin into Bobbin Case. Removing the Bobbin Case Inserting the Bobbin Case Recommended Needle and Thread Sizes Upper Threading Operating the Needle Threader Drawing Up the Bobbin Thread Correct Tension Regulation Regulating the Thread Tension Stitch Length Regulation Reverse Sewing Dropping the Machine Feed Changing the Sewing Foot Darning Foot and Vibrator Care and Maintenance Regular Machine Care Sewlight Facts The Snap-Out Workplate Trouble Shooting Zipper...


