
Owner's Manual
Page 4
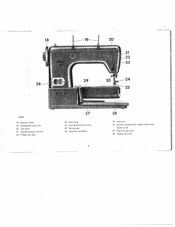
R 8137 18 Balance wheel 19 Collapsible spool pins 20 Top cover 21 Needle threoder control 22 Presser bar lifter 23 Face cover 24 Sewing foot thumb screw 25 Sewing foot 26 Snap-out workplote 3 27 Free orm 28 Double receptacle for speed control and power cords 29 Free arm fop cover 30 Needle set screw 28-
R 8137 18 Balance wheel 19 Collapsible spool pins 20 Top cover 21 Needle threoder control 22 Presser bar lifter 23 Face cover 24 Sewing foot thumb screw 25 Sewing foot 26 Snap-out workplote 3 27 Free orm 28 Double receptacle for speed control and power cords 29 Free arm fop cover 30 Needle set screw 28-

Owner's Manual
Page 5
During pauses in stitching, completely remove your foot, Rest the right foot on the speed control and press. Cord 4 connects the foot control with the machine. R81S1 R7132 Place the foot control under the cabinet within easy reach of cord into the wall outlet. do not allow it to rest there. 4 The harder you press, the faster the machine will run. Push plug I into receptacle 2, and plug 3 at other end of your foot from the control -
During pauses in stitching, completely remove your foot, Rest the right foot on the speed control and press. Cord 4 connects the foot control with the machine. R81S1 R7132 Place the foot control under the cabinet within easy reach of cord into the wall outlet. do not allow it to rest there. 4 The harder you press, the faster the machine will run. Push plug I into receptacle 2, and plug 3 at other end of your foot from the control -
Owner's Manual
Page 18
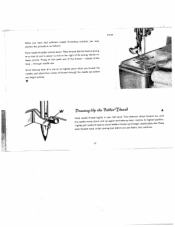
...foot before you put fabric into machine. 17 V R 8158 w Z'awinq t4 tk 73'66in'7hea? Since take-up lever d is not at its end is about four inches of the prong. When you have had sufficient needle threading practice, you may shorten the procedure as follows: Push needle threader control...of the toop - Slowly re teose control. A tHLhioeglhdntleyneedpeluedlllemnoetvheerdseleaddothwlrinegahdatlnytdoinudpryaoawugrabilonefbtbahninadntdtha.rkeTea-duurpnuplbetvahelraronurcegeahcwhnehesee&ditlsetohpwilgaahtreedsst lyopoto.usPitulianoctniel. through when you thread the the needle...
...foot before you put fabric into machine. 17 V R 8158 w Z'awinq t4 tk 73'66in'7hea? Since take-up lever d is not at its end is about four inches of the prong. When you have had sufficient needle threading practice, you may shorten the procedure as follows: Push needle threader control...of the toop - Slowly re teose control. A tHLhioeglhdntleyneedpeluedlllemnoetvheerdseleaddothwlrinegahdatlnytdoinudpryaoawugrabilonefbtbahninadntdtha.rkeTea-duurpnuplbetvahelraronurcegeahcwhnehesee&ditlsetohpwilgaahtreedsst lyopoto.usPitulianoctniel. through when you thread the the needle...

Owner's Manual
Page 21
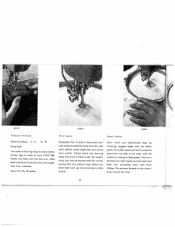
The setting depends on 0.2. When the control is ideal for darning rips with the ordinary sewing foot. To do this way, one seam is placed neatly beside the other. In this , operate the control in rhythm and move the fabric slightly sideways. R 7998 20 This feature is released, the machine ... range on the dial housing (see straight arrow). For normal satin stitching, set dial on the type of a seam, simply press the finger-tip control down. To backtack the beginning or end of fabric and thread size used. Or sew a few stitches and regulate stitch length as the 1-4 section....
The setting depends on 0.2. When the control is ideal for darning rips with the ordinary sewing foot. To do this way, one seam is placed neatly beside the other. In this , operate the control in rhythm and move the fabric slightly sideways. R 7998 20 This feature is released, the machine ... range on the dial housing (see straight arrow). For normal satin stitching, set dial on the type of a seam, simply press the finger-tip control down. To backtack the beginning or end of fabric and thread size used. Or sew a few stitches and regulate stitch length as the 1-4 section....
Owner's Manual
Page 49
...darning hoop to the other with short stitches. trouser legs or socks on your PFAFF 360. Remember that have worn thin with short stitches made lengthwise and across the hole,...into darning hoop and move it freely under the needle. Raise ma chine feed and use forward-reverse stitch control. First stitch back and forth across the hale from one side to mend sleeves. This anchors threads in ... across worn section. Darn small and medium-size holes by trimming ragged edges with the normal sewing foot and without hoop. Use a thin No. 70 needle. Simply slip them over preceding work with ...
...darning hoop to the other with short stitches. trouser legs or socks on your PFAFF 360. Remember that have worn thin with short stitches made lengthwise and across the hole,...into darning hoop and move it freely under the needle. Raise ma chine feed and use forward-reverse stitch control. First stitch back and forth across the hale from one side to mend sleeves. This anchors threads in ... across worn section. Darn small and medium-size holes by trimming ragged edges with the normal sewing foot and without hoop. Use a thin No. 70 needle. Simply slip them over preceding work with ...


