
Owner's Manual
Page 3
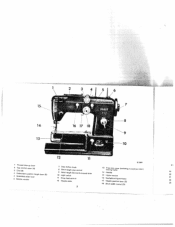
R 7379 1 Thread take-up lever 2 Top control cover (A) 3 Dial (B) 4 Embroidery pattern length lever (E) 5 Buttonhole slide lever 6 Bobbin winder 7 Slop motion knob 8 Stitch length stop control 9 Stitch length (forward-reverse) lever 10 Light switch 11 Drop feed control 12 Needle plate 13 free arm cover sewing hook) (enclosing transverse rotary 14 Needle 15 Upper tension 16 SewlighI swing-out fever 17 Needle position lever (C) 19 20 21 22 18 Stitch width control (D) 23 2 45 6 / I 5- 14-
R 7379 1 Thread take-up lever 2 Top control cover (A) 3 Dial (B) 4 Embroidery pattern length lever (E) 5 Buttonhole slide lever 6 Bobbin winder 7 Slop motion knob 8 Stitch length stop control 9 Stitch length (forward-reverse) lever 10 Light switch 11 Drop feed control 12 Needle plate 13 free arm cover sewing hook) (enclosing transverse rotary 14 Needle 15 Upper tension 16 SewlighI swing-out fever 17 Needle position lever (C) 19 20 21 22 18 Stitch width control (D) 23 2 45 6 / I 5- 14-

Owner's Manual
Page 4
30 2 - 9j R 7383 19 Balance wheel 20 Collapsible 5pOol pins 21 Top cover 22 Face cover 23 Presser bar lever 24 Needle threader lever 25 Automatic needle threader 26 Sewing foot 27 Snap-out workplate 28 Free arm 3 29 Receptacle for foot control plug 30 Receptacle for power cord plug 31 Sewlight 32 Needle set screw 33 Free arm fop cover
30 2 - 9j R 7383 19 Balance wheel 20 Collapsible 5pOol pins 21 Top cover 22 Face cover 23 Presser bar lever 24 Needle threader lever 25 Automatic needle threader 26 Sewing foot 27 Snap-out workplate 28 Free arm 3 29 Receptacle for foot control plug 30 Receptacle for power cord plug 31 Sewlight 32 Needle set screw 33 Free arm fop cover

Owner's Manual
Page 5
Raise under terial you have fabric under needle, lower sewing foot -- and ready to sew. 4 knob 6 is tightened be (clockwise as indicated 0 tbWuyrhnbelniatectvkoewarrayrrooduwyh)o.auve(ctooutunrtner-thcelobckawlainsceeaws hseheolwan, Never run a threaded machine unless you 're presser bar lever c and place both threads and behind the sewing foot. naI%.nea1s /iac.4i,w Ceaticn Make sure stop motion fore you begin sewing by white arrow). Slide ma under the presser foot.
Raise under terial you have fabric under needle, lower sewing foot -- and ready to sew. 4 knob 6 is tightened be (clockwise as indicated 0 tbWuyrhnbelniatectvkoewarrayrrooduwyh)o.auve(ctooutunrtner-thcelobckawlainsceeaws hseheolwan, Never run a threaded machine unless you 're presser bar lever c and place both threads and behind the sewing foot. naI%.nea1s /iac.4i,w Ceaticn Make sure stop motion fore you begin sewing by white arrow). Slide ma under the presser foot.
Owner's Manual
Page 6
... have completed a seam. Never try to hasten feeding by pushing or pulling the fabric while stitching because the needle may cause the thread to tangle under the needle plate or slip out of the needle eye. 5 All you have to observe this is done automatically by take -up lever d. Luqctant 7cins ic R 6808...
... have completed a seam. Never try to hasten feeding by pushing or pulling the fabric while stitching because the needle may cause the thread to tangle under the needle plate or slip out of the needle eye. 5 All you have to observe this is done automatically by take -up lever d. Luqctant 7cins ic R 6808...

Owner's Manual
Page 7
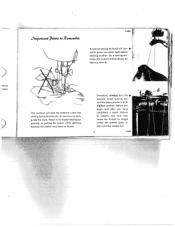
... work surface. Larger articles may require a larger work area for flat sewing and embroi dery. '7he $nq-Cs.t tOorkvtae Your PFAFF Automatic has a snap-out workplate which is flush with the needle plate. To further increase the sewing area, attach the workptate extension which can be raised to give you want to...
... work surface. Larger articles may require a larger work area for flat sewing and embroi dery. '7he $nq-Cs.t tOorkvtae Your PFAFF Automatic has a snap-out workplate which is flush with the needle plate. To further increase the sewing area, attach the workptate extension which can be raised to give you want to...
Owner's Manual
Page 10
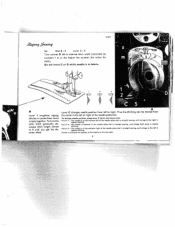
... slot in straight sewing and swings to the right in zigzag stitching. To change needle position, press ever C down and mov, into: Notch I to 4; Notch 3-The needle is the needle plate slot in straight sewing, and swings both ways in fabric. 2 A Lever f lengthens zigzag stitches or pocks them more... closely together. Pointer z indicates the position of the needle plate slot in straight sewing, and swings to the left in zigzag stitching. To form the satin stitch graduolly de crease stitch length almost to...
... slot in straight sewing and swings to the right in zigzag stitching. To change needle position, press ever C down and mov, into: Notch I to 4; Notch 3-The needle is the needle plate slot in straight sewing, and swings both ways in fabric. 2 A Lever f lengthens zigzag stitches or pocks them more... closely together. Pointer z indicates the position of the needle plate slot in straight sewing, and swings to the left in zigzag stitching. To form the satin stitch graduolly de crease stitch length almost to...
Owner's Manual
Page 15
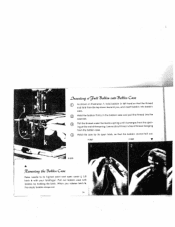
Hold the bobbin firmly in left hand so that the bobbin cannot fall out. 6030 eu.ovin the 7 o 6 6in Ca5e Raise needle to its highest point and open cover j. Pull out bobbin case with your forefinger. Pull the thread under the tension spring until it emerges from ...
Hold the bobbin firmly in left hand so that the bobbin cannot fall out. 6030 eu.ovin the 7 o 6 6in Ca5e Raise needle to its highest point and open cover j. Pull out bobbin case with your forefinger. Pull the thread under the tension spring until it emerges from ...
Owner's Manual
Page 16
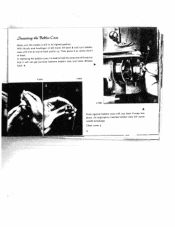
Then place it on center stud I of thread so bobbin case and hook. Close cover 15 I I latch k. With thumb arid forefinger of latch points up. R 7380 A Press against bobbin case until slot at end of left hand, lift latch k and turn bobbin case until you hear it snap into place. An improperly inserted bobbin case will not get jammed between to hold the loose end of hook. In replacing the bobbin case, it is still in its highest position. Release I . D9 n.stin th 7 c 6 in 3 6 Casz Make sure the needle is best that it will cquse needle breakage.
Then place it on center stud I of thread so bobbin case and hook. Close cover 15 I I latch k. With thumb arid forefinger of latch points up. R 7380 A Press against bobbin case until slot at end of left hand, lift latch k and turn bobbin case until you hear it snap into place. An improperly inserted bobbin case will not get jammed between to hold the loose end of hook. In replacing the bobbin case, it is still in its highest position. Release I . D9 n.stin th 7 c 6 in 3 6 Casz Make sure the needle is best that it will cquse needle breakage.
Owner's Manual
Page 17
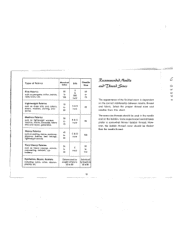
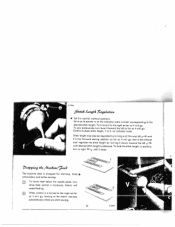
..., slipcover fabrics, bed tickings, lightweight canvas. 40 to 50 C&D twist The same size threads should be used in the needle and on the correct relationship between needle, thread and fabric. Medium Fabrics 50 such as dress silks and cottons, sheers, woolens, shirting, dra. How ever, the...Very Heavy Fabrics 24 90 such as georgette, chiffon, batiste, to voile, lawn, silk. iftuwn? /l4?e?1 Typos of Fabrics Mercerized Cotton Silk Needle Size an '7h&'a? $i.c Or Fine Fabrics 80 such as heavy TIcKrngz, canvas, overcodting, sailcloth, up to hoistery, 40 E twist to ...
..., slipcover fabrics, bed tickings, lightweight canvas. 40 to 50 C&D twist The same size threads should be used in the needle and on the correct relationship between needle, thread and fabric. Medium Fabrics 50 such as dress silks and cottons, sheers, woolens, shirting, dra. How ever, the...Very Heavy Fabrics 24 90 such as georgette, chiffon, batiste, to voile, lawn, silk. iftuwn? /l4?e?1 Typos of Fabrics Mercerized Cotton Silk Needle Size an '7h&'a? $i.c Or Fine Fabrics 80 such as heavy TIcKrngz, canvas, overcodting, sailcloth, up to hoistery, 40 E twist to ...
Owner's Manual
Page 18
Genuine Pfaff needles, System 130, are used . Loosen needle set screw 0. Tighten needle set screw o half a turn ,c-'tEC and pull old needle out of the needle shank and holds the needle in place. 17 The needle system is stamped on The needle plate. Bent or blunt needles should not be used for all ordinary sewing and embroidery work. R 6798 Dit,1tant...
Genuine Pfaff needles, System 130, are used . Loosen needle set screw 0. Tighten needle set screw o half a turn ,c-'tEC and pull old needle out of the needle shank and holds the needle in place. 17 The needle system is stamped on The needle plate. Bent or blunt needles should not be used for all ordinary sewing and embroidery work. R 6798 Dit,1tant...
Owner's Manual
Page 19
PFAFF's Automatic needle threader will go and pass thread from right to back. Ill). Pull thread into slots at left of thread guides 8 and 9, and then into the ... will do this for you easily and quickly. 18 11 HI Pull thread between any two of needle clamp 10. The thread passes underneath the thread check spring which holds it down permanently. Then thread needle, front to left through both thread retainer openings 4 (see illustration opposite). II) until it snaps into...
PFAFF's Automatic needle threader will go and pass thread from right to back. Ill). Pull thread into slots at left of thread guides 8 and 9, and then into the ... will do this for you easily and quickly. 18 11 HI Pull thread between any two of needle clamp 10. The thread passes underneath the thread check spring which holds it down permanently. Then thread needle, front to left through both thread retainer openings 4 (see illustration opposite). II) until it snaps into...

Owner's Manual
Page 21
R 7068 the Auiô,sate ,'\ee1e '7hea?er 4 Before you begin, make sure that the needle is in this position. Sir Hold thread loosely and lead from left hand push threader engaging lever p up slightly so the thread ioop will fall ...off the prong. Jerk lever p up until prong w reverses and pulls thread through needle eye. S 7c169 I S 7089 2 R7088 3 R7087 4 Pull thread through the eye. when the lower hole Pus of the ascending take-up lever d is at its the...
R 7068 the Auiô,sate ,'\ee1e '7hea?er 4 Before you begin, make sure that the needle is in this position. Sir Hold thread loosely and lead from left hand push threader engaging lever p up slightly so the thread ioop will fall ...off the prong. Jerk lever p up until prong w reverses and pulls thread through needle eye. S 7c169 I S 7089 2 R7088 3 R7087 4 Pull thread through the eye. when the lower hole Pus of the ascending take-up lever d is at its the...
Owner's Manual
Page 22
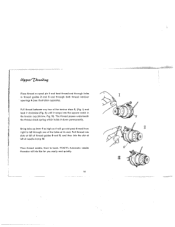
... into machine. 21 Slowly lower lever p. instead of the thread - Since take -up lever reaches its highest position. When you hove had sufficient needle threading practice, you until the needle moves down and up again and take -up lever d is about four inches of the prong. Lightly pull... before you begin sewing. Turn balance wheel toward you may shorten the procedure as follows: Push lever p up through needle eye. V R $390 9kJ 7 awinj 14 the '4 13cn6t '7hea' A Hold needle thread lightly in your left hand. Place thread ,behind hook of prong w so that its end is not at its ...
... into machine. 21 Slowly lower lever p. instead of the thread - Since take -up lever reaches its highest position. When you hove had sufficient needle threading practice, you until the needle moves down and up again and take -up lever d is about four inches of the prong. Lightly pull... before you begin sewing. Turn balance wheel toward you may shorten the procedure as follows: Push lever p up through needle eye. V R $390 9kJ 7 awinj 14 the '4 13cn6t '7hea' A Hold needle thread lightly in your left hand. Place thread ,behind hook of prong w so that its end is not at its ...
Owner's Manual
Page 25
Set e so its pointer is dropped for darning, hoop embroidery and button sewing. To lower feed below the needle plate, turn e right )- To sew backwards, turn lever f toward the left arid fin the forward sewing position as far as it will go . Sew a few ...
Set e so its pointer is dropped for darning, hoop embroidery and button sewing. To lower feed below the needle plate, turn e right )- To sew backwards, turn lever f toward the left arid fin the forward sewing position as far as it will go . Sew a few ...

Owner's Manual
Page 26
... presser bars to their highest positions and turn screw c to lower presser bar lever e so that it is behind the needle set screw, and tighten screw c. R7086 t Remove the sewing foot. Remember to the left. Attach darning foot from the rear. The screw usuaily can be ...
... presser bars to their highest positions and turn screw c to lower presser bar lever e so that it is behind the needle set screw, and tighten screw c. R7086 t Remove the sewing foot. Remember to the left. Attach darning foot from the rear. The screw usuaily can be ...

Owner's Manual
Page 27
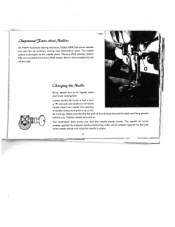
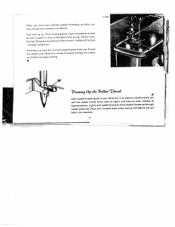
... an , 4 aintenani Longevity and smooth machine performance are dependent on regular and proper cleaning and oiling. The principal oiling points ore marked by removing the needle plate and oiling the mechanism in the sewing hook is the most im portant oiling point. A dry raceway will cause rapid wear. I The raceway in... animal or vegetable oils. This is advis able to put a drop of oil into the raceway each of oil into each day you sew. Use Pfaff sewing machine oil only. Put one drop of the two oil holes behind the sewing foot. R 6A32 R 7377 A I .
... an , 4 aintenani Longevity and smooth machine performance are dependent on regular and proper cleaning and oiling. The principal oiling points ore marked by removing the needle plate and oiling the mechanism in the sewing hook is the most im portant oiling point. A dry raceway will cause rapid wear. I The raceway in... animal or vegetable oils. This is advis able to put a drop of oil into the raceway each of oil into each day you sew. Use Pfaff sewing machine oil only. Put one drop of the two oil holes behind the sewing foot. R 6A32 R 7377 A I .
Owner's Manual
Page 31
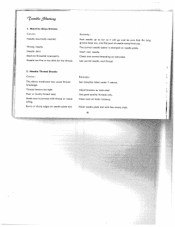
... is jammed with fine emery cloth. 30 I Insert new needle. Needle Thread Breaks Cause: The above . Polish needle plate slot with thread or needs oiling. Machine Skips Stitches Ca use: Needle incorrectly inserted. Needle too fine or too thick for the thread. Thread tension too tight. Remedy: See remedies ...and be sure that the long groove faces you, and flat part of needle away from you. Wrong needle. Remedy: Push needle up as far as instructed. Use correct needle and thread. 2. Burrs or sharp edges on needle plate. Poor or knotty thread used. Hook race is stamped on...
... is jammed with fine emery cloth. 30 I Insert new needle. Needle Thread Breaks Cause: The above . Polish needle plate slot with thread or needs oiling. Machine Skips Stitches Ca use: Needle incorrectly inserted. Needle too fine or too thick for the thread. Thread tension too tight. Remedy: See remedies ...and be sure that the long groove faces you, and flat part of needle away from you. Wrong needle. Remedy: Push needle up as far as instructed. Use correct needle and thread. 2. Burrs or sharp edges on needle plate. Poor or knotty thread used. Hook race is stamped on...

Owner's Manual
Page 32
.... Thread too heavy, knotty or hard. Fabric pulls needle so it snap into ploce. Bobbin unevenly wound. 3. Pieces of sewing hook. Don't force the feeding motion. Guide the material lightly. Remedy: Have your Pfaff dealer make the necessary adjustment. 31 1 I Bobbin case... inserted incorrectly. 4. Use only first-rote thread - - Needle too thin or thread too heavy. Faulty Stitch Formation Cause: Improper tension. Release ...
.... Thread too heavy, knotty or hard. Fabric pulls needle so it snap into ploce. Bobbin unevenly wound. 3. Pieces of sewing hook. Don't force the feeding motion. Guide the material lightly. Remedy: Have your Pfaff dealer make the necessary adjustment. 31 1 I Bobbin case... inserted incorrectly. 4. Use only first-rote thread - - Needle too thin or thread too heavy. Faulty Stitch Formation Cause: Improper tension. Release ...

Owner's Manual
Page 33
Remedy: Loosen or tighten motor belt by following the instructions on pages 4 and 5. 32 Hook raceway lacks oil or is still jammed, call your Pfaff dealer for help. If thread is obstructed by inferior oil. Thread iamming can be avoided by adjusting idler. Take the end of lint packed betweenfeedteeth. ... a few drops of thread. Tighten the stop motion knob. Unwind and remove thread. Machine Works Heavily Cause: Motor belt is not being filled). Take off needle plate and remove lint with a stiff brush. 6.
Remedy: Loosen or tighten motor belt by following the instructions on pages 4 and 5. 32 Hook raceway lacks oil or is still jammed, call your Pfaff dealer for help. If thread is obstructed by inferior oil. Thread iamming can be avoided by adjusting idler. Take the end of lint packed betweenfeedteeth. ... a few drops of thread. Tighten the stop motion knob. Unwind and remove thread. Machine Works Heavily Cause: Motor belt is not being filled). Take off needle plate and remove lint with a stiff brush. 6.

Owner's Manual
Page 35
... felling foot, as illustrated, so that the bottom fabric is folded over edge of fabric. Second Seam Open the two pieces, place them under the needle right side up with the bottom piece protruding 1/e inch. R 7171 41242 flp Flat Felled Seams Machine Setting: E -o C-2 8-0 D -0 or 2 (oplional) Stitch... protruding seam allowance is placed close to permit zigzag felling. 1 iI 34 R7154 i I I iI The felling foot has a needle slot, rather than a needle hole, to the edge but not beyond it. Make sure that second seam is not folded twice. Flat felled seams usually ore ...
... felling foot, as illustrated, so that the bottom fabric is folded over edge of fabric. Second Seam Open the two pieces, place them under the needle right side up with the bottom piece protruding 1/e inch. R 7171 41242 flp Flat Felled Seams Machine Setting: E -o C-2 8-0 D -0 or 2 (oplional) Stitch... protruding seam allowance is placed close to permit zigzag felling. 1 iI 34 R7154 i I I iI The felling foot has a needle slot, rather than a needle hole, to the edge but not beyond it. Make sure that second seam is not folded twice. Flat felled seams usually ore ...

