
Owner's Manual
Page 3
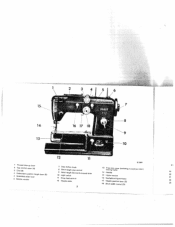
R 7379 1 Thread take-up lever 2 Top control cover (A) 3 Dial (B) 4 Embroidery pattern length lever (E) 5 Buttonhole slide lever 6 Bobbin winder 7 Slop motion knob 8 Stitch length stop control 9 Stitch length (forward-reverse) lever 10 Light switch 11 Drop feed control 12 Needle plate 13 free arm cover sewing hook) (enclosing transverse rotary 14 Needle 15 Upper tension 16 SewlighI swing-out fever 17 Needle position lever (C) 19 20 21 22 18 Stitch width control (D) 23 2 45 6 / I 5- 14-
R 7379 1 Thread take-up lever 2 Top control cover (A) 3 Dial (B) 4 Embroidery pattern length lever (E) 5 Buttonhole slide lever 6 Bobbin winder 7 Slop motion knob 8 Stitch length stop control 9 Stitch length (forward-reverse) lever 10 Light switch 11 Drop feed control 12 Needle plate 13 free arm cover sewing hook) (enclosing transverse rotary 14 Needle 15 Upper tension 16 SewlighI swing-out fever 17 Needle position lever (C) 19 20 21 22 18 Stitch width control (D) 23 2 45 6 / I 5- 14-

Owner's Manual
Page 5
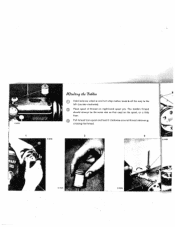
and ready to sew. 4 knob 6 is tightened be (clockwise as indicated 0 tbWuyrhnbelniatectvkoewarrayrrooduwyh)o.auve(ctooutunrtner-thcelobckawlainsceeaws hseheolwan, Never run a threaded machine unless you 're presser bar lever c and place both threads and behind the sewing foot. Raise under terial you have fabric under needle, lower sewing foot -- naI%.nea1s /iac.4i,w Ceaticn Make sure stop motion fore you begin sewing by white arrow). Slide ma under the presser foot.
and ready to sew. 4 knob 6 is tightened be (clockwise as indicated 0 tbWuyrhnbelniatectvkoewarrayrrooduwyh)o.auve(ctooutunrtner-thcelobckawlainsceeaws hseheolwan, Never run a threaded machine unless you 're presser bar lever c and place both threads and behind the sewing foot. Raise under terial you have fabric under needle, lower sewing foot -- naI%.nea1s /iac.4i,w Ceaticn Make sure stop motion fore you begin sewing by white arrow). Slide ma under the presser foot.
Owner's Manual
Page 6
Never try to hasten feeding by pushing or pulling the fabric while stitching because the needle may cause the thread to do is at its highest position before making another. chine under I t The machine will nor mally draw one stitch tight before you begin and ...
Never try to hasten feeding by pushing or pulling the fabric while stitching because the needle may cause the thread to do is at its highest position before making another. chine under I t The machine will nor mally draw one stitch tight before you begin and ...
Owner's Manual
Page 13
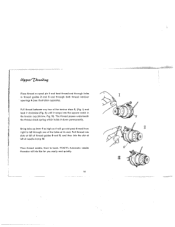
Pull thread from spool and lead it clockwise around thread retainer g, crossing the thread. 2 3 7100 h. Place spool of thread on the spool, or a little finer. /9 Oin?in th 2o6in Hold balance wheel a and turn stop motion knob b all the way to the left (counter-clockwise). The bobbin thread should always be the same size as that used on right-hand spool pin.
Pull thread from spool and lead it clockwise around thread retainer g, crossing the thread. 2 3 7100 h. Place spool of thread on the spool, or a little finer. /9 Oin?in th 2o6in Hold balance wheel a and turn stop motion knob b all the way to the left (counter-clockwise). The bobbin thread should always be the same size as that used on right-hand spool pin.
Owner's Manual
Page 14
... through slot in bobbin, from in side. If you are winding bobbin without disconnecting balance wheel. 7 R7067 R 7097 R 7099 Pass end of thread has been wound. Hold end of thread and continue winding at a faster pace. 0 Bobbin winder will stop automatically when bobbin is full. Having wound a few turns, break off end... ot base of spindle enters slot in lever i. You may continue sewing while you don't wont a full bobbin, press out lever i when sufficient amount of thread through thread guide h.
... through slot in bobbin, from in side. If you are winding bobbin without disconnecting balance wheel. 7 R7067 R 7097 R 7099 Pass end of thread has been wound. Hold end of thread and continue winding at a faster pace. 0 Bobbin winder will stop automatically when bobbin is full. Having wound a few turns, break off end... ot base of spindle enters slot in lever i. You may continue sewing while you don't wont a full bobbin, press out lever i when sufficient amount of thread through thread guide h.
Owner's Manual
Page 15
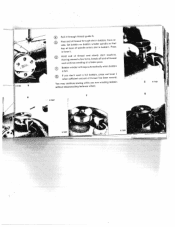
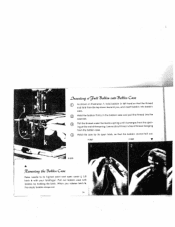
... , and insert bobbin into the case slot. Hold the case by holding the latch. Leave about three inches of thread hanging from the open ing at the end of the spring. Pull the thread under the tension spring until it emerges from the bobbin case. Lift latch k with bobbin by its highest... point and open latch, so that the thread end falls from the top down toward you release latch k, the empty bobbin drops out. 14 Hold the bobbin firmly in left hand so that ...
... , and insert bobbin into the case slot. Hold the case by holding the latch. Leave about three inches of thread hanging from the open ing at the end of the spring. Pull the thread under the tension spring until it emerges from the bobbin case. Lift latch k with bobbin by its highest... point and open latch, so that the thread end falls from the top down toward you release latch k, the empty bobbin drops out. 14 Hold the bobbin firmly in left hand so that ...
Owner's Manual
Page 16
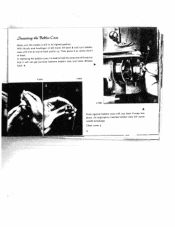
In replacing the bobbin case, it is still in 3 6 Casz Make sure the needle is best that it will cquse needle breakage. I I latch k. Release I . R 7380 A Press against bobbin case until slot at end of hook. With thumb arid forefinger of left hand, lift latch k and turn bobbin case until you hear it on center stud I of latch points up. Close cover 15 Then place it snap into place. D9 n.stin th 7 c 6 in its highest position. An improperly inserted bobbin case will not get jammed between to hold the loose end of thread so bobbin case and hook.
In replacing the bobbin case, it is still in 3 6 Casz Make sure the needle is best that it will cquse needle breakage. I I latch k. Release I . R 7380 A Press against bobbin case until slot at end of hook. With thumb arid forefinger of left hand, lift latch k and turn bobbin case until you hear it on center stud I of latch points up. Close cover 15 Then place it snap into place. D9 n.stin th 7 c 6 in its highest position. An improperly inserted bobbin case will not get jammed between to hold the loose end of thread so bobbin case and hook.
Owner's Manual
Page 17
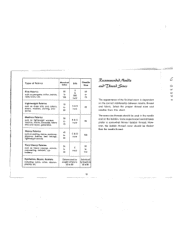
...,denim, corduroy, slipcover fabrics, bed tickings, lightweight canvas. 40 to A& B twist 80 peries. 80 on the bobbin. Select the proper thread sizes and needles from this chart. Determined by weight of the finished seam is dependent n< Lightweight Fabrics 70 such as georgette, chiffon, batiste,... Or Fine Fabrics 80 such as dress silks and cottons, sheers, woolens, shirting, dra. How ever, the bobbin thread never should be thicker than the needle thread. ioo 0 to 000 twist 60 or 70 ar sy 13 The appearance of fabric 40 to 50 Determined bythresdsiz 60...
...,denim, corduroy, slipcover fabrics, bed tickings, lightweight canvas. 40 to A& B twist 80 peries. 80 on the bobbin. Select the proper thread sizes and needles from this chart. Determined by weight of the finished seam is dependent n< Lightweight Fabrics 70 such as georgette, chiffon, batiste,... Or Fine Fabrics 80 such as dress silks and cottons, sheers, woolens, shirting, dra. How ever, the bobbin thread never should be thicker than the needle thread. ioo 0 to 000 twist 60 or 70 ar sy 13 The appearance of fabric 40 to 50 Determined bythresdsiz 60...
Owner's Manual
Page 19
...PFAFF's Automatic needle threader will go and pass thread from right to back. Bring take-up lever 7 as high as it snaps into the slot at left of thread guides 8 and 9, and then into the square notch in thread guides 2 and 3 and through one of the tension discs 5, (Fig. Then thread... needle, front to left of needle clamp 10. Pull thread between any two of the holes at left through both thread retainer openings 4 (see illustration opposite). The thread passes underneath the thread check spring which holds it clockwise (Fig. II)...
...PFAFF's Automatic needle threader will go and pass thread from right to back. Bring take-up lever 7 as high as it snaps into the slot at left of thread guides 8 and 9, and then into the square notch in thread guides 2 and 3 and through one of the tension discs 5, (Fig. Then thread... needle, front to left of needle clamp 10. Pull thread between any two of the holes at left through both thread retainer openings 4 (see illustration opposite). The thread passes underneath the thread check spring which holds it clockwise (Fig. II)...

Owner's Manual
Page 21
...with the bottom edge of prong w on needle threader. Release lever p. Now lower its highest position - Jerk lever p up until prong w reverses and pulls thread through needle eye. R 7068 the Auiô,sate ,'\ee1e '7hea?er 4 Before you begin, make sure that the needle is in this position. Sir ...Hold thread loosely and lead from left hand push threader engaging lever p up slightly so the thread ioop will fall off the prong. when the lower hole Pus of the ascending take-up lever d is...
...with the bottom edge of prong w on needle threader. Release lever p. Now lower its highest position - Jerk lever p up until prong w reverses and pulls thread through needle eye. R 7068 the Auiô,sate ,'\ee1e '7hea?er 4 Before you begin, make sure that the needle is in this position. Sir ...Hold thread loosely and lead from left hand push threader engaging lever p up slightly so the thread ioop will fall off the prong. when the lower hole Pus of the ascending take-up lever d is...
Owner's Manual
Page 22
... so that its end is not at its highest position. V R $390 9kJ 7 awinj 14 the '4 13cn6t '7hea' A Hold needle thread lightly in your left hand. Lightly pull needle thread to the!right of thread through needle eye. Place both threads back under sewing foot before you put fabric into machine. 21 instead of the...: Push lever p up. Prong w now pulls end of the loop - through the needle eye before you begin sewing. When you hove had sufficient needle threading practice, you until the needle moves down and up again and take -up lever d is about four inches of the prong.
... so that its end is not at its highest position. V R $390 9kJ 7 awinj 14 the '4 13cn6t '7hea' A Hold needle thread lightly in your left hand. Lightly pull needle thread to the!right of thread through needle eye. Place both threads back under sewing foot before you put fabric into machine. 21 instead of the...: Push lever p up. Prong w now pulls end of the loop - through the needle eye before you begin sewing. When you hove had sufficient needle threading practice, you until the needle moves down and up again and take -up lever d is about four inches of the prong.

Owner's Manual
Page 23
... stitches are essential for sewing. Sketch II - If the zigzag seam is equally wide on surface and underside of the fabric, that is, if the threads ore locked exactly at the zigs and zags of the seom, the tension adjustment is correct, you will have perfect seams as sketched (Ill) below... on the underside of the fabric. Cause: Upper tension too tight or lower tension too loose. Sketch I - The threads interlock on the surface of the fabric. Ctrett 7encion 7 9 u1aZ tion Balanced tensions are tightly drawn in on both sides of the fobric (see seam ...
... stitches are essential for sewing. Sketch II - If the zigzag seam is equally wide on surface and underside of the fabric, that is, if the threads ore locked exactly at the zigs and zags of the seom, the tension adjustment is correct, you will have perfect seams as sketched (Ill) below... on the underside of the fabric. Cause: Upper tension too tight or lower tension too loose. Sketch I - The threads interlock on the surface of the fabric. Ctrett 7encion 7 9 u1aZ tion Balanced tensions are tightly drawn in on both sides of the fobric (see seam ...
Owner's Manual
Page 31
...needle plate slot. Adjust tensions as instructed. Machine threaded improperly. Needle Thread Breaks Cause: The above . Poor or knotty thread used. Polish needle plate slot with thread or needs oiling. Check and correct threading as instructed. Thread tension too tight. Burrs or sharp edges on needle...be sure that the long groove faces you, and flat part of needle away from you. Use good quality threads only. above mentioned may cause thread breakage. Clean and oil hook raceway. '7ou61e 4 ShOOtUlf? 1. Machine Skips Stitches Ca use: Needle incorrectly inserted...
...needle plate slot. Adjust tensions as instructed. Machine threaded improperly. Needle Thread Breaks Cause: The above . Poor or knotty thread used. Polish needle plate slot with thread or needs oiling. Check and correct threading as instructed. Thread tension too tight. Burrs or sharp edges on needle...be sure that the long groove faces you, and flat part of needle away from you. Use good quality threads only. above mentioned may cause thread breakage. Clean and oil hook raceway. '7ou61e 4 ShOOtUlf? 1. Machine Skips Stitches Ca use: Needle incorrectly inserted...

Owner's Manual
Page 32
... tension. Bobbin unevenly wound. Don't force the feeding motion. Remedy: Have your Pfaff dealer make the necessary adjustment. 31 1 I Fabric pulls needle so it around thread tension over stud finger on "0" and remove thread. 3. Machine Feeds Improperly Cause: Feed dog set too low and does not rise... up enough above needle plate level. Remedy: Adjust tensions as instructed. Use correct needle and thread sizes. Don't run it bends and strikes needle plate. Bobbin case inserted incorrectly. 4. Push bobbin case until you hear it snap into...
... tension. Bobbin unevenly wound. Don't force the feeding motion. Remedy: Have your Pfaff dealer make the necessary adjustment. 31 1 I Fabric pulls needle so it around thread tension over stud finger on "0" and remove thread. 3. Machine Feeds Improperly Cause: Feed dog set too low and does not rise... up enough above needle plate level. Remedy: Adjust tensions as instructed. Use correct needle and thread sizes. Don't run it bends and strikes needle plate. Bobbin case inserted incorrectly. 4. Push bobbin case until you hear it snap into...

Owner's Manual
Page 33
Snarled thread between balance wheel and bushing. Stop bobbin winder. Bobbin winder working while sewing. (When a bobbin is still jammed, call your Pfaff dealer for help. Clean and oil hook raceway. Use only Piaff sewing machine oil - Take off needle plate and remove ...lint with a stiff brush. 6. Mechanism clogged by following the instructions on pages 4 and 5. 32 Unwind and remove thread. Thread iamming can be avoided...
Snarled thread between balance wheel and bushing. Stop bobbin winder. Bobbin winder working while sewing. (When a bobbin is still jammed, call your Pfaff dealer for help. Clean and oil hook raceway. Use only Piaff sewing machine oil - Take off needle plate and remove ...lint with a stiff brush. 6. Mechanism clogged by following the instructions on pages 4 and 5. 32 Unwind and remove thread. Thread iamming can be avoided...

Owner's Manual
Page 36
... 3. You can hem with the left side of the hem. Clip off the corner of the hemmer foot opening. 4626? For a smooth, unpuckered hem, ease thread tension slightly and set 0 on the left edge of the fabric to sew a uniform hem. To hem tricot fabrics increase the tension, and use the...
... 3. You can hem with the left side of the hem. Clip off the corner of the hemmer foot opening. 4626? For a smooth, unpuckered hem, ease thread tension slightly and set 0 on the left edge of the fabric to sew a uniform hem. To hem tricot fabrics increase the tension, and use the...

Owner's Manual
Page 40
...: E -0 C -2 B-O D 1 /-2 2to2 Stitch Length: 2 to which shirring will be exposed. Finish the shirring with a line of the filler thread used. Width of zigzag depends on the thickness of straight stitch- R 71S9 39 R 7152 When you straight-stitch, depending on the stress to 3 Ease ...Upper Tension Follow above directions for shirring but place filler thread under the groove in the groove of the foot. Single-Needle Cording Machine Setting: E -o B-O Stitch Length: C-2 D-2 -1 Trace pattern on fabric ...
...: E -0 C -2 B-O D 1 /-2 2to2 Stitch Length: 2 to which shirring will be exposed. Finish the shirring with a line of the filler thread used. Width of zigzag depends on the thickness of straight stitch- R 71S9 39 R 7152 When you straight-stitch, depending on the stress to 3 Ease ...Upper Tension Follow above directions for shirring but place filler thread under the groove in the groove of the foot. Single-Needle Cording Machine Setting: E -o B-O Stitch Length: C-2 D-2 -1 Trace pattern on fabric ...

Owner's Manual
Page 43
...'s how to a child's collar. An exciting note may vary the length of the scallops by using variegated thread. 'V and guide needle along scalloped edge. When you ore following the scrollwork outline with wide satin stitches, move... D-2 Stitch Length: Minimum Scalloping can be used effectively as trimming on numerous articles. The illustrations left , alternating the rhythm and the direction of your PFAFF 332 Automatic. Set machine (shown above), place fabric under sewing foot Machine Setting: E -0 C-2 B-0 D-2to4 Stitch Length: Minimum Draw designs on fabric. ...
...'s how to a child's collar. An exciting note may vary the length of the scallops by using variegated thread. 'V and guide needle along scalloped edge. When you ore following the scrollwork outline with wide satin stitches, move... D-2 Stitch Length: Minimum Scalloping can be used effectively as trimming on numerous articles. The illustrations left , alternating the rhythm and the direction of your PFAFF 332 Automatic. Set machine (shown above), place fabric under sewing foot Machine Setting: E -0 C-2 B-0 D-2to4 Stitch Length: Minimum Draw designs on fabric. ...
Owner's Manual
Page 44
... the edge until your fringe is very simple (see sketch). I Sew first row en the left of the area to be threaded with the Automatic needle threader. Draw several threads out of work use on shown in above. Imitation Hemstitching Machine Setting: E -0 C -2 B -0 Stitch Length: 1 -1/s Increase Tensions D -...stitch length according to of hemstitching, alternately leave needle, end proceed as d,rected needle in sketch, guiding material parallel to thread bar width you ore making sure that needle penetrates S If you desire. Hemstitching is the length you will have picot edging. 43...
... the edge until your fringe is very simple (see sketch). I Sew first row en the left of the area to be threaded with the Automatic needle threader. Draw several threads out of work use on shown in above. Imitation Hemstitching Machine Setting: E -0 C -2 B -0 Stitch Length: 1 -1/s Increase Tensions D -...stitch length according to of hemstitching, alternately leave needle, end proceed as d,rected needle in sketch, guiding material parallel to thread bar width you ore making sure that needle penetrates S If you desire. Hemstitching is the length you will have picot edging. 43...

Owner's Manual
Page 45
... or curtains Machine Setting: E -1 B-i A -6 C -1 Stitch Length 1 _V/s Blindstitching is a laborious task, You can buy at your PFAFF on edge of the blindstitch guide. It is placed in the folded edge and the right stitch up . Therefore these fabrics should be visible on... the right side of sheer and filmy fabrics. Set 0 so that matches fabric and fold the hem as illustrated. Use thread that needle takes left inside edge of the needle. Set lever C on hem edge and wide stitches pierce fold. I (L j' 46669 Blindstitching Machine Setting:...
... or curtains Machine Setting: E -1 B-i A -6 C -1 Stitch Length 1 _V/s Blindstitching is a laborious task, You can buy at your PFAFF on edge of the blindstitch guide. It is placed in the folded edge and the right stitch up . Therefore these fabrics should be visible on... the right side of sheer and filmy fabrics. Set 0 so that matches fabric and fold the hem as illustrated. Use thread that needle takes left inside edge of the needle. Set lever C on hem edge and wide stitches pierce fold. I (L j' 46669 Blindstitching Machine Setting:...


