

Owner's Manual
Page 2
... seams needed for bathrobes, corduroy Cotton. IVith the built-in utility-stitch mechanism you -ian also sew all the sewtng iobS coming up n a home. lerseY. We hope you will be glad to master such iork as sewing, em broiderlng, darning and sewing buttonholes nuickly and easily. d I I 1 \\ 4 CPFAFFD 294, 295, 294-1, 295-1, 296-1, 297-1 Foreword Your new Pfaff sewing machine NiH enable you to help you at Fabric...
... seams needed for bathrobes, corduroy Cotton. IVith the built-in utility-stitch mechanism you -ian also sew all the sewtng iobS coming up n a home. lerseY. We hope you will be glad to master such iork as sewing, em broiderlng, darning and sewing buttonholes nuickly and easily. d I I 1 \\ 4 CPFAFFD 294, 295, 294-1, 295-1, 296-1, 297-1 Foreword Your new Pfaff sewing machine NiH enable you to help you at Fabric...

Owner's Manual
Page 3
...Thread guide 4 To cover 5 Utility-stitch control 6 Spoolpins 7 Bobbin winder 8 Balance wheel 9 Stop motion knob 10 Motor disengaging mechanism 11 Stitch length control 12 Reverse feed control 13 Free arm 14 Free arm cover (enclosing transverse rotary hook) 15 Needle plate 16 Sewing foot thumb screw 17 Light switch 18 Stitch width control 19 Needle position lever 20 Presser bar lifter (on back of machine arm> 21 Presser bar lifter 22 Needle set screw 23 Sewing foot 24 Drop-feed button ____H Parts of machine arm> 21 Needle thread terson 22 Needle set screw 23 Sewing foot 24 Drop-feed button...
...Thread guide 4 To cover 5 Utility-stitch control 6 Spoolpins 7 Bobbin winder 8 Balance wheel 9 Stop motion knob 10 Motor disengaging mechanism 11 Stitch length control 12 Reverse feed control 13 Free arm 14 Free arm cover (enclosing transverse rotary hook) 15 Needle plate 16 Sewing foot thumb screw 17 Light switch 18 Stitch width control 19 Needle position lever 20 Presser bar lifter (on back of machine arm> 21 Presser bar lifter 22 Needle set screw 23 Sewing foot 24 Drop-feed button ____H Parts of machine arm> 21 Needle thread terson 22 Needle set screw 23 Sewing foot 24 Drop-feed button...

Owner's Manual
Page 5
... left and remove .t from you see 11.1 Wind a few turrs of tnreac 0" c'm ooobin anc push the bobcn toward The rigor. Push it towards the left . -1 3 6 Engaging and disengaging the sewing me nec a a at ts nign-st point On the Pfaff 294, 294-1 and 296-1 mmove the bed cover 13,, as ifljstrat,zi ..ft atch k an The bobbin case and...
... left and remove .t from you see 11.1 Wind a few turrs of tnreac 0" c'm ooobin anc push the bobcn toward The rigor. Push it towards the left . -1 3 6 Engaging and disengaging the sewing me nec a a at ts nign-st point On the Pfaff 294, 294-1 and 296-1 mmove the bed cover 13,, as ifljstrat,zi ..ft atch k an The bobbin case and...

Owner's Manual
Page 7
... the workplate support against the baseplate of the machine. 3 3 4 The sewing area of the Pfaff 294, 294-1 and 297-1 Portable is sup port and unlock it wilt go (Fig. 1). On machines having no carrying case base. the worplate supoort is pressed against the machine base until the locking stud snaps into the nole in the free arm. Please note that the thread is...
... the workplate support against the baseplate of the machine. 3 3 4 The sewing area of the Pfaff 294, 294-1 and 297-1 Portable is sup port and unlock it wilt go (Fig. 1). On machines having no carrying case base. the worplate supoort is pressed against the machine base until the locking stud snaps into the nole in the free arm. Please note that the thread is...

Owner's Manual
Page 8
... of the desired seam (straight stitch, zig zag stitch, etc.) is at its center position (Fig. 2). Place both threads back under the sewing foot after you (see ill.). Pull the needle thread to make sure the stop motion knob is raised and lowered by arrows in its highest point before you begin working your machine you a full turn. A = Presser bar lifter up the bobbin thread, hold the needle thread and lower the sewing foot Turn the...
... of the desired seam (straight stitch, zig zag stitch, etc.) is at its center position (Fig. 2). Place both threads back under the sewing foot after you (see ill.). Pull the needle thread to make sure the stop motion knob is raised and lowered by arrows in its highest point before you begin working your machine you a full turn. A = Presser bar lifter up the bobbin thread, hold the needle thread and lower the sewing foot Turn the...

Owner's Manual
Page 9
until the straight- set the stitch length control between 2 and 3. Then regulate tne sotch .idth by turn utility-stitch control (5) until the zlgzag-st;ton symbo s ooposite the dot. For ordinary sewing operations. Place the material under the sewing foot and lower the oresser bar lifter. °lace the foot cctrol within easy reach or your foot anc oess cown the oeoal The harder you Dress...
until the straight- set the stitch length control between 2 and 3. Then regulate tne sotch .idth by turn utility-stitch control (5) until the zlgzag-st;ton symbo s ooposite the dot. For ordinary sewing operations. Place the material under the sewing foot and lower the oresser bar lifter. °lace the foot cctrol within easy reach or your foot anc oess cown the oeoal The harder you Dress...

Owner's Manual
Page 10
... lower the sewing foot. For, sewing elastic fabrics, attach ordinary sewing foot No. 93-838954-00 rather than clear-view sewing foot No 93-1001 79-00. 2 oottori 100 Upper tension too tight or lower tension too loose. Turn this screw right (with your machine contains several sewing feet for a looser ten sion. bottom / top , Upper tension too .oose or lower tension too tignt. bottom top Both tensions correctly balanced .22 y 3 To change the needle, oring the needle bar...
... lower the sewing foot. For, sewing elastic fabrics, attach ordinary sewing foot No. 93-838954-00 rather than clear-view sewing foot No 93-1001 79-00. 2 oottori 100 Upper tension too tight or lower tension too loose. Turn this screw right (with your machine contains several sewing feet for a looser ten sion. bottom / top , Upper tension too .oose or lower tension too tignt. bottom top Both tensions correctly balanced .22 y 3 To change the needle, oring the needle bar...

Owner's Manual
Page 11
... threads and start stitching back and forth across the hole in sewing direction Make sure the threads are being made. Turn the faoric at right angles and sew bacK and forth over the preceding work with your macnine for sewing. --C 4 1* kcz J. Select the darning hoops in a size match ing the darning ioD to be drohped To do this, push the drop-feed button to the right to posit:on needle set screw...
... threads and start stitching back and forth across the hole in sewing direction Make sure the threads are being made. Turn the faoric at right angles and sew bacK and forth over the preceding work with your macnine for sewing. --C 4 1* kcz J. Select the darning hoops in a size match ing the darning ioD to be drohped To do this, push the drop-feed button to the right to posit:on needle set screw...

Owner's Manual
Page 12
... edge as the first seam. zipoer 'or about 4 mm ). The finished zipoer closure is folded over the entire surface of the too pece (Fig. 1>. Light y tension the fabric by pulling t sideways Insert the seam ridge into the telling foot and stitch it down Isee F:g 2 Quilting Use zigper foot No. 93-847600-00 with quilt .ng gauge or sewing parallel seams over the edge of...
... edge as the first seam. zipoer 'or about 4 mm ). The finished zipoer closure is folded over the entire surface of the too pece (Fig. 1>. Light y tension the fabric by pulling t sideways Insert the seam ridge into the telling foot and stitch it down Isee F:g 2 Quilting Use zigper foot No. 93-847600-00 with quilt .ng gauge or sewing parallel seams over the edge of...

Owner's Manual
Page 13
... ordinary sewing foot a abt. 6mm +rncb). Set the on soft fabricS, stitc' wioth, as shown pu I n the drawing. Place the ) wide and material under the hemmer foot and lower the same Make 3 to 4 straight stitches to draw up the coed n thread. To produce an elastic hem use one of mater al used for ightweignt mater ala. 295/295-1/297-1 / /7 Ii 294/294-1/296-1 23 or cording foot and insert a twin needle...
... ordinary sewing foot a abt. 6mm +rncb). Set the on soft fabricS, stitc' wioth, as shown pu I n the drawing. Place the ) wide and material under the hemmer foot and lower the same Make 3 to 4 straight stitches to draw up the coed n thread. To produce an elastic hem use one of mater al used for ightweignt mater ala. 295/295-1/297-1 / /7 Ii 294/294-1/296-1 23 or cording foot and insert a twin needle...

Owner's Manual
Page 14
... Ning needle penetrating the fabric. Lrn the fabr;c by guiding :ne material so that the wing needle enters the needle noles t has made n the fabric previously. ann insert a System 130 wi-Ho needle (obtainabie r yo ir Paff-shop) Make sure the needle and bobbin treads are the same size. S ghtly increase the needle thread tension. To select t'e desired stitch width oush tne sntb uiath oontroi to 2 5 a - Hem stitching Use...
... Ning needle penetrating the fabric. Lrn the fabr;c by guiding :ne material so that the wing needle enters the needle noles t has made n the fabric previously. ann insert a System 130 wi-Ho needle (obtainabie r yo ir Paff-shop) Make sure the needle and bobbin treads are the same size. S ghtly increase the needle thread tension. To select t'e desired stitch width oush tne sntb uiath oontroi to 2 5 a - Hem stitching Use...

Owner's Manual
Page 15
... utility-stitch control (5) to zigzag-stitch symbol. Set stitch length control bet ween buttonhole symbol and "O". Then press the seam open seams Attach ordinary sewing foot. This will cover the fabric edge securely. 26 Press-open . Set stitch width control (18) on p. 16. 27 To overcast the edges of medium width. Sew the two pieces of material together with a zigzag stitch of light and mediumweight fabrics, set as indicated above. Use ordinary sewing foot. Stitch length: 2 Turn utility-stitch control (5) to zigzag stitch symbol. Make sure the needle...
... utility-stitch control (5) to zigzag-stitch symbol. Set stitch length control bet ween buttonhole symbol and "O". Then press the seam open seams Attach ordinary sewing foot. This will cover the fabric edge securely. 26 Press-open . Set stitch width control (18) on p. 16. 27 To overcast the edges of medium width. Sew the two pieces of material together with a zigzag stitch of light and mediumweight fabrics, set as indicated above. Use ordinary sewing foot. Stitch length: 2 Turn utility-stitch control (5) to zigzag stitch symbol. Make sure the needle...

Owner's Manual
Page 17
... stitch width until the needle al ternately stitches through the needle slot in darning hooos. adjust. C.D t c-z Needle positions left , respectively. Regu ate the stitci atn to zigzag symbol. Remove the foot and drop the ma chine feed Attach the darning foot and lower the presser bar lifter Insert a No. 70 needle and use No. 50 embroidering and darning thread. Ease the needle thread tension somewhat. Let the needle stitch into the fabric at hgn speed. F:msy fabrics are visible through both holes. Button sewing Attach clear-view sewing foot...
... stitch width until the needle al ternately stitches through the needle slot in darning hooos. adjust. C.D t c-z Needle positions left , respectively. Regu ate the stitci atn to zigzag symbol. Remove the foot and drop the ma chine feed Attach the darning foot and lower the presser bar lifter Insert a No. 70 needle and use No. 50 embroidering and darning thread. Ease the needle thread tension somewhat. Let the needle stitch into the fabric at hgn speed. F:msy fabrics are visible through both holes. Button sewing Attach clear-view sewing foot...

Owner's Manual
Page 18
... outtonholes. L.ft the sewing foot. Push stitch i oth control 18) back to the first notch R 1 ann sev the second button hole seam, stooping about 1 mm (' . ) from the end of its throw ii). Open the buttonhole wTh your seam rioper whicn is the right length, leave the needle n the fabric on the thread size and the fabric weight, the button hoie symbol in the stitch ength control must be neecle...
... outtonholes. L.ft the sewing foot. Push stitch i oth control 18) back to the first notch R 1 ann sev the second button hole seam, stooping about 1 mm (' . ) from the end of its throw ii). Open the buttonhole wTh your seam rioper whicn is the right length, leave the needle n the fabric on the thread size and the fabric weight, the button hoie symbol in the stitch ength control must be neecle...

Owner's Manual
Page 19
...-1 and 297-1. -5< 5 Zigzag stitching. Baste the hem at right). Basting seam Fold 17 p / / Set the utility-stitch control to 4 Set the needle thread tension one fabric yarn only. edge finisning, tonholes, applique work, etc. I\ \TJ\ \/'J\\ /"I ,- - Sewing on the left of toe foot (ill at about I Blind stitch 294, 294-1 295, 295-1. 296-1 and 297-1 Orna mental elastic stitch 296-1 and 297-1. elastic strands and ornamental Shell edging and reinforcing eages. 34 Blindstitching Use bdindstitch sewing foot No. 93...
...-1 and 297-1. -5< 5 Zigzag stitching. Baste the hem at right). Basting seam Fold 17 p / / Set the utility-stitch control to 4 Set the needle thread tension one fabric yarn only. edge finisning, tonholes, applique work, etc. I\ \TJ\ \/'J\\ /"I ,- - Sewing on the left of toe foot (ill at about I Blind stitch 294, 294-1 295, 295-1. 296-1 and 297-1 Orna mental elastic stitch 296-1 and 297-1. elastic strands and ornamental Shell edging and reinforcing eages. 34 Blindstitching Use bdindstitch sewing foot No. 93...

Owner's Manual
Page 20
... it under the sewing foot so that the needle takes the left stitch into the fabric and the right stitch over the thin spot so that its grain matches the rest of delicate, soft fabrics ortricot. tends to be enhanced by stitching along the folded edge with elastic stitch Attach ordinary sewing foot. Stitch length: ito 2 Stitch width control (18): 4 Shell edging makes a nice trimming on models 296-1 and...
... it under the sewing foot so that the needle takes the left stitch into the fabric and the right stitch over the thin spot so that its grain matches the rest of delicate, soft fabrics ortricot. tends to be enhanced by stitching along the folded edge with elastic stitch Attach ordinary sewing foot. Stitch length: ito 2 Stitch width control (18): 4 Shell edging makes a nice trimming on models 296-1 and...

Owner's Manual
Page 23
... with the machine set as ndicateo by arrowsi until the symbol of the des red stitch is indicated n tne n structions for kn1tted or crotcheted fab rics. 42 Elastic triple straight stitch Models 294-1, 295-1, 296-1 and 297-1. '-4 Attach ordinary sewing foot. 22 I) Turn utility-stitch controi (5) to symbol of elastic triple straight stitch Turn stitch length control to symbol of the utility-stitch pattern is specially suited for all stretch fabrics, particular...
... with the machine set as ndicateo by arrowsi until the symbol of the des red stitch is indicated n tne n structions for kn1tted or crotcheted fab rics. 42 Elastic triple straight stitch Models 294-1, 295-1, 296-1 and 297-1. '-4 Attach ordinary sewing foot. 22 I) Turn utility-stitch controi (5) to symbol of elastic triple straight stitch Turn stitch length control to symbol of the utility-stitch pattern is specially suited for all stretch fabrics, particular...

Owner's Manual
Page 24
... the fabric will be gathered. Turn stitch length control to pullover-stitch symbol. Let the needle stitch into the fabric. Pass the elastic strands around the needle, lower the sewing foot. Stretch the strands during sewing. Turn utili-stitch control 5)to red triple-stitch symbol. Sew along the edge so that the needle takes the left stitch over it, a • 4. - .. Honeycomb stitch Models 294-1. 295-1 296-1 and 297-1. Turn utiliW-stitch control 5 to red triple-stitch symbol. Stitch width...
... the fabric will be gathered. Turn stitch length control to pullover-stitch symbol. Let the needle stitch into the fabric. Pass the elastic strands around the needle, lower the sewing foot. Stretch the strands during sewing. Turn utili-stitch control 5)to red triple-stitch symbol. Sew along the edge so that the needle takes the left stitch over it, a • 4. - .. Honeycomb stitch Models 294-1. 295-1 296-1 and 297-1. Turn utiliW-stitch control 5 to red triple-stitch symbol. Stitch width...
Owner's Manual
Page 27
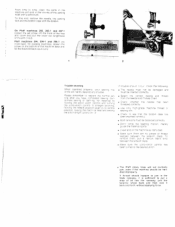
... sflo' -argtr :on the bottom of oil into the raceway. jerk the balance wheel back and then rock it is sufficient to -s tam-a. On Pfaff machines 295, 295-1 and 297-1 loosen the set screw, lift the front of the free arm cover and puil the cover out lengthwise of the sewing hook vnn a soft Crush. a 2 Trouble shooting //her ocerated orcoerly /0r sewno...
... sflo' -argtr :on the bottom of oil into the raceway. jerk the balance wheel back and then rock it is sufficient to -s tam-a. On Pfaff machines 295, 295-1 and 297-1 loosen the set screw, lift the front of the free arm cover and puil the cover out lengthwise of the sewing hook vnn a soft Crush. a 2 Trouble shooting //her ocerated orcoerly /0r sewno...

Owner's Manual
Page 28
... the ooboin Inserting the bobbin case Workolate of machine operation Straight stitching Regulating the stitch length . . Raising and lowering the sewing foot Drawing up the boboin thread Fundamentals of the . . Press-open seams . . . . Applique work Monogram embroidery . Changing the needle position Button sewing Sewing buttonholes Utility-stitch seams sewn forwards Blindstitching . . . . . Elastic triple zigzag stitch . Overlock stitch Feather stitch . . . Clean ng . Contents Foreword Parts of the Pfaff 294-1 and 296l Parts of the Pfaff 295...
... the ooboin Inserting the bobbin case Workolate of machine operation Straight stitching Regulating the stitch length . . Raising and lowering the sewing foot Drawing up the boboin thread Fundamentals of the . . Press-open seams . . . . Applique work Monogram embroidery . Changing the needle position Button sewing Sewing buttonholes Utility-stitch seams sewn forwards Blindstitching . . . . . Elastic triple zigzag stitch . Overlock stitch Feather stitch . . . Clean ng . Contents Foreword Parts of the Pfaff 294-1 and 296l Parts of the Pfaff 295...


