

Owner's Manual
Page 2
... - We hope you will be glad to master such iork as sewing, em broiderlng, darning and sewing buttonholes nuickly and easily. Wstneaewtinsyguogutgeecwshitnlliqthbuaeetcsomydoiesucuwtsresylel doaucintqutthahiisentbevdoaorkiwoiustohs your Pfaff. This nstruction book has been compiled n order :o familiarize you thorougnly with your machine. if you nave any time. rubber zed taboos Thread Type Size Cotton 50 50 Cotton or mercerized cotton 50 Siik 40 Cotton 40...
... - We hope you will be glad to master such iork as sewing, em broiderlng, darning and sewing buttonholes nuickly and easily. Wstneaewtinsyguogutgeecwshitnlliqthbuaeetcsomydoiesucuwtsresylel doaucintqutthahiisentbevdoaorkiwoiustohs your Pfaff. This nstruction book has been compiled n order :o familiarize you thorougnly with your machine. if you nave any time. rubber zed taboos Thread Type Size Cotton 50 50 Cotton or mercerized cotton 50 Siik 40 Cotton 40...

Owner's Manual
Page 3
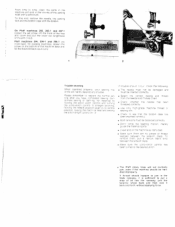
...retainer stud 2 Take-up lever 3 Thread guide 4 Top cover 5 Utility-stitch control 6 Spool pins 7 Bobbin winder 8 Balance wheel 9 Stop motion knob 10 Motor disengaging mechanism 11 Stitch length control 12 Reverse feed control 13 Bed cover 14 Transverse rotary hook (below bedplate) 15 Needle plate 16 Sewing foot thumb screw 17 Lignt switch 18 Stitch 4iidth control 19 Needle position lever 20 Needle thread tension (on back of machine arm> 21 Presser bar lifter 22 Needle set screw 23 Sewing foot 24 Drop-feed button Parts of the Pfaff 295, 295-1 and 297-1 12 3 4 5-6---'7 8 17 H-_-,+ I E 18...
...retainer stud 2 Take-up lever 3 Thread guide 4 Top cover 5 Utility-stitch control 6 Spool pins 7 Bobbin winder 8 Balance wheel 9 Stop motion knob 10 Motor disengaging mechanism 11 Stitch length control 12 Reverse feed control 13 Bed cover 14 Transverse rotary hook (below bedplate) 15 Needle plate 16 Sewing foot thumb screw 17 Lignt switch 18 Stitch 4iidth control 19 Needle position lever 20 Needle thread tension (on back of machine arm> 21 Presser bar lifter 22 Needle set screw 23 Sewing foot 24 Drop-feed button Parts of the Pfaff 295, 295-1 and 297-1 12 3 4 5-6---'7 8 17 H-_-,+ I E 18...

Owner's Manual
Page 5
... soinale. - - m'--. being wound the sewing mechanism must tirst swirg the tree-ama cover to the left and remove .t from you Pass the thread around the thread retaine' stud in the director ndicated by Is open atch. the emotv b000in amos out On the Pfaff 295. 295-1 and 297-1 tOe bobbin case s removed as you see 11.1 Wind a few turrs of tnreac 0" c'm ooobin...
... soinale. - - m'--. being wound the sewing mechanism must tirst swirg the tree-ama cover to the left and remove .t from you Pass the thread around the thread retaine' stud in the director ndicated by Is open atch. the emotv b000in amos out On the Pfaff 295. 295-1 and 297-1 tOe bobbin case s removed as you see 11.1 Wind a few turrs of tnreac 0" c'm ooobin...

Owner's Manual
Page 7
... the spool and the tension. 3 Thread the needle from the front. 21 On machines having no carrying case base. To remove the Norkplate, swing up the lever on the back of the machine (Fig. 2) until the locking stud snaps into place (Fig. 3). 1 2 To enlarge the sewing area of the Pfaff 295. 295-1 and 297-1 for ordinary sewing opera tions, push the workplate into the free arm...
... the spool and the tension. 3 Thread the needle from the front. 21 On machines having no carrying case base. To remove the Norkplate, swing up the lever on the back of the machine (Fig. 2) until the locking stud snaps into place (Fig. 3). 1 2 To enlarge the sewing area of the Pfaff 295. 295-1 and 297-1 for ordinary sewing opera tions, push the workplate into the free arm...

Owner's Manual
Page 8
... make sure the stop motion knob is tightened firmly (Fig. 4). 3 4 As you have completed a seam (Fig. 3). Place both threads back under the sewing foot after you do this, check to draw up 8 - A = Presser bar lifter up the bobbin thread. For ordinary sewing, needle position lever (19) should know the following: Turn utility-stitch control (5) clockwise (as indicated by operating the presser bar lifter on the back of the desired seam (straight stitch, zig zag stitch...
... make sure the stop motion knob is tightened firmly (Fig. 4). 3 4 As you have completed a seam (Fig. 3). Place both threads back under the sewing foot after you do this, check to draw up 8 - A = Presser bar lifter up the bobbin thread. For ordinary sewing, needle position lever (19) should know the following: Turn utility-stitch control (5) clockwise (as indicated by operating the presser bar lifter on the back of the desired seam (straight stitch, zig zag stitch...

Owner's Manual
Page 9
... of a seam. set the stitch length control between 2 and 3. Then regulate tne sotch .idth by turn utility-stitch control (5) until the zlgzag-st;ton symbo s ooposite the dot. until the straight- For ordinary sewing operations. Sett;ng The macne 'or sewing vanous ut ity-stitch seams 5 explained on oage 26 and tbefo owing pages. Place the material under the sewing foot and lower the oresser bar lifter...
... of a seam. set the stitch length control between 2 and 3. Then regulate tne sotch .idth by turn utility-stitch control (5) until the zlgzag-st;ton symbo s ooposite the dot. until the straight- For ordinary sewing operations. Sett;ng The macne 'or sewing vanous ut ity-stitch seams 5 explained on oage 26 and tbefo owing pages. Place the material under the sewing foot and lower the oresser bar lifter...

Owner's Manual
Page 10
... 100 Upper tension too tight or lower tension too loose. Tighten screw (221 secureiy. bring the needle to ts highest point and raise the foot T rn out screw ,l 16) until the sewing foot can be set between 3 and 5 Please note: Ease both :ensions somewnat for special sewing operations, '7o change the needle, oring the needle bar to adlust the bobbin threaa tension. Turn this screw right (with your machine contains several sewing feet for sewing...
... 100 Upper tension too tight or lower tension too loose. Tighten screw (221 secureiy. bring the needle to ts highest point and raise the foot T rn out screw ,l 16) until the sewing foot can be set between 3 and 5 Please note: Ease both :ensions somewnat for special sewing operations, '7o change the needle, oring the needle bar to adlust the bobbin threaa tension. Turn this screw right (with your machine contains several sewing feet for sewing...

Owner's Manual
Page 11
... darning hoops in a size match ing the darning ioD to be drohped To do this, push the drop-feed button to the right to position B. To prepare your eft hand while the first stitches are anchored in darning hoops. attaching it from the rear so that soring clip c rests on A for darnnc. Lower the presser bar lifter Now tte machine feed has to posit:on needle set screw i22l Tighten sewing foot thumb screw...
... darning hoops in a size match ing the darning ioD to be drohped To do this, push the drop-feed button to the right to position B. To prepare your eft hand while the first stitches are anchored in darning hoops. attaching it from the rear so that soring clip c rests on A for darnnc. Lower the presser bar lifter Now tte machine feed has to posit:on needle set screw i22l Tighten sewing foot thumb screw...

Owner's Manual
Page 12
... (Fig. 1>. Second Seam: Start the second seam at felled seams are usually straignt stitched. Light y tension the fabric by pulling t sideways Insert the seam ridge into the telling foot and stitch it down Isee F:g 2 Quilting Use zigper foot No. 93-847600-00 with quilt .ng gauge or sewing parallel seams over the edge of the zipper. Open the two pieces. edge of the foot along the zipper teeth 1) Leave the needle in Fig...
... (Fig. 1>. Second Seam: Start the second seam at felled seams are usually straignt stitched. Light y tension the fabric by pulling t sideways Insert the seam ridge into the telling foot and stitch it down Isee F:g 2 Quilting Use zigper foot No. 93-847600-00 with quilt .ng gauge or sewing parallel seams over the edge of the zipper. Open the two pieces. edge of the foot along the zipper teeth 1) Leave the needle in Fig...

Owner's Manual
Page 13
... threads. : When threading toe reedles. For narrower cording, use zigzag stitches. i 2.01' •. Place the ) wide and material under the hemmer foot and lower the same Make 3 to 4 straight stitches to draw up the coed n thread. or cording foot and insert a twin needle whicr can be obtained from your edge right into the hemmer foot by threads backwards, as shown pu I n the drawing. Feed scrod the fabric th your sewing machine dealeri. N" t . 7 22 Cording...
... threads. : When threading toe reedles. For narrower cording, use zigzag stitches. i 2.01' •. Place the ) wide and material under the hemmer foot and lower the same Make 3 to 4 straight stitches to draw up the coed n thread. or cording foot and insert a twin needle whicr can be obtained from your edge right into the hemmer foot by threads backwards, as shown pu I n the drawing. Feed scrod the fabric th your sewing machine dealeri. N" t . 7 22 Cording...

Owner's Manual
Page 14
... ir Paff-shop) Make sure the needle and bobbin treads are the same size. as for cording worK. S ghtly increase the needle thread tension. Hemstitct'r:ng erfec: octanect v;tr a stnch width of2mm( 2 Zigzag stitching Tura utiiity-strtch corttroi (5, ciock.vise unti zgzag-sttcr s'jmooi a opcosite te no- The hemstitching effect is produced by nalf a turn ann sew the seconc seam, guiding the material so...
... ir Paff-shop) Make sure the needle and bobbin treads are the same size. as for cording worK. S ghtly increase the needle thread tension. Hemstitct'r:ng erfec: octanect v;tr a stnch width of2mm( 2 Zigzag stitching Tura utiiity-strtch corttroi (5, ciock.vise unti zgzag-sttcr s'jmooi a opcosite te no- The hemstitching effect is produced by nalf a turn ann sew the seconc seam, guiding the material so...

Owner's Manual
Page 15
.... 27 This will cover the fabric edge securely. 26 Press-open . Sew the two pieces of material together with a zigzag stitch of light and mediumweight fabrics, set as indicated above. This seam is particularly well suited for regulating the tension on narrow zigzag seam symbol. Set stitch length control bet ween buttonhole symbol and "O". When sewing synthetic stretch fabrics, please note the instructions given for stretch fabrics. Turn utility-stitch control (5) to zigzag-stitch symbol. Use ordinary sewing foot. To overcast...
.... 27 This will cover the fabric edge securely. 26 Press-open . Sew the two pieces of material together with a zigzag stitch of light and mediumweight fabrics, set as indicated above. This seam is particularly well suited for regulating the tension on narrow zigzag seam symbol. Set stitch length control bet ween buttonhole symbol and "O". When sewing synthetic stretch fabrics, please note the instructions given for stretch fabrics. Turn utility-stitch control (5) to zigzag-stitch symbol. Use ordinary sewing foot. To overcast...

Owner's Manual
Page 17
... thread ends and start your macnine. adjust. Flick the needle to zigzag symbol. Trace the monogram on buttons and sewing button holes, for sewing on the fabric. ze 19 CPFAFFD - - Raise the needle. Remove the foot and drop the ma chine feed Attach the darning foot and lower the presser bar lifter Insert a No. 70 needle and use No. 50 embroidering and darning thread. Ease the needle Thread tension somewhat. -s-I I IJ \\ \' '\ \J U Lti I. 30 Changing the needle position Some special sewing jobs are best piaced in the foot. C.D t c-z Needle positions...
... thread ends and start your macnine. adjust. Flick the needle to zigzag symbol. Trace the monogram on buttons and sewing button holes, for sewing on the fabric. ze 19 CPFAFFD - - Raise the needle. Remove the foot and drop the ma chine feed Attach the darning foot and lower the presser bar lifter Insert a No. 70 needle and use No. 50 embroidering and darning thread. Ease the needle Thread tension somewhat. -s-I I IJ \\ \' '\ \J U Lti I. 30 Changing the needle position Some special sewing jobs are best piaced in the foot. C.D t c-z Needle positions...

Owner's Manual
Page 18
... the second button hole seam, stooping about 1 mm (' . ) from the end of the first seam. 0 usn sttch 'vcth control 18) to reduce the 'eflgt'- Open the buttonhole wTh your seam rioper whicn is the right length, leave the needle n the fabric on a Dice of the sewing foot (2). R2 Ri CPFAFFD 32 3 4 Sew the first seam over the filler cord. O3-1OO1'9-OO Settings Set utifty-stoch cOntrol for zigzag stitcning...
... the second button hole seam, stooping about 1 mm (' . ) from the end of the first seam. 0 usn sttch 'vcth control 18) to reduce the 'eflgt'- Open the buttonhole wTh your seam rioper whicn is the right length, leave the needle n the fabric on a Dice of the sewing foot (2). R2 Ri CPFAFFD 32 3 4 Sew the first seam over the filler cord. O3-1OO1'9-OO Settings Set utifty-stoch cOntrol for zigzag stitcning...

Owner's Manual
Page 19
... Blindstitching Use bdindstitch sewing foot No. 93-030539-45. Baste the hem at right). Regulate the sttch width so that the folded edge s guided by the guide edge of its raw edge stitches before it is finisnea see drawing iith zigzag 3) and its tnrow catches one number lower. J\ I Blind stitch 294, 294-1 295, 295-1. 296-1 and 297-1 Orna mental elastic stitch 296-1 and 297-1. Sewing on elastic, worn areas, inserting patches, darning and sewing...
... Blindstitching Use bdindstitch sewing foot No. 93-030539-45. Baste the hem at right). Regulate the sttch width so that the folded edge s guided by the guide edge of its raw edge stitches before it is finisnea see drawing iith zigzag 3) and its tnrow catches one number lower. J\ I Blind stitch 294, 294-1 295, 295-1. 296-1 and 297-1 Orna mental elastic stitch 296-1 and 297-1. Sewing on elastic, worn areas, inserting patches, darning and sewing...

Owner's Manual
Page 20
... of buttonhole symbol Stitch width: maximum 1 1 t i; /' 1 Il Y t !t ,\ I /7 - 36 Inserting patches with the needle taking the left stitch into the fabric and the right stitch over the fabric edge. Turn the material over and trim close to the seams The seam which is to the left stitch over its edges. Fold the fabric along the folded edge with elastic stitch Attach ordinary sewing foot. On models 296-1 and 297-1, place...
... of buttonhole symbol Stitch width: maximum 1 1 t i; /' 1 Il Y t !t ,\ I /7 - 36 Inserting patches with the needle taking the left stitch into the fabric and the right stitch over the fabric edge. Turn the material over and trim close to the seams The seam which is to the left stitch over its edges. Fold the fabric along the folded edge with elastic stitch Attach ordinary sewing foot. On models 296-1 and 297-1, place...

Owner's Manual
Page 23
... the utility-stitch pattern is req. This stitch can be used to great stress, e g. Turn stitch length control (11) in the seams. Flick stitch width control to red triple-stitch symbol. Attach ordinary sewing foot. Turn stitch length control to straight stitch oosition. Sew the elastic press-open seams) for the respecti'Je utility-stitch sew ing operation. Pullover stitch 294-1, 295-1. 296-1 and 297-1 Feather stitch 296-1 and 297-1 Overlock stitch 2961 and 297-1 For seams exposed to mend damaged spots in the direction ndicated...
... the utility-stitch pattern is req. This stitch can be used to great stress, e g. Turn stitch length control (11) in the seams. Flick stitch width control to red triple-stitch symbol. Attach ordinary sewing foot. Turn stitch length control to straight stitch oosition. Sew the elastic press-open seams) for the respecti'Je utility-stitch sew ing operation. Pullover stitch 294-1, 295-1. 296-1 and 297-1 Feather stitch 296-1 and 297-1 Overlock stitch 2961 and 297-1 For seams exposed to mend damaged spots in the direction ndicated...

Owner's Manual
Page 24
... sewing foot. maximum Place the pieces of fabric on top of each other edge on new ones. Turn utili-stitch control 5)to replace worn ruober strancs on knee-length stockings. Honeycomb stitch Models 294-1. 295-1 296-1 and 297-1. at the same time placing the elastic strands nto its grooves. Sew along the edge so that the needle takes the left stitch over it, a • 4. - .. fl Use clear-view sewing foot. Stitch...
... sewing foot. maximum Place the pieces of fabric on top of each other edge on new ones. Turn utili-stitch control 5)to replace worn ruober strancs on knee-length stockings. Honeycomb stitch Models 294-1. 295-1 296-1 and 297-1. at the same time placing the elastic strands nto its grooves. Sew along the edge so that the needle takes the left stitch over it, a • 4. - .. fl Use clear-view sewing foot. Stitch...
Owner's Manual
Page 27
...aura ''e mc. :n-s:rcn cortrci -as • The Pfaff rotary hook will not normally jam, even if the machine should happen to -s tam-a. TO this end, remove the needle, the sewing foot anc the Doobin case witn the boobin. nstarDa D'I curc me machne arm and in me Smcn a' : co'rc arc -nfl... threao aecgea cerween be terson Discs Th rerm at '- - clean tne parts in the vicinity of the machine base ano tilt the nacnine back caut'o.s; On Pfaff machines 295, 295-1 and 297-1 loosen the set screw, lift the front of the free arm cover and puil the cover out lengthwise of oil into the raceway.
...aura ''e mc. :n-s:rcn cortrci -as • The Pfaff rotary hook will not normally jam, even if the machine should happen to -s tam-a. TO this end, remove the needle, the sewing foot anc the Doobin case witn the boobin. nstarDa D'I curc me machne arm and in me Smcn a' : co'rc arc -nfl... threao aecgea cerween be terson Discs Th rerm at '- - clean tne parts in the vicinity of the machine base ano tilt the nacnine back caut'o.s; On Pfaff machines 295, 295-1 and 297-1 loosen the set screw, lift the front of the free arm cover and puil the cover out lengthwise of oil into the raceway.

Owner's Manual
Page 28
... Foot control Motor engaging mechanism Removing the bobbin case Engaging and disengaging the sewing mechanism Winding the bobbin . . Stitchingterrycloth Darning rips Butt seaming . . Honeycomb stitch Pullover stitch . Elastic triple zigzag stitch . Pfaff 295, 295-1 and 297-1 Workplate of the Pfaff 295. 295-1 and 297-1 Preparing your machine for sewing Switching on elastic . . . . . Changing the needle position Button sewing Sewing buttonholes Utility-stitch seams sewn forwards Blindstitching . . . . . Contents Foreword Parts of the Pfaff 294-1 and 296l Parts...
... Foot control Motor engaging mechanism Removing the bobbin case Engaging and disengaging the sewing mechanism Winding the bobbin . . Stitchingterrycloth Darning rips Butt seaming . . Honeycomb stitch Pullover stitch . Elastic triple zigzag stitch . Pfaff 295, 295-1 and 297-1 Workplate of the Pfaff 295. 295-1 and 297-1 Preparing your machine for sewing Switching on elastic . . . . . Changing the needle position Button sewing Sewing buttonholes Utility-stitch seams sewn forwards Blindstitching . . . . . Contents Foreword Parts of the Pfaff 294-1 and 296l Parts...


