

Owner's Manual
Page 2
... owner of your machine. CPFAFFD Automatic 332-260 iNSTRUCTIONS FOREWORD Your dream has come true! This instruction book will be glad to help you understand the machine and give you valuable tips to make sewing more fun for you will find this book a valuable guide to -operate PFAFF Automatic. G-M.PFAFFAG Sewing Machine Factory ¶1 Ka...
... owner of your machine. CPFAFFD Automatic 332-260 iNSTRUCTIONS FOREWORD Your dream has come true! This instruction book will be glad to help you understand the machine and give you valuable tips to make sewing more fun for you will find this book a valuable guide to -operate PFAFF Automatic. G-M.PFAFFAG Sewing Machine Factory ¶1 Ka...

Owner's Manual
Page 5
naI%.nea1s /iac.4i,w Ceaticn Make sure stop motion fore you 're presser bar lever c and place both threads and behind the sewing foot. and ready to sew. 4 Slide ma under the presser foot. Raise under terial you begin sewing by white arrow). knob 6 is tightened be (clockwise as indicated 0 tbWuyrhnbelniatectvkoewarrayrrooduwyh)o.auve(ctooutunrtner-thcelobckawlainsceeaws hseheolwan, Never run a threaded machine unless you have fabric under needle, lower sewing foot --
naI%.nea1s /iac.4i,w Ceaticn Make sure stop motion fore you 're presser bar lever c and place both threads and behind the sewing foot. and ready to sew. 4 Slide ma under the presser foot. Raise under terial you begin sewing by white arrow). knob 6 is tightened be (clockwise as indicated 0 tbWuyrhnbelniatectvkoewarrayrrooduwyh)o.auve(ctooutunrtner-thcelobckawlainsceeaws hseheolwan, Never run a threaded machine unless you have fabric under needle, lower sewing foot --
Owner's Manual
Page 6
... pulling the fabric while stitching because the needle may cause the thread to hasten feeding by take -up lever d. Never try to tangle under I t The machine will nor mally draw one stitch tight before you begin and after you have completed a seam.
... pulling the fabric while stitching because the needle may cause the thread to hasten feeding by take -up lever d. Never try to tangle under I t The machine will nor mally draw one stitch tight before you begin and after you have completed a seam.
Owner's Manual
Page 8
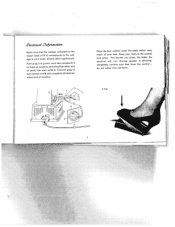
Push plug I of power cord into wall outlet 4. R 7132 jr 7 Place the foot control under the table within easy reach of machine. The harder you press, the faster the machine will run. During pauses in your foot on the control and press. do not allow it to the volt age in stitching, completely... there. Place your home. (Check other end of foot control cord 5 with receptacle at other appliances). Conned plug of cord) into receptacle 2 on bock of machine, and plug 3 (at balancewheel end of your foot from the control -
Push plug I of power cord into wall outlet 4. R 7132 jr 7 Place the foot control under the table within easy reach of machine. The harder you press, the faster the machine will run. During pauses in your foot on the control and press. do not allow it to the volt age in stitching, completely... there. Place your home. (Check other end of foot control cord 5 with receptacle at other appliances). Conned plug of cord) into receptacle 2 on bock of machine, and plug 3 (at balancewheel end of your foot from the control -
Owner's Manual
Page 12
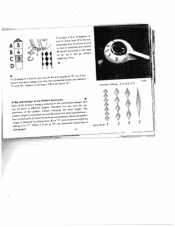
...*oeintrohaitgrropohu0ltt applying force. 123 AIw"f 1aa"n2at naadpnp"ae2ra"r.roswPieanrttbedorenxsiigDsn,n,yoyotouculmemaaray,ysifesetDtthitiesssdoeimtaleawbeoxhavacettll"yo2w"a.etr",2s"o;yobr,etiwf yeoeun Machine Setting: A 3, B 4, C 2 R 7095 AEcpfplsooaeeeancBuntathttgrriiengatbnrhognenufAcmisteislthdeebeonwvoeobgnranpfttenhard"iitti1mnhinas("eeg1.acdd,ero3Wiypnf,boaf5tyhedrftetoreaeetsnlsnhrenliendtgettidtin7nlPsw)eigbsFnayiptgnAslhieeltdceohvFttvusuetF.oehtrrnrerATeEdcEe"hhu,0ooeauwt"nnrnon,ehgmn"ftitiohc7hunah"eremge,tiehbaAcmyaetnhuosrdbeteuosrdmeom...
...*oeintrohaitgrropohu0ltt applying force. 123 AIw"f 1aa"n2at naadpnp"ae2ra"r.roswPieanrttbedorenxsiigDsn,n,yoyotouculmemaaray,ysifesetDtthitiesssdoeimtaleawbeoxhavacettll"yo2w"a.etr",2s"o;yobr,etiwf yeoeun Machine Setting: A 3, B 4, C 2 R 7095 AEcpfplsooaeeeancBuntathttgrriiengatbnrhognenufAcmisteislthdeebeonwvoeobgnranpfttenhard"iitti1mnhinas("eeg1.acdd,ero3Wiypnf,boaf5tyhedrftetoreaeetsnlsnhrenliendtgettidtin7nlPsw)eigbsFnayiptgnAslhieeltdceohvFttvusuetF.oehtrrnrerATeEdcEe"hhu,0ooeauwt"nnrnon,ehgmn"ftitiohc7hunah"eremge,tiehbaAcmyaetnhuosrdbeteuosrdmeom...
Owner's Manual
Page 14
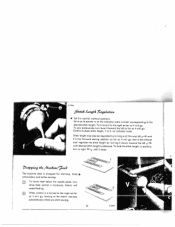
R71O0 6 Pull it through slot in bobbin, from in side. Hold end of thread through thread guide h. Pass end of threod and slowly start machine. Press in bobbin. You may continue sewing while you don't wont a full bobbin, press out lever i when sufficient amount of thread has been wound. Set ...
R71O0 6 Pull it through slot in bobbin, from in side. Hold end of thread through thread guide h. Pass end of threod and slowly start machine. Press in bobbin. You may continue sewing while you don't wont a full bobbin, press out lever i when sufficient amount of thread has been wound. Set ...
Owner's Manual
Page 18
... needle into opening of needle clomp. The needle set screw 0. R 6798 Dit,1tant 9acts 4&14t /Ve&2ks On PFAFF Automatic sewing machines, System 130R, flat-shank needles are available from every Pfoff dealer. Genuine Pfaff needles, System 130, are used . Make sure that the flat side of the needle shank and holds the...
... needle into opening of needle clomp. The needle set screw 0. R 6798 Dit,1tant 9acts 4&14t /Ve&2ks On PFAFF Automatic sewing machines, System 130R, flat-shank needles are available from every Pfoff dealer. Genuine Pfaff needles, System 130, are used . Make sure that the flat side of the needle shank and holds the...
Owner's Manual
Page 22
...!right of thread through needle eye. Prong w now pulls end of the loop - Slowly lower lever p. through the needle eye before you put fabric into machine. 21 V R $390 9kJ 7 awinj 14 the '4 13cn6t '7hea' A Hold needle thread lightly in your left hand. Place both threads back under sewing foot before you...
...!right of thread through needle eye. Prong w now pulls end of the loop - Slowly lower lever p. through the needle eye before you put fabric into machine. 21 V R $390 9kJ 7 awinj 14 the '4 13cn6t '7hea' A Hold needle thread lightly in your left hand. Place both threads back under sewing foot before you...
Owner's Manual
Page 25
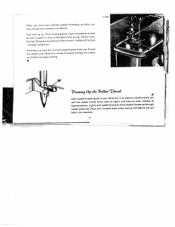
... stitch length. To lower feed below the needle plate, turn e right )- Turn lever f to the right as far as it stops. 7 zc2inf7 tli? , 4 1ac4ine The machine feed is obtained.
... stitch length. To lower feed below the needle plate, turn e right )- Turn lever f to the right as far as it stops. 7 zc2inf7 tli? , 4 1ac4ine The machine feed is obtained.

Owner's Manual
Page 27
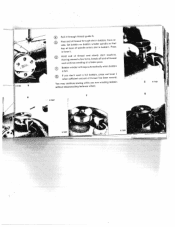
... animal or vegetable oils. A dry raceway will cause rapid wear. Ca an , 4 aintenani Longevity and smooth machine performance are dependent on regular and proper cleaning and oiling. Begin by arrows. This is advis able to keep the hook shaft bearing oiled. ; The ... plate and oiling the mechanism in the sewing hook is the most im portant oiling point. It is essential to establish a pattern when oiling your machine. All moving and rotating parts require regular lubrication. I The raceway in the free arm. Put one drop of the two oil holes behind the sewing...
... animal or vegetable oils. A dry raceway will cause rapid wear. Ca an , 4 aintenani Longevity and smooth machine performance are dependent on regular and proper cleaning and oiling. Begin by arrows. This is advis able to keep the hook shaft bearing oiled. ; The ... plate and oiling the mechanism in the sewing hook is the most im portant oiling point. It is essential to establish a pattern when oiling your machine. All moving and rotating parts require regular lubrication. I The raceway in the free arm. Put one drop of the two oil holes behind the sewing...

Owner's Manual
Page 28
The oiling points in the machine head 27 :, I Excessive quantities of oil usually will suffice. Oil should be - One or two drops of oil may soil the work and cause machine sluggishness. tilt it back and lift. Before you remove the top cover, set lever E be applied sparingly. tween 5 and 7. To pull cover up. R 7381 Oiling points in the machine arm can be reached easily by removing the top cover.
The oiling points in the machine head 27 :, I Excessive quantities of oil usually will suffice. Oil should be - One or two drops of oil may soil the work and cause machine sluggishness. tilt it back and lift. Before you remove the top cover, set lever E be applied sparingly. tween 5 and 7. To pull cover up. R 7381 Oiling points in the machine arm can be reached easily by removing the top cover.
Owner's Manual
Page 29
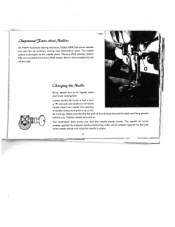
When inserting the new bulb, be sure to slide bulb pins into socket, turn right. To change the light bulb: Swing lever u up into bayonet socket slots. and pull out. Press the button on the front of the machine base to illuminate a larger working area. Push bulb up (see arrow) and hold. 4 5esøliqht 9aai The 25-waft sewlight is recessed under the machine arm. Lever u swings out the light to switch the sewlight on and off. Press bulb in and turn left.
When inserting the new bulb, be sure to slide bulb pins into socket, turn right. To change the light bulb: Swing lever u up into bayonet socket slots. and pull out. Press the button on the front of the machine base to illuminate a larger working area. Push bulb up (see arrow) and hold. 4 5esøliqht 9aai The 25-waft sewlight is recessed under the machine arm. Lever u swings out the light to switch the sewlight on and off. Press bulb in and turn left.

Owner's Manual
Page 30
I Ait.sttiii ,4ctc 3 e1i '7n.%ion d Your PFAFF 332 Automatic is equipped with the belt clips and revolves evenly. R 6546 The electric motor requires no special attention, except that it synchronizes with a 30-... s, make sure the washer is housed in U cover t and remove. Ii If the driving belt tension needs adjustment, take out the four screws in the machine base and drives the main shaft by means of service. I - - 1- --- -*1! - - 4•- Loosen screws s and adjust idler r until correct tension is obtained. Idler r should be set...
I Ait.sttiii ,4ctc 3 e1i '7n.%ion d Your PFAFF 332 Automatic is equipped with the belt clips and revolves evenly. R 6546 The electric motor requires no special attention, except that it synchronizes with a 30-... s, make sure the washer is housed in U cover t and remove. Ii If the driving belt tension needs adjustment, take out the four screws in the machine base and drives the main shaft by means of service. I - - 1- --- -*1! - - 4•- Loosen screws s and adjust idler r until correct tension is obtained. Idler r should be set...
Owner's Manual
Page 31
Wrong needle. Machine threaded improperly. Use correct needle and thread. 2. Poor or knotty thread used. above mentioned may cause thread breakage. Use good quality threads only. The correct ... needle up as far as it wilt go and be sure that the long groove faces you, and flat part of needle away from you. Machine Skips Stitches Ca use: Needle incorrectly inserted. Needle too fine or too thick for the thread. Remedy: See remedies listed under 1.
Wrong needle. Machine threaded improperly. Use correct needle and thread. 2. Poor or knotty thread used. above mentioned may cause thread breakage. Use good quality threads only. The correct ... needle up as far as it wilt go and be sure that the long groove faces you, and flat part of needle away from you. Machine Skips Stitches Ca use: Needle incorrectly inserted. Needle too fine or too thick for the thread. Remedy: See remedies listed under 1.

Owner's Manual
Page 32
...pulls needle so it snap into ploce. Bobbin unevenly wound. Pieces of sewing hook. Don't force the feeding motion. Remedy: Have your Pfaff dealer make the necessary adjustment. 31 1 I Thread too heavy, knotty or hard. the correct size for the needle and fabric. Don.... 3. Bobbin case inserted incorrectly. 4. Guide the material lightly. Needle Breaks Cause: Bent needle strikes point of thread between tension discs. Machine Feeds Improperly Cause: Feed dog set too low and does not rise up enough above needle plate level. 3. Use correct needle and thread...
...pulls needle so it snap into ploce. Bobbin unevenly wound. Pieces of sewing hook. Don't force the feeding motion. Remedy: Have your Pfaff dealer make the necessary adjustment. 31 1 I Thread too heavy, knotty or hard. the correct size for the needle and fabric. Don.... 3. Bobbin case inserted incorrectly. 4. Guide the material lightly. Needle Breaks Cause: Bent needle strikes point of thread between tension discs. Machine Feeds Improperly Cause: Feed dog set too low and does not rise up enough above needle plate level. 3. Use correct needle and thread...

Owner's Manual
Page 33
... with a stiff brush. 6. Remedy: Loosen or tighten motor belt by inferior oil. Use only Piaff sewing machine oil - Snarled thread between balance wheel and bushing. Machine Works Heavily Cause: Motor belt is still jammed, call your Pfaff dealer for help. never salad oil or glycerine. Unwind and remove thread. Thread iamming can be...
... with a stiff brush. 6. Remedy: Loosen or tighten motor belt by inferior oil. Use only Piaff sewing machine oil - Snarled thread between balance wheel and bushing. Machine Works Heavily Cause: Motor belt is still jammed, call your Pfaff dealer for help. never salad oil or glycerine. Unwind and remove thread. Thread iamming can be...
Owner's Manual
Page 34
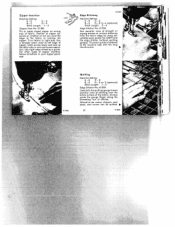
... the zipper. Sew parallel rows of ' zipper, stitch across lower end and up the other types of fabric. Use right edge of stitches. R7104 Quilting Machine Setting: E-0 C-2 8-0 D -0 or 2 (optional) Stitch Length: I - 2 Edge Stitcher No. 41350. Always guide the gauge finger along the preceding row of foot as ... D-0 Stitch Length: 1 -2 Zipper Foot No. 51 300. Used with the long thumb screw. The seam guide is fastened to the machine bed with the quilting gauge it sews parallel rows of stitching over the entire surface of the fabric to left edge of straight or zigzag...
... the zipper. Sew parallel rows of ' zipper, stitch across lower end and up the other types of fabric. Use right edge of stitches. R7104 Quilting Machine Setting: E-0 C-2 8-0 D -0 or 2 (optional) Stitch Length: I - 2 Edge Stitcher No. 41350. Always guide the gauge finger along the preceding row of foot as ... D-0 Stitch Length: 1 -2 Zipper Foot No. 51 300. Used with the long thumb screw. The seam guide is fastened to the machine bed with the quilting gauge it sews parallel rows of stitching over the entire surface of the fabric to left edge of straight or zigzag...

Owner's Manual
Page 35
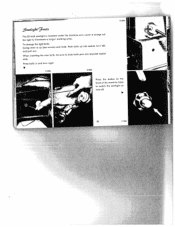
R 7171 41242 flp Flat Felled Seams Machine Setting: E -o C-2 8-0 D -0 or 2 (oplional) Stitch Length: 1-2 Flatfelled seams are used for felling on elasticized fabrics only. 4 First Seam Lay pieces together wrong sides facing up , insert ...
R 7171 41242 flp Flat Felled Seams Machine Setting: E -o C-2 8-0 D -0 or 2 (oplional) Stitch Length: 1-2 Flatfelled seams are used for felling on elasticized fabrics only. 4 First Seam Lay pieces together wrong sides facing up , insert ...

Owner's Manual
Page 36
... down feeding. To hem tricot fabrics increase the tension, and use the widest zigzag stitch so the hem has a rolled shell effect. 11246 R 6083 Hemming Machine Setting: E-O C-2 B-O D-O or 2 to 4 (optional) Stitch Length: 2 -4 The hemmer foot is in line with straight orzigzag stitches, depending on the type of the fabric to sew...
... down feeding. To hem tricot fabrics increase the tension, and use the widest zigzag stitch so the hem has a rolled shell effect. 11246 R 6083 Hemming Machine Setting: E-O C-2 B-O D-O or 2 to 4 (optional) Stitch Length: 2 -4 The hemmer foot is in line with straight orzigzag stitches, depending on the type of the fabric to sew...
Owner's Manual
Page 37
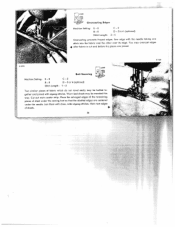
... may be mended this way. Join them with the needle taking one stitch into the fabric and the other over its edge. LJJ Overcasting Edges Machine Setting: E -0 B-0 Stitch Length: C-2 D - 2 to gether and joined with zigzag stitches. You may be butted to 4 (optional) 3 -4 ... edges. Hem row edges of sheet under the needle. Sew edge with close, wide zigzag stitches. Cut out worn center strip. R 6070 44088 Butt Seaming Machine Setting: E -0 B-0 Stitch Length: C-2 0-3 or 4 (optional) 1 3 - Place the selvaged edges of the remaining pieces of sheets. 36 R 7169 ...
... may be mended this way. Join them with the needle taking one stitch into the fabric and the other over its edge. LJJ Overcasting Edges Machine Setting: E -0 B-0 Stitch Length: C-2 D - 2 to gether and joined with zigzag stitches. You may be butted to 4 (optional) 3 -4 ... edges. Hem row edges of sheet under the needle. Sew edge with close, wide zigzag stitches. Cut out worn center strip. R 6070 44088 Butt Seaming Machine Setting: E -0 B-0 Stitch Length: C-2 0-3 or 4 (optional) 1 3 - Place the selvaged edges of the remaining pieces of sheets. 36 R 7169 ...


