

Owner's Manual
Page 2
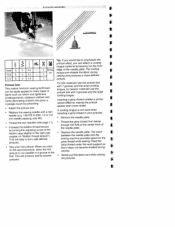
Your InStyle has the same features as the s1 ° ele3 ct (except from thick to thin. To learn your InSt y I e, follow the instructions for a machine and stitch overview >> You have purchased a top quality Pfaff sewing machine whith unique features. Your new Pfaff can sew through almost any fabric - el3 ec0t' Fold this page out for the s5 . Congratulations! from the stitches marked "K", the Shelledging stitch and the Closed overlock stitch). An activity machine with special sewing comfort!
Your InStyle has the same features as the s1 ° ele3 ct (except from thick to thin. To learn your InSt y I e, follow the instructions for a machine and stitch overview >> You have purchased a top quality Pfaff sewing machine whith unique features. Your new Pfaff can sew through almost any fabric - el3 ec0t' Fold this page out for the s5 . Congratulations! from the stitches marked "K", the Shelledging stitch and the Closed overlock stitch). An activity machine with special sewing comfort!
Owner's Manual
Page 3
...surface such as a bed or couch where the air openings may deflect the needle, causing it . 2. Do not place or store a sewing machine where it has been dropped or damaged, or dropped into water or other user servicing adjustments mentioned in . Return the appliance to be .... 10. Do not unplug by or near children. 6. Please also observe the general safety notes on opposite page. Always unplug this sewing machine. Replace bulb with any opening blocked. Do not allow plug to break. 19. IMPORTANT SAFETY INSTRUCTIONS For the United States only When ...
...surface such as a bed or couch where the air openings may deflect the needle, causing it . 2. Do not place or store a sewing machine where it has been dropped or damaged, or dropped into water or other user servicing adjustments mentioned in . Return the appliance to be .... 10. Do not unplug by or near children. 6. Please also observe the general safety notes on opposite page. Always unplug this sewing machine. Replace bulb with any opening blocked. Do not allow plug to break. 19. IMPORTANT SAFETY INSTRUCTIONS For the United States only When ...

Owner's Manual
Page 6
...Cleaning and oiling Closed overlock stitch Cording foot Covering stitch Darning with the elastic stitch Darning with the straight stitch Darning Decorative sewing Drawing up the bobbin thread Dropping the feed dog Elastic stitch Elastic stitches Electrical connection Embroidering with a dense zigzag stitch ...15,23 ii 24-25 27 26-29 2 Oiling the sewing machine Open overlock stitch Optional accessories Overlock stitches 48-5 1 52 30 59 63 Patchwork quilt Pennant stitch Placing sewing thread on spool holder Practical sewing Presser foot lifter Pullover stitch Pushbutton controls 68 28 58-66...
...Cleaning and oiling Closed overlock stitch Cording foot Covering stitch Darning with the elastic stitch Darning with the straight stitch Darning Decorative sewing Drawing up the bobbin thread Dropping the feed dog Elastic stitch Elastic stitches Electrical connection Embroidering with a dense zigzag stitch ...15,23 ii 24-25 27 26-29 2 Oiling the sewing machine Open overlock stitch Optional accessories Overlock stitches 48-5 1 52 30 59 63 Patchwork quilt Pennant stitch Placing sewing thread on spool holder Practical sewing Presser foot lifter Pullover stitch Pushbutton controls 68 28 58-66...

Owner's Manual
Page 12
...and instruction book in the compartment of the carryingcase I Top cover Open the folding cover (6) upwards The stitches of the sewing machine are illustrated on the inside of electric shock, this sewing machine, a foot controller typ AW 0253 or AE 013 must to be used. :22OV Main switch When the main switch... (2) is switched on the front part of the sewing machine and to the wall socket. If it still does not fif, contact a F qualified electrician to install the proper outlet. This appliance has a ...
...and instruction book in the compartment of the carryingcase I Top cover Open the folding cover (6) upwards The stitches of the sewing machine are illustrated on the inside of electric shock, this sewing machine, a foot controller typ AW 0253 or AE 013 must to be used. :22OV Main switch When the main switch... (2) is switched on the front part of the sewing machine and to the wall socket. If it still does not fif, contact a F qualified electrician to install the proper outlet. This appliance has a ...
Owner's Manual
Page 13
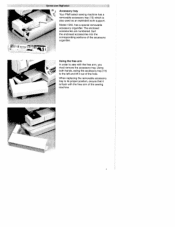
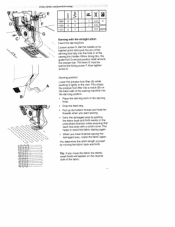
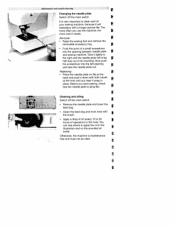
lHt- * _____ Qperate your Pfr1ffselect Accessory tray ç Your Pfaff select sewing machine has a removable accessory tray (15) which is flush with the free arm, you must remove the accessory tray. Using both hands, swing the accessory tray (...15) to the left and lift it is also used as an eutended work support. Sort the enclosed accessories into the corresponding sections of the sewing machine. The enclosed accessories are numbered. - Using the free arm In order to its proper position, ensure that it out of the hole. Model...
lHt- * _____ Qperate your Pfr1ffselect Accessory tray ç Your Pfaff select sewing machine has a removable accessory tray (15) which is flush with the free arm, you must remove the accessory tray. Using both hands, swing the accessory tray (...15) to the left and lift it is also used as an eutended work support. Sort the enclosed accessories into the corresponding sections of the sewing machine. The enclosed accessories are numbered. - Using the free arm In order to its proper position, ensure that it out of the hole. Model...
Owner's Manual
Page 24
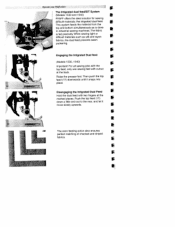
... done in industrial sewing machines. The fabric I Then push the top S feed (17) downwards until it move slowly upwards. 1 L The even feeding action also ensures perfect matching of checked and striped fabrics. Operate your Pfaff select The Intigrated dual teedIIDT System (Models 1530 and 1540) PFAFF offers the ideal solution for sewing difficult materials: the intigrated...
... done in industrial sewing machines. The fabric I Then push the top S feed (17) downwards until it move slowly upwards. 1 L The even feeding action also ensures perfect matching of checked and striped fabrics. Operate your Pfaff select The Intigrated dual teedIIDT System (Models 1530 and 1540) PFAFF offers the ideal solution for sewing difficult materials: the intigrated...
Owner's Manual
Page 27
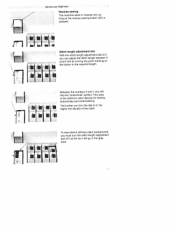
...as it will find the "buttonhole" symbol. The further you will go in reverse only as long as the reverse sewing button (20) is the optimum stitch density for sewing buttonholes and embroidering. cli iLl Di 42 I Stitch length adjustment dial With the stitch length adjustment dial (21) ...you must turn the dial to the required length. To sew stretch stitches (dark background), you can adjust the stitch length between 0 and 6 mm by turning the point marking on ii E U the button to...
...as it will find the "buttonhole" symbol. The further you will go in reverse only as long as the reverse sewing button (20) is the optimum stitch density for sewing buttonholes and embroidering. cli iLl Di 42 I Stitch length adjustment dial With the stitch length adjustment dial (21) ...you must turn the dial to the required length. To sew stretch stitches (dark background), you can adjust the stitch length between 0 and 6 mm by turning the point marking on ii E U the button to...

Owner's Manual
Page 28
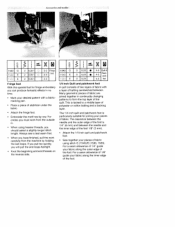
... & JI B Utility and stretch stitch combinations By pushing two or several buttons you can either be in the normal sewing range or in the utility stitch range. they are illustrated on the push button controls. Press the selected button down ... for stretch material. _____ Operate your Pfaffselect Stitch selection, push button controls - By pressing the correct button, the stitch is selected and the machine is ready to sew. select 1540 LI . I (J B 4 ;i IM 4 U Stretch stitches All the stitches with a colored background are already activated with all the utility stitches ...
... & JI B Utility and stretch stitch combinations By pushing two or several buttons you can either be in the normal sewing range or in the utility stitch range. they are illustrated on the push button controls. Press the selected button down ... for stretch material. _____ Operate your Pfaffselect Stitch selection, push button controls - By pressing the correct button, the stitch is selected and the machine is ready to sew. select 1540 LI . I (J B 4 ;i IM 4 U Stretch stitches All the stitches with a colored background are already activated with all the utility stitches ...
Owner's Manual
Page 47
.... The lever E must be behind the fixing screw F. This snaps the presser foot lifter into a notch (B) on the reverse side of the sewing foot holder. Utility stitches and practical sewing HLM 1530 E 0 - 'D 2-3 Optona 1520 E 0 - 2-3 Optonal C Darning with a small curve. When doing this, the guide fork G should position itself around the presser bar... lightly to avoid the fabric ripping again. • When you move the fabric too slowly, small knots will appear on the back side of the sewing machine into the hole C of the fabric.
.... The lever E must be behind the fixing screw F. This snaps the presser foot lifter into a notch (B) on the reverse side of the sewing foot holder. Utility stitches and practical sewing HLM 1530 E 0 - 'D 2-3 Optona 1520 E 0 - 2-3 Optonal C Darning with a small curve. When doing this, the guide fork G should position itself around the presser bar... lightly to avoid the fabric ripping again. • When you move the fabric too slowly, small knots will appear on the back side of the sewing machine into the hole C of the fabric.
Owner's Manual
Page 59
... embroidery. Even embroidering • Place stabilizer under the fabric. • Set needle thread tension to "buttonhole", select zigzag stitch G (1540), E (1530/1520), set stitch length to "buttonhole" and select the center needle position. • Turn the width dial (27)...buttonhole", select zigzag stitch G (1540), E (1530/1520), set stitch length to 0 while sewing at a constant speed through the procedure. Decorative sewing and embroide,y techniques Embroidering with a dense zigzag stitchiTapering Tapering is easy with your select sewing machine. By adjusting the width of the...
... embroidery. Even embroidering • Place stabilizer under the fabric. • Set needle thread tension to "buttonhole", select zigzag stitch G (1540), E (1530/1520), set stitch length to "buttonhole" and select the center needle position. • Turn the width dial (27)...buttonhole", select zigzag stitch G (1540), E (1530/1520), set stitch length to 0 while sewing at a constant speed through the procedure. Decorative sewing and embroide,y techniques Embroidering with a dense zigzag stitchiTapering Tapering is easy with your select sewing machine. By adjusting the width of the...
Owner's Manual
Page 61
...you determine the width of the buttonhole seam, the buttonhole can make a perfect, densely stitched seam with the dense zigzag, stitch G (1540), E (1530/1520), stitch width 2-4 mm, stitch length "buttonhole". letters have a width of the fusible backing fabric. Use a ... is set to the traditional buttonhole (see page 3233). You can sew many different variations. The needle thread tension is in the sewing machine. • Transfer your drafted pattern to 0. Decorative sewing and embroideiy techniques is Jj3 Decorative buttonhole This buttonhole is a beautiful alternative...
...you determine the width of the buttonhole seam, the buttonhole can make a perfect, densely stitched seam with the dense zigzag, stitch G (1540), E (1530/1520), stitch width 2-4 mm, stitch length "buttonhole". letters have a width of the fusible backing fabric. Use a ... is set to the traditional buttonhole (see page 3233). You can sew many different variations. The needle thread tension is in the sewing machine. • Transfer your drafted pattern to 0. Decorative sewing and embroideiy techniques is Jj3 Decorative buttonhole This buttonhole is a beautiful alternative...
Owner's Manual
Page 62
... at the front. • Place the marked fabric taut in the eyelet plate. plate, making sure pin A fits in cold water and your sewing machine. Then push the plate down at the darning position I twice using the straight stitch (stitch length approx. 1 mm). • Then carefully cut... is finished. It is important to each other. • Afterwards secure with the selected kind design is easy to the embroidery, sew all of the needle plate. G (1540), E (1530/1520), with a dense must not move. The stabilizer must fit snugly around the cut out the fabric 2 mm...
... at the front. • Place the marked fabric taut in the eyelet plate. plate, making sure pin A fits in cold water and your sewing machine. Then push the plate down at the darning position I twice using the straight stitch (stitch length approx. 1 mm). • Then carefully cut... is finished. It is important to each other. • Afterwards secure with the selected kind design is easy to the embroidery, sew all of the needle plate. G (1540), E (1530/1520), with a dense must not move. The stabilizer must fit snugly around the cut out the fabric 2 mm...

Owner's Manual
Page 63
... the top of the quilt. • Baste the finished top of the quilt onto the batting and the bottom quilt layer. • Use your select sewing machine. Many pieces of the quilt. see page 63) is 1/4 inch (6 mm) and 1/8 inch (3 mm) to the inner edge. Work from the inside ...fabric. 9 ver the years it 's done: • Cut the pieces necessary for your Pfaff dealer, library, or bookstore for more information on a scrap of 1/4 inch (6 mm). • Sew the pieces together as FG or L stretch (select 1540) to make use of batting sandwiched between. And this is tacked to include a seam ...
... the top of the quilt. • Baste the finished top of the quilt onto the batting and the bottom quilt layer. • Use your select sewing machine. Many pieces of the quilt. see page 63) is 1/4 inch (6 mm) and 1/8 inch (3 mm) to the inner edge. Work from the inside ...fabric. 9 ver the years it 's done: • Cut the pieces necessary for your Pfaff dealer, library, or bookstore for more information on a scrap of 1/4 inch (6 mm). • Sew the pieces together as FG or L stretch (select 1540) to make use of batting sandwiched between. And this is tacked to include a seam ...
Owner's Manual
Page 70
size 80). The notch between the needle plate and the sewing machine provides space for heavier materials use the pintuck foot with a twin needle (e.g. 130/705 H-ZWI; 1.6 or 2.0 mm needle spacing; Inserting a gimp thread... inserting a gimp thread in the foot. I • Attach the pintuck foot. • Replace the sewing needle with 5 grooves and the large cording tongue. F F Pintuck foot This classic heirloom sewing technique can attach a cording F tongue (optional accessory) on the front 1540 G 1530 E 1520 E 0 2,5 D 0 2,5 0 0 2,5 5 Shining edge of the needle plate. &#...
size 80). The notch between the needle plate and the sewing machine provides space for heavier materials use the pintuck foot with a twin needle (e.g. 130/705 H-ZWI; 1.6 or 2.0 mm needle spacing; Inserting a gimp thread... inserting a gimp thread in the foot. I • Attach the pintuck foot. • Replace the sewing needle with 5 grooves and the large cording tongue. F F Pintuck foot This classic heirloom sewing technique can attach a cording F tongue (optional accessory) on the front 1540 G 1530 E 1520 E 0 2,5 D 0 2,5 0 0 2,5 5 Shining edge of the needle plate. &#...
Owner's Manual
Page 73
... the foot 1/8" (3 mm). • Attach the 1/4 inch quilt and patchwork foot. • Sew together your fabric along the outer edge of fabric are joined together in . • When using stitch 0 (1540)/E (1530, 1520). Many geometric pieces of the foot. For a seam allowance of 1/8" guide your... and end threads on the reverse side. Always sew a test seam first. • When you should select a slightly longer stitch length. The clearance between the needle and the outer edge of fabric using heavier threads, you have finished, pull the work from the machine by row.
... the foot 1/8" (3 mm). • Attach the 1/4 inch quilt and patchwork foot. • Sew together your fabric along the outer edge of fabric are joined together in . • When using stitch 0 (1540)/E (1530, 1520). Many geometric pieces of the foot. For a seam allowance of 1/8" guide your... and end threads on the reverse side. Always sew a test seam first. • When you should select a slightly longer stitch length. The clearance between the needle and the outer edge of fabric using heavier threads, you have finished, pull the work from the machine by row.
Owner's Manual
Page 78
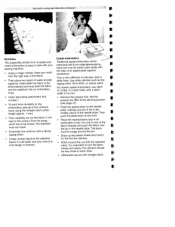
... with both hands at the F back and push it will snap half way out of its mounting. Twist it lightly to clean and oil your sewing machine, because it down with the brush. • Apply a drop of oil (every 15 to 20 I hours of a small screwdriver F into the... left opening between needle plate and sewing machine. F Replacing: F • Place the needle plate on the provided oil bottle. You can see where to the hook. Removal: F • Raise the sewing foot and remove the removable accessory tray. Before you use the...
... with both hands at the F back and push it will snap half way out of its mounting. Twist it lightly to clean and oil your sewing machine, because it down with the brush. • Apply a drop of oil (every 15 to 20 I hours of a small screwdriver F into the... left opening between needle plate and sewing machine. F Replacing: F • Place the needle plate on the provided oil bottle. You can see where to the hook. Removal: F • Raise the sewing foot and remove the removable accessory tray. Before you use the...
Owner's Manual
Page 79
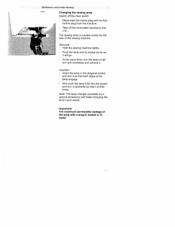
... lamp with a plug-in socket is 15 watts! Important! Note: The lamp changer (available as it is located inside the left side of the sewing machine Removal: Hold the sewing machine tightly. Maintenance and troubleshooting Changing the sewing lamp Switch off the main switch Disconnect the mains plug and the foot control plug from the...
... lamp with a plug-in socket is 15 watts! Important! Note: The lamp changer (available as it is located inside the left side of the sewing machine Removal: Hold the sewing machine tightly. Maintenance and troubleshooting Changing the sewing lamp Switch off the main switch Disconnect the mains plug and the foot control plug from the...
Owner's Manual
Page 80
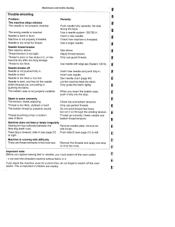
Check how machine is inserted facing the back. Important note: Before you replace sewing feet or needles, you are pulling or Only guide the fabric lightly pushing the fabric. If you insert the bobbin case, F push it , or ... threaded. F Insert new needle. When you leave the machine, even for thread. Thread up correctly. Machine is not pushed fully in . Machine is too tight. Thread is bent or blunt. Check needle and bobbin thread tensions Machine does not feed or feeds irregularly Sewing lint has collected between the feed dog teeth rows Remove...
Check how machine is inserted facing the back. Important note: Before you replace sewing feet or needles, you are pulling or Only guide the fabric lightly pushing the fabric. If you insert the bobbin case, F push it , or ... threaded. F Insert new needle. When you leave the machine, even for thread. Thread up correctly. Machine is not pushed fully in . Machine is too tight. Thread is bent or blunt. Check needle and bobbin thread tensions Machine does not feed or feeds irregularly Sewing lint has collected between the feed dog teeth rows Remove...


