

Owner's Manual
Page 3
... dial 11 Threading path 12 Thread cutter 13 Needle threader (1540) 14 Presser foot holder with presser foot 15 Removable accessory tray 16 Base plate 17 IDT System / Integrated Dual Feed (1540/1530) 18 Needle holder with fixing screw 19 Presser foot lifter 20 Button for "reverse sewing" 21 Stitch... length dial 22 Stitch selection 1540 23 Carrying handle 24 Stitch selection 1530 & 1520 25 Thread guide 26 Sewing lamp (max. 15 watt) 27...
... dial 11 Threading path 12 Thread cutter 13 Needle threader (1540) 14 Presser foot holder with presser foot 15 Removable accessory tray 16 Base plate 17 IDT System / Integrated Dual Feed (1540/1530) 18 Needle holder with fixing screw 19 Presser foot lifter 20 Button for "reverse sewing" 21 Stitch... length dial 22 Stitch selection 1540 23 Carrying handle 24 Stitch selection 1530 & 1520 25 Thread guide 26 Sewing lamp (max. 15 watt) 27...

Owner's Manual
Page 5
... disconnect, turn all moving parts. Do not use outdoors. 11. Use needles recommended by the manufacturer as contained in the needle area, such as threading needle, changing needle, threading bobbin, or changing presser foot, etc. 20. Always unplug before using and before cleaning it is required around the sewing machine needle. 16...
... disconnect, turn all moving parts. Do not use outdoors. 11. Use needles recommended by the manufacturer as contained in the needle area, such as threading needle, changing needle, threading bobbin, or changing presser foot, etc. 20. Always unplug before using and before cleaning it is required around the sewing machine needle. 16...

Owner's Manual
Page 6
...overlock stitch Cording foot Covering stitch Darning with the elastic stitch Darning with the straight stitch Darning Decorative sewing Drawing up the bobbin thread Dropping the feed dog Elastic stitch Elastic stitches Electrical connection Embroidering with a dense zigzag stitch Eyelet embroidery Feather stitch Felling foot ...Integrated Dual feed / IDT 14 Left needle position 16 Main switch Maintenance and trouble-shooting Monograms 2 67-70 48 Needle table Needle thread tension Needle threader Non-elastic stitches 64-65 15,23 11 24-25 27 26-29 2 Oiling the sewing machine Open overlock ...
...overlock stitch Cording foot Covering stitch Darning with the elastic stitch Darning with the straight stitch Darning Decorative sewing Drawing up the bobbin thread Dropping the feed dog Elastic stitch Elastic stitches Electrical connection Embroidering with a dense zigzag stitch Eyelet embroidery Feather stitch Felling foot ...Integrated Dual feed / IDT 14 Left needle position 16 Main switch Maintenance and trouble-shooting Monograms 2 67-70 48 Needle table Needle thread tension Needle threader Non-elastic stitches 64-65 15,23 11 24-25 27 26-29 2 Oiling the sewing machine Open overlock ...
Owner's Manual
Page 7
...Repairing tears Reverse sewing Richelieu Right needle position Ruffler 63 53, 63 3 13 38 17 52 16 61 Tapering Thread tension Thread cutter Threading the upper thread Top feed (Integrated Dual Feed) Top-stitching Trouble-shooting Twin needle 49-51 15 12 10 14 23 70 11, ... Shirring foot 79 Shell-edging 44 Smocking 35 Special accessories table 58 Stabilizing edges 42 Standard buttonhole 33 Standard buttonhole with gimp thread 33 Stitch density 17 Stitch length adjustment dial 17 Stitch selection dial 19 Straight stitch 24 Stretch triple straight stitch 26 Stretch ...
...Repairing tears Reverse sewing Richelieu Right needle position Ruffler 63 53, 63 3 13 38 17 52 16 61 Tapering Thread tension Thread cutter Threading the upper thread Top feed (Integrated Dual Feed) Top-stitching Trouble-shooting Twin needle 49-51 15 12 10 14 23 70 11, ... Shirring foot 79 Shell-edging 44 Smocking 35 Special accessories table 58 Stabilizing edges 42 Standard buttonhole 33 Standard buttonhole with gimp thread 33 Stitch density 17 Stitch length adjustment dial 17 Stitch selection dial 19 Straight stitch 24 Stretch triple straight stitch 26 Stretch ...

Owner's Manual
Page 9
Introduction Stitch table (stretch stitches) select 1540 select 1530 & select 1520 Stitch Description 1540 1530/1520 D - Herringbone stitch G E Stretch triple straight stitch, 15 needle positions Application Elastic closing and serging seams for jersey. inside seams as well as seams on elastic thread, overstitching terry cloth seams and for ornamental hem seams. Penant stitch A decorative...
Introduction Stitch table (stretch stitches) select 1540 select 1530 & select 1520 Stitch Description 1540 1530/1520 D - Herringbone stitch G E Stretch triple straight stitch, 15 needle positions Application Elastic closing and serging seams for jersey. inside seams as well as seams on elastic thread, overstitching terry cloth seams and for ornamental hem seams. Penant stitch A decorative...

Owner's Manual
Page 11
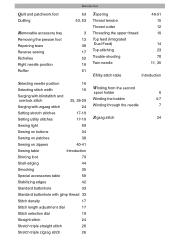
Operate your Pfaff select Operate your Pfaff select Electrical connection Removable accessory tray Bobbins Bobbin case Threading the needle Needle threader Pulling up the bobbin thread Presser foot lifter Thread cutter Changing the presser foot IDT System/Integrated Dual Feed Changing the needle Needle thread tension Lowering the feed dog Stitch width dial Needle position dial Reverse sewing Stitch length dial Stitch selection 2 3 4-7 8-9 10 11 12 13 12 13 14 15 15 15 16 16 17 17 18-19 1
Operate your Pfaff select Operate your Pfaff select Electrical connection Removable accessory tray Bobbins Bobbin case Threading the needle Needle threader Pulling up the bobbin thread Presser foot lifter Thread cutter Changing the presser foot IDT System/Integrated Dual Feed Changing the needle Needle thread tension Lowering the feed dog Stitch width dial Needle position dial Reverse sewing Stitch length dial Stitch selection 2 3 4-7 8-9 10 11 12 13 12 13 14 15 15 15 16 16 17 17 18-19 1
Owner's Manual
Page 15
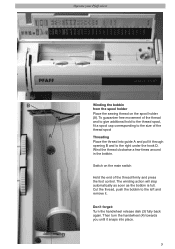
... and pull it . Operate your Pfaff select B A D Winding the bobbin from the spool holder Place the sewing thread on the main switch Hold the end of the thread spool Threading Place the thread into place. 5 Cut the thread, push the bobbin to the size of the thread firmly and press the foot... control. Wind the thread clockwise a few times around in ...
... and pull it . Operate your Pfaff select B A D Winding the bobbin from the spool holder Place the sewing thread on the main switch Hold the end of the thread spool Threading Place the thread into place. 5 Cut the thread, push the bobbin to the size of the thread firmly and press the foot... control. Wind the thread clockwise a few times around in ...
Owner's Manual
Page 16
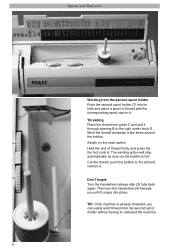
Operate your Pfaff select C B Winding from the second spool D holder without having to the left and remove it. TIP: If the machine is full. Wind the thread clockwise a few times around the bobbin. Switch on the main switch Hold the end of thread with the corresponding spool cap on it ...through opening B to the right under hook D. Cut the thread, push the bobbin to unthread the machine. 6 The winding action will stop automatically as soon as the bobbin is already threaded, you until it snaps into guide C and pull it . Don't forget: Turn...
Operate your Pfaff select C B Winding from the second spool D holder without having to the left and remove it. TIP: If the machine is full. Wind the thread clockwise a few times around the bobbin. Switch on the main switch Hold the end of thread with the corresponding spool cap on it ...through opening B to the right under hook D. Cut the thread, push the bobbin to unthread the machine. 6 The winding action will stop automatically as soon as the bobbin is already threaded, you until it snaps into guide C and pull it . Don't forget: Turn...

Owner's Manual
Page 17
... positioned at its very top. Pass the thread to right (9). Then wind the thread several times around the bobbin. Don't forget: Make sure to stop the needle from left to the right under the guide hook D. then through the presser foot and downwards; Operate your Pfaff select D Winding through the needle Even if...
... positioned at its very top. Pass the thread to right (9). Then wind the thread several times around the bobbin. Don't forget: Make sure to stop the needle from left to the right under the guide hook D. then through the presser foot and downwards; Operate your Pfaff select D Winding through the needle Even if...

Owner's Manual
Page 18
The interlacing should be interlaced between the two fabric pieces. Operate your Pfaff select Bobbin Case/Hook Cover Switch off the main switch Hold the side of the material only when sewing decorative seams, buttonholes and darning. 8 Release ... the bobbin case Raise the bobbin case lever and pull out the bobbin case. Thread tension To ensure perfect sewing and a durable seam, the top and bottom thread-tensions must be well adjusted to each other and the threads must be visible from the underside of the bobbin case/hook cover and open...
The interlacing should be interlaced between the two fabric pieces. Operate your Pfaff select Bobbin Case/Hook Cover Switch off the main switch Hold the side of the material only when sewing decorative seams, buttonholes and darning. 8 Release ... the bobbin case Raise the bobbin case lever and pull out the bobbin case. Thread tension To ensure perfect sewing and a durable seam, the top and bottom thread-tensions must be well adjusted to each other and the threads must be visible from the underside of the bobbin case/hook cover and open...

Owner's Manual
Page 19
In doing so, pull the thread sideways through slot A, then under the tension plate B until it will go. Inserting the bobbin case Lift lever F and slide the bobbin case onto the hook pin D as far as it rests in the opening (see arrow). The bobbin case must turn clockwise. Operate your Pfaff select Inserting the bobbin Insert the full bobbin into the bobbin case. Check: When you look at the bobbin and pull the thread, the bobbin must not fall out of the bobbin case must face upwards. Opening E of the hook. 9 Check: Pull the bobbin thread sharply.
In doing so, pull the thread sideways through slot A, then under the tension plate B until it will go. Inserting the bobbin case Lift lever F and slide the bobbin case onto the hook pin D as far as it rests in the opening (see arrow). The bobbin case must turn clockwise. Operate your Pfaff select Inserting the bobbin Insert the full bobbin into the bobbin case. Check: When you look at the bobbin and pull the thread, the bobbin must not fall out of the bobbin case must face upwards. Opening E of the hook. 9 Check: Pull the bobbin thread sharply.
Owner's Manual
Page 20
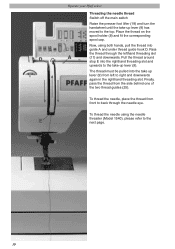
... the take-up lever (9). Finally, pass the thread from front to back through the lefthand threading slot D A (11) and downwards. To thread the needle using both hands, pull the thread into the righthand threading slot and upwards to the next page. 10 Operate your Pfaff select Threading the needle thread Switch off the main switch Raise the presser...
... the take-up lever (9). Finally, pass the thread from front to back through the lefthand threading slot D A (11) and downwards. To thread the needle using both hands, pull the thread into the righthand threading slot and upwards to the next page. 10 Operate your Pfaff select Threading the needle thread Switch off the main switch Raise the presser...
Owner's Manual
Page 21
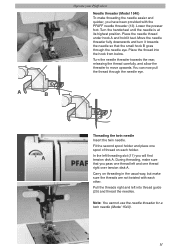
...it taut. Place the thread into thread guide (25) and thread the needles. You can now pull the thread through the needle eye. During threading, make sure that the small hook B goes through the needle eye. A B Operate your Pfaff select Needle threader (Model 1540) To make threading the needle easier and ...that you will find tension disk A. Pull the threads right and left threading slot (11) you pass one thread left and one spool of thread on threading in the usual way, but make sure the threads are not twisted with the PFAFF needle threader (13). A In the left into the...
...it taut. Place the thread into thread guide (25) and thread the needles. You can now pull the thread through the needle eye. During threading, make sure that the small hook B goes through the needle eye. A B Operate your Pfaff select Needle threader (Model 1540) To make threading the needle easier and ...that you will find tension disk A. Pull the threads right and left threading slot (11) you pass one thread left and one spool of thread on threading in the usual way, but make sure the threads are not twisted with the PFAFF needle threader (13). A In the left into the...

Owner's Manual
Page 22
Hold the needle thread and turn the handwheel towards you until the needle is at the top again and the bobbin thread has formed a loop. Pull the needle thread to the front over the thread cutter (12). 12 Thread cutter Pull the threads from the back to draw up the bobbin thread Turn off the main switch Raise the presser foot. Bobbin thread Close the bobbin case/hook cover and pull the thread under the presser foot to the left. Operate your Pfaff select Drawing up the bobbin thread.
Hold the needle thread and turn the handwheel towards you until the needle is at the top again and the bobbin thread has formed a loop. Pull the needle thread to the front over the thread cutter (12). 12 Thread cutter Pull the threads from the back to draw up the bobbin thread Turn off the main switch Raise the presser foot. Bobbin thread Close the bobbin case/hook cover and pull the thread under the presser foot to the left. Operate your Pfaff select Drawing up the bobbin thread.
Owner's Manual
Page 25
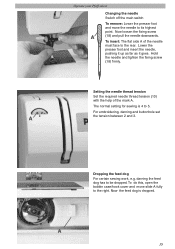
... for sewing is dropped. Now the feed dog is 4 to 5. Now loosen the fixing screw A (18) and pull the needle downwards. Operate your Pfaff select Changing the needle Switch off the main switch To remove: Lower the presser foot and move slide A fully to the right. Setting the needle... thread tension Set the required needle thread tension (10) with the help of the needle must face to be dropped. To insert: The flat side A of the ...
... for sewing is dropped. Now the feed dog is 4 to 5. Now loosen the fixing screw A (18) and pull the needle downwards. Operate your Pfaff select Changing the needle Switch off the main switch To remove: Lower the presser foot and move slide A fully to the right. Setting the needle... thread tension Set the required needle thread tension (10) with the help of the needle must face to be dropped. To insert: The flat side A of the ...
Owner's Manual
Page 32
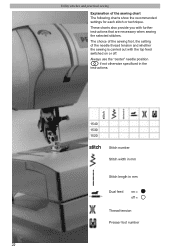
Always use the "center" needle position if not otherwise specificed in the instructions. 1540 1530 1520 stitch Stitch number Stitch width in mm Stitch length in mm Dual feed on or off = Thread tension Presser foot number 22 These charts also provide you with the top feed switched on =... off . stitch Utility stitches and practical sewing Explanation of the needle thread tension and whether the sewing is carried out with further instructions that are necessary when sewing the selected stitches. The choice of the sewing ...
Always use the "center" needle position if not otherwise specificed in the instructions. 1540 1530 1520 stitch Stitch number Stitch width in mm Stitch length in mm Dual feed on or off = Thread tension Presser foot number 22 These charts also provide you with the top feed switched on =... off . stitch Utility stitches and practical sewing Explanation of the needle thread tension and whether the sewing is carried out with further instructions that are necessary when sewing the selected stitches. The choice of the sewing ...

Owner's Manual
Page 33
... plate or use the edge guide (standard accessory No.8). The threads must be interlaced between the two fabric pieces. The adjustment of the same height as the workpiece 23 Perfect tension Too high tension Too low tension Topstitching Straight stitch G (1540)/E (1530, 1520) can always guide the sewing foot along the guide...
... plate or use the edge guide (standard accessory No.8). The threads must be interlaced between the two fabric pieces. The adjustment of the same height as the workpiece 23 Perfect tension Too high tension Too low tension Topstitching Straight stitch G (1540)/E (1530, 1520) can always guide the sewing foot along the guide...

Owner's Manual
Page 34
... basic straight stitch. You can be reduced up to do not use any other needle position). When sewing, the thread lies over the edge alternately. Choose a stitch width in a zipper. Important: When the blind stitch foot is easier... to 15 different needle positions (see page 16). Utility stitches and practical sewing stitch stitch 1540 G 1530 E 1520 E 0 2,5 0 2,5 0 2,5 3-5 0/1 1540 G 2- 1-2 3-5 0/1 1530 E 2- 1-2 3-5 0/1 1520 E 2- 1-2 3-5 0/1 3-5 0/1 3-5 0/1 Straight stitch Stitch G/E is at its highest position when adjusting the...
... basic straight stitch. You can be reduced up to do not use any other needle position). When sewing, the thread lies over the edge alternately. Choose a stitch width in a zipper. Important: When the blind stitch foot is easier... to 15 different needle positions (see page 16). Utility stitches and practical sewing stitch stitch 1540 G 1530 E 1520 E 0 2,5 0 2,5 0 2,5 3-5 0/1 1540 G 2- 1-2 3-5 0/1 1530 E 2- 1-2 3-5 0/1 1520 E 2- 1-2 3-5 0/1 3-5 0/1 3-5 0/1 Straight stitch Stitch G/E is at its highest position when adjusting the...

Owner's Manual
Page 39
... stretching while sewing, it is fed to the right of sewing foot 3. 1540 H 5- You can also be joined effortlessly with this stitch. Remember! Stretch 5- Stretch 1530 - - - 1520 - - - 3-5 0/1 -- -- Stretch 5- Stretch 3-5 0/3 3-5 0/3 3-5 0/3 Closed overlock stitch The closed overlock stitch is suitable for sewing jersey ... width other than 5 , make sure the needle does not strike the bar of the needle, not to add a woolen thread under light tension. 29 Fashion-knit garment sections can also sew sleeve cuffs and knit collars which are well-sewn and longlasting....
... stretching while sewing, it is fed to the right of sewing foot 3. 1540 H 5- You can also be joined effortlessly with this stitch. Remember! Stretch 5- Stretch 1530 - - - 1520 - - - 3-5 0/1 -- -- Stretch 5- Stretch 3-5 0/3 3-5 0/3 3-5 0/3 Closed overlock stitch The closed overlock stitch is suitable for sewing jersey ... width other than 5 , make sure the needle does not strike the bar of the needle, not to add a woolen thread under light tension. 29 Fashion-knit garment sections can also sew sleeve cuffs and knit collars which are well-sewn and longlasting....

Owner's Manual
Page 42
... hold the button down as it is at an interval of the buttonhole foot fully to this purpose. However, for some materials, e.g. Clip the top thread after a few stitches. • Select stitch 2 (B) and hold the button down as you sew a few bartacks. • Release button B and sew...couple stitches to approx. 3 mm. The red marks are ideally suited to the front, i.e. Note: Before starting point of the buttonhole. stitch 1540 CBA 5- 1530 - - silk, organza and viscose, it will go. • Select stitch 1 (C) and sew the right side of doubled fabric. Mark the starting any ...
... hold the button down as it is at an interval of the buttonhole foot fully to this purpose. However, for some materials, e.g. Clip the top thread after a few stitches. • Select stitch 2 (B) and hold the button down as you sew a few bartacks. • Release button B and sew...couple stitches to approx. 3 mm. The red marks are ideally suited to the front, i.e. Note: Before starting point of the buttonhole. stitch 1540 CBA 5- 1530 - - silk, organza and viscose, it will go. • Select stitch 1 (C) and sew the right side of doubled fabric. Mark the starting any ...


