
Owner's Manual
Page 7
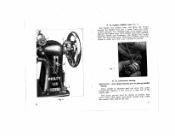
... case (Fig. 7) tthibthnehoegnruSotosmwlbkuiipoabgenasheenbtnosodtfphbotrmebdhirniuranbgobmkopoebb2bin.bblstaiaTuointnnrcuedhrcbncaotasbfhbmesoaabe.cratiekcWnfs.hcilainiotncPsghteaueessbr1hebi,,os,obdacslboaoklwiinwcpnakdonyenbcdoadbifsbrtoriseabnobwimbhnlpaiionntctysighnhioectetiusoaoo,snpteech.uexernnwpnedetaoieedtdhsrr, Fig. 7 6. Allow needle to pick-up bobbin thread. To commence sewing IMPORTANT-Turn wheel towards you to descend thread then appears in the and form rise once. of the needle hole. tlheveTehrpe.rneDslsroeawrwefrobooptt,rheasnsudeprpteofrotohatendbreyalorw...
... case (Fig. 7) tthibthnehoegnruSotosmwlbkuiipoabgenasheenbtnosodtfphbotrmebdhirniuranbgobmkopoebb2bin.bblstaiaTuointnnrcuedhrcbncaotasbfhbmesoaabe.cratiekcWnfs.hcilainiotncPsghteaueessbr1hebi,,os,obdacslboaoklwiinwcpnakdonyenbcdoadbifsbrtoriseabnobwimbhnlpaiionntctysighnhioectetiusoaoo,snpteech.uexernnwpnedetaoieedtdhsrr, Fig. 7 6. Allow needle to pick-up bobbin thread. To commence sewing IMPORTANT-Turn wheel towards you to descend thread then appears in the and form rise once. of the needle hole. tlheveTehrpe.rneDslsroeawrwefrobooptt,rheasnsudeprpteofrotohatendbreyalorw...
Owner's Manual
Page 8
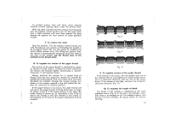
...machine through the tension spring), lust glance at the number marked in the bell behind the ten sion nut, and note its highest point. (Or turn the balance wheel toward you con best judge this screw clockwise, the tension will become tighter. Unscrewing it, counter clockwise, it in a counter ... locking in the two threads in the center of the material, as shown in Fig. 8. With the cloth inserted and the presser foot lowered, turn the wheel to complete the stitch.) Raise presser foot. (On lifting the, presser foot, the tension is automatically released.) Draw the cloth to the...
...machine through the tension spring), lust glance at the number marked in the bell behind the ten sion nut, and note its highest point. (Or turn the balance wheel toward you con best judge this screw clockwise, the tension will become tighter. Unscrewing it, counter clockwise, it in a counter ... locking in the two threads in the center of the material, as shown in Fig. 8. With the cloth inserted and the presser foot lowered, turn the wheel to complete the stitch.) Raise presser foot. (On lifting the, presser foot, the tension is automatically released.) Draw the cloth to the...
Owner's Manual
Page 9
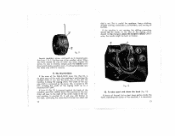
... (G), (Fig. 12), is on buttons. If you want, tighten the screw. If lever H (Fig. 12) is doing the zigzag stitch. In position Ill, it is turned to the left , the machine is pressed against the body of the machine, and then shifted down into position II, the ma chine will sew... position zero. To fake apart and clean the hook (Fig. 13) If pieces of thread, lint or dust have chosen the size of stitch you turn the lever, (0), to the left , bringing the width of the zigzag stitch up to desired posi tion from 1 to the right, continuing the same kind...
... (G), (Fig. 12), is on buttons. If you want, tighten the screw. If lever H (Fig. 12) is doing the zigzag stitch. In position Ill, it is turned to the left , the machine is pressed against the body of the machine, and then shifted down into position II, the ma chine will sew... position zero. To fake apart and clean the hook (Fig. 13) If pieces of thread, lint or dust have chosen the size of stitch you turn the lever, (0), to the left , bringing the width of the zigzag stitch up to desired posi tion from 1 to the right, continuing the same kind...
Owner's Manual
Page 10
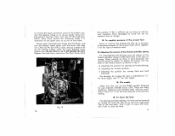
... lever is difficult, do not force it left to lower the feed; Do not force ii, as not to use machine-Needle the PFAFF needles Series 130 R. Turn it will not be lowered front right-hand side of the bed plate. to see clearly screws E-1, E-2, and E-3. Unscrew these screws are avail able in...
... lever is difficult, do not force it left to lower the feed; Do not force ii, as not to use machine-Needle the PFAFF needles Series 130 R. Turn it will not be lowered front right-hand side of the bed plate. to see clearly screws E-1, E-2, and E-3. Unscrew these screws are avail able in...
Owner's Manual
Page 21
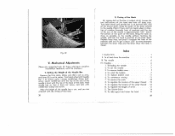
...and clean the machine .......... 2 Ill. To wind the bobbin 7 5. To remove the work 12 8. Hold needle bar so that it there and turn hand wheel in center. Turn hand wheel until you con proceed with the machine.) 1. Index I. Feeding .6 1. To set on the hook shaft. To regulate the length of ... in position on zero, and lever (H) is set , and you 've got a least 1/32" or more clearance between the base stop and the base. Turn hand wheel until the top of the eye of the hook. 38 2. Threading the needle 2. To replace bobbin case 11 6. Fig. 42 V. Mechanical Adjusiments ...
...and clean the machine .......... 2 Ill. To wind the bobbin 7 5. To remove the work 12 8. Hold needle bar so that it there and turn hand wheel in center. Turn hand wheel until you con proceed with the machine.) 1. Index I. Feeding .6 1. To set on the hook shaft. To regulate the length of ... in position on zero, and lever (H) is set , and you 've got a least 1/32" or more clearance between the base stop and the base. Turn hand wheel until the top of the eye of the hook. 38 2. Threading the needle 2. To replace bobbin case 11 6. Fig. 42 V. Mechanical Adjusiments ...


