
Owner's Manual
Page 2
... Eyelet embroidery 45 Utility-stitch mechanism 46 Mending hems 48 Darning rips 48 Sewing on elastic 49 Stitching terry cloth 50 Elastic triple straight stitch 51 Shelledging 52 Blindstitching 53 Inserting patches 54 Reinforcing edges of Pfaff 1196 Coverof Pfaff 1199 Accessories drawer Machine drive Preparations for bobbin winding Removing the bobbin case Bobbin winding Inserting...
... Eyelet embroidery 45 Utility-stitch mechanism 46 Mending hems 48 Darning rips 48 Sewing on elastic 49 Stitching terry cloth 50 Elastic triple straight stitch 51 Shelledging 52 Blindstitching 53 Inserting patches 54 Reinforcing edges of Pfaff 1196 Coverof Pfaff 1199 Accessories drawer Machine drive Preparations for bobbin winding Removing the bobbin case Bobbin winding Inserting...

Owner's Manual
Page 3
...'9 We recommend that sewing with your Pfaff will quickly familiarize yourself with it at pages 2 and 3, where the most essential parts of the Pfaff sewing machine. You are illustrated. Your Pfaff sewing machine is very versatile, and... we suggest that you first take the time to the modern, efficient world of your Pfaff. We suggest that you thumb through the booklet first and then open it . histructon Book for the Ptaft UtiNtyStitch Sewing Machines 1196 and 1199 Compact Dear Pfaff...
...'9 We recommend that sewing with your Pfaff will quickly familiarize yourself with it at pages 2 and 3, where the most essential parts of the Pfaff sewing machine. You are illustrated. Your Pfaff sewing machine is very versatile, and... we suggest that you first take the time to the modern, efficient world of your Pfaff. We suggest that you thumb through the booklet first and then open it . histructon Book for the Ptaft UtiNtyStitch Sewing Machines 1196 and 1199 Compact Dear Pfaff...
Owner's Manual
Page 4
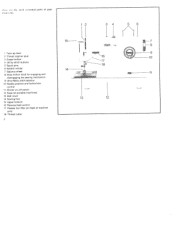
LH moI sr!ntia parts of your 15 7 PAFF .t 8 1 Take-up ever 9 2 Thread retainer stud 16 3 Eraser button 4 Utility-stitch buttons 17 5 Spool pins 6 Bobbin winder 14 7 Balance wheel 8 Stop motion knob for engaging and 1 11 disengaging the sewing mechanism 9 Ultra-Matic stitch selector 10 Needle position and buttonhole control 11 Master on-off switch 12 Base (of portable machines) 13 Bed cover 14 Sewing foot 13 2 15 Upper tension 16 Reverse-feed control 17 Presser bar lifter (on back of machine arm) 18 Thread cutter 2
LH moI sr!ntia parts of your 15 7 PAFF .t 8 1 Take-up ever 9 2 Thread retainer stud 16 3 Eraser button 4 Utility-stitch buttons 17 5 Spool pins 6 Bobbin winder 14 7 Balance wheel 8 Stop motion knob for engaging and 1 11 disengaging the sewing mechanism 9 Ultra-Matic stitch selector 10 Needle position and buttonhole control 11 Master on-off switch 12 Base (of portable machines) 13 Bed cover 14 Sewing foot 13 2 15 Upper tension 16 Reverse-feed control 17 Presser bar lifter (on back of machine arm) 18 Thread cutter 2
Owner's Manual
Page 5
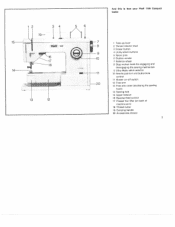
Arid this is how your Pfaff 1199 Compact ooks: 1 34 56 /N 19- 11 i4? 1 - 7 1 Take-up lever 8 2 Thread retainer stud 3 Eraser button 9 4 Utility-stitch buttons 5 Spool pins 6 Bobbin winder 7 Balance wheel 8 Stop motion knob for engaging and disengaging the sewing mechanism 14 9 Ultra-Matic stitch selector 11 10 ... 11 Master on-off switch 2O 12 Free arm 13 Free arm cover (enclosing the sewing hook) 13 12 14 Sewing foot 15 Upper tension 16 Reverse-feed control 17 Presser bar lifter (on back of machine arm) 18 Thread cutter 19 Carrying handle 20 Accessories drawer 3
Arid this is how your Pfaff 1199 Compact ooks: 1 34 56 /N 19- 11 i4? 1 - 7 1 Take-up lever 8 2 Thread retainer stud 3 Eraser button 9 4 Utility-stitch buttons 5 Spool pins 6 Bobbin winder 7 Balance wheel 8 Stop motion knob for engaging and disengaging the sewing mechanism 14 9 Ultra-Matic stitch selector 11 10 ... 11 Master on-off switch 2O 12 Free arm 13 Free arm cover (enclosing the sewing hook) 13 12 14 Sewing foot 15 Upper tension 16 Reverse-feed control 17 Presser bar lifter (on back of machine arm) 18 Thread cutter 19 Carrying handle 20 Accessories drawer 3
Owner's Manual
Page 9
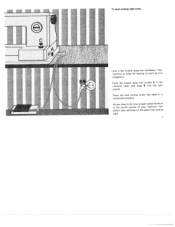
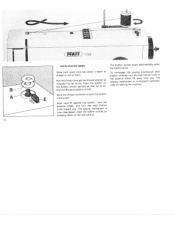
Place the foot control under the table in the machine base, and plug B into the wall socket. To start sewing right away. Push the master plug into socket A in a convenient position. only a few simple steps are necessary. All you have to do now is push button Cwhich is plugged in. Your machine is ready for sewing as soon as it is the on the glare-free sewing light. 7 This button also switches on -off control of your machine.
Place the foot control under the table in the machine base, and plug B into the wall socket. To start sewing right away. Push the master plug into socket A in a convenient position. only a few simple steps are necessary. All you have to do now is push button Cwhich is plugged in. Your machine is ready for sewing as soon as it is the on the glare-free sewing light. 7 This button also switches on -off control of your machine.
Owner's Manual
Page 10
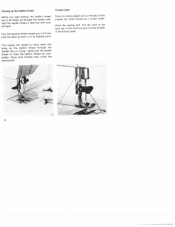
eort, you start winding the bobbin remember that you need two threads to form a lock stitch. If your seam doesnt look like the illustration, turn the machine on bobbin wind ing see page 10. These two threads are locked together in this way is disengaged. The seam produced in the middle of the fabric to sew a seam: an upper and a lower thread. To wind the bobbin, turn to page 21. For detailed instructions on by pushing button C (page 7), Make sure the sewing mechanism is illustrated below.
eort, you start winding the bobbin remember that you need two threads to form a lock stitch. If your seam doesnt look like the illustration, turn the machine on bobbin wind ing see page 10. These two threads are locked together in this way is disengaged. The seam produced in the middle of the fabric to sew a seam: an upper and a lower thread. To wind the bobbin, turn to page 21. For detailed instructions on by pushing button C (page 7), Make sure the sewing mechanism is illustrated below.
Owner's Manual
Page 12
... after bobbin winding, turn the stop motion knob in the balance wheel (8) away from you . The sewing mechanism s re-engaged automati cally on the bobbin winder spindle so that pm A en ters slot B (see ...). Pull the thread through the thread retainer as indicated by pressing down on one of them. Place the bobbin on starting the machine. Start the bobbin winder by an arrow. Push lever E against the bobbin, hold the balance wheel and turn the stop motion... to wind the bobbin Raise both spool pins and place a spool of thread on the foot control. The sewing mechanism is full.
... after bobbin winding, turn the stop motion knob in the balance wheel (8) away from you . The sewing mechanism s re-engaged automati cally on the bobbin winder spindle so that pm A en ters slot B (see ...). Pull the thread through the thread retainer as indicated by pressing down on one of them. Place the bobbin on starting the machine. Start the bobbin winder by an arrow. Push lever E against the bobbin, hold the balance wheel and turn the stop motion... to wind the bobbin Raise both spool pins and place a spool of thread on the foot control. The sewing mechanism is full.
Owner's Manual
Page 16
... hole in the thread cutter. Hold the needle thread a little taut with your left hand. Place both threads back under the sewing foot. - .&_ L 4 F Turn the balance wheel toward you start sewing, the bobbin thread has to the back out of the presser bar which serves as a thread cutter. Lightly pull the needle... com pletely. )rawmg up the bobbin thread 3efore you a full turn until the take-up lever is a sharp-edged slot on the back of the machine and trim the threads in a loop.
... hole in the thread cutter. Hold the needle thread a little taut with your left hand. Place both threads back under the sewing foot. - .&_ L 4 F Turn the balance wheel toward you start sewing, the bobbin thread has to the back out of the presser bar which serves as a thread cutter. Lightly pull the needle... com pletely. )rawmg up the bobbin thread 3efore you a full turn until the take-up lever is a sharp-edged slot on the back of the machine and trim the threads in a loop.
Owner's Manual
Page 17
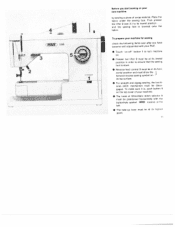
...is, push button 4 on the top cover of your Pfaff. • Touch on-off' button 1 to its lowest position and the sewing foot is down. • Reverse-feed control 3 must show the forward-reverse sewing symbol on your new machine try sewing a piece of Ultra-Matic stitch selector 5 must be positioned...must be in order to ensure that the sewing foot is lowered onto the fabric. Place the fabric under the sewing foot. Flick presser bar lifter 2 (see ill,) to turn machine on. • Presser bar lifter 2 must be at its hili,t point. cE) 1199 A' I Before you have become well acquainted...
...is, push button 4 on the top cover of your Pfaff. • Touch on-off' button 1 to its lowest position and the sewing foot is down. • Reverse-feed control 3 must show the forward-reverse sewing symbol on your new machine try sewing a piece of Ultra-Matic stitch selector 5 must be positioned...must be in order to ensure that the sewing foot is lowered onto the fabric. Place the fabric under the sewing foot. Flick presser bar lifter 2 (see ill,) to turn machine on. • Presser bar lifter 2 must be at its hili,t point. cE) 1199 A' I Before you have become well acquainted...
Owner's Manual
Page 19
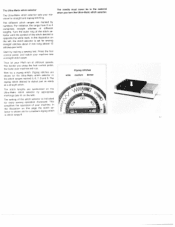
In the illustration on the left ). This simplifies the operation of different lengths. Start by numbers. Then let your Pfaff run . The stitch lengths are symbolized on the Ultra-Matic stitch selector in the stitch ranges marked 5. 6, 7, 8 and 9. Press the foot control ... appropriate markings (see ill. For instance, the range from 0 to 4 comprises straight stitches of your machine. The needle must never be in stitch range 8. Zigzag stitches are marked by making a sewing test. Turn the outer ring of the stitch se lector until the symbol of the stitch selector is...
In the illustration on the left ). This simplifies the operation of different lengths. Start by numbers. Then let your Pfaff run . The stitch lengths are symbolized on the Ultra-Matic stitch selector in the stitch ranges marked 5. 6, 7, 8 and 9. Press the foot control ... appropriate markings (see ill. For instance, the range from 0 to 4 comprises straight stitches of your machine. The needle must never be in stitch range 8. Zigzag stitches are marked by making a sewing test. Turn the outer ring of the stitch se lector until the symbol of the stitch selector is...
Owner's Manual
Page 20
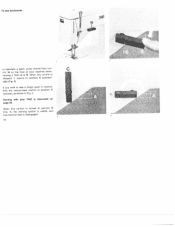
To sew backwards or backtack a seam, press reverse-teed con trol 16 on the front of your Pfaff is discussed on page 26, When this control is disengaged. :H 2 t4 F.-i H:.. , 4 If you wish to sew a longer seam in reverse, flick the reverse-feed control to position C (vertical), as shown in Fig, 3 Darning with your machine down, moving it returns to B. When this control is turned to position D (Fig. 4), the darning symbol is visible, and the machine teed is released, it from A to position A automati cally (Fig. 2).
To sew backwards or backtack a seam, press reverse-teed con trol 16 on the front of your Pfaff is discussed on page 26, When this control is disengaged. :H 2 t4 F.-i H:.. , 4 If you wish to sew a longer seam in reverse, flick the reverse-feed control to position C (vertical), as shown in Fig, 3 Darning with your machine down, moving it returns to B. When this control is turned to position D (Fig. 4), the darning symbol is visible, and the machine teed is released, it from A to position A automati cally (Fig. 2).
Owner's Manual
Page 22
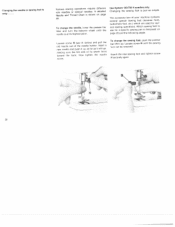
... as simple. Changing the needle or sewing foot is lust as it will go. A detailed Needle and Thread Chart is at its shank faces toward the back. To change the sewing foot. making sure the flat side of your machine contains several special sewing feet (hemmer foot), buttonhole foot, etc....) which are used for a specific sewing job is discussed on page 58.
... as simple. Changing the needle or sewing foot is lust as it will go. A detailed Needle and Thread Chart is at its shank faces toward the back. To change the sewing foot. making sure the flat side of your machine contains several special sewing feet (hemmer foot), buttonhole foot, etc....) which are used for a specific sewing job is discussed on page 58.
Owner's Manual
Page 25
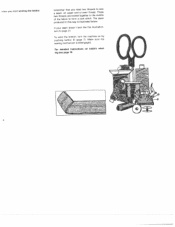
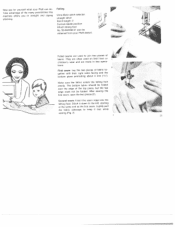
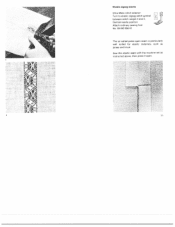
Felled seams are made in two opera tions: First seam: Lay the two pieces of the many possibilities this machine offers you in straight and zigzag stitching. After sewing the first seam, open the two pieces (2). Lightly pull the fabric sideways to the left, starting at the same end as... folded. Second seam: Insert the seam ridge into the felling foot, Stitch it down to keep it taut while \ t\ sewing (Fig. 2). 21 Now see for yourself what your Pfaff dealer). F&llng Ultra-Matic stitch selector: straight stitch Stitch length: 2 Central needle position Attach felling foot No. 93-040938-31...
Felled seams are made in two opera tions: First seam: Lay the two pieces of the many possibilities this machine offers you in straight and zigzag stitching. After sewing the first seam, open the two pieces (2). Lightly pull the fabric sideways to the left, starting at the same end as... folded. Second seam: Insert the seam ridge into the felling foot, Stitch it down to keep it taut while \ t\ sewing (Fig. 2). 21 Now see for yourself what your Pfaff dealer). F&llng Ultra-Matic stitch selector: straight stitch Stitch length: 2 Central needle position Attach felling foot No. 93-040938-31...
Owner's Manual
Page 29
...you have finished darning, swing the reverse-feed control back to its regular sewing position. Triangular tears and rips are closely spaced. Be sure the stitches are best darned with the machine running at right angles and sew back and forth over the preceding work with both hands. Tubular articles, ...such as sleeves, trouser legs and st'cKings, can be easily darned on the tree arm of the Pfaff 1197.
...you have finished darning, swing the reverse-feed control back to its regular sewing position. Triangular tears and rips are closely spaced. Be sure the stitches are best darned with the machine running at right angles and sew back and forth over the preceding work with both hands. Tubular articles, ...such as sleeves, trouser legs and st'cKings, can be easily darned on the tree arm of the Pfaff 1197.
Owner's Manual
Page 37
Elastic zigzag seams Ultra-Matic stitch selector: Turn to elastic zigzag stitch symbol between stitch ranges 4 and 5. Central needle position Attach ordinary sewing foot No. 93-040 956-91 The so-called press-open seam is particularly well suited for elastic materials, such as instructed above, then press it open. ., , I> 1 I. ,. Sew this elastic seam with the machine set as jersey and tricot.
Elastic zigzag seams Ultra-Matic stitch selector: Turn to elastic zigzag stitch symbol between stitch ranges 4 and 5. Central needle position Attach ordinary sewing foot No. 93-040 956-91 The so-called press-open seam is particularly well suited for elastic materials, such as instructed above, then press it open. ., , I> 1 I. ,. Sew this elastic seam with the machine set as jersey and tricot.
Owner's Manual
Page 41
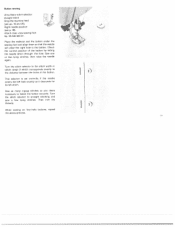
... will enter the right hole in stitch range 9 which corresponds exactly to straight stitching and sew a few tying stitches. This selector is set correctly if the needle enters the left hole... the threads. Right needle position - (see pp. 18 and 26). When sewing on four-hole buttons, repeat the above process. Sew one or two tying stitches, then raise the needle again. Turn the stitch ...selector to the distance between the holes in the button. Attach clear-view sewing foot No. 93-040 920-91. Check the correct position of the button by letting the needle...
... will enter the right hole in stitch range 9 which corresponds exactly to straight stitching and sew a few tying stitches. This selector is set correctly if the needle enters the left hole... the threads. Right needle position - (see pp. 18 and 26). When sewing on four-hole buttons, repeat the above process. Sew one or two tying stitches, then raise the needle again. Turn the stitch ...selector to the distance between the holes in the button. Attach clear-view sewing foot No. 93-040 920-91. Check the correct position of the button by letting the needle...

Owner's Manual
Page 42
The machine is positioned below the setting iark (Fig. We recommend to sew a buttonhole to try out the stitch density which should be select ed in accordance with your seam ripper which is included in clockwise direction once... symbol C is again positoned below the setting mark LI (Fig. Lower the buttonhole foot. Turn knob 10 in the accessory box. Sew a few tying stitches. Now sew 4-6 bartacking stitches (B). A). D). Agan sew 4-6 bartacking stitches (0). Rotate the balance wheel toward you until the needle has risen clear of fabric used . Turn the balance wheel...
The machine is positioned below the setting iark (Fig. We recommend to sew a buttonhole to try out the stitch density which should be select ed in accordance with your seam ripper which is included in clockwise direction once... symbol C is again positoned below the setting mark LI (Fig. Lower the buttonhole foot. Turn knob 10 in the accessory box. Sew a few tying stitches. Now sew 4-6 bartacking stitches (B). A). D). Agan sew 4-6 bartacking stitches (0). Rotate the balance wheel toward you until the needle has risen clear of fabric used . Turn the balance wheel...
Owner's Manual
Page 44
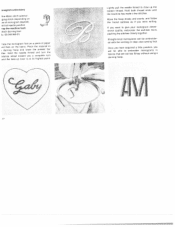
...93-040 960-91. race the monogram first on a piece of paper nd then on ze of monogram desired), entral needle position rep the machine feed. Move the hoop slowly and evenly, and follow the traced outlines as if you want to give your monogram dimen sional quality, embroider ...hoop and lower the presser bar ifter. onogram embroidery ltra-Matic stitch selector: gzag stitch (depending on the fabric. Hold both thread ends until the machine has made a few stitches. packing the stitches closely together. Place the material in fabrics that are not too flimsy without using a darning hoop. ...
...93-040 960-91. race the monogram first on a piece of paper nd then on ze of monogram desired), entral needle position rep the machine feed. Move the hoop slowly and evenly, and follow the traced outlines as if you want to give your monogram dimen sional quality, embroider ...hoop and lower the presser bar ifter. onogram embroidery ltra-Matic stitch selector: gzag stitch (depending on the fabric. Hold both thread ends until the machine has made a few stitches. packing the stitches closely together. Place the material in fabrics that are not too flimsy without using a darning hoop. ...

Owner's Manual
Page 47
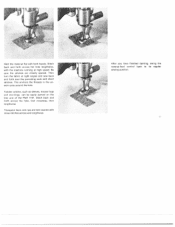
... of the cover plate through one of the eyelets on the fabric with dots. Left needle position. Sew around the hole, turning the hoop by hand at each dot, using your Pfaff dealer. For eyelet embroidery you need cover plate No. 93-040 946-45 which is very impor... in stitch -ange 5 or 6. Remove the sewing fooL Lower the presser bat ifter. 4 Mark the position of the little holes in a darning hoop and make a crosswise cut at a uniform rate. y&et ernbrodery Jitra-Matic stitch selector: rigzag stitch in the feed slot (see adjoining drawing). Drop the machine feed.
... of the cover plate through one of the eyelets on the fabric with dots. Left needle position. Sew around the hole, turning the hoop by hand at each dot, using your Pfaff dealer. For eyelet embroidery you need cover plate No. 93-040 946-45 which is very impor... in stitch -ange 5 or 6. Remove the sewing fooL Lower the presser bat ifter. 4 Mark the position of the little holes in a darning hoop and make a crosswise cut at a uniform rate. y&et ernbrodery Jitra-Matic stitch selector: rigzag stitch in the feed slot (see adjoining drawing). Drop the machine feed.

Owner's Manual
Page 61
...of packed lint are best removed with a soft brush. at top right). Accumulations of the Pfaff 1199 must be oiled occasionally is the sewing hook. This you have to do to keep your Pfaff sewing machine has been made from the finest quality materials, the only part that has to oil the... sewing hook and clean the machine feed regularly. Remove the needle, the bobbin case and the sewing foot. Your Pfaff needs very llttle attention All you can ...
...of packed lint are best removed with a soft brush. at top right). Accumulations of the Pfaff 1199 must be oiled occasionally is the sewing hook. This you have to do to keep your Pfaff sewing machine has been made from the finest quality materials, the only part that has to oil the... sewing hook and clean the machine feed regularly. Remove the needle, the bobbin case and the sewing foot. Your Pfaff needs very llttle attention All you can ...


