User Manual
Page 1
SLR Digital Camera Operating Manual For optimum camera performance, please read the Operating Manual before using the camera.
SLR Digital Camera Operating Manual For optimum camera performance, please read the Operating Manual before using the camera.
User Manual
Page 2
...trademarks or registered trademarks of all the camera's capabilities. Lenses you to connect the printer and digital camera directly, using the camera in the Copyright Act. However, this camera • There is a possibility that recorded data may be used without permission according to the rights ...or may not function correctly when used with the purpose of obtaining copyrights also cannot be used in this manual before using the unified standard for the direct printout of items on taking pictures even for purchasing the PENTAX L Digital Camera. PRINT Image Matching is 99...
...trademarks or registered trademarks of all the camera's capabilities. Lenses you to connect the printer and digital camera directly, using the camera in the Copyright Act. However, this camera • There is a possibility that recorded data may be used without permission according to the rights ...or may not function correctly when used with the purpose of obtaining copyrights also cannot be used in this manual before using the unified standard for the direct printout of items on taking pictures even for purchasing the PENTAX L Digital Camera. PRINT Image Matching is 99...
User Manual
Page 3
... request your special attention regarding items marked with the risk of electric shock. • If the camera interior is accidentally swallowed. • Always use immediately, remove the batteries or the AC adapter, and contact your nearest PENTAX service center. Seek medical attention immediately if a memory card is accidentally swallowed. • Wrapping the strap...
... request your special attention regarding items marked with the risk of electric shock. • If the camera interior is accidentally swallowed. • Always use immediately, remove the batteries or the AC adapter, and contact your nearest PENTAX service center. Seek medical attention immediately if a memory card is accidentally swallowed. • Wrapping the strap...
User Manual
Page 4
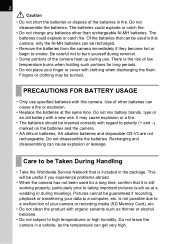
... not charge any batteries other batteries can be useful if you experience problems abroad. • When the camera has not been used in fire. Recharging and disassembling can get very high. This will be recharged. • Remove the batteries from the camera immediately if they become hot or begin to ... computer, etc. Do not mix battery brands, type or an old battery with this camera, only the Ni-MH batteries can cause a fire or explosion. • Replace the batteries at a wedding or during use specified batteries with a new one. Care to be Taken During Handling • Take ...
... not charge any batteries other batteries can be useful if you experience problems abroad. • When the camera has not been used in fire. Recharging and disassembling can get very high. This will be recharged. • Remove the batteries from the camera immediately if they become hot or begin to ... computer, etc. Do not mix battery brands, type or an old battery with this camera, only the Ni-MH batteries can cause a fire or explosion. • Replace the batteries at a wedding or during use specified batteries with a new one. Care to be Taken During Handling • Take ...
User Manual
Page 5
...well-ventilated location. • This camera is not waterproof, and should not be used in the rain or where the camera could get wet. • Do not subject the camera to normal as it may respond more slowly at low temperatures. Never use a spray blower for camera use is not a fault. •... forcefully on the lens or viewfinder. Wipe dry any rain or water drops on the camera. • Refer to "Precautions When Using the SD Memory Card" (p.30) regarding the SD Memory Card. • Use a lens brush to maintain high performance. • Sudden temperature changes will return to...
...well-ventilated location. • This camera is not waterproof, and should not be used in the rain or where the camera could get wet. • Do not subject the camera to normal as it may respond more slowly at low temperatures. Never use a spray blower for camera use is not a fault. •... forcefully on the lens or viewfinder. Wipe dry any rain or water drops on the camera. • Refer to "Precautions When Using the SD Memory Card" (p.30) regarding the SD Memory Card. • Use a lens brush to maintain high performance. • Sudden temperature changes will return to...
User Manual
Page 6
... to be Taken During Handling 2 Contents 4 Composition of the Operating Manual 9 Before Using Your Camera 11 L Camera Characteristics 12 Checking the Contents of the Package 13 Names of Working Parts 14 Camera 14 LCD Monitor Indications 16 Viewfinder Indications 20 LCD Panel Indications 22 Getting Started 23 ...27 Approximate Image Storage Capacity and Playback Time (new batteries 27 Using the AC Adapter (Optional 28 Inserting/Removing the SD Memory Card 29 Recorded Pixels and Quality Level 31 Turning the Camera On and Off 32 Initial Settings 33 Setting the Display Language ...
... to be Taken During Handling 2 Contents 4 Composition of the Operating Manual 9 Before Using Your Camera 11 L Camera Characteristics 12 Checking the Contents of the Package 13 Names of Working Parts 14 Camera 14 LCD Monitor Indications 16 Viewfinder Indications 20 LCD Panel Indications 22 Getting Started 23 ...27 Approximate Image Storage Capacity and Playback Time (new batteries 27 Using the AC Adapter (Optional 28 Inserting/Removing the SD Memory Card 29 Recorded Pixels and Quality Level 31 Turning the Camera On and Off 32 Initial Settings 33 Setting the Display Language ...

User Manual
Page 7
... Operations 5 41 Basic Shooting Operation 42 Holding the Camera 42 Letting the Camera Choose the Optimal Settings 43 Selecting the Appropriate Capturing Mode for Scenes 47 Using the Zoom Lens 48 Using the Built-in Flash 49 Using the Built-in Flash 49 Other Shooting Modes 53 Continuous... Shooting 53 Self-Timer Shooting 55 Remote Control Shooting (Remote Control F: Sold Separately) ........59 Using Mirror Lock Up Function to Prevent Camera Shake 62 Playing Back Still Pictures 63 Playing Back Images 63 Enlarging Playback Images 65 Nine-Image Display 66 Slideshow...
... Operations 5 41 Basic Shooting Operation 42 Holding the Camera 42 Letting the Camera Choose the Optimal Settings 43 Selecting the Appropriate Capturing Mode for Scenes 47 Using the Zoom Lens 48 Using the Built-in Flash 49 Using the Built-in Flash 49 Other Shooting Modes 53 Continuous... Shooting 53 Self-Timer Shooting 55 Remote Control Shooting (Remote Control F: Sold Separately) ........59 Using Mirror Lock Up Function to Prevent Camera Shake 62 Playing Back Still Pictures 63 Playing Back Images 63 Enlarging Playback Images 65 Nine-Image Display 66 Slideshow...
User Manual
Page 8
...110 Setting the Saturation/Sharpness/Contrast 111 Setting the White Balance 112 Setting the Sensitivity 115 Setting the Color Space 117 Focusing 118 Using the Autofocus 118 Setting the Focusing Area 121 Setting the AF Mode 122 Fixing the Focus (Focus Lock 123 Adjusting the Focus ...127 Selecting the Metering Method 130 Changing the Exposure Mode 132 Setting the Exposure 141 Changing the Exposure and Shooting (Auto Bracket 143 Using the Built-in Flash 146 Compensating Flash Output 146 Allowing Shooting while Charging Flash 147 Flash Characteristics in Each Exposure Mode 147 6 ...
...110 Setting the Saturation/Sharpness/Contrast 111 Setting the White Balance 112 Setting the Sensitivity 115 Setting the Color Space 117 Focusing 118 Using the Autofocus 118 Setting the Focusing Area 121 Setting the AF Mode 122 Fixing the Focus (Focus Lock 123 Adjusting the Focus ...127 Selecting the Metering Method 130 Changing the Exposure Mode 132 Setting the Exposure 141 Changing the Exposure and Shooting (Auto Bracket 143 Using the Built-in Flash 146 Compensating Flash Output 146 Allowing Shooting while Charging Flash 147 Flash Characteristics in Each Exposure Mode 147 6 ...
User Manual
Page 9
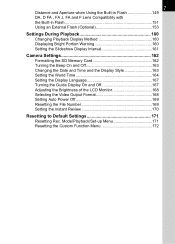
...Menu 171 Resetting the Custom Function Menu 172 7 Distance and Aperture when Using the Built-in Flash 149 DA, D FA , FA J, FA and F Lens Compatibility with the Built-in Flash 151 Using an External Flash (Optional 153 Settings During Playback 160 Changing Playback Display ...Method 160 Displaying Bright Portion Warning 160 Setting the Slideshow Display Interval 161 Camera Settings 162 Formatting the SD Memory Card 162 Turning the Beep...
...Menu 171 Resetting the Custom Function Menu 172 7 Distance and Aperture when Using the Built-in Flash 149 DA, D FA , FA J, FA and F Lens Compatibility with the Built-in Flash 151 Using an External Flash (Optional 153 Settings During Playback 160 Changing Playback Display ...Method 160 Displaying Bright Portion Warning 160 Setting the Slideshow Display Interval 161 Camera Settings 162 Formatting the SD Memory Card 162 Turning the Beep...

User Manual
Page 10
8 Appendix 173 Default Settings 174 Functions Available with Various Lens Combinations .......... 178 Notes on [Using Aperture Ring 180 Cleaning the CCD 181 Optional Accessories 183 Error Messages 186 Troubleshooting 188 Main Specifications 190 Specifications for Remote Control F (Optional 192 Glossary 193 Index 198 WARRANTY POLICY 202
8 Appendix 173 Default Settings 174 Functions Available with Various Lens Combinations .......... 178 Notes on [Using Aperture Ring 180 Cleaning the CCD 181 Optional Accessories 183 Error Messages 186 Troubleshooting 188 Main Specifications 190 Specifications for Remote Control F (Optional 192 Glossary 193 Index 198 WARRANTY POLICY 202
User Manual
Page 11
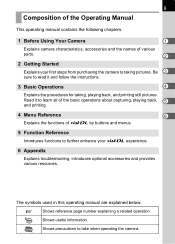
... parts. 2 2 Getting Started Explains your L experience. 6 Appendix Explains troubleshooting, introduces optional accessories and provides various resources. Shows useful information. 9 Composition of the Operating Manual This operating manual contains the following chapters. 1 Before Using Your Camera 1 Explains camera characteristics, accessories and the names of L by buttons and menus. 5 Function Reference Introduces functions to further enhance...
... parts. 2 2 Getting Started Explains your L experience. 6 Appendix Explains troubleshooting, introduces optional accessories and provides various resources. Shows useful information. 9 Composition of the Operating Manual This operating manual contains the following chapters. 1 Before Using Your Camera 1 Explains camera characteristics, accessories and the names of L by buttons and menus. 5 Function Reference Introduces functions to further enhance...

User Manual
Page 13
L Camera Characteristics 12 Checking the Contents of the Package 13 Names of working parts before use. 1 Before Using Your Camera Check the package contents and names of Working Parts 14
L Camera Characteristics 12 Checking the Contents of the Package 13 Names of working parts before use. 1 Before Using Your Camera Check the package contents and names of Working Parts 14
User Manual
Page 14
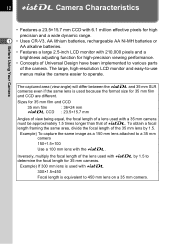
...of the lens used with L by 1.5. Sizes for 35 mm cameras. The large, high-resolution LCD monitor and easy-to-use menus make the camera easier to a 35 mm camera 150÷1.5=100 Use a 100 mm lens with the L. 12 L Camera Characteristics Before Using Your Camera • Features ...Uses CR-V3, AA lithium batteries, rechargeable AA Ni-MH batteries or AA alkaline batteries. • Features a large 2.5-inch LCD monitor with 210,000 pixels and a brightness adjusting function for 35 mm film and CCD are different. The captured area (view angle) will differ between the L and 35 mm SLR cameras...
...of the lens used with L by 1.5. Sizes for 35 mm cameras. The large, high-resolution LCD monitor and easy-to-use menus make the camera easier to a 35 mm camera 150÷1.5=100 Use a 100 mm lens with the L. 12 L Camera Characteristics Before Using Your Camera • Features ...Uses CR-V3, AA lithium batteries, rechargeable AA Ni-MH batteries or AA alkaline batteries. • Features a large 2.5-inch LCD monitor with 210,000 pixels and a brightness adjusting function for 35 mm film and CCD are different. The captured area (view angle) will differ between the L and 35 mm SLR cameras...
User Manual
Page 15
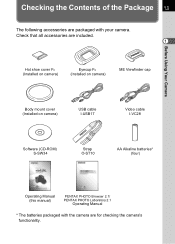
... included. 1 Hot shoe cover FK (Installed on camera) Eyecup FN (Installed on camera) ME Viewfinder cap Before Using Your Camera Body mount cover (Installed on camera) USB cable I-USB17 Video cable I-VC28 Software (CD-ROM) S-SW34 Strap O-ST10 AA Alkaline batteries* (four) Operating Manual (this manual) PENTAX PHOTO Browser 2.1/ PENTAX PHOTO Laboratory 2.1 Operating Manual * The batteries packaged...
... included. 1 Hot shoe cover FK (Installed on camera) Eyecup FN (Installed on camera) ME Viewfinder cap Before Using Your Camera Body mount cover (Installed on camera) USB cable I-USB17 Video cable I-VC28 Software (CD-ROM) S-SW34 Strap O-ST10 AA Alkaline batteries* (four) Operating Manual (this manual) PENTAX PHOTO Browser 2.1/ PENTAX PHOTO Laboratory 2.1 Operating Manual * The batteries packaged...

User Manual
Page 16
14 Names of Working Parts Before Using Your Camera Camera 1 Lens mount index Shutter release button Main switch Self-Timer lamp/ Remote control receiver Lens unlock button 3 button i button M button Q button Mirror AF coupler Focus mode lever Lens information contacts e-dial L/Z button Four-way controller 4 button { button Battery cover Tripod socket
14 Names of Working Parts Before Using Your Camera Camera 1 Lens mount index Shutter release button Main switch Self-Timer lamp/ Remote control receiver Lens unlock button 3 button i button M button Q button Mirror AF coupler Focus mode lever Lens information contacts e-dial L/Z button Four-way controller 4 button { button Battery cover Tripod socket
User Manual
Page 17
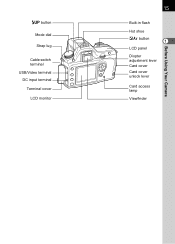
K button Mode dial Strap lug Cable switch terminal USB/Video terminal DC input terminal Terminal cover LCD monitor 15 Before Using Your Camera Built-in flash Hot shoe mc button 1 LCD panel Diopter adjustment lever Card cover Card cover unlock lever Card access lamp Viewfinder
K button Mode dial Strap lug Cable switch terminal USB/Video terminal DC input terminal Terminal cover LCD monitor 15 Before Using Your Camera Built-in flash Hot shoe mc button 1 LCD panel Diopter adjustment lever Card cover Card cover unlock lever Card access lamp Viewfinder
User Manual
Page 18
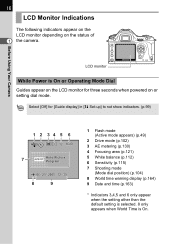
... and time (p.163) * Indicators 3,4,5 and 6 only appear when the setting other than the default setting is selected. 8 only appears when World Time is On. Before Using Your Camera LCD monitor While Power is On or Operating Mode Dial Guides appear on the status of 1 the...
... and time (p.163) * Indicators 3,4,5 and 6 only appear when the setting other than the default setting is selected. 8 only appears when World Time is On. Before Using Your Camera LCD monitor While Power is On or Operating Mode Dial Guides appear on the status of 1 the...
User Manual
Page 19
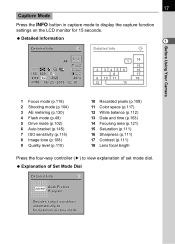
... 1 Detailed Info Detailed Info AF ISO 800 sRGB 40mm 06 / 25 / 2005 12 : 30 1 14 15 2 3456 16 7 8 17 9 10 11 18 12 13 Before Using Your Camera 1 Focus mode (p.118) 2 Shooting mode (p.104) 3 AE metering (p.130) 4 Flash mode (p.49) 5 Drive mode (p.102) 6 Auto bracket (p.145) 7 ISO sensitivity (p.115) 8 Image tone (p.108...
... 1 Detailed Info Detailed Info AF ISO 800 sRGB 40mm 06 / 25 / 2005 12 : 30 1 14 15 2 3456 16 7 8 17 9 10 11 18 12 13 Before Using Your Camera 1 Focus mode (p.118) 2 Shooting mode (p.104) 3 AE metering (p.130) 4 Flash mode (p.49) 5 Drive mode (p.102) 6 Auto bracket (p.145) 7 ISO sensitivity (p.115) 8 Image tone (p.108...

User Manual
Page 20
... screen displays every time you press M button during playback. 1 You can change the information initially displayed by pressing the Q button. (p.160) Before Using Your Camera Detailed Information 100-0001 AF 1 / 2000 F2 . 8 + 1 . 5EV ISO 800 sRGB 40mm 06 / 25 / 2005 12 : 30 2 1 5 7 8 9 11 12 13 14 15 17 18 20 ...
... screen displays every time you press M button during playback. 1 You can change the information initially displayed by pressing the Q button. (p.160) Before Using Your Camera Detailed Information 100-0001 AF 1 / 2000 F2 . 8 + 1 . 5EV ISO 800 sRGB 40mm 06 / 25 / 2005 12 : 30 2 1 5 7 8 9 11 12 13 14 15 17 18 20 ...

User Manual
Page 21
19 Histogram Display 1 2 100-0046 3 1 Before Using Your Camera 4 1 Capture quality (Image file type) 2 Image folder number and file number (p.169) 3 Protect icon (p.77) 4 Histogram • Areas where blooming occurred blink if Bright Portion warning is on. (p.160) • Press the four-way controller (23) in the histogram display to move the Histogram display position up or down.
19 Histogram Display 1 2 100-0046 3 1 Before Using Your Camera 4 1 Capture quality (Image file type) 2 Image folder number and file number (p.169) 3 Protect icon (p.77) 4 Histogram • Areas where blooming occurred blink if Bright Portion warning is on. (p.160) • Press the four-way controller (23) in the histogram display to move the Histogram display position up or down.
