
ZX-60 Manual
Page 2
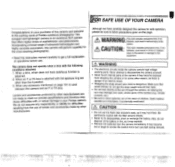
... not followed, could result in serious injury to the exciting world of Pentax autofocus photography! When a lens, which does not have carefully designed this camera for safe operation, please be sure to follow precautions given on this camera and welcome to the person. &CAUTION: This mark indicates precautions that ... neck. • Do not look directly at the sun through the camera, as it may damage your eyes, and/or parts of the camera (e.g.: shutter curtains, etc.) • Be sure to get the strap caught around your Pentax camera. When an F or FA lens is attached with , or actual ...
... not followed, could result in serious injury to the exciting world of Pentax autofocus photography! When a lens, which does not have carefully designed this camera for safe operation, please be sure to follow precautions given on this camera and welcome to the person. &CAUTION: This mark indicates precautions that ... neck. • Do not look directly at the sun through the camera, as it may damage your eyes, and/or parts of the camera (e.g.: shutter curtains, etc.) • Be sure to get the strap caught around your Pentax camera. When an F or FA lens is attached with , or actual ...
ZX-60 Manual
Page 3
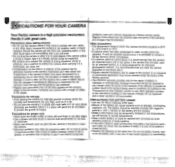
... can cause hazards such as paint thinner, alcohol or benzene to clean the camera. • Electrical problems may be assessed. The battery should occur, it is advisable to contact a Pentax Service Center immediately. •To maintain optimum performance, it with good dry ... not covered under the terms of the Pentax warranty. • The PENTAX warranty provides only for inspection. • Be careful not to subject the camera to hit solid objects. PRECAUTIONS FOR YOUR CAMERA Your Pentax camera is minimized. Store it to a Pentax service center for the repair of the ...
... can cause hazards such as paint thinner, alcohol or benzene to clean the camera. • Electrical problems may be assessed. The battery should occur, it is advisable to contact a Pentax Service Center immediately. •To maintain optimum performance, it with good dry ... not covered under the terms of the Pentax warranty. • The PENTAX warranty provides only for inspection. • Be careful not to subject the camera to hit solid objects. PRECAUTIONS FOR YOUR CAMERA Your Pentax camera is minimized. Store it to a Pentax service center for the repair of the ...
ZX-60 Manual
Page 4
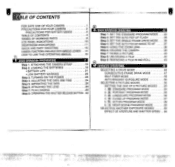
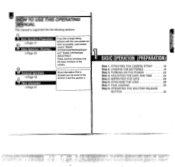
...60 '' 1 TURNING ON THE POWER 23 Step 4. ADJUSTING THE DATE AND TIME 24 Step 5. SET THE AUTO POP UP FLASH 35 Step 3. ACTION PROGRAM MODE 58 6. TAKING A PICTURE 40 Step 8. SET THE STANDARD PROGRAM MODE . . . .34 Step 2. SET THE SINGLE FRAME DRIVE MODE . . . .36 Step 4. Step 1. HOLDING THE CAMERA... BUTTON .32 BASIC' OPERATION (SHOOTING) 33 Step 1. iSHEIZZ, BLE OF CONTENTS FOR SAFE USE OF YOUR CAMERA 1 PRECAUTIONS FOR YOUR CAMERA 2 PRECAUTIONS FOR BATTERY USAGE 3 TABLE OF CONTENTS 4 NAMES OF WORKING PARTS 8 LCD PANEL INDICATIONS 10 VIEWFINDER...
...60 '' 1 TURNING ON THE POWER 23 Step 4. ADJUSTING THE DATE AND TIME 24 Step 5. SET THE AUTO POP UP FLASH 35 Step 3. ACTION PROGRAM MODE 58 6. TAKING A PICTURE 40 Step 8. SET THE STANDARD PROGRAM MODE . . . .34 Step 2. SET THE SINGLE FRAME DRIVE MODE . . . .36 Step 4. Step 1. HOLDING THE CAMERA... BUTTON .32 BASIC' OPERATION (SHOOTING) 33 Step 1. iSHEIZZ, BLE OF CONTENTS FOR SAFE USE OF YOUR CAMERA 1 PRECAUTIONS FOR YOUR CAMERA 2 PRECAUTIONS FOR BATTERY USAGE 3 TABLE OF CONTENTS 4 NAMES OF WORKING PARTS 8 LCD PANEL INDICATIONS 10 VIEWFINDER...

ZX-60 Manual
Page 8
...to set the pointer 41. Frame the subject in down position. See page 24. 3 Attaching the lens Align the red dots on the camera and lens mounts. See page 34. 5 Turn the power switch ON. o DATE Set the exposure mode to 1 while depressing the exposure... mode button. Loading the film. Turn the lens to A position This camera does not work other than A , position. See page 37. f.s.7=1BallailMOSSUZ';: QUICK AND EASY SHOOTING AKIMAIVEIMUSVII,, NOISIMMIBMIENIEBUICSM.W.MMTIVPMENNSIONON 1Loading the batteries Open ...
...to set the pointer 41. Frame the subject in down position. See page 24. 3 Attaching the lens Align the red dots on the camera and lens mounts. See page 34. 5 Turn the power switch ON. o DATE Set the exposure mode to 1 while depressing the exposure... mode button. Loading the film. Turn the lens to A position This camera does not work other than A , position. See page 37. f.s.7=1BallailMOSSUZ';: QUICK AND EASY SHOOTING AKIMAIVEIMUSVII,, NOISIMMIBMIENIEBUICSM.W.MMTIVPMENNSIONON 1Loading the batteries Open ...
ZX-60 Manual
Page 9
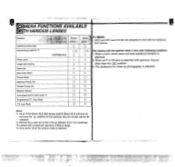
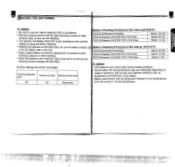
...lenses and FA 28mm f/2.8 soft lens do not have autofocus function is attached with following condition. 1. A_.lens . [Mount typs) . [KAF21*1 (with the Autofocus SLR camera. F„len.s, .. [KAF] *i 0 0*3 0 X X X On MEMO • KAF2 and KAF mount lenses are designed to work with Matte field) 0 0*3 ... 0 0 0 0 0 0 0 Notes: *1. Only works when the picture mode is attached. qAMERA FUNCTIONS AVAILABLE 4WiTH VARIOUS LENSES Function -- The camera will not operate when a lens with aperture ring set other than the I A] position. 3. When an F or FA lens is attached. 2. ...
...lenses and FA 28mm f/2.8 soft lens do not have autofocus function is attached with following condition. 1. A_.lens . [Mount typs) . [KAF21*1 (with the Autofocus SLR camera. F„len.s, .. [KAF] *i 0 0*3 0 X X X On MEMO • KAF2 and KAF mount lenses are designed to work with Matte field) 0 0*3 ... 0 0 0 0 0 0 0 Notes: *1. Only works when the picture mode is attached. qAMERA FUNCTIONS AVAILABLE 4WiTH VARIOUS LENSES Function -- The camera will not operate when a lens with aperture ring set other than the I A] position. 3. When an F or FA lens is attached. 2. ...
ZX-60 Manual
Page 10
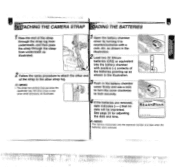
... (Preparation) --›Page 17 --I Step 1. LOADING THE BATTERIES 19 Step 3. ATTACHING THE LENS 28 Step 7. These sections introduce only the basic functions of this new camera as soon as possible, read section land 2, "BASIC OPERATION(PREPARATION)" and " BASIC OPERATION (SHOOTING)". ADJUSTING THE DATE AND TIME 24 Step 5. IMPRINTING THE DATE 26.... TURNING ON THE POWER 23 Step 4. OPERATING THE SHUTTER RELEASE BUTTON 32 Operation ( Shooting -.Page 33 If you like to begin taking pictures with this camera. ATTACHING THE CAMERA STRAP 18 Step 2.
... (Preparation) --›Page 17 --I Step 1. LOADING THE BATTERIES 19 Step 3. ATTACHING THE LENS 28 Step 7. These sections introduce only the basic functions of this new camera as soon as possible, read section land 2, "BASIC OPERATION(PREPARATION)" and " BASIC OPERATION (SHOOTING)". ADJUSTING THE DATE AND TIME 24 Step 5. IMPRINTING THE DATE 26.... TURNING ON THE POWER 23 Step 4. OPERATING THE SHUTTER RELEASE BUTTON 32 Operation ( Shooting -.Page 33 If you like to begin taking pictures with this camera. ATTACHING THE CAMERA STRAP 18 Step 2.
ZX-60 Manual
Page 11
... shoe cover or any other end the batteries pointing up as shown in the illustration. as shown in the illustration. cmioFF OS, TvAv M n MEMO The camera memorizes only the exposure number and date when the batteries were removed. See page 24 for adjusting the date and time. TTACHING THE... CAMERA STRAP OADING THE BATTERIES 1Pass the end of 2 Follow the same procedure to attach the other small accessory as illustrated. 3 Push in the battery chamber ...
... shoe cover or any other end the batteries pointing up as shown in the illustration. as shown in the illustration. cmioFF OS, TvAv M n MEMO The camera memorizes only the exposure number and date when the batteries were removed. See page 24 for adjusting the date and time. TTACHING THE... CAMERA STRAP OADING THE BATTERIES 1Pass the end of 2 Follow the same procedure to attach the other small accessory as illustrated. 3 Push in the battery chamber ...
ZX-60 Manual
Page 12
... Off On Single frame but it will remain unchanged • CR2 batteries were used under Pentax testing conditions. • Actual battery life and performance may vary drastically depending on hand for this camera General existing light photography Flash photography (using flash 50% of the times) Flash photography (...-exposure film rolls at 20°C/68°F) • Be sure to use two Lithium batteries CR2 or equivalents. • Both the camera function and the data imprinting function to keep constant track of time use the batteries. • The optional "AA-Battery Pack FG" is...
... Off On Single frame but it will remain unchanged • CR2 batteries were used under Pentax testing conditions. • Actual battery life and performance may vary drastically depending on hand for this camera General existing light photography Flash photography (using flash 50% of the times) Flash photography (...-exposure film rolls at 20°C/68°F) • Be sure to use two Lithium batteries CR2 or equivalents. • Both the camera function and the data imprinting function to keep constant track of time use the batteries. • The optional "AA-Battery Pack FG" is...
ZX-60 Manual
Page 13
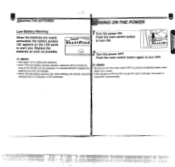
... over 3 minutes, the power is released and no indication in used. • When the low battery warning @ starts blinking, the shutter cannot b • If the camera is ON and left unused for loading the batteries. • Even if the low-battery symbol appears, exposure will be correct as MEMO long as...
... over 3 minutes, the power is released and no indication in used. • When the low battery warning @ starts blinking, the shutter cannot b • If the camera is ON and left unused for loading the batteries. • Even if the low-battery symbol appears, exposure will be correct as MEMO long as...
ZX-60 Manual
Page 15
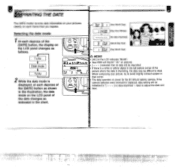
... frame that no data imprinted ", need to read. NOD5E 1b2 (Month Day Year) ; DATE • The data operates on power for the 6V lithium battery camera. If there is a white picture where the When composing or yellow object in the illustration, the date mode on the LCD indicates "Month". If the...
... frame that no data imprinted ", need to read. NOD5E 1b2 (Month Day Year) ; DATE • The data operates on power for the 6V lithium battery camera. If there is a white picture where the When composing or yellow object in the illustration, the date mode on the LCD indicates "Month". If the...

ZX-60 Manual
Page 16
... lens counterclockwise to make sure it clicks in place. 3 To remove the front lens cap, squeeze the tabs on both sides in place. • The camera body and lens mount incorporate lens information contacts and an AF coupler. AVACHING THE LENS lislessaag-27-mAr.bria: 1Remove the body mount cap C) and... rear lens cap Q. 2 Align the red dots on the lens and camera while mounting the lens to the camera body, then turn the lens clockwise until it is designed to protect the camera against damage after removal, be sure to place the lens down the lens unlock button and...
... lens counterclockwise to make sure it clicks in place. 3 To remove the front lens cap, squeeze the tabs on both sides in place. • The camera body and lens mount incorporate lens information contacts and an AF coupler. AVACHING THE LENS lislessaag-27-mAr.bria: 1Remove the body mount cap C) and... rear lens cap Q. 2 Align the red dots on the lens and camera while mounting the lens to the camera body, then turn the lens clockwise until it is designed to protect the camera against damage after removal, be sure to place the lens down the lens unlock button and...
ZX-60 Manual
Page 17
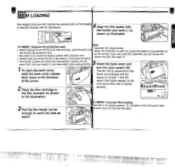
... fine precision material. ins* 0 0 0=1 C 0 0 ri ya ' , Note Ai MEMO Remove the protective card • Automatic film speed setting • Before loading film for the camera. for the first time after purchase, open the back cover, Close the back cover and turn the main switch ON. The film will blink on.... • Always load and unload the film in the film chamber as illustrated. If you use a non-DX coded film, you first operate the camera with your fingers or any other object while loading the film. 1 • To open the back coy When DX-coded film is used, the correct...
... fine precision material. ins* 0 0 0=1 C 0 0 ri ya ' , Note Ai MEMO Remove the protective card • Automatic film speed setting • Before loading film for the camera. for the first time after purchase, open the back cover, Close the back cover and turn the main switch ON. The film will blink on.... • Always load and unload the film in the film chamber as illustrated. If you use a non-DX coded film, you first operate the camera with your fingers or any other object while loading the film. 1 • To open the back coy When DX-coded film is used, the correct...
ZX-60 Manual
Page 18
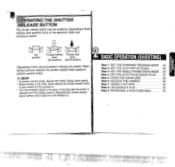
... the shutter release button gently. • Before loading a roll of film, slowly depress the shutter release button to prevent camera shake. SET THE AUTO FOCUS MODE TO AF . .37 Step 5. HOLDING THE CAMERA 39 Step 7. TAKING A PICTURE 40 Step 8. SET THE SINGLE FRAME DRIVE MODE . .36 Step 4. USING THE ZOOM LENS 38...
... the shutter release button gently. • Before loading a roll of film, slowly depress the shutter release button to prevent camera shake. SET THE AUTO FOCUS MODE TO AF . .37 Step 5. HOLDING THE CAMERA 39 Step 7. TAKING A PICTURE 40 Step 8. SET THE SINGLE FRAME DRIVE MODE . .36 Step 4. USING THE ZOOM LENS 38...
ZX-60 Manual
Page 19
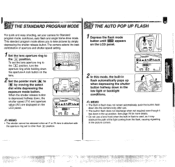
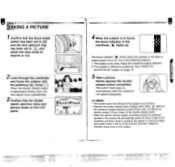
... mark • to other than position. 1Depress the flash mode button until AUTO appears on the LCD panel. Ay ' 125 8.0 aacsn _1 a. The camera selects the best combination of the light coming from the flash, causing vignetting in flash automatically pops up position. tra„, o9 MODE DATE 2 In... button is used, as it has been in the up when depressing the shutter button halfway down in flash is depressed halfway down into the camera body after use a lens hood when the built-in the low light or backlight conditions. See page 76 for Standard program mode, autofocus,...
... mark • to other than position. 1Depress the flash mode button until AUTO appears on the LCD panel. Ay ' 125 8.0 aacsn _1 a. The camera selects the best combination of the light coming from the flash, causing vignetting in flash automatically pops up position. tra„, o9 MODE DATE 2 In... button is used, as it has been in the up when depressing the shutter button halfway down in flash is depressed halfway down into the camera body after use a lens hood when the built-in the low light or backlight conditions. See page 76 for Standard program mode, autofocus,...
ZX-60 Manual
Page 21
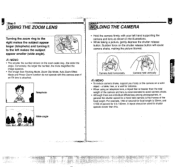
... makes the subject appear larger (telephoto) and turning it is 100mm. MEMO • The smaller the number shown on the shutter release button will cause camera shake, making the picture blurred. a table, tree, or a wall for focal length is attached. Conversely, the larger the number, the more magnified the ...; The Image Size Tracking Mode, Zoom Clip Mode, Auto Zoom Effect Mode and Power Zoom function do not operate with your body or the camera on a solid object - For example, 1/50 of second for instance. • When using an telephoto lens, a tripod that is heavier than this...
... makes the subject appear larger (telephoto) and turning it is 100mm. MEMO • The smaller the number shown on the shutter release button will cause camera shake, making the picture blurred. a table, tree, or a wall for focal length is attached. Conversely, the larger the number, the more magnified the ...; The Image Size Tracking Mode, Zoom Clip Mode, Auto Zoom Effect Mode and Power Zoom function do not operate with your body or the camera on a solid object - For example, 1/50 of second for instance. • When using an telephoto lens, a tripod that is heavier than this...
ZX-60 Manual
Page 22
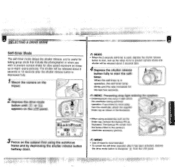
...through the viewfinder and frame the subject with the autofocus AF' frame C When the shutter release button is depressed halfway down . Adjust the camera-to obtain proper focus for one of the following reasons. 1. See "HARD-TO- The subject is not lighted adequately. The built-in ... )0N/OFF OA A ZNI,TvAvM MD Tv Av 8.0 4 When the subject is difficult to autofocus. The focus indicator ! • blinks when the camera is out of shutter release to -subject distance is fixed (Focus lock). AUTOFOCUS" subject on the subject. ,...""4-47 ,1,1474.4 -• • While ...
...through the viewfinder and frame the subject with the autofocus AF' frame C When the shutter release button is depressed halfway down . Adjust the camera-to obtain proper focus for one of the following reasons. 1. See "HARD-TO- The subject is not lighted adequately. The built-in ... )0N/OFF OA A ZNI,TvAvM MD Tv Av 8.0 4 When the subject is difficult to autofocus. The focus indicator ! • blinks when the camera is out of shutter release to -subject distance is fixed (Focus lock). AUTOFOCUS" subject on the subject. ,...""4-47 ,1,1474.4 -• • While ...

ZX-60 Manual
Page 23
... of frames indicated on the LCD panel. 3 Open the back cover and remove the film. • I - 7 7; 4O MEMO • When removing the film from the camera, avoid direct sun light. • A roll of the roll. See page 43. ... I - )ON/OFF OL A :MCATvAvM N.
... of frames indicated on the LCD panel. 3 Open the back cover and remove the film. • I - 7 7; 4O MEMO • When removing the film from the camera, avoid direct sun light. • A roll of the roll. See page 43. ... I - )ON/OFF OL A :MCATvAvM N.

ZX-60 Manual
Page 25
...pictures. See page 50 for more details. Consecutive-Frame Drive Mode Pictures can be taken with the Bulb timer exposure. SELECTING A DRIVE MODE This camera has a total of six drive modes as shown. Single-Frame Drive Mode MI One picture is taken each time the shutter release button is ...being charged. • Depress the drive mode button to another setting to prevent camera shake and the shutter is released about 2 seconds later. See page 48. 2 Seconds self-timer Mode v2s Auto Bracket Exposure Mode clu 1/2 i__1...
...pictures. See page 50 for more details. Consecutive-Frame Drive Mode Pictures can be taken with the Bulb timer exposure. SELECTING A DRIVE MODE This camera has a total of six drive modes as shown. Single-Frame Drive Mode MI One picture is taken each time the shutter release button is ...being charged. • Depress the drive mode button to another setting to prevent camera shake and the shutter is released about 2 seconds later. See page 48. 2 Seconds self-timer Mode v2s Auto Bracket Exposure Mode clu 1/2 i__1...
ZX-60 Manual
Page 26
...in operation, the self-timer lamp blinks and the rate increases for the last two seconds. When the self-timer is depressed fully. 1Mount the camera on the tripod. 2 Depress the drive mode button until u or :o2s appears on the subject first using accessories such as the finder cap,...you intend to move away from the LCD panel. -•=51;;', Q et4, 2 MODE DATE CD 0 ON/OFF PI A 4 1$.171TvAvM 416 aMED Tv Av "-- 60 5.6 e__1 3 Focus on the LCD panel. a.. • When using the autofocus frame and by depressing the shutter release button halfway down. 03 MEMO • When...
...in operation, the self-timer lamp blinks and the rate increases for the last two seconds. When the self-timer is depressed fully. 1Mount the camera on the tripod. 2 Depress the drive mode button until u or :o2s appears on the subject first using accessories such as the finder cap,...you intend to move away from the LCD panel. -•=51;;', Q et4, 2 MODE DATE CD 0 ON/OFF PI A 4 1$.171TvAvM 416 aMED Tv Av "-- 60 5.6 e__1 3 Focus on the LCD panel. a.. • When using the autofocus frame and by depressing the shutter release button halfway down. 03 MEMO • When...
ZX-60 Manual
Page 29
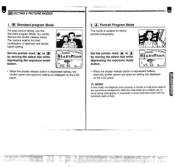
Faaii*g. On MEMO In this Standard program Mode. You simply depress the shutter release button. 1 The camera selects the best combination of -field. Set the pointer mark AZ to by moving the select dial while depressing the exposure mode button. (---) ON/OFF ...
Faaii*g. On MEMO In this Standard program Mode. You simply depress the shutter release button. 1 The camera selects the best combination of -field. Set the pointer mark AZ to by moving the select dial while depressing the exposure mode button. (---) ON/OFF ...

