
ZX-60 Manual
Page 2
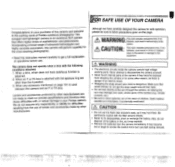
...their neck. • Do not look directly at the sun through the camera, as it may damage your Pentax camera. Incorporating a broad range of advanced technologies and highly accurate automation, this camera will perform superbly for the most exacting photographer. • Read this ... WARNING • The electronic circuits inside the camera contain high voltage working parts. Make sure that small children do not dispose of children. Also, do not get a full explanation of Pentax autofocus photography! This compact and lightweight camera is dangerous. A CAUTION • Do not...
...their neck. • Do not look directly at the sun through the camera, as it may damage your Pentax camera. Incorporating a broad range of advanced technologies and highly accurate automation, this camera will perform superbly for the most exacting photographer. • Read this ... WARNING • The electronic circuits inside the camera contain high voltage working parts. Make sure that small children do not dispose of children. Also, do not get a full explanation of Pentax autofocus photography! This compact and lightweight camera is dangerous. A CAUTION • Do not...
ZX-60 Manual
Page 3
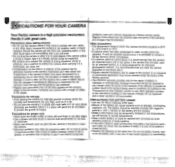
... in an area where chemicals are handled. If the camera has not been used for replacement convenience when shooting outdoors or while traveling. • If the built-in temperature difference is faulty; PRECAUTIONS FOR YOUR CAMERA Your Pentax camera is advisable to polarity (+ and -) marked on the... lens or viewfinder. • Never use the camera where it off what appears on hand for an extended period, or is taken...
... in an area where chemicals are handled. If the camera has not been used for replacement convenience when shooting outdoors or while traveling. • If the built-in temperature difference is faulty; PRECAUTIONS FOR YOUR CAMERA Your Pentax camera is advisable to polarity (+ and -) marked on the... lens or viewfinder. • Never use the camera where it off what appears on hand for an extended period, or is taken...
ZX-60 Manual
Page 4
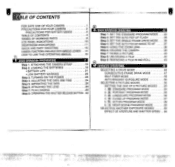
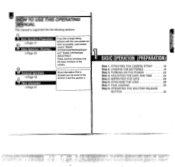
... .53 1. ADJUSTING THE DATE AND TIME 24 Step 5. ITC STANDARD PROGRAM MODE 54 2. PORTRAIT PROGRAM MODE 55 3. Step 1. ATTACHING THE CAMERA STRAP 18 Step 2. LOADING THE BATTERIES 19 • BATTERY LIFE 21 • LOW BATTERY WARNING 22 Step 3. EL- TURNING ON THE..., LANDSCAPE PROGRAM MODE 56 4. .: CLOSE-UP PROGRAM MODE 57 5. a:, NIGHT-SCENE PROGRAM MODE 59 SELECTING ANOTHER EXPOSURE MODES 60 EFFECT OF APERTURE AND SHUTTER SPEED . . 60 '' 1 OPERATING THE SHUTTER RELEASE BUTTON .32 BASIC' OPERATION (SHOOTING) 33 Step 1. SET THE STANDARD PROGRAM MODE . ...
... .53 1. ADJUSTING THE DATE AND TIME 24 Step 5. ITC STANDARD PROGRAM MODE 54 2. PORTRAIT PROGRAM MODE 55 3. Step 1. ATTACHING THE CAMERA STRAP 18 Step 2. LOADING THE BATTERIES 19 • BATTERY LIFE 21 • LOW BATTERY WARNING 22 Step 3. EL- TURNING ON THE..., LANDSCAPE PROGRAM MODE 56 4. .: CLOSE-UP PROGRAM MODE 57 5. a:, NIGHT-SCENE PROGRAM MODE 59 SELECTING ANOTHER EXPOSURE MODES 60 EFFECT OF APERTURE AND SHUTTER SPEED . . 60 '' 1 OPERATING THE SHUTTER RELEASE BUTTON .32 BASIC' OPERATION (SHOOTING) 33 Step 1. SET THE STANDARD PROGRAM MODE . ...

ZX-60 Manual
Page 8
See page 24. 3 Attaching the lens Align the red dots on the camera and lens mounts. See page 23. to Standard program mode. Auto I flash pops up automatically if it 1$11TvAvM Av T250 8.0 e_ v im, `{t Turn the lens ..., 10 Adjust the focus and take (DON/OFF Olt A 2G ItPl TVA% a picture. ON/OFF (iik, A it necessary. Move the select lever to A position This camera does not work other than A , position. Compose the subject by turning the zoom ring. f.s.7=1BallailMOSSUZ';: QUICK AND EASY SHOOTING AKIMAIVEIMUSVII,, NOISIMMIBMIENIEBUICSM.W.MMTIVPMENNSIONON 1Loading the batteries...
See page 24. 3 Attaching the lens Align the red dots on the camera and lens mounts. See page 23. to Standard program mode. Auto I flash pops up automatically if it 1$11TvAvM Av T250 8.0 e_ v im, `{t Turn the lens ..., 10 Adjust the focus and take (DON/OFF Olt A 2G ItPl TVA% a picture. ON/OFF (iik, A it necessary. Move the select lever to A position This camera does not work other than A , position. Compose the subject by turning the zoom ring. f.s.7=1BallailMOSSUZ';: QUICK AND EASY SHOOTING AKIMAIVEIMUSVII,, NOISIMMIBMIENIEBUICSM.W.MMTIVPMENNSIONON 1Loading the batteries...
ZX-60 Manual
Page 9
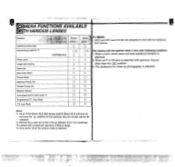
... with following condition. 1. X X 0 0 0 0 0 0 0 0 0 0 0 0 0 0 Notes: *1. Autofocus (Lens only) Manual focus (with the Autofocus SLR camera. A_.lens . [Mount typs) . [KAF21*1 (with aperture ring set other than the I A] position. 3. When an F or FA lens is attached. 2. Lens F. As...with aid of f/5.6 or larger. *4. Only works when the picture mode is attached. qAMERA FUNCTIONS AVAILABLE 4WiTH VARIOUS LENSES Function -- The camera will not operate when a lens with a maximum aperture of the in-focus indicator (Fl) in flash mode '4 Programmed TTL Auto Flash...
... with following condition. 1. X X 0 0 0 0 0 0 0 0 0 0 0 0 0 0 Notes: *1. Autofocus (Lens only) Manual focus (with the Autofocus SLR camera. A_.lens . [Mount typs) . [KAF21*1 (with aperture ring set other than the I A] position. 3. When an F or FA lens is attached. 2. Lens F. As...with aid of f/5.6 or larger. *4. Only works when the picture mode is attached. qAMERA FUNCTIONS AVAILABLE 4WiTH VARIOUS LENSES Function -- The camera will not operate when a lens with a maximum aperture of the in-focus indicator (Fl) in flash mode '4 Programmed TTL Auto Flash...
ZX-60 Manual
Page 10
...II I I I Basic. LOADING THE BATTERIES 19 Step 3. IMPRINTING THE DATE 26 Step 6. These sections introduce only the basic functions of this new camera as soon as possible, read section land 2, "BASIC OPERATION(PREPARATION)" and " BASIC OPERATION (SHOOTING)". Operation ( Shooting -.Page 33 If you like ...to begin taking pictures with this camera. TURNING ON THE POWER 23 Step 4. W TO USE THIS OPERATING MANUAL This manual is detailed can be found in the section 3 and...
...II I I I Basic. LOADING THE BATTERIES 19 Step 3. IMPRINTING THE DATE 26 Step 6. These sections introduce only the basic functions of this new camera as soon as possible, read section land 2, "BASIC OPERATION(PREPARATION)" and " BASIC OPERATION (SHOOTING)". Operation ( Shooting -.Page 33 If you like ...to begin taking pictures with this camera. TURNING ON THE POWER 23 Step 4. W TO USE THIS OPERATING MANUAL This manual is detailed can be found in the section 3 and...
ZX-60 Manual
Page 11
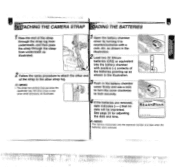
TTACHING THE CAMERA STRAP OADING THE BATTERIES 1Pass the end of the strap through the clasp from 1Open the battery chamber cover by turning it to underneath, and ... batteries (CR2) or equivalent into the battery chamber with a the strap through the strap lug from underneath as coin, etc. cmioFF OS, TvAv M n MEMO The camera memorizes only the exposure number and date when the batteries were removed. as shown in the illustration. of 2 Follow the same procedure to attach the...
TTACHING THE CAMERA STRAP OADING THE BATTERIES 1Pass the end of the strap through the clasp from 1Open the battery chamber cover by turning it to underneath, and ... batteries (CR2) or equivalent into the battery chamber with a the strap through the strap lug from underneath as coin, etc. cmioFF OS, TvAv M n MEMO The camera memorizes only the exposure number and date when the batteries were removed. as shown in the illustration. of 2 Follow the same procedure to attach the...
ZX-60 Manual
Page 12
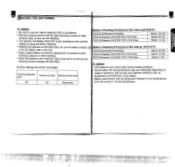
... times) Flash photography (using flash 100% of the times) Approx. 15 rolls Approx. 5 rolls following camera settings will remain unchanged • CR2 batteries were used under Pentax testing conditions. • Actual battery life and performance may be temporarily hindered in low temperatures, Off On ...an old battery with a new one. General existing light photography Approx. 30 rolls • Keep a spare battery on hand for this camera General existing light photography Flash photography (using flash 50% of the times) Flash photography (using flash 100% of the times) Approx. 120...
... times) Flash photography (using flash 100% of the times) Approx. 15 rolls Approx. 5 rolls following camera settings will remain unchanged • CR2 batteries were used under Pentax testing conditions. • Actual battery life and performance may be temporarily hindered in low temperatures, Off On ...an old battery with a new one. General existing light photography Approx. 30 rolls • Keep a spare battery on hand for this camera General existing light photography Flash photography (using flash 50% of the times) Flash photography (using flash 100% of the times) Approx. 120...
ZX-60 Manual
Page 13
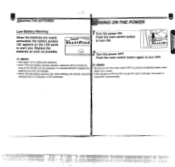
.... ON/OFF OLASA.WITv to turn ON. when not in used. • When the low battery warning @ starts blinking, the shutter cannot b • If the camera is recommended to replace the • Be sure to warn you. ne, It is ON and left unused for loading the batteries. • Even if...
.... ON/OFF OLASA.WITv to turn ON. when not in used. • When the low battery warning @ starts blinking, the shutter cannot b • If the camera is recommended to replace the • Be sure to warn you. ne, It is ON and left unused for loading the batteries. • Even if...
ZX-60 Manual
Page 15
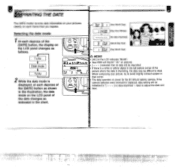
... each depress of the [DATE] button, the display on the LCD panel changes as shown in that no data imprinted ", need to read. If the camera batteries were removed or replaced, data setting will be initialized to "[ ] no data will imprint " 00 " on the LCD panel of the data changes as...
... each depress of the [DATE] button, the display on the LCD panel changes as shown in that no data imprinted ", need to read. If the camera batteries were removed or replaced, data setting will be initialized to "[ ] no data will imprint " 00 " on the LCD panel of the data changes as...

ZX-60 Manual
Page 16
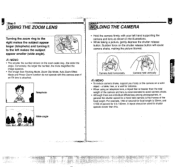
Ofn MEMO • The body mount cap is designed to the electrical system. Dirt, dust, or corrosion may cause damage to protect the camera against damage after removal, be sure to make sure it clicks in place. 3 To remove the front lens cap, squeeze the tabs on both sides ...in place. • The camera body and lens mount incorporate lens information contacts and an AF coupler. For storage, the optional accessory "Body Mount Cap K" is available. k• After mounting...
Ofn MEMO • The body mount cap is designed to the electrical system. Dirt, dust, or corrosion may cause damage to protect the camera against damage after removal, be sure to make sure it clicks in place. 3 To remove the front lens cap, squeeze the tabs on both sides ...in place. • The camera body and lens mount incorporate lens information contacts and an AF coupler. For storage, the optional accessory "Body Mount Cap K" is available. k• After mounting...
ZX-60 Manual
Page 17
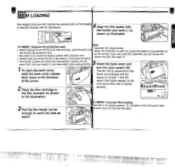
If you use a non-DX coded film, you first operate the camera with no film loaded to become familiar with protective card. • Always load and unload the film in the shade or avoid direct sunshine. The ... film chamber as illustrated. ins* 0 0 0=1 C 0 0 ri ya ' , Note Ai MEMO Remove the protective card • Automatic film speed setting • Before loading film for the camera. es. M LOADING 4 We suggest that you can set and remove the protective card. • Be careful not to touch the shutter curtains with its operations...
If you use a non-DX coded film, you first operate the camera with no film loaded to become familiar with protective card. • Always load and unload the film in the shade or avoid direct sunshine. The ... film chamber as illustrated. ins* 0 0 0=1 C 0 0 ri ya ' , Note Ai MEMO Remove the protective card • Automatic film speed setting • Before loading film for the camera. es. M LOADING 4 We suggest that you can set and remove the protective card. • Be careful not to touch the shutter curtains with its operations...
ZX-60 Manual
Page 18
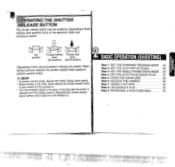
...position is released from the halfway position. SET THE AUTO POP UP FLASH 35 Step 3. USING THE ZOOM LENS 38 Step 6. MEMO • To prevent camera shake, depress the shutter release button gently. • Before loading a roll of film, slowly depress the shutter release button to prevent... camera shake. Depressing the shutter release button halfway down keeps the LCD indicator on for about 10 seconds after the button is . • The LCD ...
...position is released from the halfway position. SET THE AUTO POP UP FLASH 35 Step 3. USING THE ZOOM LENS 38 Step 6. MEMO • To prevent camera shake, depress the shutter release button gently. • Before loading a roll of film, slowly depress the shutter release button to prevent... camera shake. Depressing the shutter release button halfway down keeps the LCD indicator on for about 10 seconds after the button is . • The LCD ...
ZX-60 Manual
Page 19
... the lens aperture ring to the A position, turn the aperture ring while holding down into the camera body after use a lens hood when the built-in flash is attached with the aperture ring set your camera for more details. • Do not use . • The built-in the picture corners. .J -... Qn.om- 44- .7- The camera selects the best combination of the light coming from the flash, causing vignetting in flash ...
... the lens aperture ring to the A position, turn the aperture ring while holding down into the camera body after use a lens hood when the built-in flash is attached with the aperture ring set your camera for more details. • Do not use . • The built-in the picture corners. .J -... Qn.om- 44- .7- The camera selects the best combination of the light coming from the flash, causing vignetting in flash ...
ZX-60 Manual
Page 21
... lens as shown in general the shutter speed for instance. • When using an telephoto lens, a tripod that is heavier than this camera even if an FA lens is 100mm. For example, 1/50 of second for focal length is the inverse of the focal length. Telephoto Pgr 4!... ...Sudden force on a solid object - a table, tree, or a wall for a hand held vertically .a6 MEMO • To reduce camera shake, support your left makes the subject appear smaller (wide angle). Ste5p USING THE ZOOM LENS Turning the zoom ring to the right makes the...
... lens as shown in general the shutter speed for instance. • When using an telephoto lens, a tripod that is heavier than this camera even if an FA lens is 100mm. For example, 1/50 of second for focal length is the inverse of the focal length. Telephoto Pgr 4!... ...Sudden force on a solid object - a table, tree, or a wall for a hand held vertically .a6 MEMO • To reduce camera shake, support your left makes the subject appear smaller (wide angle). Ste5p USING THE ZOOM LENS Turning the zoom ring to the right makes the...
ZX-60 Manual
Page 22
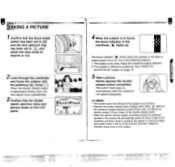
...a picture. Gently depress the shutter release button completely. The subject is in focus, the focus indicator in flash pops up . Adjust the camera-to-subject distance. 2.The subject is difficult to maintain sharp focus on another subject, lift your finger off the shutter release button. •...; viewfinder 741 lights up automatically when the subject is out of the following reasons. 1. The focus indicator ! • blinks when the camera is not able to obtain proper focus for one of focus. • Depress the shutter release button halfway down , the lens adjust focus...
...a picture. Gently depress the shutter release button completely. The subject is in focus, the focus indicator in flash pops up . Adjust the camera-to-subject distance. 2.The subject is difficult to maintain sharp focus on another subject, lift your finger off the shutter release button. •...; viewfinder 741 lights up automatically when the subject is out of the following reasons. 1. The focus indicator ! • blinks when the camera is not able to obtain proper focus for one of focus. • Depress the shutter release button halfway down , the lens adjust focus...

ZX-60 Manual
Page 23
... the LCD panel. 3 Open the back cover and remove the film. • I- )ON/OFF OL A :MCATvAvM N. I - 7 7; 4O MEMO • When removing the film from the camera, avoid direct sun light. • A roll of frames have been used as indicated on the film cartridge. step 1 xffiltsn:r UNLOADING A FILM 1The film automatically rewinds...
... the LCD panel. 3 Open the back cover and remove the film. • I- )ON/OFF OL A :MCATvAvM N. I - 7 7; 4O MEMO • When removing the film from the camera, avoid direct sun light. • A roll of frames have been used as indicated on the film cartridge. step 1 xffiltsn:r UNLOADING A FILM 1The film automatically rewinds...

ZX-60 Manual
Page 25
... mirror locks up to focus on the LCD panel. ® 2 MODE DATE =oll 1.Depress the shutter release button halfway down to prevent camera shake and the shutter is depressed. See page 50 for more details. Setting the consecutive frame drive mode. Depress the drive mode button until... q=l13 appears on the subject. 2.Depress and hold down the shutter release button. SELECTING A DRIVE MODE This camera has a total of six drive modes as shown. Consecutive-Frame Drive Mode ... .--I I Pictures can be released while the built-in flash is ...
... mirror locks up to focus on the LCD panel. ® 2 MODE DATE =oll 1.Depress the shutter release button halfway down to prevent camera shake and the shutter is depressed. See page 50 for more details. Setting the consecutive frame drive mode. Depress the drive mode button until... q=l13 appears on the subject. 2.Depress and hold down the shutter release button. SELECTING A DRIVE MODE This camera has a total of six drive modes as shown. Consecutive-Frame Drive Mode ... .--I I Pictures can be released while the built-in flash is ...
ZX-60 Manual
Page 26
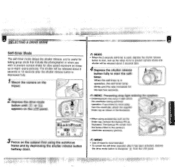
...MODE DATE CD 0 ON/OFF PI A 4 1$.171TvAvM 416 aMED Tv Av "-- 60 5.6 e__1 3 Focus on the LCD panel. When the self-timer is in the .... 03 MEMO • When the 2 seconds self-timer is used, depress the shutter release button to the camera's viewfinder accessory grooves. scene pictures. The shutter will be released about 2 seconds later. 4 Depress the shutter ...release button fully to start , lock-up the reflex mirror to prevent camera shake and shutter will be released about 2 seconds or 12 seconds after the shutter release button is recommended. ...
...MODE DATE CD 0 ON/OFF PI A 4 1$.171TvAvM 416 aMED Tv Av "-- 60 5.6 e__1 3 Focus on the LCD panel. When the self-timer is in the .... 03 MEMO • When the 2 seconds self-timer is used, depress the shutter release button to the camera's viewfinder accessory grooves. scene pictures. The shutter will be released about 2 seconds later. 4 Depress the shutter ...release button fully to start , lock-up the reflex mirror to prevent camera shake and shutter will be released about 2 seconds or 12 seconds after the shutter release button is recommended. ...
ZX-60 Manual
Page 29
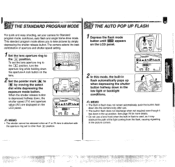
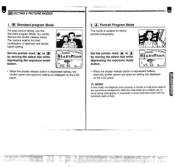
... or snapshots in sharp and clear focus with the extended depth-of aperture and shutter speed setting. You simply depress the shutter release button. 1 The camera selects the best combination of -field. Set the pointer mark • to IX by moving the select dial while depressing the exposure mode button. )ON...
... or snapshots in sharp and clear focus with the extended depth-of aperture and shutter speed setting. You simply depress the shutter release button. 1 The camera selects the best combination of -field. Set the pointer mark • to IX by moving the select dial while depressing the exposure mode button. )ON...

