Operation Manual
Page 10
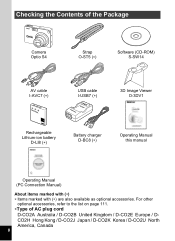
..., refer to the list on page 111. ∗Type of the Package Camera Optio S4 Strap O-ST5 (∗) Software (CD-ROM) S-SW14 AV cable I-AVC7 (∗) USB cable I-USB7 (∗) 3D Image Viewer O-3DV1 Rechargeable Lithium-ion battery D-LI8 (∗) Battery charger D-BC8 (∗) Operating Manual this manual Operating Manual (PC Connection Manual) About...
..., refer to the list on page 111. ∗Type of the Package Camera Optio S4 Strap O-ST5 (∗) Software (CD-ROM) S-SW14 AV cable I-AVC7 (∗) USB cable I-USB7 (∗) 3D Image Viewer O-3DV1 Rechargeable Lithium-ion battery D-LI8 (∗) Battery charger D-BC8 (∗) Operating Manual this manual Operating Manual (PC Connection Manual) About...
Operation Manual
Page 14
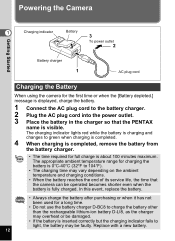
... vary depending on the ambient temperature and charging conditions. • When the battery reaches the end of its service life, the time that the PENTAX name is inserted correctly but the charging indicator fails to light, the battery may be faulty. In this event, replace the battery. •... [Battery depleted.] message is displayed, charge the battery. 1 Connect the AC plug cord to the battery charger. 2 Plug the AC plug cord into the power outlet. 3 Place the battery in the charger so that the camera can be operated becomes shorter even when the battery is about 100 minutes maximum.
... vary depending on the ambient temperature and charging conditions. • When the battery reaches the end of its service life, the time that the PENTAX name is inserted correctly but the charging indicator fails to light, the battery may be faulty. In this event, replace the battery. •... [Battery depleted.] message is displayed, charge the battery. 1 Connect the AC plug cord to the battery charger. 2 Plug the AC plug cord into the power outlet. 3 Place the battery in the charger so that the camera can be operated becomes shorter even when the battery is about 100 minutes maximum.

Operation Manual
Page 15
... flip the cover open . When using the side of the AC adapter D-AC8 (optional) is recommended. (1 p.15) • Do not remove the battery when the camera is turned on. • If you do not intend to press the battery lock lever in the same direction as when you inserted the battery... in the direction indicated by the arrow. 3 Close the battery/card cover. If the battery is incorrectly oriented, it may damage the cover. 13 3 1 Battery charger Battery lock lever 1 2 Battery Getting Started Installing the Battery Install the battery provided.
... flip the cover open . When using the side of the AC adapter D-AC8 (optional) is recommended. (1 p.15) • Do not remove the battery when the camera is turned on. • If you do not intend to press the battery lock lever in the same direction as when you inserted the battery... in the direction indicated by the arrow. 3 Close the battery/card cover. If the battery is incorrectly oriented, it may damage the cover. 13 3 1 Battery charger Battery lock lever 1 2 Battery Getting Started Installing the Battery Install the battery provided.

Operation Manual
Page 113
AC adapter D-AC8 USB Cable I-USB7 AV Cable I-AVC7 Camera Case O-CC8 Strap O-ST5 Remote control E Remote control F Rechargeable lithium-ion battery D-LI8 Battery charger D-BC8 8 111 Appendix Optional Accessories A number of dedicated accessories are available for this camera.
AC adapter D-AC8 USB Cable I-USB7 AV Cable I-AVC7 Camera Case O-CC8 Strap O-ST5 Remote control E Remote control F Rechargeable lithium-ion battery D-LI8 Battery charger D-BC8 8 111 Appendix Optional Accessories A number of dedicated accessories are available for this camera.