
Operation Manual
Page 1
Digital Camera Operating Manual To ensure the best performance from your camera, please read the Operating Manual before using the camera.
Digital Camera Operating Manual To ensure the best performance from your camera, please read the Operating Manual before using the camera.

Operation Manual
Page 2
.... Regarding trademarks • The SD logo is a trademark. • PENTAX is a trademark of PENTAX Corporation. • Optio is a trademark of Seiko Epson Corporation. Regarding copyrights Images taken using the camera in helping you for display. Copyright © 2002 inSilicon Corporation. All Rights...as there are even cases where limitations are trademarks of registered trademarks of the copyright as items for buying the Pentax Optio S4 Digital Camera. When used outside the scope of use of their intentions. Images taken with the purpose of obtaining copyrights also...
.... Regarding trademarks • The SD logo is a trademark. • PENTAX is a trademark of PENTAX Corporation. • Optio is a trademark of Seiko Epson Corporation. Regarding copyrights Images taken using the camera in helping you for display. Copyright © 2002 inSilicon Corporation. All Rights...as there are even cases where limitations are trademarks of registered trademarks of the copyright as items for buying the Pentax Optio S4 Digital Camera. When used outside the scope of use of their intentions. Images taken with the purpose of obtaining copyrights also...

Operation Manual
Page 3
... the battery or disconnect the AC adapter and contact your neck is a danger of receiving an electric shock. • Wrapping the strap of the camera around your nearest Pentax service center. These symbols indicate that it being dropped, please do not hang the strap around their necks. • To avoid the risk...
... the battery or disconnect the AC adapter and contact your neck is a danger of receiving an electric shock. • Wrapping the strap of the camera around your nearest Pentax service center. These symbols indicate that it being dropped, please do not hang the strap around their necks. • To avoid the risk...

Operation Manual
Page 4
... is a risk of a motorbike, car, or ship, etc. • The liquid crystal display will return to burn yourself during removal. • Some portions of the camera heat up during storage. • Do not use , so please take care, as there is a risk of low temperature burns if such portions are held... for protection when the camera is discharging as thinner or alcohol benzene. • Places of time. • Do not place your eyes, do not rub them. Be careful not to...
... is a risk of a motorbike, car, or ship, etc. • The liquid crystal display will return to burn yourself during removal. • Some portions of the camera heat up during storage. • Do not use , so please take care, as there is a risk of low temperature burns if such portions are held... for protection when the camera is discharging as thinner or alcohol benzene. • Places of time. • Do not place your eyes, do not rub them. Be careful not to...

Operation Manual
Page 5
...that 0.01% or fewer of the liquid crystal and is not a fault. • Remove dust from failure of this product. • If the camera is manufactured using a lens brush. • Periodic checks are different form the actual product. 3 Although the level of functioning pixels is 99.99%... when the difference in temperature has subsided. • The temperature range in surroundings such as this camera. If rain or drops of the camera. If you should not. Pentax is not responsible for this may form on the recorded image. • There is a possibility that were to be used...
...that 0.01% or fewer of the liquid crystal and is not a fault. • Remove dust from failure of this product. • If the camera is manufactured using a lens brush. • Periodic checks are different form the actual product. 3 Although the level of functioning pixels is 99.99%... when the difference in temperature has subsided. • The temperature range in surroundings such as this camera. If rain or drops of the camera. If you should not. Pentax is not responsible for this may form on the recorded image. • There is a possibility that were to be used...

Operation Manual
Page 6
...Checking the Contents of the Package 8 Names of Parts 9 Names of Operating Parts 10 Getting Started 11 Attaching the Strap 11 Powering the Camera 12 Charging the Battery 12 Installing the Battery 13 Using the AC Adapter (optional 15 Installing the SD Memory Card / MultiMediaCard 16 Initial... Settings 18 Setting the Display Language 18 Setting the Home Town 19 Setting the D.S.T. Contents FOR SAFE USE OF YOUR CAMERA 1 Care to Set the Menus 32 Menu List 34 Taking Pictures 36 Setting the Shooting Functions 36 Changing the Mode 36 Selecting ...
...Checking the Contents of the Package 8 Names of Parts 9 Names of Operating Parts 10 Getting Started 11 Attaching the Strap 11 Powering the Camera 12 Charging the Battery 12 Installing the Battery 13 Using the AC Adapter (optional 15 Installing the SD Memory Card / MultiMediaCard 16 Initial... Settings 18 Setting the Display Language 18 Setting the Home Town 19 Setting the D.S.T. Contents FOR SAFE USE OF YOUR CAMERA 1 Care to Set the Menus 32 Menu List 34 Taking Pictures 36 Setting the Shooting Functions 36 Changing the Mode 36 Selecting ...

Operation Manual
Page 8
... 89 Printing Single Image 89 Printing All Images 91 Editing Images 92 Changing the Image Size 92 Trimming Images 94 Copying Files 95 Settings 96 Camera Settings 96 Formatting a SD Memory Card / MultiMediaCard and the Built-in memory 96 Changing the Sound Settings 97 Changing the Start-up Screen 98 Setting...
... 89 Printing Single Image 89 Printing All Images 91 Editing Images 92 Changing the Image Size 92 Trimming Images 94 Copying Files 95 Settings 96 Camera Settings 96 Formatting a SD Memory Card / MultiMediaCard and the Built-in memory 96 Changing the Sound Settings 97 Changing the Start-up Screen 98 Setting...

Operation Manual
Page 9
...6 Playback/Erasing/Editing This chapter explains how to play back images. indicates precautions to be taken when operating the camera. Use it and follow the instructions. 2 Quick Start 2 This chapter explains the simplest way to take pictures and play back images ...Playback/Erasing/Editing] and [Settings] chapters. 4 4 Taking Pictures This chapter explains the various ways of capturing images and how to set the camera-related functions. 8 Appendix 8 This tells you start taking pictures. It also tells you want to start taking pictures straightaway. The meanings of ...
...6 Playback/Erasing/Editing This chapter explains how to play back images. indicates precautions to be taken when operating the camera. Use it and follow the instructions. 2 Quick Start 2 This chapter explains the simplest way to take pictures and play back images ...Playback/Erasing/Editing] and [Settings] chapters. 4 4 Taking Pictures This chapter explains the various ways of capturing images and how to set the camera-related functions. 8 Appendix 8 This tells you start taking pictures. It also tells you want to start taking pictures straightaway. The meanings of ...
Operation Manual
Page 10
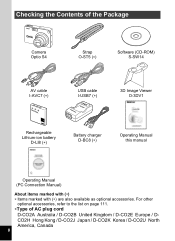
... Kong / D-CO2J Japan / D-CO2K Korea / D-CO2U North America, Canada 8 For other optional accessories, refer to the list on page 111. ∗Type of the Package Camera Optio S4 Strap O-ST5 (∗) Software (CD-ROM) S-SW14 AV cable I-AVC7 (∗) USB cable I-USB7 (∗) 3D Image Viewer O-3DV1 Rechargeable Lithium-ion battery D-LI8 (∗...
... Kong / D-CO2J Japan / D-CO2K Korea / D-CO2U North America, Canada 8 For other optional accessories, refer to the list on page 111. ∗Type of the Package Camera Optio S4 Strap O-ST5 (∗) Software (CD-ROM) S-SW14 AV cable I-AVC7 (∗) USB cable I-USB7 (∗) 3D Image Viewer O-3DV1 Rechargeable Lithium-ion battery D-LI8 (∗...
Operation Manual
Page 14
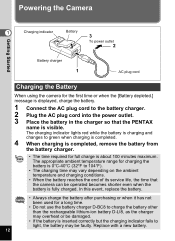
...vary depending on the ambient temperature and charging conditions. • When the battery reaches the end of its service life, the time that the PENTAX name is visible. In this event, replace the battery. • Always charge the battery after purchasing or when it has not been used .... 2 Plug the AC plug cord into the power outlet. 3 Place the battery in the charger so that the camera can be faulty. Replace with a new battery. 12 Powering the Camera Getting Started 1 Charging indicator Battery 3 To power outlet 2 Battery charger 1 AC plug cord Charging the Battery When ...
...vary depending on the ambient temperature and charging conditions. • When the battery reaches the end of its service life, the time that the PENTAX name is visible. In this event, replace the battery. • Always charge the battery after purchasing or when it has not been used .... 2 Plug the AC plug cord into the power outlet. 3 Place the battery in the charger so that the camera can be faulty. Replace with a new battery. 12 Powering the Camera Getting Started 1 Charging indicator Battery 3 To power outlet 2 Battery charger 1 AC plug cord Charging the Battery When ...

Operation Manual
Page 15
...battery lock lever in the same direction as when you inserted the battery, and pull the battery out. • If you intend to use the camera continuously for the first time, charge the battery before installing. 1 Slide the battery/card cover in the direction indicated by the arrow and flip ... D-AC8 (optional) is recommended. (1 p.15) • Do not remove the battery when the camera is turned on. • If you do not intend to use the camera for a long time, remove the battery. • If the camera is open . 2 Insert the battery with 2 symbol facing toward the LCD monitor while using the...
...battery lock lever in the same direction as when you inserted the battery, and pull the battery out. • If you intend to use the camera continuously for the first time, charge the battery before installing. 1 Slide the battery/card cover in the direction indicated by the arrow and flip ... D-AC8 (optional) is recommended. (1 p.15) • Do not remove the battery when the camera is turned on. • If you do not intend to use the camera for a long time, remove the battery. • If the camera is open . 2 Insert the battery with 2 symbol facing toward the LCD monitor while using the...

Operation Manual
Page 16
... Level Indicator You can check the battery level by holding it in some protection against cold or inside the clothes. When the camera is displayed, the camera will be recovered when the batteries are returned to room temperature. • Be sure to take a spare battery with you when... images : Approx. 180 (when 50% shooting uses 1 Playback time flash, LCD monitor ON) : Approx. 110 min. • The description above is based on Pentax measuring conditions and may vary depending on the LCD (lit green) ↓ (lit green) ↓ (lit yellow) ↓ (lit red) ↓ [Battery Depleted...
... Level Indicator You can check the battery level by holding it in some protection against cold or inside the clothes. When the camera is displayed, the camera will be recovered when the batteries are returned to room temperature. • Be sure to take a spare battery with you when... images : Approx. 180 (when 50% shooting uses 1 Playback time flash, LCD monitor ON) : Approx. 110 min. • The description above is based on Pentax measuring conditions and may vary depending on the LCD (lit green) ↓ (lit green) ↓ (lit yellow) ↓ (lit red) ↓ [Battery Depleted...

Operation Manual
Page 17
... turned off and open the terminal cover. 2 Connect the DC terminal on the AC adapter to the DC input terminal on the camera, being sure to match the 4 symbols. 3 Connect the AC plug cord to match the 4 symbols. Inserting the plugs with too much force may be lost. &#...; When connecting the DC terminals, be sure to the AC adapter. 4 Plug the AC plug cord into the power outlet. • Make sure that the camera is turned off when connecting or disconnecting the AC adapter. • Make sure that the AC plug cord and connecting cord are inserted securely.
... turned off and open the terminal cover. 2 Connect the DC terminal on the AC adapter to the DC input terminal on the camera, being sure to match the 4 symbols. 3 Connect the AC plug cord to match the 4 symbols. Inserting the plugs with too much force may be lost. &#...; When connecting the DC terminals, be sure to the AC adapter. 4 Plug the AC plug cord into the power outlet. • Make sure that the camera is turned off when connecting or disconnecting the AC adapter. • Make sure that the AC plug cord and connecting cord are inserted securely.

Operation Manual
Page 18
...card in memory if no card is inserted ( icon on the subject, shooting conditions, capture mode, SD Memory Card, etc. 16 Make sure that the camera is turned off before inserting or removing the SD Memory Card / MultiMediaCard. 1 Open the battery/card cover. 2 Insert SD Memory Card / MultiMediaCard so ...the label (the side with the 2 symbol) is based on standard shooting conditions specified by PENTAX and may vary depending on the LCD monitor). To remove the card, eject the card by pressing it in the direction indicated by the arrow...
...card in memory if no card is inserted ( icon on the subject, shooting conditions, capture mode, SD Memory Card, etc. 16 Make sure that the camera is turned off before inserting or removing the SD Memory Card / MultiMediaCard. 1 Open the battery/card cover. 2 Insert SD Memory Card / MultiMediaCard so ...the label (the side with the 2 symbol) is based on standard shooting conditions specified by PENTAX and may vary depending on the LCD monitor). To remove the card, eject the card by pressing it in the direction indicated by the arrow...

Operation Manual
Page 19
... Card / MultiMediaCard during formatting as this may cause the card to be damaged and become unreadable. Pentax does not accept any liability for data that the camera is turned off while data is being recorded on another camera. Refer to "Formatting a SD Memory Card / MultiMediaCard and the Built-in memory" (p.96)...8226; Avoid using or storing the card where it may be hot. • Do not remove the SD Memory Card / MultiMediaCard or turn the camera off before opening the battery/Card cover. • The SD Memory Card / MultiMediaCard is not used on the card or transferred to PC using...
... Card / MultiMediaCard during formatting as this may cause the card to be damaged and become unreadable. Pentax does not accept any liability for data that the camera is turned off while data is being recorded on another camera. Refer to "Formatting a SD Memory Card / MultiMediaCard and the Built-in memory" (p.96)...8226; Avoid using or storing the card where it may be hot. • Do not remove the SD Memory Card / MultiMediaCard or turn the camera off before opening the battery/Card cover. • The SD Memory Card / MultiMediaCard is not used on the card or transferred to PC using...

Operation Manual
Page 20
... 3 Press the four-way controller (3). are displayed from the following: English, French, German, Spanish, Italian, Russian, Chinese and Japanese. 1 Turn the camera on. 2 Use the four-way controller (45) Initial settings Language/ English to "Changing the Display Language" (p.102). 18 Initial Settings 1 Power switch Getting... Four-way controller OK button Playback button Display button Menu button If the initial settings screen appears when you turn the camera on, follow the instructions for "Changing the Date/Time" (p.100) to set the display language, Home Town, DST and current...
... 3 Press the four-way controller (3). are displayed from the following: English, French, German, Spanish, Italian, Russian, Chinese and Japanese. 1 Turn the camera on. 2 Use the four-way controller (45) Initial settings Language/ English to "Changing the Display Language" (p.102). 18 Initial Settings 1 Power switch Getting... Four-way controller OK button Playback button Display button Menu button If the initial settings screen appears when you turn the camera on, follow the instructions for "Changing the Date/Time" (p.100) to set the display language, Home Town, DST and current...

Operation Manual
Page 21
... setting the Date and Time MENU Exit OK Ok will be MENU Exit OK Ok displayed. • See p.110 for setting the D.S.T will use the camera. 1 Press the four-way controller (45) Initial Setting 1 to select Y (On) or Z (Off). D.S.T The screen for the list of cities and corresponding code names. •...
... setting the Date and Time MENU Exit OK Ok will be MENU Exit OK Ok displayed. • See p.110 for setting the D.S.T will use the camera. 1 Press the four-way controller (45) Initial Setting 1 to select Y (On) or Z (Off). D.S.T The screen for the list of cities and corresponding code names. •...

Operation Manual
Page 23
Refer to Capture mode by pressing the MENU button. If this is ready to take a picture. The camera is done, the initial settings screen will be displayed next time you turn the camera on. • You can change the settings after pressing the OK button when the clock reaches 00 1 seconds to return...
Refer to Capture mode by pressing the MENU button. If this is ready to take a picture. The camera is done, the initial settings screen will be displayed next time you turn the camera on. • You can change the settings after pressing the OK button when the clock reaches 00 1 seconds to return...

Operation Manual
Page 24
... on the LCD monitor. 22 w: makes the subject smaller. Focus frame You can change the size of the subject by looking through the viewfinder. The camera will turn on. 2 Confirm the subject and shooting 200 information on the light conditions. 1 Press the power switch. As there is no focus frame in...
... on the LCD monitor. 22 w: makes the subject smaller. Focus frame You can change the size of the subject by looking through the viewfinder. The camera will turn on. 2 Confirm the subject and shooting 200 information on the light conditions. 1 Press the power switch. As there is no focus frame in...

Operation Manual
Page 27
... • When the screen is changed to the playback screen, the image with rotated images. Moreover, DPOF and delete/protect settings cannot be made. (The camera returns to capture mode. Quick Start Deleting a Displayed Image During this time you can enlarge the image displayed on the LCD monitor by File No...
... • When the screen is changed to the playback screen, the image with rotated images. Moreover, DPOF and delete/protect settings cannot be made. (The camera returns to capture mode. Quick Start Deleting a Displayed Image During this time you can enlarge the image displayed on the LCD monitor by File No...


