
WVSP302 User Guide
Page 3
Configure the settings relating to the schedules [Schedule 86 Maintenance of the camera [Maintenance 87 Check the system log [System log 87 Upgrade the firmware [Upgrade 88 Reset the settings/Reboot the camera [Default reset 89 Viewing Help 90 Displaying the Help screen 90 About the displayed system log 91 Troubleshooting 93 Directory structure of drive B 101 3
Configure the settings relating to the schedules [Schedule 86 Maintenance of the camera [Maintenance 87 Check the system log [System log 87 Upgrade the firmware [Upgrade 88 Reset the settings/Reboot the camera [Default reset 89 Viewing Help 90 Displaying the Help screen 90 About the displayed system log 91 Troubleshooting 93 Directory structure of drive B 101 3
WVSP302 User Guide
Page 9
...] and [1280x720] are displayed only when "16:9" is selected for "Aspect ratio". • When "1280x960" or "1280x720" is clicked, the alarm output terminal will be reset and this button is selected for "Save logs" on the SD memory card can be displayed. When this button will disappear. (☞ Page 13) !3 Full...
...] and [1280x720] are displayed only when "16:9" is selected for "Aspect ratio". • When "1280x960" or "1280x720" is clicked, the alarm output terminal will be reset and this button is selected for "Save logs" on the SD memory card can be displayed. When this button will disappear. (☞ Page 13) !3 Full...

WVSP302 User Guide
Page 52
... Selects the automatic tracing white balance mode under a sodium lamp. When the cursor is approx. 2 lx or less. Click the [Reset] button to reset the color to the default. Auto2(IR Light): SP306 Suitable when using near-infrared light source at sunset • When shooting a ...subject whose major part is approx. 2 000 K - 6 000 K. AUTO: SP305 SP302 SF336 SF335 SF332 Same as "Auto1(Normal)". Click the [Reset] button to reset the color to the default. When the cursor is selected, click the [Set] button. [Red gain] Adjust the red color of images. When...
... Selects the automatic tracing white balance mode under a sodium lamp. When the cursor is approx. 2 lx or less. Click the [Reset] button to reset the color to the default. Auto2(IR Light): SP306 Suitable when using near-infrared light source at sunset • When shooting a ...subject whose major part is approx. 2 000 K - 6 000 K. AUTO: SP305 SP302 SF336 SF335 SF332 Same as "Auto1(Normal)". Click the [Reset] button to reset the color to the default. When the cursor is selected, click the [Set] button. [Red gain] Adjust the red color of images. When...
WVSP302 User Guide
Page 53
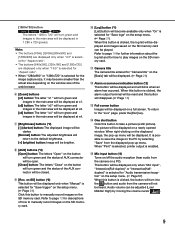
... "+" direction, the colors will be darker. When the cursor is moved in the "-" direction, the colors will become brighter. Click the [Reset] button to reset the level to the "+" direction, images will be sharper when the cursor is moved in the "-" direction. Images will be softer when the... cursor is moved to the default. When the cursor is moved in the "+" direction, and will become thicker. Click the [Reset] button to reset the level to the default. Select an effect level "Low" or "High" for the digital noise reduction. [DNR] The digital noise ...
... "+" direction, the colors will be darker. When the cursor is moved in the "-" direction, the colors will become brighter. Click the [Reset] button to reset the level to the "+" direction, images will be sharper when the cursor is moved in the "-" direction. Images will be softer when the... cursor is moved to the default. When the cursor is moved in the "+" direction, and will become thicker. Click the [Reset] button to reset the level to the default. Select an effect level "Low" or "High" for the digital noise reduction. [DNR] The digital noise ...

WVSP302 User Guide
Page 54
... for the aspect ratio Image in the aspect ratio of the nondisplayed masked area will be once set , the brightness of "4:3" Note: • When the [Reset] button is clicked, masking for the aspect ratio. Step 4 Click the [End] button after completing masking areas. → The borders on the image displayed on...
... for the aspect ratio Image in the aspect ratio of the nondisplayed masked area will be once set , the brightness of "4:3" Note: • When the [Reset] button is clicked, masking for the aspect ratio. Step 4 Click the [End] button after completing masking areas. → The borders on the image displayed on...
WVSP302 User Guide
Page 55
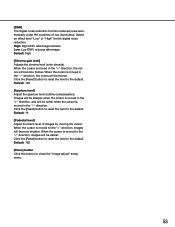
... [Execute] button. [Manual] The focus can be adjusted manually. [Near] button: Click this button to adjust the focus to the "Near" side. [Reset] button: Click this button to reset the focus to the default. [Far] button: Click this button to adjust the focus to the "Far" side. [Adjusting method] SP306 Select the...
... [Execute] button. [Manual] The focus can be adjusted manually. [Near] button: Click this button to adjust the focus to the "Near" side. [Reset] button: Click this button to reset the focus to the default. [Far] button: Click this button to adjust the focus to the "Far" side. [Adjusting method] SP306 Select the...

WVSP302 User Guide
Page 87
In this page. the [System log] tab, the [Upgrade] tab and the [Default reset] tab. When "Not use" is selected for "SD memory card" on the [SD memory card] tab (☞ Page 28). When using the SD memory card, ...
In this page. the [System log] tab, the [Upgrade] tab and the [Default reset] tab. When "Not use" is selected for "SD memory card" on the [SD memory card] tab (☞ Page 28). When using the SD memory card, ...
WVSP302 User Guide
Page 88
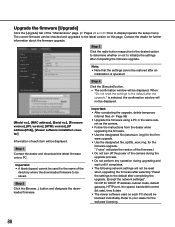
...to initialize the settings after the upgrade." Important: • A blank (space) cannot be used on this page. When "Do not reset the settings to the latest version on each item will be displayed. ware upgrade. • Use the designated file, sp305_xxxx.img, for...Do not perform any operation during upgrading and wait until it completes. • The following network settings will not be reset when upgrading the firmware after selecting "Reset the settings to the default after an initialization is selected, the confirmation window will not be displayed. [Model no.],...
...to initialize the settings after the upgrade." Important: • A blank (space) cannot be used on this page. When "Do not reset the settings to the latest version on each item will be displayed. ware upgrade. • Use the designated file, sp305_xxxx.img, for...Do not perform any operation during upgrading and wait until it completes. • The following network settings will not be reset when upgrading the firmware after selecting "Reset the settings to the default after an initialization is selected, the confirmation window will not be displayed. [Model no.],...

WVSP302 User Guide
Page 89
... the default and load the default HTML files.] Click the [Execute] button to reset the settings of the camera and the HTML files to the default. Reset the settings/Reboot the camera [Default reset] Click the [Default reset] tab of the "Maintenance" page. (☞ Pages 22 and 23: How to display/operate ... operate the camera for 5 seconds.Wait around 2 minutes just after the initialization. [Load the default HTML files (setup menu).] Click the [Execute] button to reset the HTML files to the default. It is impossible to the default. Note that the network settings will not be...
... the default and load the default HTML files.] Click the [Execute] button to reset the settings of the camera and the HTML files to the default. Reset the settings/Reboot the camera [Default reset] Click the [Default reset] tab of the "Maintenance" page. (☞ Pages 22 and 23: How to display/operate ... operate the camera for 5 seconds.Wait around 2 minutes just after the initialization. [Load the default HTML files (setup menu).] Click the [Execute] button to reset the HTML files to the default. It is impossible to the default. Note that the network settings will not be...


