Operating Instructions
Page 5
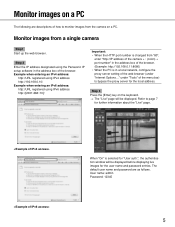
... "User auth.", the authentication window will be displayed before displaying live images for the user name and password entries. Step 2 Enter the IP address designated using IPv6 address http://[2001:db8::10]/ Important: • When the HTTP port number is in a local network, configure the... address: http://URL registered using IPv4 address http://192.168.0.10/ Example when entering an IPv6 address: http://URL registered using the Panasonic IP setup software in the address box of the menu bar) to bypass the proxy server for further information about the "Live" page. Monitor...
... "User auth.", the authentication window will be displayed before displaying live images for the user name and password entries. Step 2 Enter the IP address designated using IPv6 address http://[2001:db8::10]/ Important: • When the HTTP port number is in a local network, configure the... address: http://URL registered using IPv4 address http://192.168.0.10/ Example when entering an IPv6 address: http://URL registered using the Panasonic IP setup software in the address box of the menu bar) to bypass the proxy server for further information about the "Live" page. Monitor...
Operating Instructions
Page 12
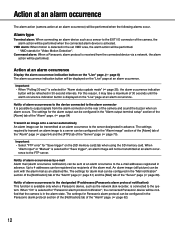
...on the "Live" page at an alarm occurrence) will be performed. * VMD stands for the alarm output can be configured in the "Alarm output terminal setup" section of the [Alarm] tab of the "Server" page ( page 70). When "Alarm input" or "Manual" is selected for alarm mail can ... to the e-mail addresses registered in the set VMD area, the alarm action will be sent with the alarm mail as a sensor to the designated IP addresses (Panasonic alarm protocol notification) This function is activated. Important: • Select "FTP error" for "Alarm status update mode" ( page 25), the alarm...
...on the "Live" page at an alarm occurrence) will be performed. * VMD stands for the alarm output can be configured in the "Alarm output terminal setup" section of the [Alarm] tab of the "Server" page ( page 70). When "Alarm input" or "Manual" is selected for alarm mail can ... to the e-mail addresses registered in the set VMD area, the alarm action will be sent with the alarm mail as a sensor to the designated IP addresses (Panasonic alarm protocol notification) This function is activated. Important: • Select "FTP error" for "Alarm status update mode" ( page 25), the alarm...

Operating Instructions
Page 53
...not be registered. The entered camera title will be displayed on the "Multi-screen" page. ( pages 20 and 21: How to display/operate the setup menu) [Camera title] Enter the title of the camera to be used for the multi-screen. 4 cameras can be registered as follows: Example ...8080 Example when entering an IPv6 address: [2001:db8:0:0:0:0:0:1]:8080 Available number of the PC to be displayed on a multi-screen can be displayed. [IP address] Enter the IP address or the host name of the camera. Available number of characters: 0 - 20 characters Note: • When selecting a 16 split-screen,...
...not be registered. The entered camera title will be displayed on the "Multi-screen" page. ( pages 20 and 21: How to display/operate the setup menu) [Camera title] Enter the title of the camera to be used for the multi-screen. 4 cameras can be registered as follows: Example ...8080 Example when entering an IPv6 address: [2001:db8:0:0:0:0:0:1]:8080 Available number of the PC to be displayed on a multi-screen can be displayed. [IP address] Enter the IP address or the host name of the camera. Available number of characters: 0 - 20 characters Note: • When selecting a 16 split-screen,...
Operating Instructions
Page 62
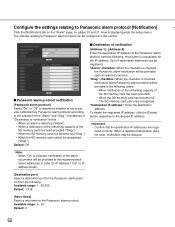
... the settings relating to Panasonic alarm protocol [Notification] Click the [Notification] tab on the "Alarm" page. ( pages 20 and 21: How to display/operate the setup menu) The settings relating to Panasonic alarm protocol can be registered. To delete the registered IP address, click the [Delete...] button respective to the settings for the Panasonic alarm protocol. Note: • When "On" is checked,...
... the settings relating to Panasonic alarm protocol [Notification] Click the [Notification] tab on the "Alarm" page. ( pages 20 and 21: How to display/operate the setup menu) The settings relating to Panasonic alarm protocol can be registered. To delete the registered IP address, click the [Delete...] button respective to the settings for the Panasonic alarm protocol. Note: • When "On" is checked,...

Operating Instructions
Page 66
...information will be configured on the "User mng." Default: 3. The "User mng." page. ( pages 20 and 21: How to display/operate the setup menu) The settings relating to the user authentication can be registered. Live only [User check] By clicking [C] of "User check", the registered user can... users. page has 3 tabs; Note: • When user authentication (authentication error) has failed to pass 8 times within 30 seconds using the same IP address (PC), access to the camera will be displayed with the access level. (Example: admin [1]) To delete the registered user, click the [Delete]...
...information will be configured on the "User mng." Default: 3. The "User mng." page. ( pages 20 and 21: How to display/operate the setup menu) The settings relating to the user authentication can be registered. Live only [User check] By clicking [C] of "User check", the registered user can... users. page has 3 tabs; Note: • When user authentication (authentication error) has failed to pass 8 times within 30 seconds using the same IP address (PC), access to the camera will be displayed with the access level. (Example: admin [1]) To delete the registered user, click the [Delete]...

Operating Instructions
Page 67
... is pos- Camera control/3. Live only 67 page. ( pages 20 and 21: How to display/operate the setup menu) The restriction settings of PCs (IP address) from the following. 1. For example, when "192.168.0.1/24" is clicked, the respective host information will be displayed with the access level "2. ...[Host auth.] tab on this page. [Host check] By clicking [C] of "Host check", the registered host can be selected and the selected host's IP address can access the camera with the access level. (Example:192.168.0.21 [1]) To delete the registered host, click the [Delete] button after selecting ...
... is pos- Camera control/3. Live only 67 page. ( pages 20 and 21: How to display/operate the setup menu) The restriction settings of PCs (IP address) from the following. 1. For example, when "192.168.0.1/24" is clicked, the respective host information will be displayed with the access level "2. ...[Host auth.] tab on this page. [Host check] By clicking [C] of "Host check", the registered host can be selected and the selected host's IP address can access the camera with the access level. (Example:192.168.0.21 [1]) To delete the registered host, click the [Delete] button after selecting ...

Operating Instructions
Page 68
...Priority stream", number of the priority stream that can access the camera will be limited. [Destination IP address(1)] Enter the first destination IP address. [Destination IP address(2)] Enter the second destination IP address. [Stream type] Select either "JPEG", "H.264/MPEG-4(1)" or "H.264/ MPEG-4(2)". This...MPEG-4(2)) images will be transmitted. Priority stream [Activation] Select "On" or "Off" to determine whether or not to display/operate the setup menu) The description below is selected for "Stream type". Default: Off Note: • When "On" is the configuration of users who...
...Priority stream", number of the priority stream that can access the camera will be limited. [Destination IP address(1)] Enter the first destination IP address. [Destination IP address(2)] Enter the second destination IP address. [Stream type] Select either "JPEG", "H.264/MPEG-4(1)" or "H.264/ MPEG-4(2)". This...MPEG-4(2)) images will be transmitted. Priority stream [Activation] Select "On" or "Off" to determine whether or not to display/operate the setup menu) The description below is selected for "Stream type". Default: Off Note: • When "On" is the configuration of users who...

Operating Instructions
Page 69
... The settings relating to access the server. Available number of characters: 1 - 128 characters Important: • When entering the host name for "Type", enter the IP address or the host name of the "Network" page. ( page 73) [Authentication] • Type Select the authentication method to access the server. The entered... to the mail server [Mail] Click the [Mail] tab on the "Server" page. ( pages 20 and 21: How to display/operate the setup menu) The settings relating to the mail server used to send the alarm mail can be configured on the [Network] tab of the POP server.
... The settings relating to access the server. Available number of characters: 1 - 128 characters Important: • When entering the host name for "Type", enter the IP address or the host name of the "Network" page. ( page 73) [Authentication] • Type Select the authentication method to access the server. The entered... to the mail server [Mail] Click the [Mail] tab on the "Server" page. ( pages 20 and 21: How to display/operate the setup menu) The settings relating to the mail server used to send the alarm mail can be configured on the [Network] tab of the POP server.

Operating Instructions
Page 70
Available number of the FTP server. Normally, select "Passive". Default: Passive [FTP server address] Enter the IP address or the host name of characters: 1 - 32 characters [Password] Enter the password to access the FTP server. Configure the settings relating to the FTP ... characters: 0 - 32 characters [Control port] Enter a control port number to be configured on the "Server" page. ( pages 20 and 21: How to display/operate the setup menu) The settings relating to the FTP server used to transmit the alarm images can be used for the FTP mode. Available number of the...
Available number of the FTP server. Normally, select "Passive". Default: Passive [FTP server address] Enter the IP address or the host name of characters: 1 - 32 characters [Password] Enter the password to access the FTP server. Configure the settings relating to the FTP ... characters: 0 - 32 characters [Control port] Enter a control port number to be configured on the "Server" page. ( pages 20 and 21: How to display/operate the setup menu) The settings relating to the FTP server used to transmit the alarm images can be used for the FTP mode. Available number of the...
Operating Instructions
Page 71
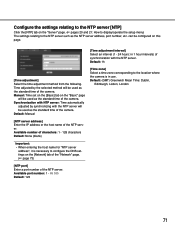
... following. can be used as the standard time of the camera. Default: (GMT) Greenwich Mean Time: Dublin, Edinburgh, Lisbon, London [NTP server address] Enter the IP address or the host name of the NTP server. Configure the settings relating to the NTP server [NTP] Click the [NTP] tab on the "Server..." page. ( pages 20 and 21: How to display/operate the setup menu) The settings relating to the NTP server such as the standard time of the camera.
... following. can be used as the standard time of the camera. Default: (GMT) Greenwich Mean Time: Dublin, Edinburgh, Lisbon, London [NTP server address] Enter the IP address or the host name of the NTP server. Configure the settings relating to the NTP server [NTP] Click the [NTP] tab on the "Server..." page. ( pages 20 and 21: How to display/operate the setup menu) The settings relating to the NTP server such as the standard time of the camera.
Operating Instructions
Page 72
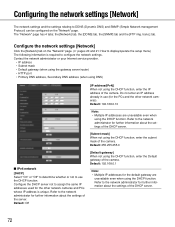
...and SNMP (Simple Network management Protocol) can be configured on the "Network" page. ( pages 20 and 21: How to display/operate the setup menu) The following information is unique. Configure the DHCP server not to configure the network settings. Configure the network settings [Network] Click the ...[Network] tab on the "Network" page. trans.] tab. Default: 192.168.0.1 Note: • Multiple IP addresses for further information about the settings of the camera. the [Network] tab, the [DDNS] tab, the [SNMP] tab and the [FTP img...
...and SNMP (Simple Network management Protocol) can be configured on the "Network" page. ( pages 20 and 21: How to display/operate the setup menu) The following information is unique. Configure the DHCP server not to configure the network settings. Configure the network settings [Network] Click the ...[Network] tab on the "Network" page. trans.] tab. Default: 192.168.0.1 Note: • Multiple IP addresses for further information about the settings of the camera. the [Network] tab, the [DDNS] tab, the [SNMP] tab and the [FTP img...

Operating Instructions
Page 75
...to the dedicated DDNS server. Available number of characters: 1 - 64 characters [User name] Enter the user name (login name) to display/operate the setup menu) When communicating using the DDNS function, it is necessary to the web site for the DDNS function. Configure the settings relating to DDNS [DDNS...it is necessary to connect to be used. Refer to configure the settings for further information about the DDNS. When using IPv4, obtain a global IP address from the following. 1min/10min/30min/1h/6h/24h Default: 1h 75 Refer to access with "Host name registered in the DDNS server. [...
...to the dedicated DDNS server. Available number of characters: 1 - 64 characters [User name] Enter the user name (login name) to display/operate the setup menu) When communicating using the DDNS function, it is necessary to the web site for the DDNS function. Configure the settings relating to DDNS [DDNS...it is necessary to connect to be used. Refer to configure the settings for further information about the DDNS. When using IPv4, obtain a global IP address from the following. 1min/10min/30min/1h/6h/24h Default: 1h 75 Refer to access with "Host name registered in the DDNS server. [...
Operating Instructions
Page 82
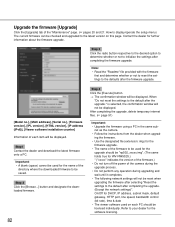
...] tab of the "Maintenance" page. ( pages 20 and 21: How to display/operate the setup menu) The current firmware can be displayed. Step1 Contact the dealer and download the latest firmware onto...to the latest version on each PC should be "np502_xxxxx.img". (The same holds true for WV-NW502S.) * ("xxxxx" indicates the version of the firmware.) • Do not turn off the .... [Model no.], [MAC address], [Serial no.], [Firmware version], [IPL version], [HTML version], [IP address (IPv6)], [Viewer software installation counter] Information of the camera during the upgrade process. • Do...
...] tab of the "Maintenance" page. ( pages 20 and 21: How to display/operate the setup menu) The current firmware can be displayed. Step1 Contact the dealer and download the latest firmware onto...to the latest version on each PC should be "np502_xxxxx.img". (The same holds true for WV-NW502S.) * ("xxxxx" indicates the version of the firmware.) • Do not turn off the .... [Model no.], [MAC address], [Serial no.], [Firmware version], [IPL version], [HTML version], [IP address (IPv6)], [Viewer software installation counter] Information of the camera during the upgrade process. • Do...
Operating Instructions
Page 87
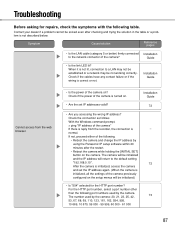
... proceed either of the camera is correct or not. Check if the cables have any contact failure or if the wiring is turned on the setup menus will be initialized.) • Is "554" selected for repairs, check the symptoms with the following table. Check if the power of the...For the HTTP port number, select a port number other than the following . • Reboot the camera and change the IP address by the camera. The number used by using the Panasonic IP setup software within 20 minutes after checking and trying the solution in the table or a problem is not lit, connection to...
... proceed either of the camera is correct or not. Check if the cables have any contact failure or if the wiring is turned on the setup menus will be initialized.) • Is "554" selected for repairs, check the symptoms with the following table. Check if the power of the...For the HTTP port number, select a port number other than the following . • Reboot the camera and change the IP address by the camera. The number used by using the Panasonic IP setup software within 20 minutes after checking and trying the solution in the table or a problem is not lit, connection to...


