Operating Instructions
Page 2
... network security 19 Equipped security functions 19 Display the setup menu from a PC 20 How to display the setup menu 20 How to operate the setup menu 21 About the setup menu window 22 Configure the basic settings of the camera [Basic 24 Configure the basic settings [Basic 24 Configure the settings relating to the SD memory card [SD memory card 26 Access copy images saved on the SD memory card onto the PC [SD memory card images] ........ 29 Configure...
... network security 19 Equipped security functions 19 Display the setup menu from a PC 20 How to display the setup menu 20 How to operate the setup menu 21 About the setup menu window 22 Configure the basic settings of the camera [Basic 24 Configure the basic settings [Basic 24 Configure the settings relating to the SD memory card [SD memory card 26 Access copy images saved on the SD memory card onto the PC [SD memory card images] ........ 29 Configure...
Operating Instructions
Page 3
periodic image transmission [FTP img. trans.] ..... 78 Configure the settings relating to the schedules [Schedule 80 Maintenance of the camera [Maintenance 81 Check the system log [System log 81 Upgrade the firmware [Upgrade 82 Reset the settings/Reboot the camera [Default reset 83 Viewing Help 84 Displaying the Help screen 84 About the displayed system log 85 Troubleshooting 87 Directory structure of drive B 95 3
periodic image transmission [FTP img. trans.] ..... 78 Configure the settings relating to the schedules [Schedule 80 Maintenance of the camera [Maintenance 81 Check the system log [System log 81 Upgrade the firmware [Upgrade 82 Reset the settings/Reboot the camera [Default reset 83 Viewing Help 84 Displaying the Help screen 84 About the displayed system log 85 Troubleshooting 87 Directory structure of drive B 95 3
Operating Instructions
Page 4
... displayed for under eave installation) * The windows displayed in these instructions represent WV-NP502. The number of installations of how to connect to operate this product and of the viewer software from the camera will be checked on the information bar of the browser. • When the "Live" page is necessary to install the viewer software "Network Camera Viewer4" to read the PDF files (the operating instructions) on a PC. Preface About the user manuals The user manuals...
... displayed for under eave installation) * The windows displayed in these instructions represent WV-NP502. The number of installations of how to connect to operate this product and of the viewer software from the camera will be checked on the information bar of the browser. • When the "Live" page is necessary to install the viewer software "Network Camera Viewer4" to read the PDF files (the operating instructions) on a PC. Preface About the user manuals The user manuals...
Operating Instructions
Page 5
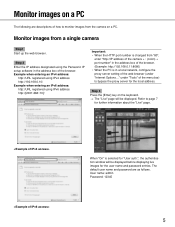
... window will be displayed before displaying live images for the user name and password entries. Refer to page 7 for the local address. under "Internet Options..." Monitor images on a PC The following are as follows. Example when entering an IPv4 address: http://URL registered using IPv4 address http://192.168.0.10/ Example when entering an IPv6 address: http://URL registered using the Panasonic IP setup software in a local network, configure the proxy server setting of the web browser...
... window will be displayed before displaying live images for the user name and password entries. Refer to page 7 for the local address. under "Internet Options..." Monitor images on a PC The following are as follows. Example when entering an IPv4 address: http://URL registered using IPv4 address http://192.168.0.10/ Example when entering an IPv6 address: http://URL registered using the Panasonic IP setup software in a local network, configure the proxy server setting of the web browser...

Operating Instructions
Page 9
... on the [Audio] tab of audio transmission is selected for "Save trigger" on the setup menu. ( page 27) !8 Main area Images from the camera will be displayed according to the settings configured for "User auth." ( page 66). *3 Operable by a lower access level user, images displayed on the setup menu. ( page 51) • Actual volume level will be performed using the audio transmission func- The current time and date will light red.
... on the [Audio] tab of audio transmission is selected for "Save trigger" on the setup menu. ( page 27) !8 Main area Images from the camera will be displayed according to the settings configured for "User auth." ( page 66). *3 Operable by a lower access level user, images displayed on the setup menu. ( page 51) • Actual volume level will be performed using the audio transmission func- The current time and date will light red.

Operating Instructions
Page 11
... open. Record images on the SD memory card manually Images displayed on the "Live" page can be recorded on the SD memory card. This button is operable only when "Manual" is selected for "Save trigger" on the setup menu. ( page 27) Images recorded on the SD memory card can be copied onto the PC. ( page 29) Step1 Display the "Live" page. ( page 7) Step 4 Click the [Stop] button to close the window.
... open. Record images on the SD memory card manually Images displayed on the "Live" page can be recorded on the SD memory card. This button is operable only when "Manual" is selected for "Save trigger" on the setup menu. ( page 27) Images recorded on the SD memory card can be copied onto the PC. ( page 29) Step1 Display the "Live" page. ( page 7) Step 4 Click the [Stop] button to close the window.
Operating Instructions
Page 12
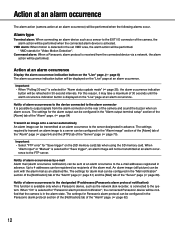
... as the network disk recorder, is connected to the EXT I/O connector of the camera and sound the buzzer when an alarm occurs. When "Alarm input" or "Manual" is selected for Panasonic alarm protocol can be configured in the Panasonic alarm protocol section of the [Notification] tab of the "Alarm" page. ( page 54) Transmit an image onto a server automatically An alarm image can be displayed on the [SD memory card] tab when using the SD...
... as the network disk recorder, is connected to the EXT I/O connector of the camera and sound the buzzer when an alarm occurs. When "Alarm input" or "Manual" is selected for Panasonic alarm protocol can be configured in the Panasonic alarm protocol section of the [Notification] tab of the "Alarm" page. ( page 54) Transmit an image onto a server automatically An alarm image can be displayed on the [SD memory card] tab when using the SD...

Operating Instructions
Page 13
... saved on the network traffic, the number of the transmitted images may not reach the set the user name and the password to access the FTP server to restrict users who can log into the FTP server. • To transmit images to the FTP server, select "Not use the FTP periodic image transmission function and to configure the settings relating to alarm images and the schedule on the line speed or the traffic...
... saved on the network traffic, the number of the transmitted images may not reach the set the user name and the password to access the FTP server to restrict users who can log into the FTP server. • To transmit images to the FTP server, select "Not use the FTP periodic image transmission function and to configure the settings relating to alarm images and the schedule on the line speed or the traffic...

Operating Instructions
Page 20
... [Setup] button on the setup menu. Refer to configure the access level. Refer to page 66 for how to page 22 for further information about this menu. 20 Step 3 Click the [OK] button after entering the user name and the password. → The setup menu will be displayed. Display the setup menu from a PC The settings of the camera can be configured on the "Live" page. → The window with the user...
... [Setup] button on the setup menu. Refer to configure the access level. Refer to page 66 for how to page 22 for further information about this menu. 20 Step 3 Click the [OK] button after entering the user name and the password. → The setup menu will be displayed. Display the setup menu from a PC The settings of the camera can be configured on the "Live" page. → The window with the user...

Operating Instructions
Page 25
... to use the following . Default: Off [Link/Access LED] Determine whether or not to display the status of the "Live" page. This LED will light when accessing a network. • SD memory card error LED/ABF LED [Red]: Lights when an error occurred in real time. [Alarm status reception port] When selecting "Real time" for "Alarm status update mode", designate a port number to which the status change notification is to check the operational status by lighting them. On: Installs the viewer software from...
... to use the following . Default: Off [Link/Access LED] Determine whether or not to display the status of the "Live" page. This LED will light when accessing a network. • SD memory card error LED/ABF LED [Red]: Lights when an error occurred in real time. [Alarm status reception port] When selecting "Real time" for "Alarm status update mode", designate a port number to which the status change notification is to check the operational status by lighting them. On: Installs the viewer software from...

Operating Instructions
Page 26
...; The number of the viewer software installations can be performed correctly as configured when multiple users are limited times to overwrite on this case, set the refresh interval longer. • There are receiving images. Configure the settings relating to the SD memory card [SD memory card] Click the [SD memory card] tab on the "Basic" page. ( pages 20 and 21: How to display/operate the setup menu) The settings relating...
...; The number of the viewer software installations can be performed correctly as configured when multiple users are limited times to overwrite on this case, set the refresh interval longer. • There are receiving images. Configure the settings relating to the SD memory card [SD memory card] Click the [SD memory card] tab on the "Basic" page. ( pages 20 and 21: How to display/operate the setup menu) The settings relating...
Operating Instructions
Page 28
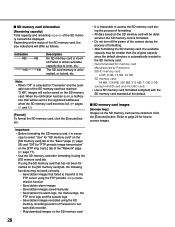
... Description No SD memory card is selected for how to the FTP server using the FTP periodic image transmission function • Save/obtain alarm images • Save/obtain images saved manually • Save/obtain the alarm logs, the manual logs, the FTP error logs and the system logs • Save/obtain images recorded using the [SD memory card] tab. Click the [Execute] button. sary to error, etc. trans.] tab of...
... Description No SD memory card is selected for how to the FTP server using the FTP periodic image transmission function • Save/obtain alarm images • Save/obtain images saved manually • Save/obtain the alarm logs, the manual logs, the FTP error logs and the system logs • Save/obtain images recorded using the [SD memory card] tab. Click the [Execute] button. sary to error, etc. trans.] tab of...

Operating Instructions
Page 44
... can be configured with the setup menu displayed in the mode of 3 mega pixel. Super Dynamic function When there is wide variation between the illumination of light and dark areas of the location being monitored, the camera adjusts the lens iris in accordance with an image that is set up for "Light control mode". • When "Super Dynamic" is the same in a newly displayed window. Subject in...
... can be configured with the setup menu displayed in the mode of 3 mega pixel. Super Dynamic function When there is wide variation between the illumination of light and dark areas of the location being monitored, the camera adjusts the lens iris in accordance with an image that is set up for "Light control mode". • When "Super Dynamic" is the same in a newly displayed window. Subject in...

Operating Instructions
Page 54
... display/operate the setup menu) The settings relating to the alarm can be configured on the "Live" page. Alarm input: Receives alarms. Alarm output: Alarm output will be supplied. Alarm input: Receives alarms. AUX output: AUX output will be carried out accord- The command alarm is the function that allows users to oper- Alarm input: Receives alarms. Black & white input: Receives the black & white switchover input. (When the input is installed by connecting the terminal to the light controller. • Refer to the installation guide for "Alarm output...
... display/operate the setup menu) The settings relating to the alarm can be configured on the "Live" page. Alarm input: Receives alarms. Alarm output: Alarm output will be supplied. Alarm input: Receives alarms. AUX output: AUX output will be carried out accord- The command alarm is the function that allows users to oper- Alarm input: Receives alarms. Black & white input: Receives the black & white switchover input. (When the input is installed by connecting the terminal to the light controller. • Refer to the installation guide for "Alarm output...

Operating Instructions
Page 59
... set . Default: 8 [Delete] button Click the [Delete] button corresponding to the area to be configured for "Light detection control", the video motion detection may not work when bright- Default: Off [Detection area] Adjust the size of the VMD area using the slider. Set the VMD areas [VMD area] Click the [VMD area] tab on the "Alarm" page. ( pages 20 and 21: How to display/operate the setup menu) The video motion detection areas can be set...
... set . Default: 8 [Delete] button Click the [Delete] button corresponding to the area to be configured for "Light detection control", the video motion detection may not work when bright- Default: Off [Detection area] Adjust the size of the VMD area using the slider. Set the VMD areas [VMD area] Click the [VMD area] tab on the "Alarm" page. ( pages 20 and 21: How to display/operate the setup menu) The video motion detection areas can be set...
Operating Instructions
Page 82
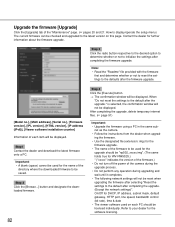
... DHCP, IP address, subnet mask, default gateway, HTTP port, line speed, bandwidth control (bit rate), time & date • The viewer software used on this page. On/Off for WV-NW502S.) * ("xxxxx" indicates the version of the firmware.) • Do not turn off the power of each PC should be reset when upgrading the firmware after selecting "Reset the settings to initialize the settings after the upgrade." Step 3 Click the radio button respective to...
... DHCP, IP address, subnet mask, default gateway, HTTP port, line speed, bandwidth control (bit rate), time & date • The viewer software used on this page. On/Off for WV-NW502S.) * ("xxxxx" indicates the version of the firmware.) • Do not turn off the power of each PC should be reset when upgrading the firmware after selecting "Reset the settings to initialize the settings after the upgrade." Step 3 Click the radio button respective to...
Operating Instructions
Page 83
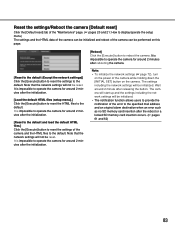
... the network settings ( page 72), turn on the camera. Reset the settings/Reboot the camera [Default reset] Click the [Default reset] tab of the "Maintenance" page. ( pages 20 and 21: How to display/operate the setup menu) The settings and the HTML data of the camera can be initialized and reboot of the camera can be initialized. • The notification function allows users to provide the notification of the error...
... the network settings ( page 72), turn on the camera. Reset the settings/Reboot the camera [Default reset] Click the [Default reset] tab of the "Maintenance" page. ( pages 20 and 21: How to display/operate the setup menu) The settings and the HTML data of the camera can be initialized and reboot of the camera can be initialized. • The notification function allows users to provide the notification of the error...
Operating Instructions
Page 87
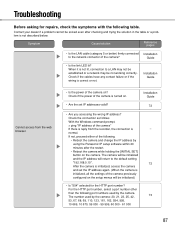
... reply from the web browser. • Is the power of the camera? If not, proceed either of the camera previously configured on the setup menus will return to the network connector of the camera on? Installation Guide 72 • Are you accessing the wrong IP address? Symptom Cause/solution Reference pages • Is the LAN cable (category 5 or better) firmly connected Installation to the default setting "192.168.0.10...
... reply from the web browser. • Is the power of the camera? If not, proceed either of the camera previously configured on the setup menus will return to the network connector of the camera on? Installation Guide 72 • Are you accessing the wrong IP address? Symptom Cause/solution Reference pages • Is the LAN cable (category 5 or better) firmly connected Installation to the default setting "192.168.0.10...

Operating Instructions
Page 88
... the version of the web browser checked? - tings of DirectX is older than 9.0c, upgrade it is "Use Proxy Server" for "FTP 73 access to camera" on the [Network] tab of the camera in the displayed dialog box and click - Install the viewer software on the [Network] tab of the "Network" page. • Is the entered password correct? from the web browser. Are there contradictions between the address and the network subnet...
... the version of the web browser checked? - tings of DirectX is older than 9.0c, upgrade it is "Use Proxy Server" for "FTP 73 access to camera" on the [Network] tab of the camera in the displayed dialog box and click - Install the viewer software on the [Network] tab of the "Network" page. • Is the entered password correct? from the web browser. Are there contradictions between the address and the network subnet...
Operating Instructions
Page 90
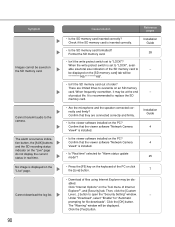
... "Enable" for "Automatic prompting for "Alarm status update mode"? 25 • Press the [F5] key on the "Live" page do not display the current status in real time. The "Warning" window will be dis- Format the SD memory card. 28 • Isn't the write protect switch set to - Confirm that the viewer software "Network Camera 4 View4" is set to open the "Security Setting" window. - Then, click the [Custom Level...] button...
... "Enable" for "Automatic prompting for "Alarm status update mode"? 25 • Press the [F5] key on the "Live" page do not display the current status in real time. The "Warning" window will be dis- Format the SD memory card. 28 • Isn't the write protect switch set to - Confirm that the viewer software "Network Camera 4 View4" is set to open the "Security Setting" window. - Then, click the [Custom Level...] button...


