
Assembly Instructions
Page 1
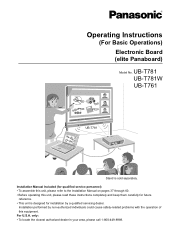
For U.S.A. UB-T781 UB-T781W UB-T761 UB-T781 Stand is designed for installation by a qualified servicing dealer. only: • To locate the closest authorized dealer in your area, please call 1-800-449-... this unit, please read these instructions completely and keep them carefully for future reference. • This unit is sold separately. Operating Instructions (For Basic Operations) Electronic Board (elite Panaboard) Model No. Installation Manual Included (for qualified service personnel) • To assemble this unit, please refer to the Installation Manual on pages...
For U.S.A. UB-T781 UB-T781W UB-T761 UB-T781 Stand is designed for installation by a qualified servicing dealer. only: • To locate the closest authorized dealer in your area, please call 1-800-449-... this unit, please read these instructions completely and keep them carefully for future reference. • This unit is sold separately. Operating Instructions (For Basic Operations) Electronic Board (elite Panaboard) Model No. Installation Manual Included (for qualified service personnel) • To assemble this unit, please refer to the Installation Manual on pages...
Assembly Instructions
Page 2
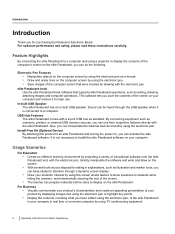
... USB speaker when it for later use their respective features directly with the electronic pen, directly manipulate the software and write and draw on your disposal for purchasing the Panasonic Electronic Board. Introduction Introduction Thank you save the contents of the screen on the... and safety, please read these instructions carefully. Sound can activate the elite Panaboard software. Also, you have written using the electronic pen. Usage Scenarios For Education • Create an effective learning environment by projecting a variety of educational software onto the elite...
... USB speaker when it for later use their respective features directly with the electronic pen, directly manipulate the software and write and draw on your disposal for purchasing the Panasonic Electronic Board. Introduction Introduction Thank you save the contents of the screen on the... and safety, please read these instructions carefully. Sound can activate the elite Panaboard software. Also, you have written using the electronic pen. Usage Scenarios For Education • Create an effective learning environment by projecting a variety of educational software onto the elite...
Assembly Instructions
Page 3
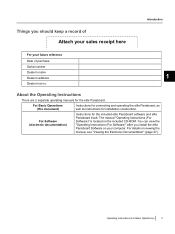
The manual "Operating Instructions (For Software)" is located on viewing the manual, see "Viewing the Electronic Documentation" (page 27). For Software (electronic documentation) Instructions for the elite Panaboard. Operating Instructions (For Basic Operations) 3 Things you install the elite Panaboard Software on your future reference Date of purchase ...
The manual "Operating Instructions (For Software)" is located on viewing the manual, see "Viewing the Electronic Documentation" (page 27). For Software (electronic documentation) Instructions for the elite Panaboard. Operating Instructions (For Basic Operations) 3 Things you install the elite Panaboard Software on your future reference Date of purchase ...
Assembly Instructions
Page 7
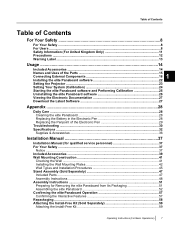
... 24 Starting the elite Panaboard software and Performing Calibration 25 Uninstalling the elite Panaboard software 26 Viewing the Electronic Documentation 27 Download the Latest Software 27 Appendix 28 Daily Care ...28 Cleaning the elite Panaboard 28 Replacing the Battery in... the Electronic Pen 28 Replacing the Penpoint of the Electronic Pen 29 Troubleshooting ...30 Specifications ...32 Supplies & Accessories 36 Installation Manual 37 Installation Manual (for qualified ...
... 24 Starting the elite Panaboard software and Performing Calibration 25 Uninstalling the elite Panaboard software 26 Viewing the Electronic Documentation 27 Download the Latest Software 27 Appendix 28 Daily Care ...28 Cleaning the elite Panaboard 28 Replacing the Battery in... the Electronic Pen 28 Replacing the Penpoint of the Electronic Pen 29 Troubleshooting ...30 Specifications ...32 Supplies & Accessories 36 Installation Manual 37 Installation Manual (for qualified ...

Assembly Instructions
Page 12
... the plug that is marked with the letter E or by the Earth symbol or coloured GREEN or GREEN-AND-YELLOW. Leaving a drained battery in the electronic pen may result in the plug which is used improperly, the battery may leak, causing corrosion of the unit, or it according to replace the... cover. For Your Safety As the colours of the wire in the mains lead of this , always follow the precaution given below. • If the electronic pen ceases to function because the battery has run out, remove it immediately and dispose of it may burst. The wire that is coloured BLUE...
... the plug that is marked with the letter E or by the Earth symbol or coloured GREEN or GREEN-AND-YELLOW. Leaving a drained battery in the electronic pen may result in the plug which is used improperly, the battery may leak, causing corrosion of the unit, or it according to replace the... cover. For Your Safety As the colours of the wire in the mains lead of this , always follow the precaution given below. • If the electronic pen ceases to function because the battery has run out, remove it immediately and dispose of it may burst. The wire that is coloured BLUE...

Assembly Instructions
Page 14
... Basic Operations) In the event that all of the protective case. • Do not leave the disc in .]) 1 Software CD-ROM 1 AAA Battery (LR03) (Disposable) 1 Electronic Pen 1 Penpoint (Replacement) 2 Operating Instructions (For Basic Operations) 1 Warranty 1 (this operating manual. About Using the CD-ROM To prevent damage to the CD-ROM: •...
... Basic Operations) In the event that all of the protective case. • Do not leave the disc in .]) 1 Software CD-ROM 1 AAA Battery (LR03) (Disposable) 1 Electronic Pen 1 Penpoint (Replacement) 2 Operating Instructions (For Basic Operations) 1 Warranty 1 (this operating manual. About Using the CD-ROM To prevent damage to the CD-ROM: •...

Assembly Instructions
Page 15
... green when the power is set in stereo. Operating Instructions (For Basic Operations) 15 External Audio Input Port Connect the audio output port of the electronic pen. Right: Error LED (red) Blinks red when an error occurs. USB Hub (2 Ports) You can connect external devices directly to the elite Panaboard using... the center of the door to open the pen tray, which can hold up to this port and hear sound through the USB speaker. to 2 electronic pens. Usage Names and Uses of the Parts Screen Front View Position Sensor Detects the position of a VCR or DVD player etc. Do not block...
... green when the power is set in stereo. Operating Instructions (For Basic Operations) 15 External Audio Input Port Connect the audio output port of the electronic pen. Right: Error LED (red) Blinks red when an error occurs. USB Hub (2 Ports) You can connect external devices directly to the elite Panaboard using... the center of the door to open the pen tray, which can hold up to this port and hear sound through the USB speaker. to 2 electronic pens. Usage Names and Uses of the Parts Screen Front View Position Sensor Detects the position of a VCR or DVD player etc. Do not block...

Assembly Instructions
Page 16
... as scanners or CD/ CD-Rs, may not operate properly. Doing so will prevent the elite Panaboard from correctly detecting the electronic pen's position. Battery Cover 16 Operating Instructions (For Basic Operations) Doing so will prevent the elite Panaboard from correctly detecting the... electronic pen's position. Infrared Emitter Do not block this area with your fingers. Do not write on the penpoint, ultrasonic waves and infrared...
... as scanners or CD/ CD-Rs, may not operate properly. Doing so will prevent the elite Panaboard from correctly detecting the electronic pen's position. Battery Cover 16 Operating Instructions (For Basic Operations) Doing so will prevent the elite Panaboard from correctly detecting the... electronic pen's position. Infrared Emitter Do not block this area with your fingers. Do not write on the penpoint, ultrasonic waves and infrared...

Assembly Instructions
Page 17
...penpoint while holding it at an angle can cause erroneous behavior. Notice • Use the electronic pen by pushing the penpoint, the pen's reaction may be read incorrectly. Note • • • The electronic pen switches to the screen board. It will hear a buzzing sound due to be slow....it at a right angle to power-save mode by holding the pen close to use multiple pens at the same time. When operating the electronic pen, you will not cause electrical shocks. When waking up the pen from power-save mode after about 30 minutes. Operating Instructions (For ...
...penpoint while holding it at an angle can cause erroneous behavior. Notice • Use the electronic pen by pushing the penpoint, the pen's reaction may be read incorrectly. Note • • • The electronic pen switches to the screen board. It will hear a buzzing sound due to be slow....it at a right angle to power-save mode by holding the pen close to use multiple pens at the same time. When operating the electronic pen, you will not cause electrical shocks. When waking up the pen from power-save mode after about 30 minutes. Operating Instructions (For ...
Assembly Instructions
Page 23
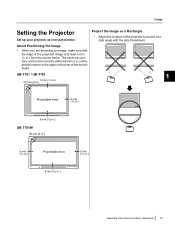
... an image, make sure that the edge of the projected image is at a right angle with the elite Panaboard. UB-T781 / UB-T761 1 50 mm (2 in.) 5 mm (1/4 in.) Projectable Area 5 mm (1/4 in.) 5 mm (1/4 in.) UB-T781W 50 mm (2 in.) 5 mm (1/4 in.) Projectable Area 5 mm (1/4 in.) 5 mm (1/4 in the upper-...Adjust the location of the projector to project at least 5 mm (1/4 in.) from the screen frame. Project the Image as instructed below. The electronic pen may not function correctly within 50 mm (2 in.) of the position sensor in .) Operating Instructions (For Basic Operations) 23
... an image, make sure that the edge of the projected image is at a right angle with the elite Panaboard. UB-T781 / UB-T761 1 50 mm (2 in.) 5 mm (1/4 in.) Projectable Area 5 mm (1/4 in.) 5 mm (1/4 in.) UB-T781W 50 mm (2 in.) 5 mm (1/4 in.) Projectable Area 5 mm (1/4 in.) 5 mm (1/4 in the upper-...Adjust the location of the projector to project at least 5 mm (1/4 in.) from the screen frame. Project the Image as instructed below. The electronic pen may not function correctly within 50 mm (2 in.) of the position sensor in .) Operating Instructions (For Basic Operations) 23

Assembly Instructions
Page 24
...hurt your projector's documentation for information on a stand, be aware that accidentally hitting the elite Panaboard or pushing too strongly with the electronic pen will become misaligned in the zoom, focus, etc. - After Calibration Do Not Move the elite Panaboard or the Projector &#...Proper Resolution • Set your computer to perform calibration. Usage • If the image is projected trapezoidally, the position of the electronic pen may not be difficult to see. Setting Your System (Calibration) About Calibration Calibration is setting up the elite Panaboard, project an ...
...hurt your projector's documentation for information on a stand, be aware that accidentally hitting the elite Panaboard or pushing too strongly with the electronic pen will become misaligned in the zoom, focus, etc. - After Calibration Do Not Move the elite Panaboard or the Projector &#...Proper Resolution • Set your computer to perform calibration. Usage • If the image is projected trapezoidally, the position of the electronic pen may not be difficult to see. Setting Your System (Calibration) About Calibration Calibration is setting up the elite Panaboard, project an ...

Assembly Instructions
Page 25
... computer has restarted, connect the elite Panaboard to the screen board. • When you start the elite Panaboard software. Press the electronic pen at a right angle against the board at a right angle to your computer with the USB cable. 3. Perform calibration. 4....Starting the elite Panaboard software and Performing Calibration 1. Repeat in the order shown in the illustration below. • Hold and press the electronic pen at the intersecting points of the indicated point has 1 been determined correctly, calibration automatically moves to the next point. • ...
... computer has restarted, connect the elite Panaboard to the screen board. • When you start the elite Panaboard software. Press the electronic pen at a right angle against the board at a right angle to your computer with the USB cable. 3. Perform calibration. 4....Starting the elite Panaboard software and Performing Calibration 1. Repeat in the order shown in the illustration below. • Hold and press the electronic pen at the intersecting points of the indicated point has 1 been determined correctly, calibration automatically moves to the next point. • ...
Assembly Instructions
Page 26
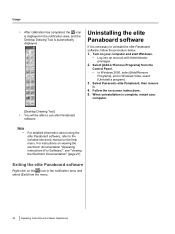
...and start Windows. • Log into an account with Administrator privileges. 2. Turn on viewing the electronic documentation "Operating Instructions (For Software)", see "Viewing the Electronic Documentation" (page 27). Follow the on the icon in the notification area, and the Desktop ... [Uninstall a program]. 3. Select [Add or Remove Programs] from the menu. 26 Operating Instructions (For Basic Operations) Select Panasonic elite Panaboard, then remove it is necessary to uninstall the elite Panaboard software, follow the procedure below. 1. Uninstalling the elite Panaboard software ...
...and start Windows. • Log into an account with Administrator privileges. 2. Turn on viewing the electronic documentation "Operating Instructions (For Software)", see "Viewing the Electronic Documentation" (page 27). Follow the on the icon in the notification area, and the Desktop ... [Uninstall a program]. 3. Select [Add or Remove Programs] from the menu. 26 Operating Instructions (For Basic Operations) Select Panasonic elite Panaboard, then remove it is necessary to uninstall the elite Panaboard software, follow the procedure below. 1. Uninstalling the elite Panaboard software ...

Assembly Instructions
Page 27
... download Adobe Reader from the Start menu. ([Start] ® [All Programs] ® [Panasonic] ® [elite Panaboard] ® [Operating Instructions for Software]) • The electronic documentation will be displayed. • For Windows 2000, [Programs] is connected to [All Programs] ® [Panasonic] ® [elite Panaboard], and click [Download the latest version]. Download the Latest Software...
... download Adobe Reader from the Start menu. ([Start] ® [All Programs] ® [Panasonic] ® [elite Panaboard] ® [Operating Instructions for Software]) • The electronic documentation will be displayed. • For Windows 2000, [Programs] is connected to [All Programs] ® [Panasonic] ® [elite Panaboard], and click [Download the latest version]. Download the Latest Software...

Assembly Instructions
Page 28
... moet u ze niet weggooien maar inleveren als KCA. will be displayed on replacing the battery. • Dispose of the electronic pen can result in the electronic pen is low, the message, "The pen battery is designed exclusively for details on the computer screen. For Taiwan 28 ...Operating Instructions (For Basic Operations) Cleaning the elite Panaboard Replacing the Battery in the Electronic Pen When the charge in the battery in discoloration.) Após o uso as possible. Replace the battery as soon as pilhas /...
... moet u ze niet weggooien maar inleveren als KCA. will be displayed on replacing the battery. • Dispose of the electronic pen can result in the electronic pen is low, the message, "The pen battery is designed exclusively for details on the computer screen. For Taiwan 28 ...Operating Instructions (For Basic Operations) Cleaning the elite Panaboard Replacing the Battery in the Electronic Pen When the charge in the battery in discoloration.) Após o uso as possible. Replace the battery as soon as pilhas /...

Assembly Instructions
Page 29
Appendix 1 Operating Instructions (For Basic Operations) 29 Continuing to use the electronic pen in the penpoint. Replacing the Penpoint of the Electronic Pen As the penpoint of the electronic pen becomes worn, a hole will appear in this condition can cause damage to the screen or unsatisfactory operation, so replace the penpoint with a new one as soon as possible.
Appendix 1 Operating Instructions (For Basic Operations) 29 Continuing to use the electronic pen in the penpoint. Replacing the Penpoint of the Electronic Pen As the penpoint of the electronic pen becomes worn, a hole will appear in this condition can cause damage to the screen or unsatisfactory operation, so replace the penpoint with a new one as soon as possible.

Assembly Instructions
Page 30
... comments are not completely displayed or are displayed in an operable state, and that the elite Panaboard is properly connected. - The electronic pen loses the functions. • • • • • There is causing the problem. The projected image ...batteries. → Check that the power cord is misaligned. → Perform the calibration again. 25 • You are displayed electronic pen, you pushed the penpoint with your finger. 30 Operating Instructions (For Basic Operations) unexpectedly lost. Appendix Troubleshooting When experiencing ...
... comments are not completely displayed or are displayed in an operable state, and that the elite Panaboard is properly connected. - The electronic pen loses the functions. • • • • • There is causing the problem. The projected image ...batteries. → Check that the power cord is misaligned. → Perform the calibration again. 25 • You are displayed electronic pen, you pushed the penpoint with your finger. 30 Operating Instructions (For Basic Operations) unexpectedly lost. Appendix Troubleshooting When experiencing ...

Assembly Instructions
Page 31
...white-board cleaner or neutral 28 household cleaner diluted with a white-board marker cannot be installed on the computer screen. Replace the The electronic pen's battery is not correct. → Securely connect the external audio input port and the VCR or DVD player etc. •...not connected. → Securely connect the elite Panaboard and external The external device devices. is displayed → Replace the electronic pen's battery. 28 on your computer is output from the speaker. is weak. 17 battery soon." Operating Instructions (For Basic Operations) 31
...white-board cleaner or neutral 28 household cleaner diluted with a white-board marker cannot be installed on the computer screen. Replace the The electronic pen's battery is not correct. → Securely connect the external audio input port and the VCR or DVD player etc. •...not connected. → Securely connect the elite Panaboard and external The external device devices. is displayed → Replace the electronic pen's battery. 28 on your computer is output from the speaker. is weak. 17 battery soon." Operating Instructions (For Basic Operations) 31
Assembly Instructions
Page 32
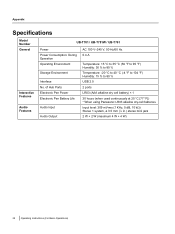
Appendix Specifications Model Number General Interactive Features Audio Features UB-T781 / UB-T781W / UB-T761 Power Power Consumption: During Operation Operating Environment Storage Environment Interface No. of Hub Ports Electronic Pen Power Electronic Pen Battery Life Audio Input Audio Output AC 100 V-240 ...% USB 2.0 2 ports LR03 (AAA alkaline dry cell battery) × 1 30 hours (when used continuously at 25 °C [77 °F]) * When using Panasonic LR03 alkaline dry-cell batteries. Input level: 309 mVrms (1 KHz, 0 dB, 10 kW) Stereo 1 system, ø 3.5 mm (1/8 in.) stereo mini jack...
Appendix Specifications Model Number General Interactive Features Audio Features UB-T781 / UB-T781W / UB-T761 Power Power Consumption: During Operation Operating Environment Storage Environment Interface No. of Hub Ports Electronic Pen Power Electronic Pen Battery Life Audio Input Audio Output AC 100 V-240 ...% USB 2.0 2 ports LR03 (AAA alkaline dry cell battery) × 1 30 hours (when used continuously at 25 °C [77 °F]) * When using Panasonic LR03 alkaline dry-cell batteries. Input level: 309 mVrms (1 KHz, 0 dB, 10 kW) Stereo 1 system, ø 3.5 mm (1/8 in.) stereo mini jack...

Assembly Instructions
Page 33
....) 5 mm (1/4 in . The electronic pen may not function 1 correctly within 50 mm (2 in.) of the position sensor in the upper-left corner of the screen board. 50 mm (2 in.) 5 mm (1/4 in.) 77 in .) Operating Instructions (For Basic Operations) 33 Appendix Model Number General Input Unit Interactive Features UB-T781 External Dimensions: Height...
....) 5 mm (1/4 in . The electronic pen may not function 1 correctly within 50 mm (2 in.) of the position sensor in the upper-left corner of the screen board. 50 mm (2 in.) 5 mm (1/4 in.) 77 in .) Operating Instructions (For Basic Operations) 33 Appendix Model Number General Input Unit Interactive Features UB-T781 External Dimensions: Height...
